Difference between revisions of "Draft:X-Cart:ShippingEasy"
m |
m |
||
| Line 16: | Line 16: | ||
## From the '''Platform''' drop-down box, select ''X-Cart''. In the '''Store URL''' field below, enter your X-Cart store's URL. | ## From the '''Platform''' drop-down box, select ''X-Cart''. In the '''Store URL''' field below, enter your X-Cart store's URL. | ||
## Click '''Save'''. | ## Click '''Save'''. | ||
| − | ## Enter the required store settings and click '''Save''' at the bottom of the page. This creates an entry for your X-Cart store in your list of stores in ShippingEasy. | + | ## Enter the required store settings and click '''Save''' at the bottom of the page. This creates an entry for your X-Cart store in your list of stores in ShippingEasy:<br />[[File:shippingeasy_store_details.png|border]] |
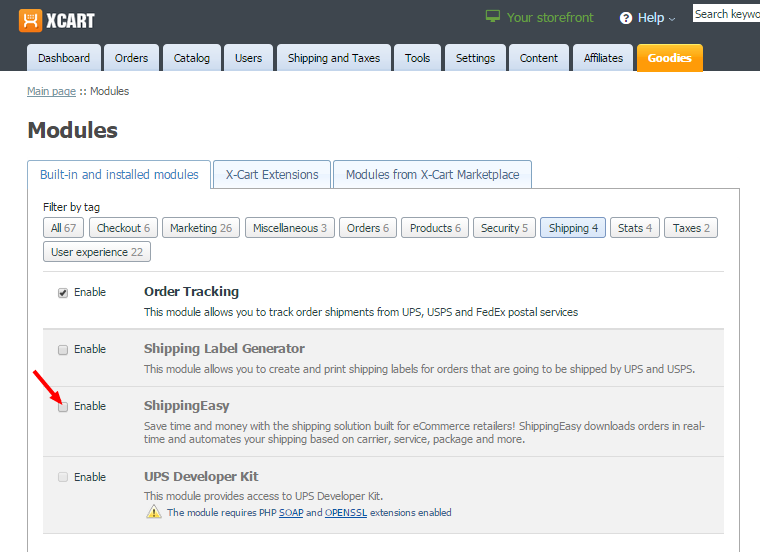
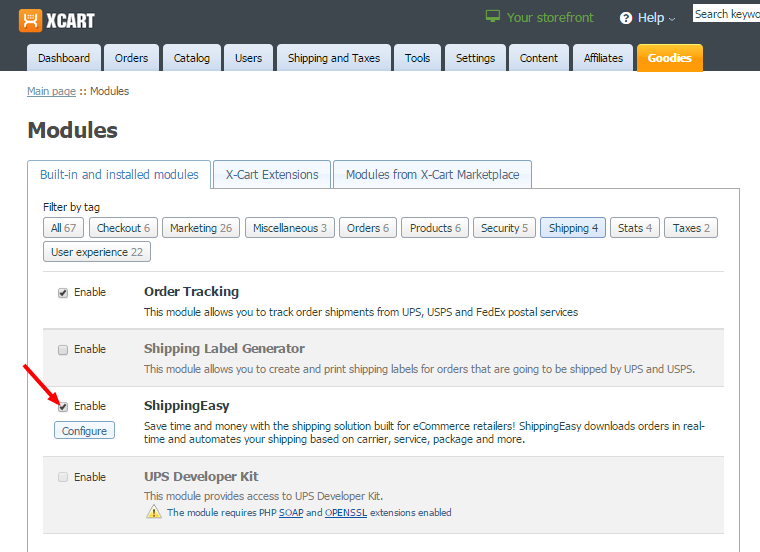
# In your X-Cart store's Admin area, go to the Modules section ('''Settings menu''' -> '''Modules'''), locate the entry for 'ShippingEasy' and click the Configure link next to it.<br />[[File:shippingeasy_configure.png|border]]<br /><br />You should now see the ShippingEasy module configuration page:<br />[[File:shippingeasy_config_settings1.png|border]]<br /><br />The page provides three fields that you will need to fill with values copied from your ShippingEasy account settings: your '''API Key''', '''API Secret''' and '''Store API Key'''. | # In your X-Cart store's Admin area, go to the Modules section ('''Settings menu''' -> '''Modules'''), locate the entry for 'ShippingEasy' and click the Configure link next to it.<br />[[File:shippingeasy_configure.png|border]]<br /><br />You should now see the ShippingEasy module configuration page:<br />[[File:shippingeasy_config_settings1.png|border]]<br /><br />The page provides three fields that you will need to fill with values copied from your ShippingEasy account settings: your '''API Key''', '''API Secret''' and '''Store API Key'''. | ||
| − | # Back in the browser tab where you are using ShippingEasy, copy the Store API Key for your X-Cart store:<br />< | + | # Back in the browser tab where you are using ShippingEasy, copy the Store API Key for your X-Cart store:<br />[[File:shippingeasy_store_api_key.png |border]]<br /><br />Paste this value into the '''Store API Key''' field on the ShippingEasy module configuration page in your X-Cart store. |
# In ShippingEasy, click on the '''Settings''' tab, then click on the '''API Credentials''' link under '''Account Settings''':<br />[[File:shippingeasy_api_credentials.png|border]]<br /><br />Your API Key and API Secret will be displayed:<br />[[File:shippingeasy_api_credentials1.png|border]]<br /><br />Copy and paste these values one by one into the '''API Key''' and '''API Secret''' fields on the ShippingEasy module configuration page in your X-Cart store. | # In ShippingEasy, click on the '''Settings''' tab, then click on the '''API Credentials''' link under '''Account Settings''':<br />[[File:shippingeasy_api_credentials.png|border]]<br /><br />Your API Key and API Secret will be displayed:<br />[[File:shippingeasy_api_credentials1.png|border]]<br /><br />Copy and paste these values one by one into the '''API Key''' and '''API Secret''' fields on the ShippingEasy module configuration page in your X-Cart store. | ||
# If you are a third party developer using a staging ShippingEasy account, select the '''Staging account''' option on the ShippingEasy module configuration page in X-Cart. For production use, leave the '''Staging account''' check box unselected. | # If you are a third party developer using a staging ShippingEasy account, select the '''Staging account''' option on the ShippingEasy module configuration page in X-Cart. For production use, leave the '''Staging account''' check box unselected. | ||
Revision as of 17:49, 3 November 2014
Contents
Overview
ShippingEasy module system requirements and installation
See ShippingEasy module installation.
Integrating your X-Cart store with ShippingEasy
To integrate your X-Cart store with ShippingEasy:
- Sign up for an account with ShippingEasy. For detailed information, see the How to create a ShippingEasy account guide on the ShippingEasy website.
- If you haven't yet done so, install the ShippingEasy module in your X-Cart store.
- To complete the integration of your X-Cart store with ShippingEasy, you will need access to both your X-Cart store's Admin area and your ShippingEasy account settings. So sign in to both the sites and keep them open in your web browser tabs. For a production ShippingEasy account, to access your account settings, use the URL https://app.shippingeasy.com/settings, for a staging account - https://staging.shippingeasy.com/settings.
- (Skip this step if you have already configured your X-Cart store's settings in ShippingEasy during registration): Add your X-Cart store to the list of stores in your ShippingEasy account:
- In the Settings section of your ShippingEasy account, click on the Stores link under Integrations:
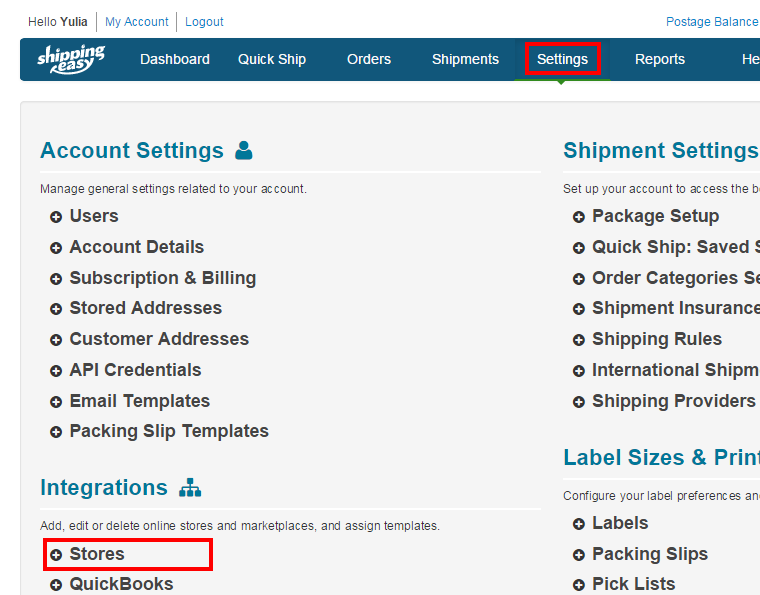
- Click the + Add New button on the right-hand side of the screen:
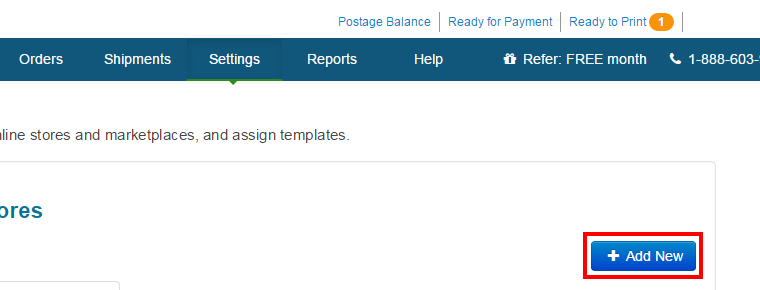
This opens a screen where you will be able to provide the details of your X-Cart store: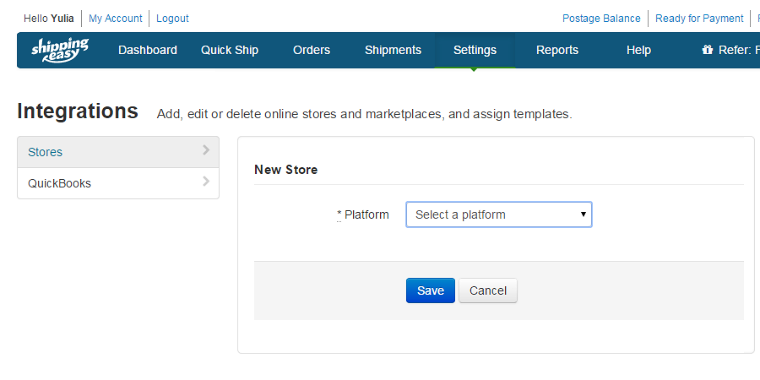
- From the Platform drop-down box, select X-Cart. In the Store URL field below, enter your X-Cart store's URL.
- Click Save.
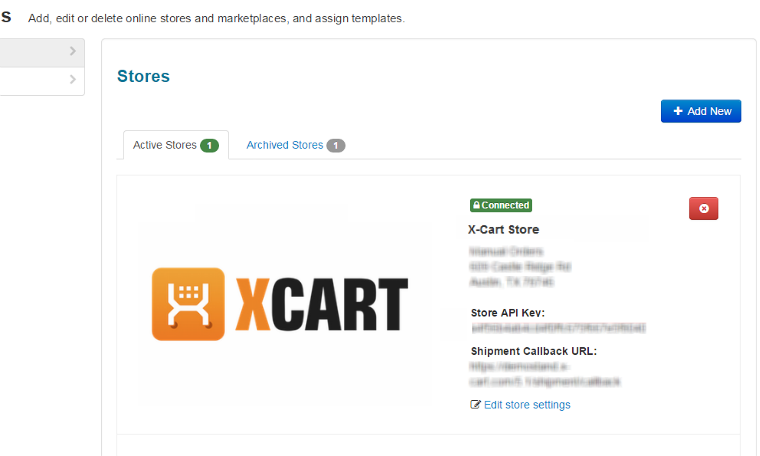
- Enter the required store settings and click Save at the bottom of the page. This creates an entry for your X-Cart store in your list of stores in ShippingEasy:
- In the Settings section of your ShippingEasy account, click on the Stores link under Integrations:
- In your X-Cart store's Admin area, go to the Modules section (Settings menu -> Modules), locate the entry for 'ShippingEasy' and click the Configure link next to it.
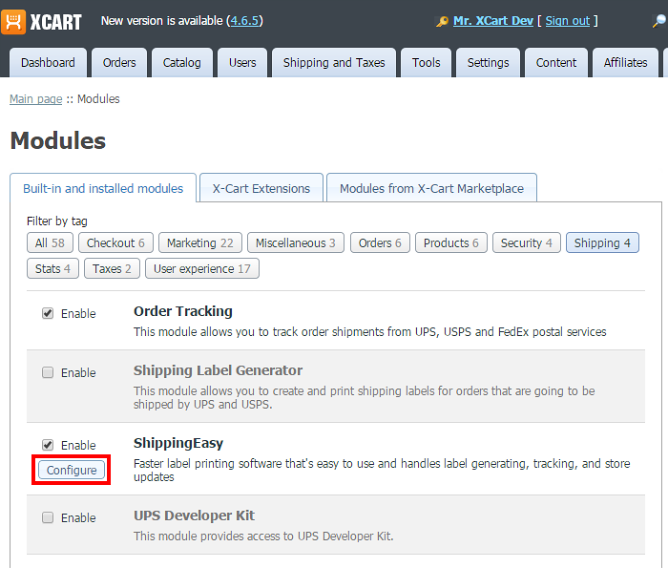
You should now see the ShippingEasy module configuration page: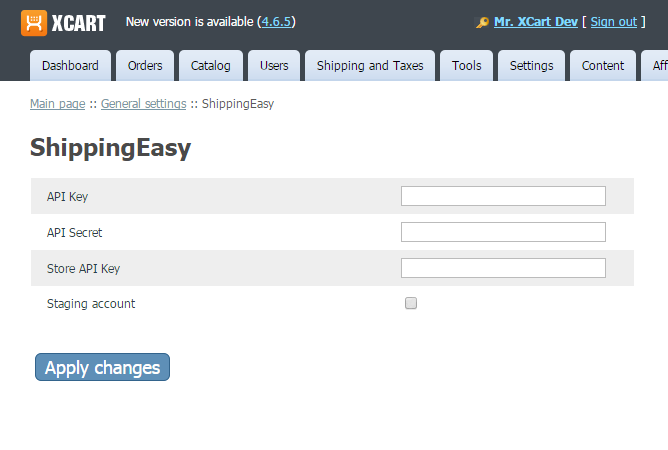
The page provides three fields that you will need to fill with values copied from your ShippingEasy account settings: your API Key, API Secret and Store API Key. - Back in the browser tab where you are using ShippingEasy, copy the Store API Key for your X-Cart store:
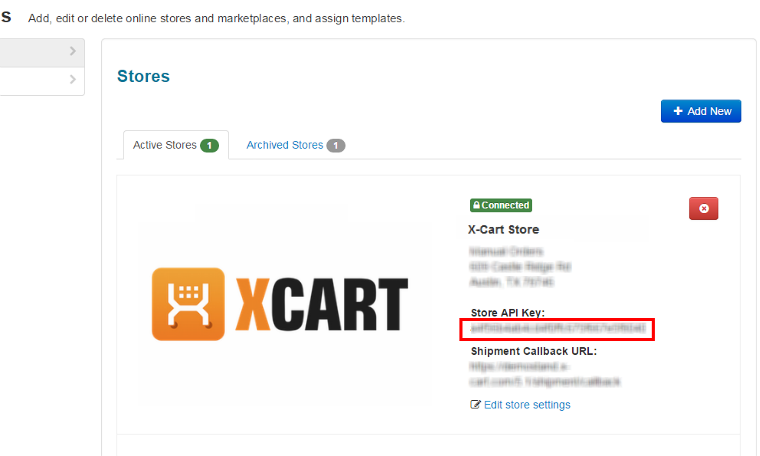
Paste this value into the Store API Key field on the ShippingEasy module configuration page in your X-Cart store. - In ShippingEasy, click on the Settings tab, then click on the API Credentials link under Account Settings:
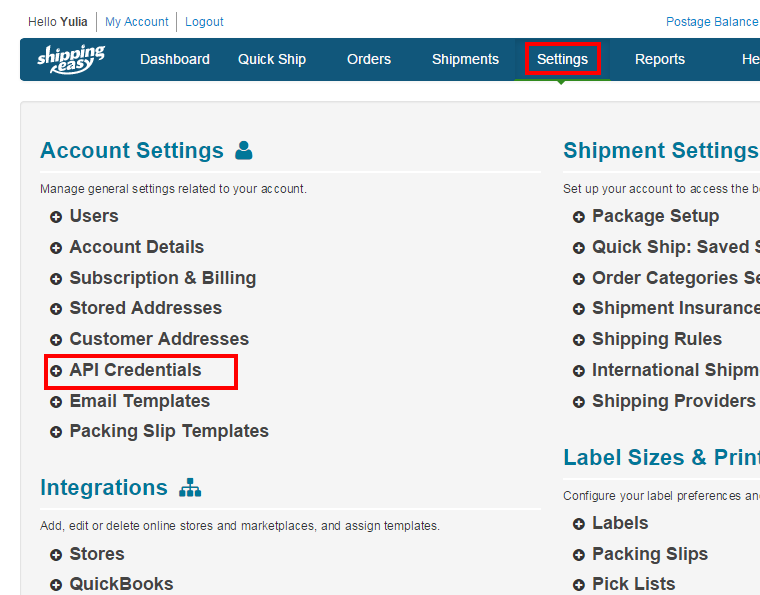
Your API Key and API Secret will be displayed: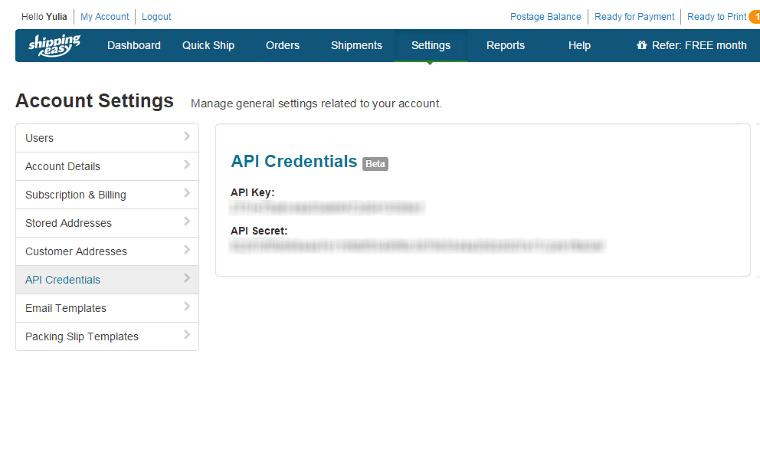
Copy and paste these values one by one into the API Key and API Secret fields on the ShippingEasy module configuration page in your X-Cart store. - If you are a third party developer using a staging ShippingEasy account, select the Staging account option on the ShippingEasy module configuration page in X-Cart. For production use, leave the Staging account check box unselected.
- Click the Apply changes button at the bottom of the ShippingEasy module configuration page in X-Cart to save the module configuration.
- Make the Shipment Callback URL that was automatically formed for your store by ShippingEasy as "Store URL + /shipment/callback" actually work for your store. To do so, insert the following rewrite rule into the .htaccess file located in your X-Cart installation directory:


<IfModule mod_rewrite.c>
    RewriteEngine On
    RewriteRule ^shipment/callback shippingeasy_callback.php
</IfModule>
- Important: If your store uses the Clean URLs feature, make sure this code block goes before the code block for clean URLs in your .htaccess file.
That is all. You have completed integrating your X-Cart store with ShippingEasy. The next step will be to activate the ShippingEasy module, after which it will be fully ready to use.
Activating and deactivating the module
If the module ShippingEasy is installed, but not active, you can enable (activate) it.
To enable the module:
- Go to the Modules section of your store's Admin area (Settings menu->Modules). This opens the list of your store's installed modules.
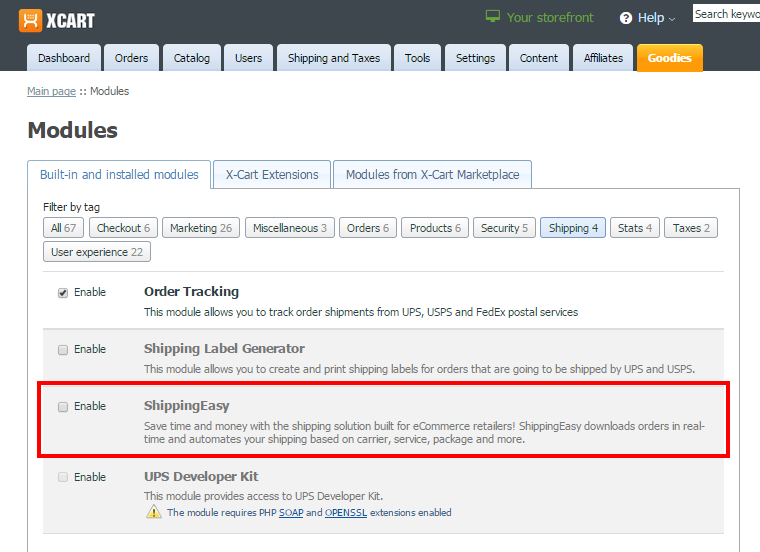
- Locate the entry for the ShippingEasy module and select the Enable check box on the left.
- Depending on the version of X-Cart you are using, you may need to apply the change by clicking Apply changes. The module will be enabled.


It is possible to temporarily disable (deactivate) the installed ShippingEasy module. Deactivation stops the module from operation, but it does not remove any settings you made to the module configuration nor clear any data that was generated during the period that the module was in operation. If you wish to completely remove all the data related to using the module, you need to uninstall it. See ShippingEasy module: Uninstallation for more info.
To disable the module:
- Go to the Modules section of your store's Admin area (Settings menu->Modules).
- Locate the entry for the ShippingEasy module and unselect the Enable check box on the left.
- Depending on the version of X-Cart you are using, you may need to apply the change by clicking Apply changes. The module will be disabled.


Order status mapping

