X-Cart:RMA
Contents
Overview
The X-RMA module is designed to simplify the process of managing product returns, which may be very annoying if you do not have a special tool to deal with it. With X-RMA product returns become quick and convenient; the module organizes the whole process and allows your customers and you to avoid negative experience by getting rid of endless email correspondence.
The key features of the X-RMA add-on module include:
- Individual return period for each product;
- Automatic generation of return slips;
- Ability to issue credits for future purchases;
- Configurable product return reasons;
- Email notifications about submitted return request to the store staff;
- Email notifications about authorized and declined requests to customers.
X-RMA is a reliable and up-to-date solution that makes your business even more competitive.
Enabling and Configuring
To enable the module:
- In the Admin area, go to the Modules section (Administration menu->Modules).
- In the list of the available modules, find the entry "RMA" and select the check box next to it.
- Click the Update button at the bottom of the page.
X-RMA allows you to adjust some of its options.
To configure the module:
1. In the Admin area, go to the Modules section (Administration menu->Modules).
2. Find the entry "RMA" and click on the Configure link that corresponds to the entry.
- After you click on Configure, X-Cart will open the General settings box with the RMA section inside it.

3. Adjust the X-RMA options by selecting/unselecting the check boxes that correspond to the options.
4. Click the Save button to apply the changes.
Setting Product Return Time
For each product in the catalog, X-RMA enables you to specify a time period during which the product return is permitted. This feature also allows you to decide whether a product should be returnable or not.
To set the product return time for a product:
1. In the Admin area, use the Search for products section (Products menu->Search for products) to find the product that you want to set the product return time for.
2. In the Search result box, click on the product name to open the product for editing.
- You'll be redirected to the product details page.
3. In the Product details box, scroll down until you see the text field Product return time (days):

4. Use the Product return time (days) text field to set up the time period (in days) during which a customer should be permitted to return the product.
5. Click the Save button to apply the changes.
Managing Return Requests
As a store administrator, you can manage the existing returns requests in the following ways:
- Approve and decline requests by changing their status;
- Edit return request details;
- Issue credits for returned products;
- Delete return requests.
Finding return requests
To find the existing return requests:
In the Admin area, go to the Returns section (Management menu->Returns).
The system will display the Search form. Use the form to adjust search criteria. The system will display only those results that meet the criteria.

Click the Search button to display the list of return requests that meet the search criteria.
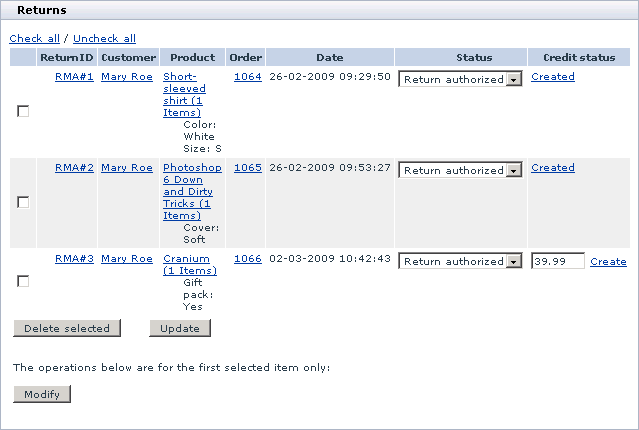
The Returns box with the list of return requests will appear.

Changing request status
There are five possible statuses for the return requests: Return requested, Return authorized, Return declined, Return completed and Removed by customer. When a customer creates a return request, it automatically gets the Return requested status. The store administrator is supposed to change the request status when the request is processed.
Changing the request status to Return authorized or Return completed means that you approve the request. For each approved request the system allows you to issue a credit. Changing the request status to Return declined means that you do not approve the request and you are not going to finalize the return.
The Removed by customer status means that the customer who had created the request chose to delete it. Request with the Removed by customer status are not displayed at the Customer area.
To change the request status:
1. Open the Returns box with the list of existing return requests.
2. In the Status column, select a new request status from the drop-down box.

3. Click the Update button to apply the changes.
Modifying return requests
You can modify the existing return requests by editing their details and changing their status.
To modify a return request:
1.Open the Returns box with the list of existing return requests.
2. In the Returns box, select the check box for the request that you want to modify and click the Modify button. Alternatively, click on the request ID in the ReturnID column.
- This will open the Modify box where you can edit request details.

3. Edit the return details. If necessary, change the order status.
4. Click the Modify button to apply the changes.
5. If required, click the Print Return slip button to print out a slip for the approved return request.
6. Click the Returns list button to go back to the list of returns.
Issuing credits for returned products
For each approved product return, which has the status Return authorized or Return completed, you can create a monetary credit. The amount of the credit is controlled by the store administrator and can either coincide with the original order amount or differ from it. It is very convenient to have an editable amount of the credit if, for example, your return policy does not cover 100% of the original product cost or it involves other limitations.
Once you create a credit, X-RMA automatically converts it to a gift certificate and sends it to the email address of the customer who requested the return.
To create a credit:
1. Open the Returns box with the list of existing return requests.
2. In the Returns box, click on the Create link that corresponds to the approved return request. If necessary, edit the return amount before clicking on Create.

- This will reload the page. Now the credit status of the request has changed to Created.
3. Click on Created to view the gift certificate details.

Deleting existing return request
- Open the Returns box with the list of existing return requests.
- In the Returns box, select the check boxes for the requests that you want to delete.
- Click the Delete selected button.
Adding/Modifying Reasons for Returns
X-RMA offers a set of predefine reasons for requested returns (e.g., Wrong item ordered, Damaged during shipping, etc.). Customers need to choose one of the reasons when requesting a return so that to give the store staff a general idea of why the return is being requested. You can edit the list of the available reasons so that it could better fit your business model.
You can carry out the following tasks:
- Modify the existing return reasons;
- Delete the existing return reasons;
- Add new return reasons.
Opening return reason interface
To open the interface for managing return reasons:
- In the Admin area, go to the Returns section (Management menu->Returns).
- Click on the Add/Modify reasons link on the In this section box.

This will open the Add/Modify reasons box.

Editing existing return reasons
- Open the Add/Modify reasons box.
- Edit the text of the existing return reasons.
- Click the Update button.
Deleting existing return reasons
- Open the Add/Modify reasons box.
- Select the check boxes for the reasons that you want to delete.
- Click the Delete selected button.
Adding new return reasons
To add a new reason to the list:
- Open the Add/Modify reasons box.
- In the New reason text field enter the name of the reason you want to add.
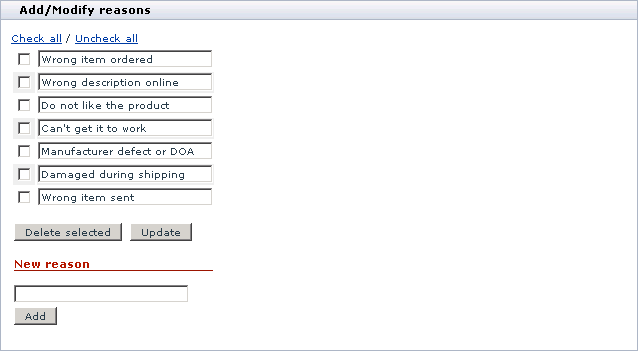
- Click the Add button.