Difference between revisions of "X-Cart:Tax Settings"
(→“How to operate if Tax Number validation service not available” setting in X-Cart 4.7.6) |
(added <div id="DisplayOrderTotalsIncludingTax"></div>) |
||
| (One intermediate revision by the same user not shown) | |||
| Line 217: | Line 217: | ||
The following options are provided: | The following options are provided: | ||
| + | <div id="DisplayOrderTotalsIncludingTax"></div> | ||
* <u>Display cart/order totals including tax</u>: This option defines whether tax cost is displayed included in the order totals or not. When this option is disabled, the order totals on the 'Payment details' page of checkout are displayed like this: | * <u>Display cart/order totals including tax</u>: This option defines whether tax cost is displayed included in the order totals or not. When this option is disabled, the order totals on the 'Payment details' page of checkout are displayed like this: | ||
| Line 225: | Line 226: | ||
: [[Image:totals_incl_tax_enabled.gif]] | : [[Image:totals_incl_tax_enabled.gif]] | ||
| + | <div id="NotediscountCouponBeCountedIncludingTax"></div> | ||
{{Note1|Note: please keep in mind that if you select to display order totals including tax, all the discount coupon sums will also be counted as including tax. }} | {{Note1|Note: please keep in mind that if you select to display order totals including tax, all the discount coupon sums will also be counted as including tax. }} | ||
Latest revision as of 15:43, 16 June 2017
Contents
- 1 Tax settings in X-Cart
- 2 Roles in tax settings management
- 3 Video tutorial
- 4 Taxes
- 5 Tax Rates
- 6 Tax Formula Editor
- 7 Tax Options
- 8 “How to operate if Tax Number validation service not available” setting in X-Cart 4.7.6
- 9 Applying Taxes to Products
- 10 Examples of Configuring Taxes
- 11 FAQ
- 12 Troubleshooting
Tax settings in X-Cart
X-Cart provides you with AvaTax module for reliable, fast and affordable sales tax automation service by Avalara. There's also a flexible tool for manual defining the taxes to be used in your store. Simple settings allow you to define virtually any tax and tax rate. For each tax you can define how it needs to be calculated, to what products it needs to be applied, how information about it needs to be displayed to customers, etc. You can make taxes dependent on the customer's location (billing or shipping address) and on the customer's membership. Customers coming from a certain location and having a certain membership will see just the tax rates for their destination zone and membership level, while the other tax rates will be hidden. X-Cart also allows you to have non-taxable products at your store.
Roles in tax settings management
If you are an X-Cart GOLD/GOLD PLUS administrator/provider:
- You can define taxes (See the chapter Taxes).
- You can define taxes options (See the chapter Taxes Options).
- You can define tax rates (See the chapter Tax Rates).
- You can apply taxes to products (See the chapter Applying Taxes to Products).
If you are an X-Cart PLATINUM/PRO administrator:
- You can define taxes (See the chapter Taxes).
- You can define taxes options (See the chapter Taxes Options).
- You can apply taxes to products (See the chapter Applying Taxes to Products).
If you are an X-Cart PLATINUM/PRO provider:
- You can define tax rates for your products (See the chapter Tax Rates).
- You can apply taxes to your products (See the chapter Applying Taxes to Products).
Video tutorial
Taxes
Adding taxes
To add a tax:
1. Go to the 'Taxes' section of your store's Admin area. In X-Cart versions 4.4.0 and later, this section can be found at Shipping and Taxes menu -> Tax system (X-Cart Gold) or Shipping and Taxes menu -> Taxes (X-Cart Pro); in X-Cart versions 4.3.0-4.3.2, this section can be found at Settings menu -> Tax system; in earlier versions, this section can be found at Management menu -> Tax system.
A dialog box titled 'Taxes' opens:

Before you have created any taxes, the dialog box is empty.
2. In the 'Taxes' dialog box, click the Add new... button. A dialog box 'Tax details' opens.

3. Define the details of the desired tax by completing the fields of the 'Tax details' dialog box (The fields marked by a red asterisk sign are mandatory):
- Tax service name: Unique name by which X-Cart application will identify this tax. A tax service name may include letters (A-Z, a-z) and digits (0-9), may not exceed 10 characters in length and must begin with a letter. This value will not appear anywhere in your store's Customer area.
- Tax display name: Name of the tax as it will appear to customers. If necessary, you can define a different tax display name for each of the languages used in your store. To add a tax display name in another language, select the necessary language from the Current language selector at the top of the page, enter the tax display name in this language into the appropriate field and click the Save button.
- Tax registration number: Tax registration number (required for certain types of taxes; appears on the invoice)
- Tax priority: Number defining the order in which the tax needs to be applied (relative to the other taxes).
- Status: Tax status (Enabled or Disabled).
- Apply tax to: Tax base. Use the #Tax Formula Editor to create the formula according to which this tax needs be applied.
- Rates depend on: Select if the tax rate should be calculated for Shipping Address or Billing Address.
- Included into the product price: This option defines whether the prices of products to which this tax applies are stored in the database with this tax included or excluded. If you want the product prices to be inclusive of this tax, select this check box. If you leave this check box unselected, the prices will be tax-exclusive.
- Display product price including tax: This option defines whether the prices of products to which this tax applies are displayed to customers with this tax included or excluded. If you want the product prices to be displayed as inclusive of this tax, select this check box. If you leave this check box unselected, the prices will appear tax-exclusive.
- Also display (on the products list, product details and cart pages): This option is used in conjunction with the option 'Display product price including tax' and defines what needs to be displayed on the named pages of your store besides the price with the included tax (Nothing, Rate value, Calculated tax cost, Rate value and tax cost).
4. Click the Save button. The tax will be created and added to the list of your store's taxes. To view the list of your store's taxes, you can click the Taxes list link at the top right-hand corner of the 'Tax details' dialog box.
Now that the tax has been created, it is possible to add tax rates for it. See the chapter #Tax Rates.
After the necessary taxes have been defined, be sure to set the options affecting how all taxes in your store are applied and displayed. See the chapter #Taxes Options.
Also, please be aware that, before the taxes you have created become functional, they will need to be applied to products. See the chapter #Applying Taxes to Products.
Managing Taxes
The 'Taxes' dialog box in the 'Taxes' section of your store's Admin area shows all the taxes defined in your store. When you have some taxes defined, it looks similar to this:

The table columns provide the following information about each tax:
- TAX - Service tax name.
- APPLY TAX TO - Tax base as defined in the 'Apply tax to' field of the 'Tax details'.
- PRIORITY - Order in which the tax needs to be applied (relative to the other taxes).
- STATUS - Enabled or disabled.
To edit the details of a tax:
- Click on the name link of the tax that needs to be edited. The 'Tax details' dialog box displaying the details of the selected tax opens.
- Edit the tax details.
- Click the Save button at the bottom of the 'Tax details' dialog box to save the changes.
To change the order in which your taxes should be applied:
- Change the order numbers in the PRIORITY column (The tax with the highest priority needs to have the smallest order number, the tax with the lowest priority - the greatest order number).
- Click the Update button.
To temporarily disable a tax or to re-enable a disabled tax:
- Select the appropriate status from the STATUS drop-down box opposite the name of the tax.
- Click the Update button.
To delete a tax:
- Select the check box next to the name of the tax that needs to be deleted. (You can use the Check all / Uncheck all links to select or unselect all the taxes on the page.
- Click the Delete selected button.
Tax Rates
Adding tax rates
After the necessary taxes have been defined, you need to define tax rates for each tax.
To define a tax rate:
If you are an X-Cart GOLD administrator/provider:
1. Go to the 'Taxes' section of your store's Admin area. In X-Cart versions 4.4.0 and later, this section can be found at Shipping and Taxes menu -> Tax system; in X-Cart versions 4.3.0-4.3.2, this section can be found at Settings menu -> Tax system; in earlier versions, this section can be found at Management menu -> Tax system.
2. In the dialog box titled 'Taxes', find the tax for which you would like to add rates and click on its name. The 'Tax details' section of your store opens. Scroll down through the 'Tax details' dialog box. You should see a dialog box titled '<Tax name>: Tax rates' (where '<Tax name>' is the name of the tax whose details are being displayed).
If you are an X-Cart PRO provider:
1. Go to the 'Tax rates' section (In X-Cart versions 4.4.0 and later, this section can be found at Shipping and Taxes menu -> Tax rates; in earlier X-Cart versions, this section can be found at Inventory menu -> Tax rates). You should see a dialog box 'Taxes' displaying the names of all taxes defined for your store by the store administrator (The expression 'N rates defined' displayed in brackets next to each of the tax names shows the number of tax rates defined by you for these taxes. Before you have defined any rates, this number is 0 (zero)).
2. In the 'Taxes' dialog box, find the tax for which you would like to add rates and click on its name. The 'Tax details' section of your store opens. On the page, you should see a box titled 'Tax details' displaying the details of the selected tax as defined by the store administrator:

Below the 'Tax details' box, you should see a dialog box titled '<Tax name>: Tax rates' (where '<Tax name>' is the name of the tax whose details are being displayed).
3. Turn to the '<Tax name>: Tax rates' dialog box:

4. Define the details of the tax rate by completing the fields of the 'Add tax rate' subsection of the '<Tax name>: Tax rates' dialog box:
- Rate value: Tax rate value (Use the drop-down box next to the 'Rate value' field to define whether the tax rate should be an absolute or percentage value).
1. Please keep in mind that if you define an absolute tax value - for example, $3 - that value can happen to be greater than a product price. This may result in obtaining negative product prices. In this case, customers will be able to see the products but not allowed to buy or even add them to the cart, getting an error message stating that the product has not been configured properly. The customer will be asked to contact the store administrator with a buying request.
2. Taxes can be charged separately or included in the product price. When a tax is charged separately, it applies to the product net price. When a tax is included in the product price, it applies to the gross price.- Zone: Destination zone to which the rate needs to be applied.
- Membership: Membership level to which the rate needs to be applied.
- Apply tax to: Tax base. This field needs to be completed in the '<Tax name>: Tax rates' dialog box only if the tax base for the different destination zones and membership levels to which the tax will be applied needs to be different from the value defined by the store administrator in the 'Apply tax to' field of the 'Tax details' dialog box.
To complete the field, use the #Tax Formula Editor.
5. Click the Add button to save the changes. The new rate will be created and added to the list of tax rates for the tax.

After you have added the necessary tax rates for a tax, be sure to apply the tax to all the products to which it needs to be applied.
Managing tax rates
Tax rates can be managed from the '<Tax name>: Tax rates' dialog box. X-Cart allows you to view, edit and delete tax rates.
To change the value of a tax rate:
- In the 'Taxes' dialog box, find the tax rate that you would like to change and click on its name. The 'Tax details' section opens.
- In the '<Tax name>: Tax rates' dialog box, find the rate that you wish to change.
- Change the value of the 'Rate value' field specifying whether the value is absolute or percentage.
- Click the Update button.
To edit the details of a tax rate:
- In the 'Taxes' dialog box, find the tax rate that you would like to change and click on its name. The 'Tax details' section opens.
- In the '<Tax name>: Tax rates' dialog box, find the rate whose details you wish to edit.
- Click either on the membership link (MEMBERSHIP column) or on the tax formula link (APPLY TAX TO column) corresponding to this rate. The rate details appear in the 'Edit tax rate' subsection of the '<Tax name>: Tax rates' dialog box.
- Change the necessary tax rate details (rate value, destination zone, membership level, tax base formula).
- Click the Update button.
To delete a tax rate:
- In the 'Taxes' dialog box, click on the name of the tax whose rate you wish to delete. The 'Tax details' section opens.
- In the '<Tax name>: Tax rates' dialog box, find the rate you wish to delete.
- Select the check box next to this rate. You can use the Check all / Uncheck all links to select or unselect all the rates displayed on the page.
- Click the Delete selected button.
Tax Formula Editor
The 'Apply tax to' subsection of the 'Tax details' and '<Tax name>: Tax details' dialog boxes allows you to create and edit a formula defining what the tax being edited needs to be applied to.

The field at the top of the editor is intended for your tax base formula. The formula field is not manually editable - to enter your formula into this field, you will need to provide components for the formula using the fields and buttons below. Your formula will be assembled from the components you provide.
It is possible to provide the following components:
- mathematical signs (plus, minus, multiplication, division);
- variables symbolically representing objects that need to be taxed or should be used for calculating the tax (subtotal amount, discounted subtotal amount, shipping cost, amount levied in the form of some other tax defined in your store and applied to the purchase);
- numbers.
Mathematical signs are used to indicate the operations that need to be performed on the other components of the formula. They can be added to the formula by clicking the appropriate buttons: [ + ] for addition, [ - ] for subtraction, [ * ] for multiplication, and [ / ] for division.
Variables can be selected from the drop-down box below the row of buttons with mathematical signs. In the list of variables that can be selected, ST stands for 'Subtotal amount', DST - for 'Discounted subtotal amount', SH - for 'Shipping cost'. Taxes are labeled by their own names. To add a variable, select it from the drop-down box and click the Add button next to it.
Numbers can be added using the input field located below the drop-down box with the list of available variables. To add a number, simply type it into the input field and click the Add button on the right-hand side of the field.
For example, if you want your tax to be applied to the sum of discounted order subtotal and shipping cost:
- Select DST from the drop-down box, click the Add button.
- Click on [ + ].
- Select SH from the drop-down box, click the Add button.
You can cancel the latest action using the Undo button, re-apply the change after the cancellation by clicking on Redo, and clear the formula field by clicking the Clear button.
Tax Options
After you have created at least one tax, a dialog box titled 'Taxes options' appears below the 'Taxes' dialog box in the 'Taxes' section. This dialog box provides some options allowing you to choose how you want your taxes to be applied and displayed. The options in this dialog box affect all the taxes in your store in general.

The following options are provided:
- Display cart/order totals including tax: This option defines whether tax cost is displayed included in the order totals or not. When this option is disabled, the order totals on the 'Payment details' page of checkout are displayed like this:

- When this option is enabled, the order totals are displayed like this:

- Display a tax rate for each product in cart/order: This option defines whether tax rates are displayed for each product being ordered. When this option is enabled, the information about the products being ordered is displayed like this:

- When this option is disabled, the column with tax rates for each product is not displayed.
- Enable tax exemption for customers: This option defines whether tax exemption feature for customers is enabled at your store or not.When this option is enabled, a check box 'Tax exemption' is added to the 'Profile details' page for customers.
- When this option is disabled, the 'Tax exemption' check box does not appear.
- Allow customers to modify their tax number after tax exemption is enabled: This option defines whether customers can modify their tax number after tax exemption has been enabled in their profile. You may want to keep this option disabled to prevent customers from changing their tax numbers without your knowing.
To adjust the options:
- Select the check boxes for the options that need to be enabled. Unselect the check boxes for the options that need to be disabled.
- Click the Update button to apply the changes.
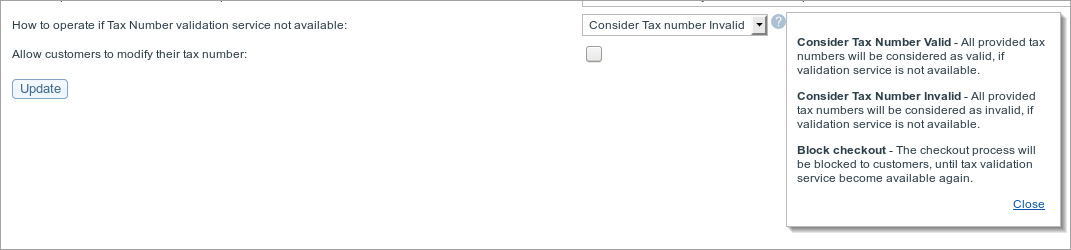
“How to operate if Tax Number validation service not available” setting in X-Cart 4.7.6
In version 4.7.6 a new setting "How to operate if Tax Number validation service not available" was added. When a customer provides his tax number in the user profile, X-Cart validates it with the Tax Number Validation Service http://ec.europa.eu/taxation_customs/. In case the service is not available due to the issues on its side, X-Cart can not determine whether the tax number is valid or not. In previous versions, if it was unavailable the order was successfully processed and the VAT number was considered as invalid even when it was valid, and the tax was charged. In X-Cart version 4.7.6 and higher the setting "How to operate if Tax Number validation service not available" provides the store administrator with the ability to specify how they want X-Cart to handle tax numbers while the validation service is unavailable. For example, the administrator may choose to treat all tax numbers that cannot be validated due to the service failure as valid, or treat them as invalid, or block access to checkout.
- Tax Validation setting:

Applying Taxes to Products
After the necessary taxes have been configured, they need to be applied to products. This step is very important, because taxes will not work until you tell X-Cart to which products you wish them applied to.
The 'Product details' dialog box (the one you will use to add/modify products - see the section X-Cart:Adding Products further in this manual for details) contains a field 'Apply tax'. This field is a selectbox providing names of all taxes defined in the store. When creating a new product, you will use the 'Apply tax' field to apply taxes to your products.
To apply one or more taxes to a product:
- Find the product to which you would like to apply taxes and open it for modification. A dialog box titled 'Product details' opens.
- In the 'Apply tax' field of the 'Product details' dialog box, highlight the name of the tax that needs to be applied to the product. If you need to highlight more than one tax, hold down the CTRL key while selecting the desired names of taxes with your mouse.
- Click the Save button to apply the changes.
If the same tax or set of taxes need to be applied to more than one product, you can apply them simultaneously to multiple products by editing them in batch. Instructions for mass-editing of products are provided in the section Group product editing.
Non-taxable products
If your store is going to sell non-taxable products, you will need to adjust their details in such a way that no taxes will be applied.
For non-taxable products, the tax settings in the 'Product details' need to be adjusted like this:
- Select Yes from the 'Tax exempt' drop-down box.
- Select nothing from the 'Apply tax' field.
- Click the Save button to apply the changes.
Examples of Configuring Taxes
Example 1.
Suppose, your store is located in Texas, United States, and you need to impose a 8.25% sales tax on all orders delivered within Texas (The sales tax is not charged on deliveries made outside Texas). The tax needs to be calculated based on the discounted subtotal amount of orders before any shipping charges are applied.
To configure this tax, follow these steps:
1. Set up a destination zone for Texas (for example, name this zone "Texas"):
| Countries: | United States |
| States: | United States: Texas |
| Counties: | -- |
| Cities: | -- |
| Zip/Postal codes: | -- |
| Addresses: | -- |
2. Go to the 'Taxes' section of your store's Admin area and add a new tax:
- Call it your state name or whatever you want (for example, "Texas" for the tax service name and "Texas sales tax" for the tax display name).
- Apply it to DST.
- Set rates to depend on Shipping address (not Billing, as you only need to tax orders going to Texas addresses; customers buying products to send out of state as a gift should not be charged sales tax).
- Click the Save button.
3. Set up the tax rate:
- Set the rate value to 8.25%.
- Apply it to the zone "Texas".
- Set the membership level to All.
- Click the Add button.
4. If you haven't yet done so, adjust 'Taxes options' for your store as needed.
5. Apply the tax to all the products to which it needs to be applied by highlighting the tax name on the 'Product details' page. Make sure that the 'Tax exempt' drop-down box for these products is set to No.
Please note that if the cost of shipping for different locations in Texas is not the same, you will have to define several destination zones for Texas (a separate zone for each Texas location with a different shipping rate) and to apply the tax rate of 8.25% to each of these zones. Technically, this means that you will have more than one rates defined for Texas sales tax, and each of these tax rates will have the value of 8.25% and will be applied to a certain destination zone in Texas.
Example 2.
Suppose, your store sells products to your own state and to two neighboring states. You have two categories of customers, retail and wholesale. Wholesale customers correspond to the membership level "Wholesale", retail customers are just ordinary customers (registered or anonymous) without a membership level. For example, you need to impose a sales tax on products purchased by retail customers and shipped within your own state. Any customers who order products to be shipped out of state and wholesale customers in-state do not pay sales tax.
In this situation, the sales tax can be set up as follows:
- Set up a destination zone for your own state (for example, "Zone 1").
- Add a tax and name it your state's sales tax.
- Define two tax rates for this tax:
- Set the first tax rate equal to the sales tax amount that needs to be applied to in-state retail purchases. Apply this rate to Zone 1 and All membership levels.
- Set the second tax rate to 0%. Apply this rate to Zone 1 and to the Wholesale membership level.
This way everyone in Zone 1 except Wholesale users will pay the sales tax. Wholesale users will see a "0%" tax line appear on their checkout page.
Please note that if the cost of shipping for different locations within your state is not the same, you will have to define several destination zones for your state (a separate zone for each location with a different shipping rate) and to apply the sales tax rate to each of these zones.
FAQ
How to set up % tax for a US state?
Example: 5% tax for California. Tax will be applied to subtotal (you can change this). Tax depends on shipping address of the customer.
Steps:
- Add destination zone "California":
- Login to admin area
- Click on "Destination zones"
- Click "Add new ..."
- Enter zone name "California"
- Click update
- Scroll down to section States
- Click on "United States: California"
- Scroll down.
- Click "Save zone details"
- Create tax
- Click "Taxing system"
- Tick "Display cart/order totals including tax", "Display a tax rate for each product in cart/order"
- Click "Add new"
- Set "Tax service name" to CA
- Set "Tax display name" to "California Tax"
- Create tax formula (we will apply the tax to subtotal - clear sum of the product prices)
- Near "Apply tax to:" select "ST" from the first drop down box, press Add.
- If you want to apply the tax to discounted subtotal plus shipping cost, clear the formula (button clear) and select DST, press add, click on "plus" sign, select SH from the drop down box and press Add.
- Select "Rates depend on". We will choose shipping address.
- Tick "Display product price including tax"
- From "Also display " drop down box select "Rate value and tax cost".
- Click "Save".
- You have created the tax. Now you need to create a tax rate rule.
- Scroll down to "CA: Tax rates" section.
- Find "Add tax rate"
- Set rate to "5".
- Set "Zone" to "California"
- Set Membership to "All"
- Create tax rate rule once again.
- Select "Subtotal", press Add.
- Click "add" at the bottom of the page.
Tax and tax rate value have been set. Now you should modify your products and set the list of taxes applied to product cost. Without this information x-cart does not know whether it should apply the tax to product or not.Note: in X-Cart Pro tax rates are defined by Providers. So you should be logged in as a Provider to create tax rates ('Inventory' menu -> "Tax rates" section)
- To assign the tax to all products in the cart you should do the following:
- Click on "Modify product"
- Tick "Search-and-modify:"
- Select empty value for "Search in category"
- Tick as "Main category", tick "Additional category".
- "Search for pattern" -> empty value and clean up another search criteria.
- Click "Search"
- Scroll the search results page and tick a checkbox near "Apply taxes".
- (!) Press Control button on your keyboard and mark (select) all the taxes mentioned in the select box.
- Click Save. Modification to the list of Applied taxes will propagate to all your products.
Why tax rate is not applied to products in catalog?
Probably the tax is not assigned to necessary products. If you want to apply the tax to only certain products go to the product details page and choose the tax in the 'Apply tax' box.
To assign a tax to all products, you should do the following:
- Click on "Modify product"
- Tick "Search-and-modify:"
- Select empty value for "Search in category"
- Tick as "Main category", tick "Additional category".
- "Search for pattern" -> empty value and clean up another search criteria.
- Click "Search"
- Scroll the search results page and tick a checkbox near "Apply taxes".
- (!) Press Control button on your keyboard and mark (select) all the taxes mentioned in the select box.
- Click Save. Modification to the list of Applied taxes will propagate to all your products.
Troubleshooting
Tax rounding on shipping charges
Problem:
I want to display delivery charges inclusive of tax, but want the tax to be noted on the invoice. This means that the value I must enter into the shipping charges screen needs to exclude VAT. However, the shipping charge fields will not accept fractions of a penny, which is what I have to do to get the charge to appear correctly.
Example:
Standard shipping is £4.95 (inc tax); Tax is 20%.
Therefore the value I need to enter into the flat charge field is 4.125.
How do I solve the problem?
Solution: Apply the patches which allow your X-Cart store to accept 3 decimal places for shipping charges.