Difference between revisions of "Draft:X-Cart:POS system for X-Cart"
m (→POS system module configuration settings) |
m (→POS system module configuration settings) |
||
| Line 36: | Line 36: | ||
After installing the module, you must adjust the module's configuration settings. Do the following: | After installing the module, you must adjust the module's configuration settings. Do the following: | ||
# In the Modules section of your X-Cart store’s Admin area ('''Settings -> Modules'''), click the '''Configure''' button next to the name of the previously installed and enabled POS system module:<br />[[File:POS_configure.png|border]]<br />The Pos system for X-Cart module settings page opens. | # In the Modules section of your X-Cart store’s Admin area ('''Settings -> Modules'''), click the '''Configure''' button next to the name of the previously installed and enabled POS system module:<br />[[File:POS_configure.png|border]]<br />The Pos system for X-Cart module settings page opens. | ||
| − | # Once the module settings page is fully loaded, allow a few seconds for the QZ Print applet to load ( | + | # Once the module settings page is fully loaded, allow a few seconds for the QZ Print applet to load (See [[Draft:X-Cart:POS_system_for_X-Cart#Notes on the QZ Print applet|Notes on the QZ Print applet]] for more info). Here the applet is employed to detect locally installed printers. We need this information so we can select which of the printers will be used to print barcodes and receipts for the POS system module. Once the applet discovers the presence of installed printers, the QZ Print Plugin status on the module settings page changes to "Printers are found", and the list of printers installed in the system is loaded in the '''Barcode printer name''' and '''Receipt printer name''' drop-down boxes:<br />[[File:POS_config_settings.png|border]] |
# Use the '''Barcode printer name''' and '''Receipt printer name''' drop-down boxes to select the printers that will be used to print out, respectively, barcodes and receipts. Failure to specify any of the said two printers will render the respective functionality (i.e., the buttons and sections of the user interface that control the respective printing operations) unavailable. For example, if you do not select a Receipt printer, you will not be able to print receipts. | # Use the '''Barcode printer name''' and '''Receipt printer name''' drop-down boxes to select the printers that will be used to print out, respectively, barcodes and receipts. Failure to specify any of the said two printers will render the respective functionality (i.e., the buttons and sections of the user interface that control the respective printing operations) unavailable. For example, if you do not select a Receipt printer, you will not be able to print receipts. | ||
| − | # Use the '''Barcode line width (in dots)''' field to set the minimum line width in a printed barcode. The smaller this value is, the more lines of the barcode can be printed on a barcode label. The number of barcode lines depends on the number of characters in the product UPC (The greater the length of UPC, the longer the barcode). The recommended value for the ‘Barcode line width (in dots)’ field is "1" or "2", but, regardless of the value you specify, please make sure that your barcode scanner can recognize the barcodes printed with this line width. The images below demonstrate a barcode printed with two different values of the minimum barcode line width parameter: | + | # Use the '''Barcode line width (in dots)''' field to set the minimum line width in a printed barcode. The smaller this value is, the more lines of the barcode can be printed on a barcode label. The number of barcode lines depends on the number of characters in the product UPC (The greater the length of UPC, the longer the barcode). The recommended value for the ‘Barcode line width (in dots)’ field is "1" or "2", but, regardless of the value you specify, please make sure that your barcode scanner can recognize the barcodes printed with this line width. The images below demonstrate a barcode printed with two different values of the minimum barcode line width parameter:<br />[[File:barcode_line_width1.png]] [[File:barcode_line_width2.png]] |
| − | [[File:barcode_line_width1.png]][[File:barcode_line_width2.png]] | ||
# Click '''Submit''' to save the changes. | # Click '''Submit''' to save the changes. | ||
| − | {{Note1|'''Important:''' If the system name of your Barcode printer or Receipt printer changes after the respective printer has been selected for use with the | + | {{Note1|'''Important:''' If the system name of your Barcode printer or Receipt printer changes after the respective printer has been selected for use with the POS system module in the module settings, you will need to reload the module settings page in your browser, allow the QZ Print applet to obtain the new printer name, select the new printer name in the module settings and save the changes.}} |
===QZ Print applet related configuration=== | ===QZ Print applet related configuration=== | ||
Revision as of 17:45, 19 February 2014
Contents
Overview
POS system for X-Cart is a module that allows you to use your X-Cart store both as an interface for web sales and a Point of Sale system. With this module, you can sell offline and online using the same software, which means you get a single inventory tracking and order management system for both your online and retail stores. Update inventory and product properties by using a barcode scanner that finds the product instantly. Got a new product? Add it to the database and decide if it should be available in the online storefront, or if you want to sell it in your retail store only. Scan the barcodes, accept payments, print receipts and barcode labels via X-Cart. It has never been so easy!
System requirements and installation
See POS system module: system requirements and installation
Getting started
To start using the X-Cart POS module on your system, do the following:
- Ensure that your system meets the software and hardware requirements, then install and enable the module.
- Configure the module. First, connect the module with the printers that you intend to use for printing barcodes and receipts and set up your printing preferences in the module's configuration settings:
- X-Cart:POS_system_for_X-Cart#POS system module configuration settings
If you experience Java security warnings related to QZ Print applet, follow the recommendations in this section: - X-Cart:POS_system_for_X-Cart#QZ Print applet related configuration
For more information on QZ Print and its use by the module, see: - X-Cart:POS_system_for_X-Cart#Notes on the QZ Print applet
- X-Cart:POS_system_for_X-Cart#POS system module configuration settings
- If POS-related tasks in your store will be performed by a staff member other than the store's Administrator with Root access permissions, set up an admin account for them and provide this account with POS operator permissions.
- To get a feel of how your X-Cart store operates at POS, log in to the store as POS operator and try doing the tasks your POS operator will need to perform. To begin with, add some products to your store's catalog (or edit your existing products) and add UPC codes for them. You can provide your own UPC codes or scan the existing barcode labels of your products so the UPC codes are "scanned" into the system from these barcodes. In the long run, all the products that you are going to sell via POS will need unique UPC codes.
- Make sure that all the product items that you are going to sell via POS have barcode labels attached to them. For product items that do not yet have barcode labels, print your own barcode labels based on UPC codes.
- While still being logged in to the POS operator account, go to the Customer area. Edit your user profile to add the POS location address to your address book (This address will be used by default as the address of the customer checking out via POS). Then try adding some products to cart via the "Checkout POS" section (Make sure you can add products to cart both by scanning their barcodes and by entering their UPC codes manually).
- Try creating a POS order by checking out with the products contained in your shopping cart. The first time you do it, go to checkout using X-Cart's standard Go to checkout button and finish creating the order using X-Cart's regular checkout flow. During checkout, use the address you configured in your POS operator user profile and select the payment method that you want to be used in future for all POS orders created using this POS operator account. Your payment method selection will be saved as default, and, later on, when creating POS orders using this account, you will be able to use the simplified order creation flow (via the Process order button) where you will not have to select a payment method again. If at some point in the future you will need to switch to a different payment method for orders of this POS operator, simply use the Go to checkout button again and select a different payment method.
- Try printing a receipt for the order that has been created.
Once you've made sure everything works as expected, you should be ready to go live with your POS-enabled X-Cart store.
Configuring the module
POS system module configuration settings
After installing the module, you must adjust the module's configuration settings. Do the following:
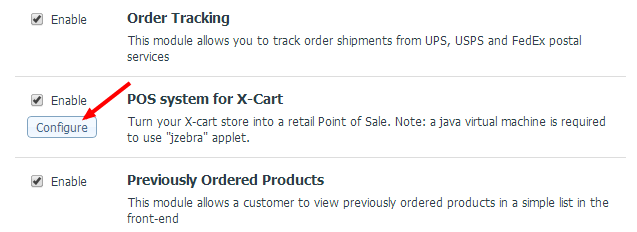
- In the Modules section of your X-Cart store’s Admin area (Settings -> Modules), click the Configure button next to the name of the previously installed and enabled POS system module:

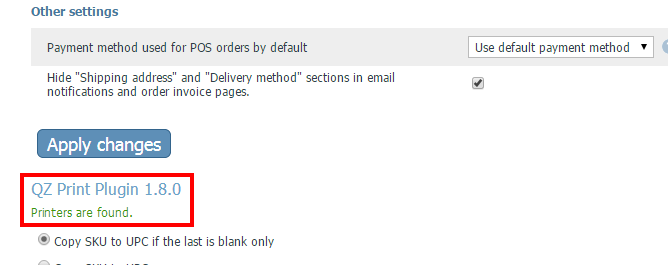
The Pos system for X-Cart module settings page opens. - Once the module settings page is fully loaded, allow a few seconds for the QZ Print applet to load (See Notes on the QZ Print applet for more info). Here the applet is employed to detect locally installed printers. We need this information so we can select which of the printers will be used to print barcodes and receipts for the POS system module. Once the applet discovers the presence of installed printers, the QZ Print Plugin status on the module settings page changes to "Printers are found", and the list of printers installed in the system is loaded in the Barcode printer name and Receipt printer name drop-down boxes:

- Use the Barcode printer name and Receipt printer name drop-down boxes to select the printers that will be used to print out, respectively, barcodes and receipts. Failure to specify any of the said two printers will render the respective functionality (i.e., the buttons and sections of the user interface that control the respective printing operations) unavailable. For example, if you do not select a Receipt printer, you will not be able to print receipts.
- Use the Barcode line width (in dots) field to set the minimum line width in a printed barcode. The smaller this value is, the more lines of the barcode can be printed on a barcode label. The number of barcode lines depends on the number of characters in the product UPC (The greater the length of UPC, the longer the barcode). The recommended value for the ‘Barcode line width (in dots)’ field is "1" or "2", but, regardless of the value you specify, please make sure that your barcode scanner can recognize the barcodes printed with this line width. The images below demonstrate a barcode printed with two different values of the minimum barcode line width parameter:


- Click Submit to save the changes.