Difference between revisions of "X-Cart:Configurator"
(→Classifying store products) |
(→Overview) |
||
| (15 intermediate revisions by 4 users not shown) | |||
| Line 1: | Line 1: | ||
== Overview == | == Overview == | ||
| + | |||
| + | X-Configurator is also known as Product Configurator. Since X-Cart version 4.5.4 the name of this module is Product Wizard. | ||
=== What X-Configurator does === | === What X-Configurator does === | ||
| − | X-Configurator enables you to sell composite products with many interchangeable and optional components | + | X-Configurator enables you to sell composite products with many interchangeable and optional components so that buyers can build their own product configurations. With that, the module can prevent non-expert customers from misconfiguring a particular product. For each product component the store administrator can set up rules of how to avoid possible incompatibility with other product components. For example, you can define that the AMD motherboard requires the Athlon processor, and your customers will not be able to order an AMD motherboard together with an Intel Pentium processor. This ensures that the customer will not order a misconfigured product, and this will not become the reason for a complain or a refund. |
Originally developed for stores that sell computers, cell phones, home cinemas and other electronics, X-Configurator has now proven that it can be successfully used in online stores that sell various types of composite products, including furniture suites, air conditioning systems, hosting plans, golf club sets, bicycles, etc. | Originally developed for stores that sell computers, cell phones, home cinemas and other electronics, X-Configurator has now proven that it can be successfully used in online stores that sell various types of composite products, including furniture suites, air conditioning systems, hosting plans, golf club sets, bicycles, etc. | ||
| Line 16: | Line 18: | ||
===How X-Configurator works=== | ===How X-Configurator works=== | ||
| − | First the store | + | First, the person preparing the store to sell configurable products (in X-Cart GOLD or GOLD PLUS this task is done by the store administrator, in X-Cart PLATINUM or PRO - by providers) defines '''product types''' and '''specifications'''. Product types and specifications are used to classify products so that they can be used as components of a configurable product. A product type is more generic than a specification. For example, in a store selling computers one could have a product type "Desktop RAM" with specifications "DDR", "DDR2" and "DDR3". |
| − | After product types and specifications have been defined, the store administrator or the product provider | + | After product types and specifications have been defined, the store administrator or the product provider '''classifies''' the products that will be used as components of configurable products by assigning each product to a particular product type and specification, and defines the requirements for the product: product types and specifications that the compatible products must belong to. Continuing the previous example, the product Patriot Viper 6GB 1600MHz DDR3 Memory Kit would belong to the product type "Desktop RAM" and the specification "DDR3", and it would have the requirements like the product type "Motherboard" with the specification like "DDR3 compatible". |
The next step is to add a configurable product and '''define its attributes''', which is very similar to creating an ordinary product. | The next step is to add a configurable product and '''define its attributes''', which is very similar to creating an ordinary product. | ||
| − | Finally, | + | Finally, one needs to '''create a scenario''' for the configuration builder, the step-by-step wizard that will help buyers to configure the product. The wizard can consist of several steps. Every step can have one or more slots that are used for selecting particular products and can be either optional or mandatory. |
=== Interaction with other X-Cart modules === | === Interaction with other X-Cart modules === | ||
| Line 28: | Line 30: | ||
When you use X-Configurator together with the [[X-Cart:Feature Comparison|X-FeatureComparison]] module, your store visitors can compare interchangeable product components before they add a particular component into the product configuration. This would generally enhance your customers' experience as they would be able to make a more thoughtful decision on which component they want to include into the configuration. | When you use X-Configurator together with the [[X-Cart:Feature Comparison|X-FeatureComparison]] module, your store visitors can compare interchangeable product components before they add a particular component into the product configuration. This would generally enhance your customers' experience as they would be able to make a more thoughtful decision on which component they want to include into the configuration. | ||
| − | == | + | === Video tutorial === |
| + | |||
| + | <youtube>OEuufTch-co</youtube> | ||
| + | |||
| + | == System requirements and installation == | ||
| + | |||
| + | In X-Cart versions 4.4.0-4.5.2, X-Configurator is available as a built-in module. It does not require instalation and can be enabled in the "Modules" section of X-Cart Admin area. Since X-Cart version 4.5.4 X-Configurator is known as Product Wizard. Product Wizard is now available in X-Cart PLATINUM edition only. | ||
| + | |||
| + | For X-Cart GOLD and PRO versions 4.0.0-4.0.19, 4.1.0-4.1.12, 4.2.0-4.2.3 and 4.3.0-4.3.2, X-Configurator is available as an add-on module which can be purchased separately. The following instructions will guide you through the process of installing the X-Configurator add-on module in your store. | ||
=== System requirements === | === System requirements === | ||
| − | To be able to successfully install and use X-Configurator you | + | To be able to successfully install and use X-Configurator, you need a working copy of X-Cart (GOLD or PRO versions 4.0.0-4.0.19, 4.1.0-4.1.12, 4.2.0-4.2.3 or 4.3.0-4.3.2) installed on your server. Make sure that the version of the module is the same as the version of the installed copy of X-Cart. |
| − | {{Note1|Note: If you do not remember the version of the installed copy of X-Cart, find it in the <u> | + | {{Note1|Note: If you do not remember the version of the installed copy of X-Cart, find it in the <u>Environment info</u> section of the [[X-Cart:Summary_Page |Summary]] page in X-Cart Admin area.}} |
=== Installing X-Configurator === | === Installing X-Configurator === | ||
| − | |||
| − | |||
To install the module: | To install the module: | ||
| − | 1. Obtain the distribution package for the X-Configurator add-on module by downloading it from the File Area section of your | + | 1. Obtain the distribution package for the X-Configurator add-on module by downloading it from the File Area section of your {{QA}}. |
The distribution package you need is contained in the archive file <u>x-pconf-x.y.z.tgz</u> where <u>x</u>, <u>y</u> and <u>z</u> are the version numbers of the module, which must be the same as the version of the installed copy of X-Cart (e.g. 4.3.0., 4.3.1., etc.). | The distribution package you need is contained in the archive file <u>x-pconf-x.y.z.tgz</u> where <u>x</u>, <u>y</u> and <u>z</u> are the version numbers of the module, which must be the same as the version of the installed copy of X-Cart (e.g. 4.3.0., 4.3.1., etc.). | ||
| Line 66: | Line 74: | ||
3. In a web browser, run the installation script http://www.example.com/install-xpconf.php replacing www.example.com with the true URL of where X-Cart is installed to. This will launch the Installation Wizard. | 3. In a web browser, run the installation script http://www.example.com/install-xpconf.php replacing www.example.com with the true URL of where X-Cart is installed to. This will launch the Installation Wizard. | ||
| − | 4. Enter the Auth code, accept the License Agreement and click the '''Next''' button. | + | 4. Enter the [[X-Cart:FAQs#What_is_Auth_code_and_where_can_I_find_it.3F|Auth code]], accept the License Agreement and click the '''Next''' button. |
| − | |||
| − | |||
After you have clicked on Next, the installation script will copy the files and activate the module. | After you have clicked on Next, the installation script will copy the files and activate the module. | ||
| Line 82: | Line 88: | ||
# In a web browser, run the installation script http://www.example.com/install-xpconf.php replacing www.example.com with the true URL of where X-Cart is installed to. This will launch the Installation Wizard. | # In a web browser, run the installation script http://www.example.com/install-xpconf.php replacing www.example.com with the true URL of where X-Cart is installed to. This will launch the Installation Wizard. | ||
| − | # Select the radio button Uninstall the module, enter the Auth code and click the '''Next''' button. | + | # Select the radio button Uninstall the module, enter the [[X-Cart:FAQs#What_is_Auth_code_and_where_can_I_find_it.3F|Auth code]] and click the '''Next''' button. |
| − | |||
| − | |||
== Product Types and Specifications == | == Product Types and Specifications == | ||
| Line 90: | Line 94: | ||
With X-Configurator, before the products in the stock can become available for inclusion into a configurable product, the products must be classified. X-Configurator will not consider unclassified products as acceptable to be used as parts of composite products and would never allow an unclassified product to appear in the product configuration. To classify a product that should be used as part of a configurable product, you need to assign the product to a product type and product specification. | With X-Configurator, before the products in the stock can become available for inclusion into a configurable product, the products must be classified. X-Configurator will not consider unclassified products as acceptable to be used as parts of composite products and would never allow an unclassified product to appear in the product configuration. To classify a product that should be used as part of a configurable product, you need to assign the product to a product type and product specification. | ||
| − | The set of available product types and specifications is defined by the store administrator (X-Cart | + | The set of available product types and specifications is defined by the store administrator (X-Cart GOLD or GOLD PLUS) or the store providers (X-Cart PLATINUM or PRO). A '''product type''' classifies a product generically; and every product type can have a list of '''specifications''', which allow you to classify products more precisely. For example, in an online store selling desktop computers one can have product types "Motherboard", "Processor", "RAM", etc. that would correspond to the types of components that the configurable product (desktop computer) should consists of. The product type "Motherboard" can have a number of specifications that reflect different product features like the form factor ("ATX", "Micro-ATX", "Flex-ATX", etc.), type of supported processors ("Intel platform motherboard" and "AMD platform motherboard"), type of supported RAM ("DDR2-compatible", "DDR3-compatible"); other product types would have different specifications. |
The system of product types and specifications allows you not only to classify products, but to resolve dependencies between products and avoid incompatibility issues. Continuing the example, a memory module assigned to product type "RAM" with a specification "DDR3" would be set up to require a motherboard belonging to the product type "Motherboard" with the specification "DDR3-compatible". If this condition is not met, the system would not allow the two products to be added into the same configuration. | The system of product types and specifications allows you not only to classify products, but to resolve dependencies between products and avoid incompatibility issues. Continuing the example, a memory module assigned to product type "RAM" with a specification "DDR3" would be set up to require a motherboard belonging to the product type "Motherboard" with the specification "DDR3-compatible". If this condition is not met, the system would not allow the two products to be added into the same configuration. | ||
| Line 98: | Line 102: | ||
To define a product type: | To define a product type: | ||
| − | # Log in to the Admin area (X-Cart | + | # Log in to the Admin area (X-Cart GOLD or GOLD PLUS) or Provider area (X-Cart PLATINUM or PRO). |
# Go to the section <u>Product Configurator</u> (<u>Catalog</u> menu -> <u>Product Configurator</u>). | # Go to the section <u>Product Configurator</u> (<u>Catalog</u> menu -> <u>Product Configurator</u>). | ||
# In the section menu, click on the link Define product types. This will open a form for adding a product type. | # In the section menu, click on the link Define product types. This will open a form for adding a product type. | ||
| Line 108: | Line 112: | ||
To define a specification for the product type: | To define a specification for the product type: | ||
| − | # Log in to the Admin area (X-Cart | + | # Log in to the Admin area (X-Cart GOLD or GOLD PLUS) or Provider area (X-Cart PLATINUM or PRO). |
# Go to the section <u>Product Configurator</u> (<u>Catalog</u> menu -> <u>Product Configurator</u>). | # Go to the section <u>Product Configurator</u> (<u>Catalog</u> menu -> <u>Product Configurator</u>). | ||
# In the section menu, click on the link Define product types. This will open the form with the available product type. | # In the section menu, click on the link Define product types. This will open the form with the available product type. | ||
| Line 118: | Line 122: | ||
==== Setting up product availability status ==== | ==== Setting up product availability status ==== | ||
| − | Products that can be used as parts of a configurable | + | Products that can be used as parts of a configurable product are ordinary products from the common store stock. It means that these products can be ordered separately as well. You can also use product variants as part of a configurable product. If you want product variant images to be displayed on the configurator pages instead of the regular product images, you need to [[X-Cart:Advanced_Tools#Re-generate_the_Image_Cache | regenerate image cache]]. |
| − | + | If you wish you can make certain products available only as part of a configurable product. For this purpose X-Configurator introduces the product availability status ''Bundled''. | |
To make a product available as a bundled product only: | To make a product available as a bundled product only: | ||
| − | # Log in to the Admin area (X-Cart | + | # Log in to the Admin area (X-Cart GOLD or GOLD PLUS) or the Provider area (X-Cart PLATINUM or PRO). |
# Find the product and go to the <u>Product management</u> page. | # Find the product and go to the <u>Product management</u> page. | ||
# In the <u>Product details</u> form, locate the '''Availability''' drop-down box and change its value to Bundled. <br/>[[Image:xconfigurator_07.gif|640px]]<br/> | # In the <u>Product details</u> form, locate the '''Availability''' drop-down box and change its value to Bundled. <br/>[[Image:xconfigurator_07.gif|640px]]<br/> | ||
| Line 135: | Line 139: | ||
To access the <u>X-Configurator classification</u> form: | To access the <u>X-Configurator classification</u> form: | ||
| − | + | # Log in to the Admin area (X-Cart GOLD or GOLD PLUS) or the Provider area (X-Cart PLATINUM or PRO). | |
| − | + | # Locate the product that you want to classify and go to the <u>Product management</u> page. | |
| − | + | # In the section menu, click on the link X-Configurator classification. | |
'''To assign a product type and specification:''' | '''To assign a product type and specification:''' | ||
| − | + | # Access the <u>X-Configurator classification</u> form for the product that you wish to classify. | |
| − | + | # Select a product type from the '''Add product type''' drop-down box. | |
| − | + | #: [[Image:xconfigurator_08.gif|640px]] | |
| − | : [[Image:xconfigurator_08.gif|640px]] | + | # Click the '''Submit''' button. This will reload the page and display the list of product types, which now contains the newly added product type. |
| − | + | #: [[Image:xconfigurator_09.gif|640px]] | |
| − | + | # Select one or more product specifications in the select box in the '''Specifications for the products''' column. | |
| − | + | # Click the '''Submit''' button. | |
| − | : [[Image:xconfigurator_09.gif|640px]] | ||
| − | |||
| − | |||
| − | |||
'''To assign product requirements''' | '''To assign product requirements''' | ||
| − | + | # Access the <u>X-Configurator classification</u> form for the product that you wish to classify. | |
| − | + | # In the '''Requirements for the product''' column, select a product type to which compatible products must belong. | |
| − | + | #: [[Image:xconfigurator_10.gif|640px]] | |
| − | : [[Image:xconfigurator_10.gif|640px]] | + | # Click the '''Submit''' button. This will reload the form and the system will display the list of specifications for the chosen product type. |
| − | + | # Select one or more specifications for the selected product type. | |
| − | + | #: [[Image:xconfigurator_11.gif|640px]] | |
| − | + | # Click the '''Submit''' button. | |
| − | |||
| − | : [[Image:xconfigurator_11.gif|640px]] | ||
| − | |||
| − | |||
| − | == Creating Configurable Product == | + | == Creating a Configurable Product == |
| − | + | To create a configurable product, you need to add a new configurable product to your product catalog and to build a configuration wizard for this product. | |
Adding a configurable product is much the same as adding a regular product, but it requires a slightly different sequence of operations. The instructions in this manual describe the information that is specific to creating configurable products only. The details on creating both configurable and regular products are described in the [[X-Cart:User manual contents#Managing the Product Catalog]] section. | Adding a configurable product is much the same as adding a regular product, but it requires a slightly different sequence of operations. The instructions in this manual describe the information that is specific to creating configurable products only. The details on creating both configurable and regular products are described in the [[X-Cart:User manual contents#Managing the Product Catalog]] section. | ||
| Line 175: | Line 171: | ||
Building a configuration wizard means that you define the wizard components: steps that the wizard will consist of, slots that will be included into each step, and the set of products that should be available for selection from a particular slot. | Building a configuration wizard means that you define the wizard components: steps that the wizard will consist of, slots that will be included into each step, and the set of products that should be available for selection from a particular slot. | ||
| − | === Adding Configurable Product === | + | === Adding a Configurable Product === |
To add a configurable product: | To add a configurable product: | ||
| − | + | # Log in to the Admin area (X-Cart GOLD or GOLD PLUS) or Provider area (X-Cart PLATINUM or PRO). | |
| − | + | # Go to the section <u>Product Configurator</u> (<u>Catalog</u> menu -> <u>Product Configurator</u>). | |
| − | + | # In the section menu, click on the link Add a configurable product. This will open the <u>Product details</u> form, which is much the same as the similar form for creating regular products. | |
| − | + | # Complete the fields of the <u>Product details</u> form.<br />The meaning and purpose of the most fields in the form is described at [[X-Cart:Adding_Products#Defining_Product_Details]] page.<br />The distinctive field in the form is the <u>Base product price</u> field. Here you should specify the base cost of the configurable product that the cost of separate components will be added to or subtracted from. | |
| − | + | #: [[Image:xconfigurator_19.gif|640px]] | |
| − | + | # Click the '''Save''' button at the bottom of the form. | |
| − | + | This will add the new configurable product to your store's catalog. After the product has been added, you can define additional product info like international description, detailed images, product options, upselling links, etc. For instructions on how to define additional details, see the [[X-Cart:Adding_Products#Defining Other Information]] page. | |
| − | |||
| − | |||
| − | |||
| − | |||
| − | |||
| − | : [[Image:xconfigurator_19.gif|640px]] | ||
| − | |||
| − | |||
| − | + | === Building the Product Configuration Wizard=== | |
| − | |||
| − | === Building Product Configuration Wizard=== | ||
In the customer area, customers configure composite products through a step-by-step wizard. The wizard leads customers through a series of steps. Every step can consist of one or more slots, which are used to include separate components into the product configuration. The picture below shows you a sample step of the configuration wizard. | In the customer area, customers configure composite products through a step-by-step wizard. The wizard leads customers through a series of steps. Every step can consist of one or more slots, which are used to include separate components into the product configuration. The picture below shows you a sample step of the configuration wizard. | ||
| Line 203: | Line 189: | ||
: [[Image:xconfigurator_14.gif|640px]] | : [[Image:xconfigurator_14.gif|640px]] | ||
| − | The scenario for the wizard (number and order of steps and slots) is set up separately for each configurable product in the store by the store administrator (X-Cart | + | The scenario for the wizard (number and order of steps and slots) is set up separately for each configurable product in the store by the store administrator (X-Cart GOLD or GOLD PLUS) or a store provider (X-Cart PLATINUM or PRO). To create a scenario for the wizard, use the scenario builder. |
==== Starting the Scenario Builder ==== | ==== Starting the Scenario Builder ==== | ||
| Line 209: | Line 195: | ||
To start the scenario builder for a configurable product: | To start the scenario builder for a configurable product: | ||
| − | # Log in to the Admin area (X-Cart | + | # Log in to the Admin area (X-Cart GOLD or GOLD PLUS) or Provider area (X-Cart PLATINUM or PRO). |
# Go to the section <u>Product Configurator</u> (<u>Catalog</u> menu -> <u>Product Configurator</u>). | # Go to the section <u>Product Configurator</u> (<u>Catalog</u> menu -> <u>Product Configurator</u>). | ||
# Use the search form to find the configurable product for which you want to create the configuration wizard. | # Use the search form to find the configurable product for which you want to create the configuration wizard. | ||
| − | + | #: [[Image:xconfigurator_12.gif|640px]] | |
| − | : [[Image:xconfigurator_12.gif|640px]] | ||
| − | |||
# Go to the product's management page. | # Go to the product's management page. | ||
# In the section menu, click on the Manage configuration wizard link. | # In the section menu, click on the Manage configuration wizard link. | ||
| − | + | #: [[Image:xconfigurator_15.gif|640px]] | |
| − | : [[Image:xconfigurator_15.gif|640px]] | + | This will open the <u>Configuration wizard management</u> form. This form can include two sections: <u>Wizard steps</u> and <u>Add new step</u>. The <u>Wizard steps</u> section is only available if you have already added one or more wizard steps. The picture below demonstrates a sample form with two steps. |
| − | |||
| − | This will open the <u>Configuration wizard management</u> form | ||
: [[Image:xconfigurator_13.gif|640px]] | : [[Image:xconfigurator_13.gif|640px]] | ||
| Line 229: | Line 211: | ||
# Start the scenario builder. | # Start the scenario builder. | ||
| − | # In the <u>Add new step</u> section, enter the name of step and click the '''Add step''' button. The new step will be added to the list of the wizard steps. | + | # In the <u>Add new step</u> section, enter the name of the step you wish to add and click the '''Add step''' button. The new step will be added to the list of the wizard steps. |
| − | |||
: [[Image:xconfigurator_16.gif|640px]] | : [[Image:xconfigurator_16.gif|640px]] | ||
| Line 237: | Line 218: | ||
'''To define step attributes and slots''' | '''To define step attributes and slots''' | ||
| − | + | # In the list of the wizard steps, click on the name of the step that you wish to edit. This will open a form with the step details. | |
| − | + | # Define the step properties. | |
| − | + | #: [[Image:xconfigurator_20.gif|640px]] | |
| − | : [[Image:xconfigurator_20.gif|640px]] | + | #* <u>Step name</u>: The name of the step how it will appear in the wizard. |
| − | + | #* <u>Step description</u>: The description of the step that customer will see below the step name. The step description is used to give buyers a basic idea of what they are expected to do at this step. | |
| − | * <u>Step name</u>: The name of the step how it will appear in the wizard. | + | #* <u>Order by</u>: The order of the step in relation to the order of other steps in the wizard. If two steps have the same order-by value, they will be sorted alphabetically.<br />{{Note1|Note: If you use several languages in the store, you can set up step attributes in other languages as well. To set up the attributes in a different language, change the active language in the Language drop-down menu in the right top corner of the form.}} |
| − | * <u>Step description</u>: The description of the step that customer will see below the step name. The step description is used to give buyers a basic idea of what they are expected to do at this step. | + | # Add the slots that will be included into the step.<br />To add a slot, use the <u>Add new slot</u> subsection at the bottom of the form. |
| − | * <u>Order by</u>: The order of the step in relation to the order of other steps in the wizard. If two steps have the same order-by value, they will be sorted alphabetically. | + | #: [[Image:xconfigurator_21.gif|640px]] |
| − | |||
| − | {{Note1|Note: If you use several languages in the store, you can set up step attributes in other languages as well. To set up the attributes in a different language, change the active language in the Language drop-down menu in the right top corner of the form.}} | ||
| − | |||
| − | |||
| − | To add a slot, use the <u>Add new slot</u> subsection at the bottom of the form. | ||
| − | |||
| − | : [[Image:xconfigurator_21.gif|640px]] | ||
| − | |||
After you have added the slot, it will be listed among other slots in the step. If necessary, you can change the slot's status and order directly in the list. Or you can click on the slot name to move to the slot's configuration page where you can edit more details. | After you have added the slot, it will be listed among other slots in the step. If necessary, you can change the slot's status and order directly in the list. Or you can click on the slot name to move to the slot's configuration page where you can edit more details. | ||
| − | |||
: [[Image:xconfigurator_22.gif|640px]] | : [[Image:xconfigurator_22.gif|640px]] | ||
| Line 311: | Line 283: | ||
# If necessary, select the membership level that the price modifier must be available to. All means that the price will be modified regardless the buyer's membership level. | # If necessary, select the membership level that the price modifier must be available to. All means that the price will be modified regardless the buyer's membership level. | ||
# Click the Add/Update button. | # Click the Add/Update button. | ||
| + | == FAQs == | ||
| + | |||
| + | === How to make an existing product bundled? === | ||
| + | |||
| + | To make a product already in use in the store bundeled, you should: | ||
| + | # Log in to the Admin area (X-Cart GOLD or GOLD PLUS) or the Provider area (X-Cart PLATINUM or PRO). | ||
| + | # Find the product in question and go to the <u>Product management</u> page. | ||
| + | # In the <u>Product details</u> form, locate the '''Availability''' drop-down box and change its value to Bundled.<br/>[[Image:xconfigurator_07.gif|640px]]<br/> | ||
| + | # Click the '''Save''' button at the bottom of the form. | ||
| + | |||
| + | === How to make a product available to be purchased as a part of a configured product and as a stand-alon one? === | ||
| + | |||
| + | # Log in to the Admin area (X-Cart GOLD or GOLD PLUS) or the Provider area (X-Cart PLATINUM or PRO). | ||
| + | # Find the product and go to the <u>Product management</u> page. | ||
| + | # In the <u>Product details</u> form, locate the '''Availability''' drop-down box and change its value to Available for sale.<br/> | ||
| + | # Click the '''Save''' button at the bottom of the form. | ||
| + | |||
| + | "Available for sale" means that products can be purchased both as a part of configurable products and as stand-alone products. | ||
| + | |||
| + | "Bundled" means that a product can be purchased as a part of configurable products only. | ||
==Glossary== | ==Glossary== | ||
| Line 316: | Line 308: | ||
; Base price : The cost of a configurable product without the cost of the product options and separate components. | ; Base price : The cost of a configurable product without the cost of the product options and separate components. | ||
| − | ; Component : A regular product | + | ; Component : A regular product sold at your store that customers can select as part of a configurable product while ordering the configurable product. Before a product can become available for selection as part of a configurable product, the product must be classified, i.e. assigned to at least one product type. |
; Composite product : See Configurable product. | ; Composite product : See Configurable product. | ||
| Line 336: | Line 328: | ||
; Slot : A unit of a wizard step that is used to select a particular component for the configurable product. The set of products that can be selected in the slot is defined by the slot rules and is known as slot products. | ; Slot : A unit of a wizard step that is used to select a particular component for the configurable product. The set of products that can be selected in the slot is defined by the slot rules and is known as slot products. | ||
| − | ; Specification : A classifying unit that is used to classify products belonging to a particular product type more precisely. The set of the available product types in the store is defined by the store administrator (X-Cart | + | ; Specification : A classifying unit that is used to classify products belonging to a particular product type more precisely. The set of the available product types in the store is defined by the store administrator (X-Cart GOLD or GOLD PLUS) or the store providers (X-Cart PLATINUM or PRO). |
| − | |||
| − | |||
| + | [[Category:X-Cart video tutorials]] | ||
| + | [[Category:X-Cart user manual]] | ||
| + | [[Category:X-Cart modules]] | ||
| + | [[Category:X-Cart video tutorials]] | ||
[[Category:X-Cart user manual]] | [[Category:X-Cart user manual]] | ||
[[Category:X-Cart modules]] | [[Category:X-Cart modules]] | ||
Latest revision as of 11:44, 14 February 2019
Contents
Overview
X-Configurator is also known as Product Configurator. Since X-Cart version 4.5.4 the name of this module is Product Wizard.
What X-Configurator does
X-Configurator enables you to sell composite products with many interchangeable and optional components so that buyers can build their own product configurations. With that, the module can prevent non-expert customers from misconfiguring a particular product. For each product component the store administrator can set up rules of how to avoid possible incompatibility with other product components. For example, you can define that the AMD motherboard requires the Athlon processor, and your customers will not be able to order an AMD motherboard together with an Intel Pentium processor. This ensures that the customer will not order a misconfigured product, and this will not become the reason for a complain or a refund.
Originally developed for stores that sell computers, cell phones, home cinemas and other electronics, X-Configurator has now proven that it can be successfully used in online stores that sell various types of composite products, including furniture suites, air conditioning systems, hosting plans, golf club sets, bicycles, etc.
Among the key features of the X-Configurator module are:
- Unlimited number of composite products;
- Flexible product configuration;
- Compatibility checking mechanism;
- Step-by-step product builder.
How X-Configurator works
First, the person preparing the store to sell configurable products (in X-Cart GOLD or GOLD PLUS this task is done by the store administrator, in X-Cart PLATINUM or PRO - by providers) defines product types and specifications. Product types and specifications are used to classify products so that they can be used as components of a configurable product. A product type is more generic than a specification. For example, in a store selling computers one could have a product type "Desktop RAM" with specifications "DDR", "DDR2" and "DDR3".
After product types and specifications have been defined, the store administrator or the product provider classifies the products that will be used as components of configurable products by assigning each product to a particular product type and specification, and defines the requirements for the product: product types and specifications that the compatible products must belong to. Continuing the previous example, the product Patriot Viper 6GB 1600MHz DDR3 Memory Kit would belong to the product type "Desktop RAM" and the specification "DDR3", and it would have the requirements like the product type "Motherboard" with the specification like "DDR3 compatible".
The next step is to add a configurable product and define its attributes, which is very similar to creating an ordinary product.
Finally, one needs to create a scenario for the configuration builder, the step-by-step wizard that will help buyers to configure the product. The wizard can consist of several steps. Every step can have one or more slots that are used for selecting particular products and can be either optional or mandatory.
Interaction with other X-Cart modules
When you use X-Configurator together with the X-FeatureComparison module, your store visitors can compare interchangeable product components before they add a particular component into the product configuration. This would generally enhance your customers' experience as they would be able to make a more thoughtful decision on which component they want to include into the configuration.
Video tutorial
System requirements and installation
In X-Cart versions 4.4.0-4.5.2, X-Configurator is available as a built-in module. It does not require instalation and can be enabled in the "Modules" section of X-Cart Admin area. Since X-Cart version 4.5.4 X-Configurator is known as Product Wizard. Product Wizard is now available in X-Cart PLATINUM edition only.
For X-Cart GOLD and PRO versions 4.0.0-4.0.19, 4.1.0-4.1.12, 4.2.0-4.2.3 and 4.3.0-4.3.2, X-Configurator is available as an add-on module which can be purchased separately. The following instructions will guide you through the process of installing the X-Configurator add-on module in your store.
System requirements
To be able to successfully install and use X-Configurator, you need a working copy of X-Cart (GOLD or PRO versions 4.0.0-4.0.19, 4.1.0-4.1.12, 4.2.0-4.2.3 or 4.3.0-4.3.2) installed on your server. Make sure that the version of the module is the same as the version of the installed copy of X-Cart.
Installing X-Configurator
To install the module:
1. Obtain the distribution package for the X-Configurator add-on module by downloading it from the File Area section of your X-Cart Account.
The distribution package you need is contained in the archive file x-pconf-x.y.z.tgz where x, y and z are the version numbers of the module, which must be the same as the version of the installed copy of X-Cart (e.g. 4.3.0., 4.3.1., etc.).
2. Put the distribution package to the X-Cart root directory on your server or hosting account.
- If you use a Windows-based server, or a UNIX-based server without terminal access:
- Decompress the archive with the X-Configurator distribution package to a directory on your local system. To decompress the archive you can use your favorite compression program like WinZIP or any other archiver with support for TAR files.
- Use an FTP client to upload all the files contained in the archive (retaining the directory structure) to the X-Cart root directory on your server or your hosting account.
- If you use a UNIX-based server with terminal access:
- Use an FTP client to upload the archive with the distribution package to the X-Cart root directory on your server or your hosting account.
- Decompress the package using one of the following commands:
gunzip < x-pconf-x.y.z.tgz | tar -xvf -
- or
tar -xzvf x-pconf-x.y.z.tgz
3. In a web browser, run the installation script http://www.example.com/install-xpconf.php replacing www.example.com with the true URL of where X-Cart is installed to. This will launch the Installation Wizard.
4. Enter the Auth code, accept the License Agreement and click the Next button.
After you have clicked on Next, the installation script will copy the files and activate the module.
5. Click the Next button to continue the installation. The installation script will generate a new system fingerprint.
6. Click the Next button to finish the installation.
Uninstalling X-Configurator
To uninstall the module:
- In a web browser, run the installation script http://www.example.com/install-xpconf.php replacing www.example.com with the true URL of where X-Cart is installed to. This will launch the Installation Wizard.
- Select the radio button Uninstall the module, enter the Auth code and click the Next button.
Product Types and Specifications
With X-Configurator, before the products in the stock can become available for inclusion into a configurable product, the products must be classified. X-Configurator will not consider unclassified products as acceptable to be used as parts of composite products and would never allow an unclassified product to appear in the product configuration. To classify a product that should be used as part of a configurable product, you need to assign the product to a product type and product specification.
The set of available product types and specifications is defined by the store administrator (X-Cart GOLD or GOLD PLUS) or the store providers (X-Cart PLATINUM or PRO). A product type classifies a product generically; and every product type can have a list of specifications, which allow you to classify products more precisely. For example, in an online store selling desktop computers one can have product types "Motherboard", "Processor", "RAM", etc. that would correspond to the types of components that the configurable product (desktop computer) should consists of. The product type "Motherboard" can have a number of specifications that reflect different product features like the form factor ("ATX", "Micro-ATX", "Flex-ATX", etc.), type of supported processors ("Intel platform motherboard" and "AMD platform motherboard"), type of supported RAM ("DDR2-compatible", "DDR3-compatible"); other product types would have different specifications.
The system of product types and specifications allows you not only to classify products, but to resolve dependencies between products and avoid incompatibility issues. Continuing the example, a memory module assigned to product type "RAM" with a specification "DDR3" would be set up to require a motherboard belonging to the product type "Motherboard" with the specification "DDR3-compatible". If this condition is not met, the system would not allow the two products to be added into the same configuration.
Defining product types
To define a product type:
- Log in to the Admin area (X-Cart GOLD or GOLD PLUS) or Provider area (X-Cart PLATINUM or PRO).
- Go to the section Product Configurator (Catalog menu -> Product Configurator).
- In the section menu, click on the link Define product types. This will open a form for adding a product type.
- In the form, enter the names of product types. If necessary, define their ordering.
To add and delete new product types, use the controls and
and  .
. 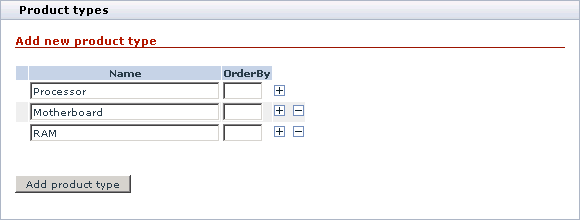
- Click the Add product type button. The page will reload and display the list of available product types.
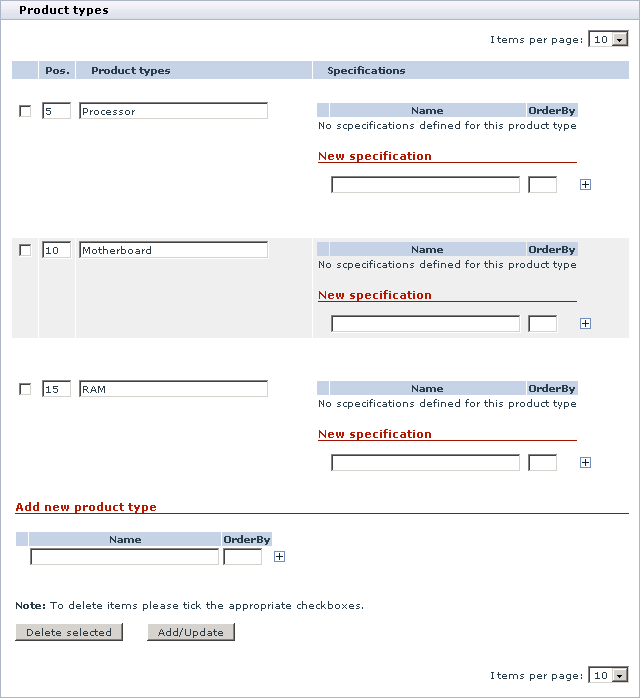
Defining product specifications
To define a specification for the product type:
- Log in to the Admin area (X-Cart GOLD or GOLD PLUS) or Provider area (X-Cart PLATINUM or PRO).
- Go to the section Product Configurator (Catalog menu -> Product Configurator).
- In the section menu, click on the link Define product types. This will open the form with the available product type.
- Find the product type that should have specifications and add new specifications. If necessary, define their order.
To add and delete new specifications, use the controls and
and  .
. 
- Click the Add/Update button at the bottom of the form. This will reload the page and display the list of product specifications defined for that product type.

Classifying store products
Setting up product availability status
Products that can be used as parts of a configurable product are ordinary products from the common store stock. It means that these products can be ordered separately as well. You can also use product variants as part of a configurable product. If you want product variant images to be displayed on the configurator pages instead of the regular product images, you need to regenerate image cache.
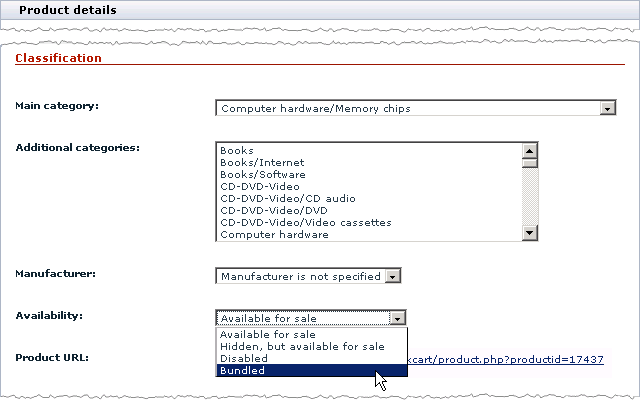
If you wish you can make certain products available only as part of a configurable product. For this purpose X-Configurator introduces the product availability status Bundled.
To make a product available as a bundled product only:
- Log in to the Admin area (X-Cart GOLD or GOLD PLUS) or the Provider area (X-Cart PLATINUM or PRO).
- Find the product and go to the Product management page.
- In the Product details form, locate the Availability drop-down box and change its value to Bundled.
- Click the Save button at the bottom of the form.
Assigning product types, specifications and requirements
Product types, specifications and requirements are assigned through a special form X-Configurator classification.
To access the X-Configurator classification form:
- Log in to the Admin area (X-Cart GOLD or GOLD PLUS) or the Provider area (X-Cart PLATINUM or PRO).
- Locate the product that you want to classify and go to the Product management page.
- In the section menu, click on the link X-Configurator classification.
To assign a product type and specification:
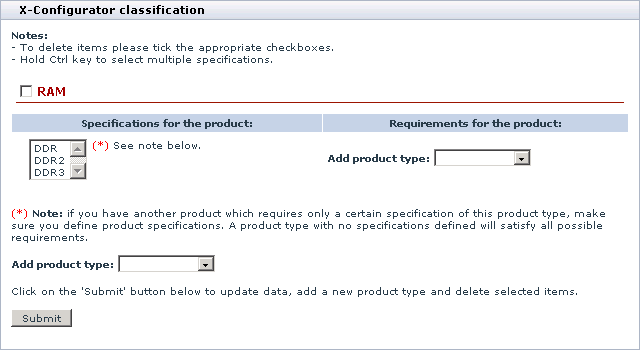
- Access the X-Configurator classification form for the product that you wish to classify.
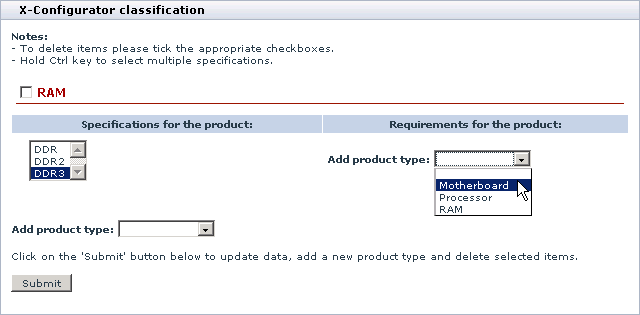
- Select a product type from the Add product type drop-down box.
- Click the Submit button. This will reload the page and display the list of product types, which now contains the newly added product type.
- Select one or more product specifications in the select box in the Specifications for the products column.
- Click the Submit button.
To assign product requirements
- Access the X-Configurator classification form for the product that you wish to classify.
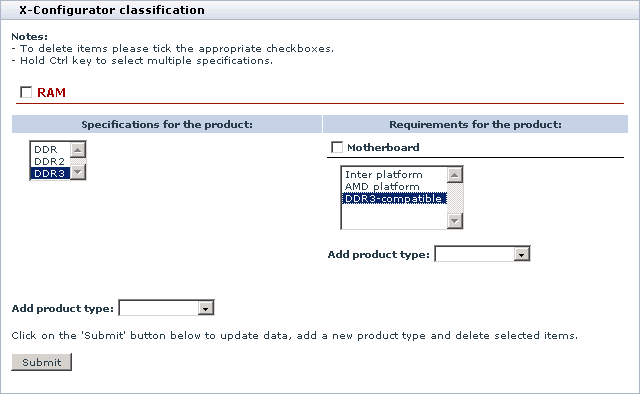
- In the Requirements for the product column, select a product type to which compatible products must belong.
- Click the Submit button. This will reload the form and the system will display the list of specifications for the chosen product type.
- Select one or more specifications for the selected product type.
- Click the Submit button.
Creating a Configurable Product
To create a configurable product, you need to add a new configurable product to your product catalog and to build a configuration wizard for this product.
Adding a configurable product is much the same as adding a regular product, but it requires a slightly different sequence of operations. The instructions in this manual describe the information that is specific to creating configurable products only. The details on creating both configurable and regular products are described in the X-Cart:User manual contents#Managing the Product Catalog section.
Building a configuration wizard means that you define the wizard components: steps that the wizard will consist of, slots that will be included into each step, and the set of products that should be available for selection from a particular slot.
Adding a Configurable Product
To add a configurable product:
- Log in to the Admin area (X-Cart GOLD or GOLD PLUS) or Provider area (X-Cart PLATINUM or PRO).
- Go to the section Product Configurator (Catalog menu -> Product Configurator).
- In the section menu, click on the link Add a configurable product. This will open the Product details form, which is much the same as the similar form for creating regular products.
- Complete the fields of the Product details form.
The meaning and purpose of the most fields in the form is described at X-Cart:Adding_Products#Defining_Product_Details page.
The distinctive field in the form is the Base product price field. Here you should specify the base cost of the configurable product that the cost of separate components will be added to or subtracted from. - Click the Save button at the bottom of the form.
This will add the new configurable product to your store's catalog. After the product has been added, you can define additional product info like international description, detailed images, product options, upselling links, etc. For instructions on how to define additional details, see the X-Cart:Adding_Products#Defining Other Information page.
Building the Product Configuration Wizard
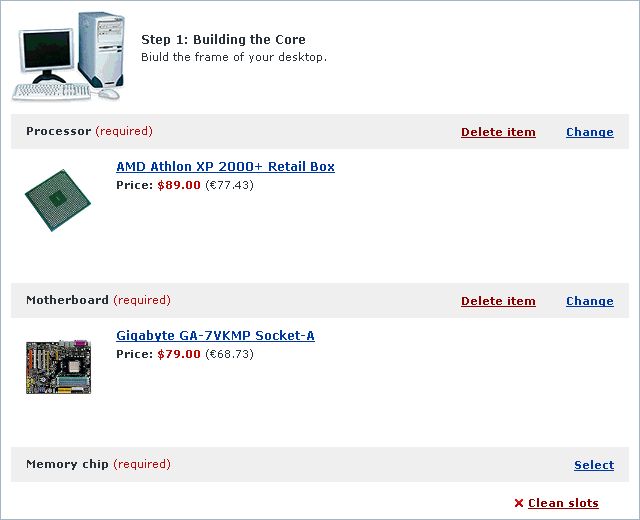
In the customer area, customers configure composite products through a step-by-step wizard. The wizard leads customers through a series of steps. Every step can consist of one or more slots, which are used to include separate components into the product configuration. The picture below shows you a sample step of the configuration wizard.
The scenario for the wizard (number and order of steps and slots) is set up separately for each configurable product in the store by the store administrator (X-Cart GOLD or GOLD PLUS) or a store provider (X-Cart PLATINUM or PRO). To create a scenario for the wizard, use the scenario builder.
Starting the Scenario Builder
To start the scenario builder for a configurable product:
- Log in to the Admin area (X-Cart GOLD or GOLD PLUS) or Provider area (X-Cart PLATINUM or PRO).
- Go to the section Product Configurator (Catalog menu -> Product Configurator).
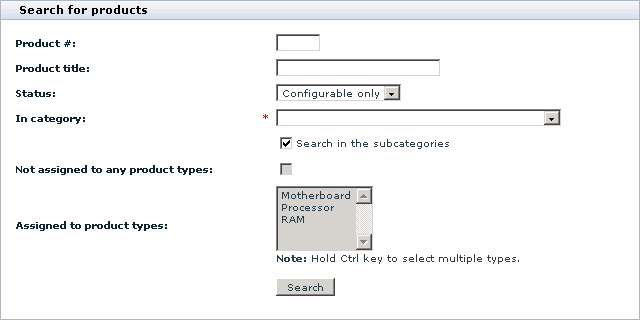
- Use the search form to find the configurable product for which you want to create the configuration wizard.
- Go to the product's management page.
- In the section menu, click on the Manage configuration wizard link.
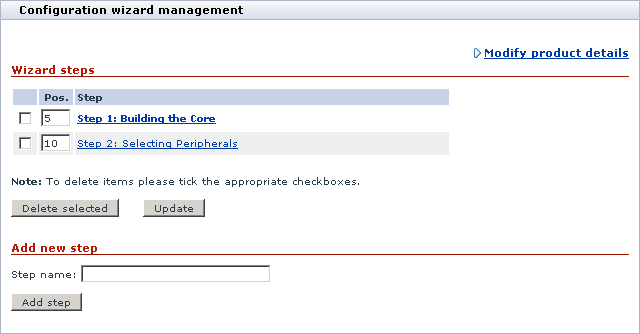
This will open the Configuration wizard management form. This form can include two sections: Wizard steps and Add new step. The Wizard steps section is only available if you have already added one or more wizard steps. The picture below demonstrates a sample form with two steps.
Managing configuration wizard steps
To add a new step:
- Start the scenario builder.
- In the Add new step section, enter the name of the step you wish to add and click the Add step button. The new step will be added to the list of the wizard steps.
If necessary, change the step order by editing the value of the respective text box in the Pos. column and click the Update button.
To define step attributes and slots
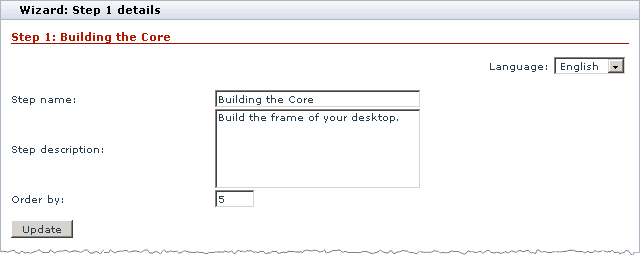
- In the list of the wizard steps, click on the name of the step that you wish to edit. This will open a form with the step details.
- Define the step properties.
- Step name: The name of the step how it will appear in the wizard.
- Step description: The description of the step that customer will see below the step name. The step description is used to give buyers a basic idea of what they are expected to do at this step.
- Order by: The order of the step in relation to the order of other steps in the wizard. If two steps have the same order-by value, they will be sorted alphabetically.Note: If you use several languages in the store, you can set up step attributes in other languages as well. To set up the attributes in a different language, change the active language in the Language drop-down menu in the right top corner of the form.
- Add the slots that will be included into the step.
To add a slot, use the Add new slot subsection at the bottom of the form.
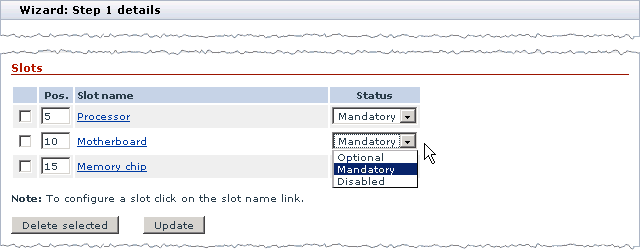
After you have added the slot, it will be listed among other slots in the step. If necessary, you can change the slot's status and order directly in the list. Or you can click on the slot name to move to the slot's configuration page where you can edit more details.
Configuring slot attributes
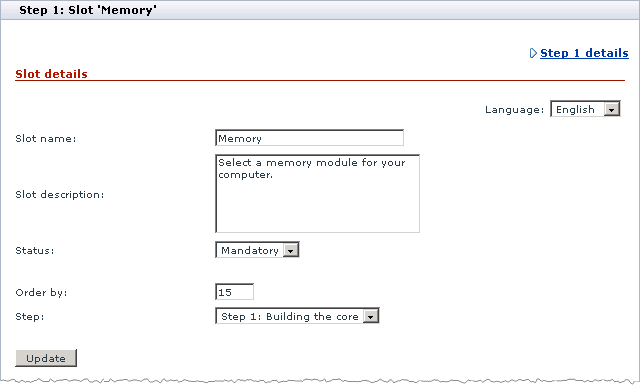
- At a step's configuration page click on the name of the slot you want to configure. This will display the slot's configuration page that consists of three sections: Slot details, Slot rules and Price modifier.
- Set up the slot configuration. The meaning and purpose of the slot options are described below.
Slot details
- Slot name: The name of the slot how it will appear in the step.
- Slot description: The description of the slot that customers will see below the slot name. Having a slot description may be useful when you want to give buyers a basic idea of what kind of a component they are expected to select and why.
- Status: The status of the slot. Possible values are Optional (slot can be left blank), Mandatory (slot must be populated) and Disabled (slot will be excluded from the configuration).
- Order by: The order of the slot in relation to the order of the other steps in the wizard. If two slots have the same order-by value, they will be sorted alphabetically.
- Step: The step of the configuration wizard that will contain the slot.
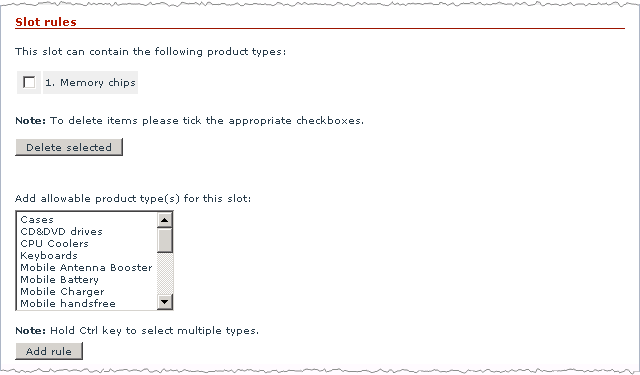
Slot rules
The slot rules define the collection of products that will be available for selection in the slot. To define the collection you need to specify the product types that the products in the slot must belong to, and the appropriate products will be automatically associated with the slot. This scheme presumes that before a product becomes available for selection in a slot, the product must be classified, i.e. assigned to at least one product type.
If necessary, you can build complex rules as combinations of different product types. X-Configurator supports two kinds of relationship between product types: logical OR and logical AND.
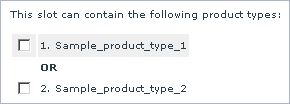
The OR relation means that the slot products must belong to one of the selected product types. The rule <Product_Type_1> OR <Product_Type_2> would allow your store visitors to select a product that belongs to at least one of these product types. To set up an OR relation between two product types, select a product type and click the Add rule button; then select another product type and click the Add rule button again.
The AND relation means that the slot products must simultaneously belong to all the selected product types. The rule <Product_Type_1> AND <Product_Type_2> would allow your store visitors to select a product that belongs to the both product types. To set up an AND relation between two product types, hold the CTRL key on your keyboard and select the two product types from the list, then click the Add rule button.
The rule <Product_Type_1> OR (<Product_Type_2> AND <Product_Type_3>) would allow your store visitors to select a product that belongs to either <Product_Type_1> or both to <Product_Type_2> and <Product_Type_3> simultaneously. Product that belong to either <Product_Type_2> or <Product_Type_3> will be excluded from the list.
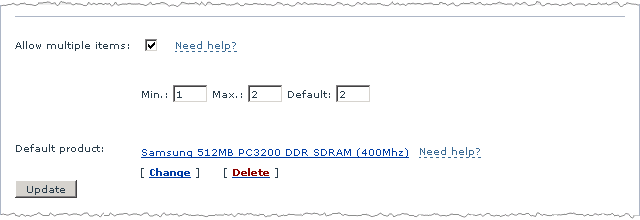
Together with the ability to define the collection of slot products, you can select a default product for the slot, choose whether the slot should have support for multiple product items and, if chosen, define the minimum, maximum and default amount of product items.
- Allow multiple items: This option enables you to decide whether your store visitors should be able to select multiple items of the same product in the slot. Select the checkbox to allow for multiple product items, and define the minimum, maximum and the default amount of product items in the slot. A zero in the Max. field means that there is no maximum limit.
- Default product: A default product is the product that will be considered as the default one for the current slot i.e. will be put into the configuration by default without asking store visitors to select a slot product. Store visitors will be able to chose a different slot product instead of the default product.
Price modifier
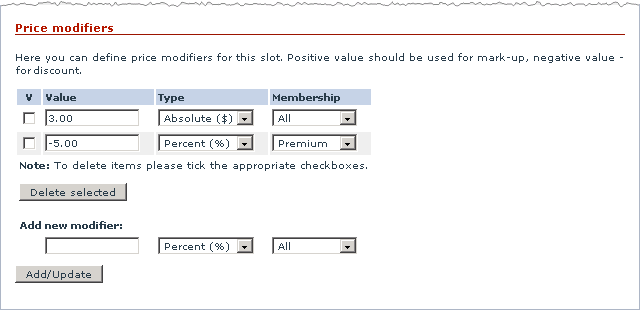
Price modifiers are the slot attributes that are used to change the original cost of the product in the slot. You are allowed to set either a discount that will be subtracted from the product cost or a surcharge that will be added to the product cost. Both the markups and markdowns can be either a percentage of the product cost or an absolute amount, and depend on a membership level of the customer who orders the configurable product.
To add a price modifier:
- Enter the modifier amount in the text field under the Add new modifier header. If you set up a discount, enter the minus sign before the modifier's value.
- Select the modifier type (Percent or Absolute).
- If necessary, select the membership level that the price modifier must be available to. All means that the price will be modified regardless the buyer's membership level.
- Click the Add/Update button.
FAQs
How to make an existing product bundled?
To make a product already in use in the store bundeled, you should:
- Log in to the Admin area (X-Cart GOLD or GOLD PLUS) or the Provider area (X-Cart PLATINUM or PRO).
- Find the product in question and go to the Product management page.
- In the Product details form, locate the Availability drop-down box and change its value to Bundled.

- Click the Save button at the bottom of the form.
How to make a product available to be purchased as a part of a configured product and as a stand-alon one?
- Log in to the Admin area (X-Cart GOLD or GOLD PLUS) or the Provider area (X-Cart PLATINUM or PRO).
- Find the product and go to the Product management page.
- In the Product details form, locate the Availability drop-down box and change its value to Available for sale.
- Click the Save button at the bottom of the form.
"Available for sale" means that products can be purchased both as a part of configurable products and as stand-alone products.
"Bundled" means that a product can be purchased as a part of configurable products only.
Glossary
- Base price
- The cost of a configurable product without the cost of the product options and separate components.
- Component
- A regular product sold at your store that customers can select as part of a configurable product while ordering the configurable product. Before a product can become available for selection as part of a configurable product, the product must be classified, i.e. assigned to at least one product type.
- Composite product
- See Configurable product.
- Configurable product
- A product that can consist of many interchangeable components. Configurable products have most of the attributes that regular products have. Components for a configurable product are selected by the store customers when they order the product.
- Configuration wizard
- A step-by-step wizard in the customer area that guides customers through a series of steps where they can select components for the configurable product.
- Price modifier
- A slot attribute that is used to change the original cost of the slot products. Can be either positive (markup) or negative (markdown).
- Product requirements
- A combination of product types and specifications that the compatible products must belong to.
- Product type
- A classifying unit that is used to classify products generically. The set of the available product types in the store is defined by the store administrator (X-Cart Gold) or the store providers (X-Cart Pro).
- Slot products
- A set of products that can be selected in the slot. The set is defined by the slot rules.
- Slot rules
- A product type or a combination of several product types that defines the set of products that can be selected in the slot.
- Slot
- A unit of a wizard step that is used to select a particular component for the configurable product. The set of products that can be selected in the slot is defined by the slot rules and is known as slot products.
- Specification
- A classifying unit that is used to classify products belonging to a particular product type more precisely. The set of the available product types in the store is defined by the store administrator (X-Cart GOLD or GOLD PLUS) or the store providers (X-Cart PLATINUM or PRO).

