Difference between revisions of "X-Cart:X-ProductNotifications"
(for the products whose current quantity in stock is smaller than the value defined by this field, the notification sign up buttons/forms are not displayed.) |
|||
| (24 intermediate revisions by 4 users not shown) | |||
| Line 3: | Line 3: | ||
== Overview == | == Overview == | ||
| − | <u>X-ProductNotifications</u> is a | + | <u>X-ProductNotifications</u> is a module that enables three types of product notifications for which your customers can sign up to stay tuned with your store's inventory updates: |
| − | * | + | * Price-drop notifications. These are used to alert subscribed customers whenever the price for the product they are interested in goes down. |
| − | * | + | * Low-stock notifications. These are sent to subscribed customers when the product is about to run out of stock, and there are just a few items left. |
| − | * | + | * Back in stock notifications. These are sent to subscribed customers when an out-of-stock item becomes available again. |
| − | + | The module works with product variations (like "T-shirt, Size M, Black") as well as with regular products. | |
| − | |||
| − | The module works with | ||
<br /> | <br /> | ||
| − | + | The store administrator enables the module and controls its configuration. For example, he or she can define which types of inventory notifications should be enabled in the store, which type of pages (just product details, or both product details and product list pages) should have links (buttons) for notification sign up, etc. | |
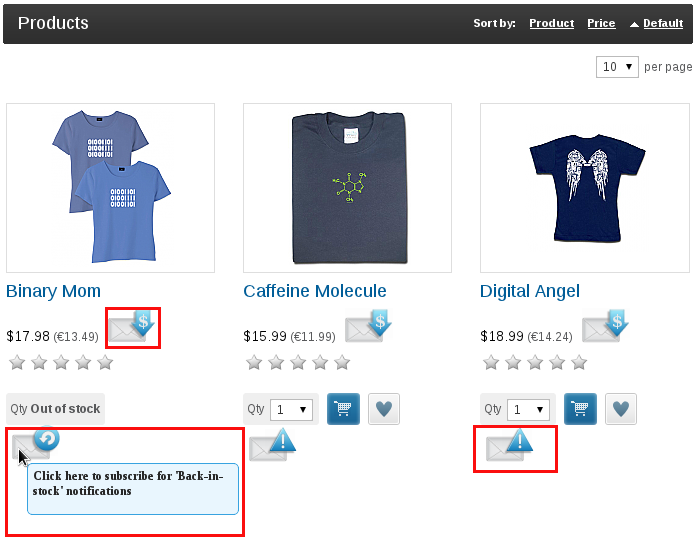
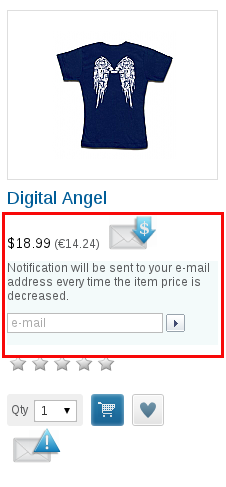
| − | + | Depending on the module settings, the product nofications links (buttons) in Customer area can be displayed in the product list section (main column): | |
: [[Image:x-product_notifications_pl.png|border]] | : [[Image:x-product_notifications_pl.png|border]] | ||
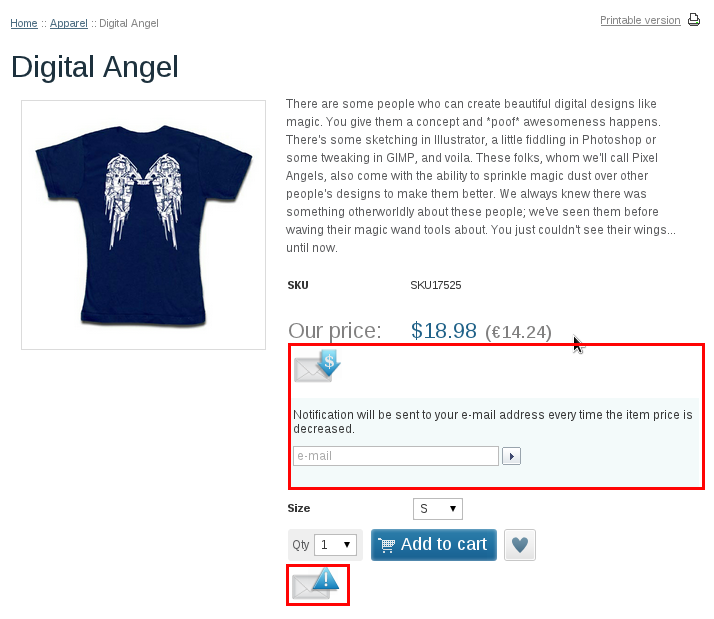
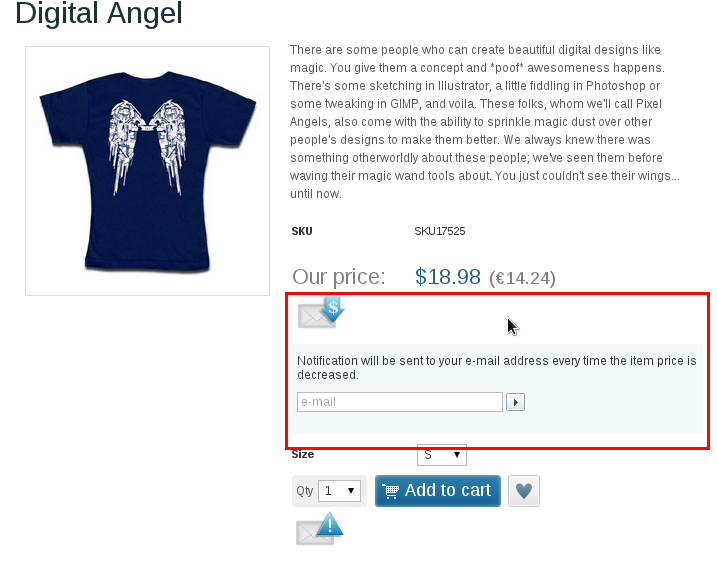
| − | + | or on product details pages: | |
: [[Image:x-product_notifications_pd.png|border]] | : [[Image:x-product_notifications_pd.png|border]] | ||
| − | + | <br /> | |
| − | |||
| − | |||
| − | + | Existing notification subscriptions are managed by admin and (X-Cart PLATINUM or PRO) provider users in the <u>Product Notifications</u> section of the store's back end (<u>Catalog</u> menu -> <u>Product notifications</u>). Users with notification management privileges can view existing notification subscriptions as a list, filter notifications by type / product name / email address and, if necessary, bulk cancel existing notification subscriptions. | |
| − | |||
| − | |||
: [[Image:x-product_notifications_admin_area.png|border]] | : [[Image:x-product_notifications_admin_area.png|border]] | ||
| + | == System requirements and installation == | ||
| + | X-ProductNotifications is available as a built-in module in X-Cart GOLD PLUS and PLATINUM editions v4.5.3 and later. In the said editions, the module does not require installation and can be enabled in the <u>Modules</u> section of X-Cart Admin area. | ||
| + | |||
| + | For X-Cart GOLD or PRO 4.4.0 and later, the X-ProductNotifications module can be purchased and installed separately. The following instructions will guide you through the process of installing the X-ProductNotifications add-on module in your store. | ||
| − | == System requirements | + | === System requirements === |
| − | To be able to successfully install and use the X-ProductNotifications module, you | + | To be able to successfully install and use the X-ProductNotifications module, you need a working copy of X-Cart GOLD or PRO v4.4.0 or later installed on your server. Make sure that the version of the <u>X-ProductNotifications module</u> you are installing is the same as the version of X-Cart on which your store is based. |
| − | {{Note1|Note: If you do not remember the version of X-Cart on which your store is based, you can look it up in the <u>Environment info</u> section of the | + | {{Note1|Note: If you do not remember the version of X-Cart on which your store is based, you can look it up in the <u>Environment info</u> section of the [[X-Cart:Summary_Page |Summary]] page in X-Cart Admin area.}} |
| − | == | + | === Installation and removal=== |
| − | |||
To install X-ProductNotifications: | To install X-ProductNotifications: | ||
| − | # Obtain the X-ProductNotifications distribution package by downloading it from the File | + | # Obtain the X-ProductNotifications distribution package by downloading it from the File area section of your {{QA}}. The distribution package you need is contained in the archive file <u>X-ProductNotifications-x.y.z-with-installer.tgz</u> where <u>x</u>, <u>y</u> and <u>z</u> stand for X-Cart version (These need to match the version of X-Cart on which your store is based). |
| − | # | + | # Copy the distribution package to the X-Cart root directory on your server or hosting account. |
#* ''If you use a Windows-based server, or a UNIX-based server without terminal access:'' | #* ''If you use a Windows-based server, or a UNIX-based server without terminal access:'' | ||
#: a) Decompress the archive with the X-ProductNotifications distribution package to a directory on your system using your favorite compression program (WinZIP or any other archiver with support for TAR files). | #: a) Decompress the archive with the X-ProductNotifications distribution package to a directory on your system using your favorite compression program (WinZIP or any other archiver with support for TAR files). | ||
| Line 57: | Line 54: | ||
#: <pre>tar -xzvf X-ProductNotifications-x.y.z-with-installer.tgz</pre> | #: <pre>tar -xzvf X-ProductNotifications-x.y.z-with-installer.tgz</pre> | ||
#: {{Note1|'''Important:''' Make sure you keep the directory structure while unpacking and uploading the distribution package, otherwise some necessary files can be overwritten! }} | #: {{Note1|'''Important:''' Make sure you keep the directory structure while unpacking and uploading the distribution package, otherwise some necessary files can be overwritten! }} | ||
| − | # In a web browser, run the installation script <u>httр://<YOUR_XCART_DOMAIN>/install-product-notifications.php</u>, replacing <u><YOUR_XCART_DOMAIN></u> with the actual domain name of your X-Cart based store. | + | # In a web browser, run the installation script <u>httр://<YOUR_XCART_DOMAIN>/install-product-notifications.php</u>, replacing the <u><YOUR_XCART_DOMAIN></u> part with the actual domain name of your X-Cart based store. |
| − | # Enter the Auth code, accept the License Agreement and click the '''Next''' button.<br /> | + | # Enter the [[X-Cart:FAQs#What_is_Auth_code_and_where_can_I_find_it.3F|Auth code]], accept the License Agreement and click the '''Next''' button.<br /> |
| − | # The installation script copies the files and activates the | + | # The installation script copies the files and activates the module. Click the '''Next''' button to continue the installation. |
# The installation script generates a new system fingerprint. Click the '''Next''' button to complete the installation. | # The installation script generates a new system fingerprint. Click the '''Next''' button to complete the installation. | ||
# Use the ADMINISTRATOR AREA link to access the Admin area.<br /><br /> | # Use the ADMINISTRATOR AREA link to access the Admin area.<br /><br /> | ||
| + | |||
| + | To uninstall <u>X-ProductNotifications</u>: | ||
| + | # In a web browser, run the installation script <u>httр://<YOUR_XCART_DOMAIN>/install-product-notifications.php</u>, replacing the <u><YOUR_XCART_DOMAIN></u> part with the actual domain name of your X-Cart based store. | ||
| + | # Choose the <u>Uninstall the module</u> option, enter the [[X-Cart:FAQs#What_is_Auth_code_and_where_can_I_find_it.3F|Auth code]], accept the License Agreement and click the '''Next''' button. | ||
| + | # Once the installation script has removed the X-ProductNotifications files and deactivated the module, click the '''Next''' button to complete the uninstallation. | ||
| + | # On the ''Uninstallation complete'' screen, click '''Next''' to leave the Wizard.<br />{{Note1|Important: After you have uninstalled X-ProductNotifications, be sure to remove the X-ProductNotifications distribution package from your web directory as well.}} | ||
== Enabling the X-ProductNotifications module== | == Enabling the X-ProductNotifications module== | ||
| − | After the X-ProductNotifications installation has been completed, the module you have installed | + | After the X-ProductNotifications installation has been completed, the module you have installed needs to be enabled in your store: |
# In Admin area, go to the <u>Modules</u> section (<u>Settings menu->Modules</u>). | # In Admin area, go to the <u>Modules</u> section (<u>Settings menu->Modules</u>). | ||
| Line 73: | Line 76: | ||
== Configuring the X-ProductNotifications module== | == Configuring the X-ProductNotifications module== | ||
| − | + | After the <u>X-ProductNotifications</u> module has been enabled in your store, you should check and adjust its configuration: | |
| − | |||
| − | |||
| − | : [[Image:x-product_notificatons_configuration_page.png|border]] | + | # In the <u>Modules</u> section (<u>Settings menu->Modules</u>), click the <u>Configure</u> link opposite the module name ('Product Notifications').<br />The module configuration page (titled by the name of the module) opens: |
| + | #: [[Image:x-product_notificatons_configuration_page.png|border]] | ||
| + | # Adjust the settings on the module configuration page as needed. Detailed information regarding the [[#ProductNotificationsModuleSettings | Product Notifications module configuration settings]] is available below. | ||
| + | # Click the '''Apply changes''' button to save the changes. | ||
| − | <div id=" | + | <div id="ProductNotificationsModuleSettings"> </div> |
| + | ===Product Notifications module configuration settings=== | ||
| − | <u> | + | Here are a few notes on the <u>X-ProductNotifications</u> module configuration settings: |
| − | * <u>Product notifications per page (in the admin area)</u>: Specify the number of | + | ====General product notifications settings==== |
| − | + | ||
| + | * <u>Product notifications per page (in the admin area)</u>: Specify the number of notification subscription records that should be visible per page in the <u>Product Notifications</u> section in the Admin/Provider area(s) (<u>Catalog</u> menu -> <u>Product notifications</u>). | ||
| − | + | ===='Back in stock' notifications settings==== | |
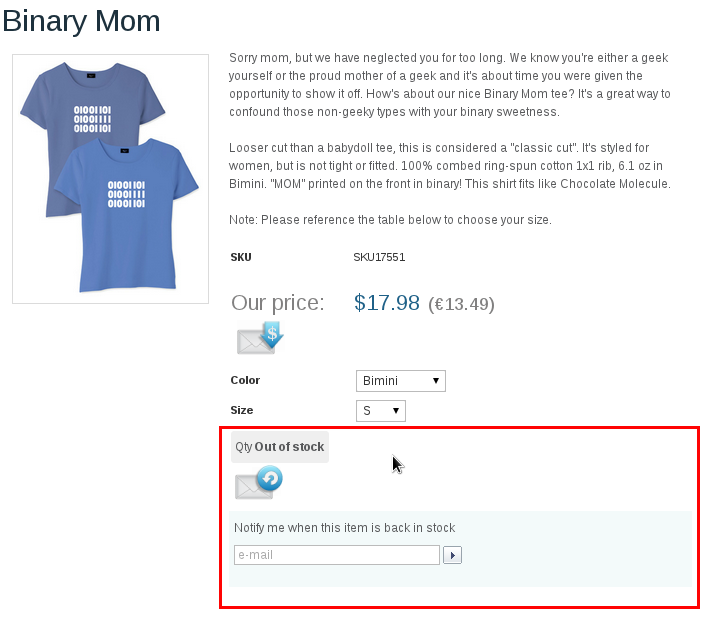
| − | * <u>Enable 'Back in stock' notifications</u>: | + | * <u>Enable 'Back in stock' notifications</u>: Select the checkbox to enable the 'Back in stock' type of notifications; this also adds 'Back in stock' notification sign up buttons/forms on the store's product details pages. |
: [[Image:x-product_notifications_back_in_stock_pd.png|border]] | : [[Image:x-product_notifications_back_in_stock_pd.png|border]] | ||
| − | * <u>Show notification request forms in the product list</u>: | + | 'Back in stock' notifications regarding a specific product will be sent to subscribed customers when the product's quantity in stock (defined by the value of the <u>Quantity in stock (items)</u> field in the product details) is greater than 0 (zero) and exceeds the product's minimum order quantity (as defined by the value of the <u>Minimum order quantity</u> field in the product details). |
| + | |||
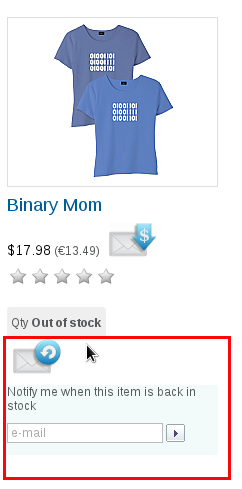
| + | * <u>Show notification request forms in the product list</u>: Select the checkbox to add 'Back in stock' notification sign up buttons/forms on the store's product list pages. | ||
: [[Image:x-product_notifications_back_in_stock_pl.png|border]] | : [[Image:x-product_notifications_back_in_stock_pl.png|border]] | ||
| − | + | ===='Low stock' notifications settings==== | |
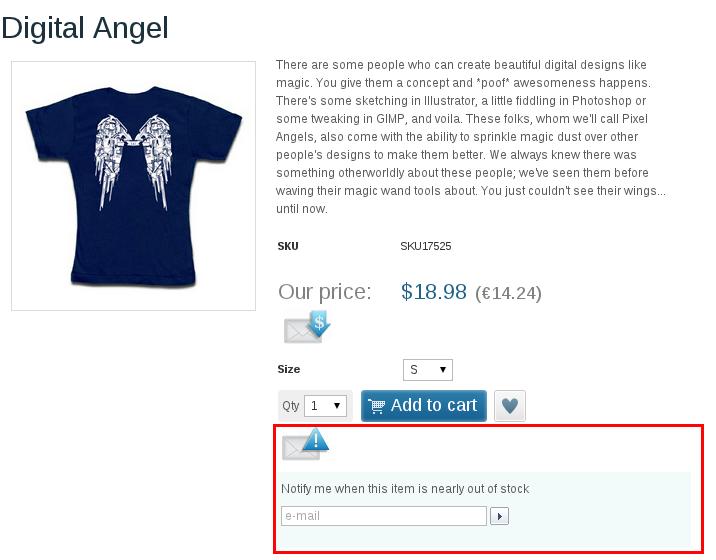
| − | + | * <u>Enable 'Low stock' notifications</u>: Select the checkbox to enable the 'Low stock' type of notifications; this also adds 'Low stock' notification sign up buttons/forms on the store's product details pages. | |
| − | <u>'Low stock' notifications | ||
| − | |||
| − | |||
: [[Image:x-product_notifications_low_stock_pd.png|border]] | : [[Image:x-product_notifications_low_stock_pd.png|border]] | ||
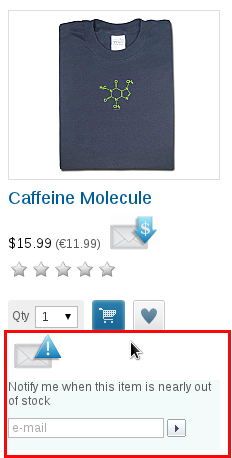
| − | * <u>Show notification request forms in the product list</u>: | + | * <u>Show notification request forms in the product list</u>: Select the checkbox to add 'Low Stock' notification sign up buttons/forms on the store's product list pages. |
: [[Image:x-product_notifications_low_stock_pl.png|border]] | : [[Image:x-product_notifications_low_stock_pl.png|border]] | ||
| − | * <u>Minimal product available amount for low-stock notifications</u>: | + | * <u>Minimal product available amount for low-stock notifications</u>: Specify the low-stock limit for customer 'Low stock' notifications. 'Low stock' notifications will be sent to subscribed customers when the product's quantity in stock becomes smaller or equal to the value defined by this field. Note that this value also has effect on the display of 'Low stock' notification sign up buttons/forms: for the products whose current quantity in stock is smaller than the value defined by this field, the notification sign up buttons/forms are not displayed. |
| − | + | ===='Price drop' notifications settings==== | |
| − | |||
| − | * <u>Enable 'Price drop' notifications</u>: | + | * <u>Enable 'Price drop' notifications</u>: Select the checkbox to enable the 'Price drop' type of notifications, this also adds 'Price drop' notification sign up buttons/forms on the store's product details pages. |
: [[Image:x-product_notifications_price_drop_pd.png|border]] | : [[Image:x-product_notifications_price_drop_pd.png|border]] | ||
| − | * <u>Show notification request forms in the product list</u>: | + | * <u>Show notification request forms in the product list</u>: Select the checkbox to add 'Price drop' notification sign up buttons/forms on the store's product list pages. |
: [[Image:x-product_notifications_price_drop_pl.png|border]] | : [[Image:x-product_notifications_price_drop_pl.png|border]] | ||
| + | |||
| + | == Adjusting the module's notification subscription termination behaviour (advanced) == | ||
| + | |||
| + | When a customer signs up for a certain notification, a notification subscription is set up for them. This means that from this moment and until such time as the subscription is terminated, a notification message will be sent to the customer every time the condition for sending the respective notification occurs. | ||
| + | |||
| + | The conditions for sending product notifications are as follows: | ||
| + | * 'Back in stock' notifications: Product quantity in stock becomes greater than 0 (zero). | ||
| + | * 'Low stock' notifications: Product quantity in stock becomes smaller or equal to the value of the <u>Minimal product available amount for low-stock notifications</u> field. | ||
| + | * 'Price drop' notifications: Product price decreases compared to the time when the 'Price drop' notification subscription was set up + (for further notifications) Product price decreases compared to the time when the previous 'Price drop' notification was sent. | ||
| + | |||
| + | By default, 'Back in stock' and 'Low stock' notifications are sent only once, after which the customer's subscription is automatically terminated by the system. As for the 'Price drop' notifications, by default they can be sent as many times as the price decreases; the customers remain subscribed to the notification until they choose to cancel their subscription using the unsubscribe link in one of the 'Price drop' notification email messages or are unsubscribed by the store's personnel with notification subscription management privileges. | ||
| + | |||
| + | If necessary, it is possible to change the default module behaviour regarding when and how subscriptions for product notifications should be terminated by adjusting some configuration settings in the file <u>modules/Product_Notifications/config.php</u>. The configuration settings that need to be adjusted use names like the following: | ||
| + | * prod_notif_auto_unsubscribe_''<notification type>'' | ||
| + | * prod_notif_send_unsub_link_''<notification type>'' | ||
| + | where the ''<notification type>'' part is one of the following notification type letter codes: | ||
| + | * B for 'Back in stock'; | ||
| + | * L for 'Low stock'; | ||
| + | * P for 'Price drop'. | ||
| + | |||
| + | prod_notif_auto_unsubscribe_''<notification type>'' can take the following values: | ||
| + | * Y = Automatically unsubscribe the customer after the notification has been sent. | ||
| + | * N = Keep the customer subscribed. | ||
| + | |||
| + | prod_notif_send_unsub_link_''<notification type>'' can take the following values: | ||
| + | * Y = Send an unsubscribe link in the notification message. | ||
| + | * N = Do not send an unsubscribe link in the notification message. | ||
| + | |||
| + | For example, for 'Back in stock' notifications the default subscription termination behaviour is coded as follows: | ||
| + | <pre>$config['Product_Notifications']['prod_notif_auto_unsubscribe_B'] = 'Y'; | ||
| + | $config['Product_Notifications']['prod_notif_send_unsub_link_B'] = 'N';</pre> | ||
| + | |||
| + | The default values for the notification unsubscribe configuration settings for the various types of product notifications are shown in the table below: | ||
| + | {| style="border-collapse: collapse; border-width: 1px; border-style: solid; border-color: #999" | ||
| + | ! style="border-style: solid; border-color: #999; border-width: 0 1px 1px 0" | Notification type | ||
| + | ! style="border-style: solid; border-color: #999; border-width: 0 1px 1px 0" | Auto unsubscribe | ||
| + | ! style="border-style: solid; border-color: #999; border-width: 0 0 1px 0" | Send unsubscribe link | ||
| + | |- | ||
| + | | style="border-style: solid; border-color: #999; border-width: 1px"| Back in stock | ||
| + | | style="border-style: solid; border-color: #999; border-width: 1px"| Y | ||
| + | | style="border-style: solid; border-color: #999; border-width: 1px"| N | ||
| + | |- | ||
| + | | style="border-style: solid; border-color: #999; border-width: 1px"| Low stock | ||
| + | | style="border-style: solid; border-color: #999; border-width: 1px"| Y | ||
| + | | style="border-style: solid; border-color: #999; border-width: 1px"| N | ||
| + | |- | ||
| + | | style="border-style: solid; border-color: #999; border-width: 1px"| Price drop | ||
| + | | style="border-style: solid; border-color: #999; border-width: 1px"| N | ||
| + | | style="border-style: solid; border-color: #999; border-width: 1px"| Y | ||
| + | |} | ||
| + | <br /> | ||
| + | |||
| + | [[Category:X-Cart modules]] | ||
Latest revision as of 15:24, 13 May 2019
Contents
Overview
X-ProductNotifications is a module that enables three types of product notifications for which your customers can sign up to stay tuned with your store's inventory updates:
- Price-drop notifications. These are used to alert subscribed customers whenever the price for the product they are interested in goes down.
- Low-stock notifications. These are sent to subscribed customers when the product is about to run out of stock, and there are just a few items left.
- Back in stock notifications. These are sent to subscribed customers when an out-of-stock item becomes available again.
The module works with product variations (like "T-shirt, Size M, Black") as well as with regular products.
The store administrator enables the module and controls its configuration. For example, he or she can define which types of inventory notifications should be enabled in the store, which type of pages (just product details, or both product details and product list pages) should have links (buttons) for notification sign up, etc.
Depending on the module settings, the product nofications links (buttons) in Customer area can be displayed in the product list section (main column):
or on product details pages:
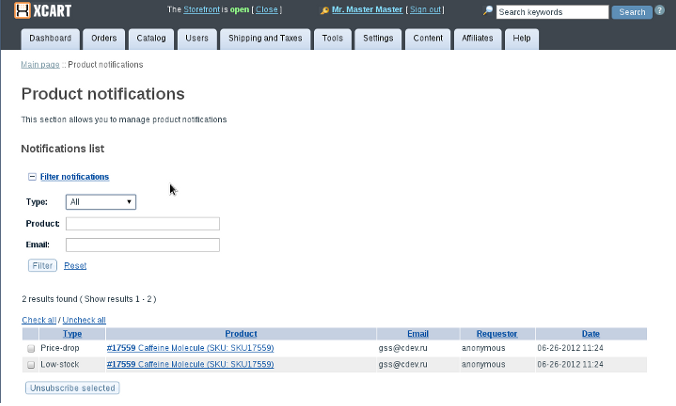
Existing notification subscriptions are managed by admin and (X-Cart PLATINUM or PRO) provider users in the Product Notifications section of the store's back end (Catalog menu -> Product notifications). Users with notification management privileges can view existing notification subscriptions as a list, filter notifications by type / product name / email address and, if necessary, bulk cancel existing notification subscriptions.
System requirements and installation
X-ProductNotifications is available as a built-in module in X-Cart GOLD PLUS and PLATINUM editions v4.5.3 and later. In the said editions, the module does not require installation and can be enabled in the Modules section of X-Cart Admin area.
For X-Cart GOLD or PRO 4.4.0 and later, the X-ProductNotifications module can be purchased and installed separately. The following instructions will guide you through the process of installing the X-ProductNotifications add-on module in your store.
System requirements
To be able to successfully install and use the X-ProductNotifications module, you need a working copy of X-Cart GOLD or PRO v4.4.0 or later installed on your server. Make sure that the version of the X-ProductNotifications module you are installing is the same as the version of X-Cart on which your store is based.
Installation and removal
To install X-ProductNotifications:
- Obtain the X-ProductNotifications distribution package by downloading it from the File area section of your X-Cart Account. The distribution package you need is contained in the archive file X-ProductNotifications-x.y.z-with-installer.tgz where x, y and z stand for X-Cart version (These need to match the version of X-Cart on which your store is based).
- Copy the distribution package to the X-Cart root directory on your server or hosting account.
- If you use a Windows-based server, or a UNIX-based server without terminal access:
- a) Decompress the archive with the X-ProductNotifications distribution package to a directory on your system using your favorite compression program (WinZIP or any other archiver with support for TAR files).
- b) Use an FTP client to upload all the files contained in the archive (retaining the directory structure) to the X-Cart root directory on your server or your hosting account.
- If you use a UNIX-based server with terminal access:
- a) Use an FTP client to upload the archive with the distribution package to the X-Cart root directory on your server or your hosting account.
- b) Decompress the package using the following command:
tar -xzvf X-ProductNotifications-x.y.z-with-installer.tgz
- Important: Make sure you keep the directory structure while unpacking and uploading the distribution package, otherwise some necessary files can be overwritten!
- In a web browser, run the installation script httр://<YOUR_XCART_DOMAIN>/install-product-notifications.php, replacing the <YOUR_XCART_DOMAIN> part with the actual domain name of your X-Cart based store.
- Enter the Auth code, accept the License Agreement and click the Next button.
- The installation script copies the files and activates the module. Click the Next button to continue the installation.
- The installation script generates a new system fingerprint. Click the Next button to complete the installation.
- Use the ADMINISTRATOR AREA link to access the Admin area.
To uninstall X-ProductNotifications:
- In a web browser, run the installation script httр://<YOUR_XCART_DOMAIN>/install-product-notifications.php, replacing the <YOUR_XCART_DOMAIN> part with the actual domain name of your X-Cart based store.
- Choose the Uninstall the module option, enter the Auth code, accept the License Agreement and click the Next button.
- Once the installation script has removed the X-ProductNotifications files and deactivated the module, click the Next button to complete the uninstallation.
- On the Uninstallation complete screen, click Next to leave the Wizard.Important: After you have uninstalled X-ProductNotifications, be sure to remove the X-ProductNotifications distribution package from your web directory as well.
Enabling the X-ProductNotifications module
After the X-ProductNotifications installation has been completed, the module you have installed needs to be enabled in your store:
- In Admin area, go to the Modules section (Settings menu->Modules).
- Choose the Product Notifications module by selecting the respective check box on the left.
- Click the Apply changes button. This activates the module.
Configuring the X-ProductNotifications module
After the X-ProductNotifications module has been enabled in your store, you should check and adjust its configuration:
- In the Modules section (Settings menu->Modules), click the Configure link opposite the module name ('Product Notifications').
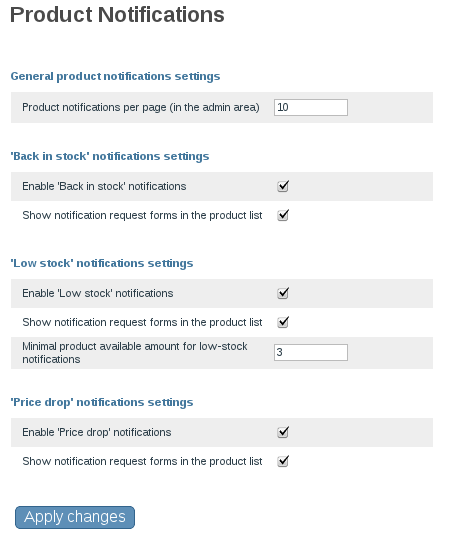
The module configuration page (titled by the name of the module) opens: - Adjust the settings on the module configuration page as needed. Detailed information regarding the Product Notifications module configuration settings is available below.
- Click the Apply changes button to save the changes.
Product Notifications module configuration settings
Here are a few notes on the X-ProductNotifications module configuration settings:
General product notifications settings
- Product notifications per page (in the admin area): Specify the number of notification subscription records that should be visible per page in the Product Notifications section in the Admin/Provider area(s) (Catalog menu -> Product notifications).
'Back in stock' notifications settings
- Enable 'Back in stock' notifications: Select the checkbox to enable the 'Back in stock' type of notifications; this also adds 'Back in stock' notification sign up buttons/forms on the store's product details pages.
'Back in stock' notifications regarding a specific product will be sent to subscribed customers when the product's quantity in stock (defined by the value of the Quantity in stock (items) field in the product details) is greater than 0 (zero) and exceeds the product's minimum order quantity (as defined by the value of the Minimum order quantity field in the product details).
- Show notification request forms in the product list: Select the checkbox to add 'Back in stock' notification sign up buttons/forms on the store's product list pages.
'Low stock' notifications settings
- Enable 'Low stock' notifications: Select the checkbox to enable the 'Low stock' type of notifications; this also adds 'Low stock' notification sign up buttons/forms on the store's product details pages.
- Show notification request forms in the product list: Select the checkbox to add 'Low Stock' notification sign up buttons/forms on the store's product list pages.
- Minimal product available amount for low-stock notifications: Specify the low-stock limit for customer 'Low stock' notifications. 'Low stock' notifications will be sent to subscribed customers when the product's quantity in stock becomes smaller or equal to the value defined by this field. Note that this value also has effect on the display of 'Low stock' notification sign up buttons/forms: for the products whose current quantity in stock is smaller than the value defined by this field, the notification sign up buttons/forms are not displayed.
'Price drop' notifications settings
- Enable 'Price drop' notifications: Select the checkbox to enable the 'Price drop' type of notifications, this also adds 'Price drop' notification sign up buttons/forms on the store's product details pages.
- Show notification request forms in the product list: Select the checkbox to add 'Price drop' notification sign up buttons/forms on the store's product list pages.
Adjusting the module's notification subscription termination behaviour (advanced)
When a customer signs up for a certain notification, a notification subscription is set up for them. This means that from this moment and until such time as the subscription is terminated, a notification message will be sent to the customer every time the condition for sending the respective notification occurs.
The conditions for sending product notifications are as follows:
- 'Back in stock' notifications: Product quantity in stock becomes greater than 0 (zero).
- 'Low stock' notifications: Product quantity in stock becomes smaller or equal to the value of the Minimal product available amount for low-stock notifications field.
- 'Price drop' notifications: Product price decreases compared to the time when the 'Price drop' notification subscription was set up + (for further notifications) Product price decreases compared to the time when the previous 'Price drop' notification was sent.
By default, 'Back in stock' and 'Low stock' notifications are sent only once, after which the customer's subscription is automatically terminated by the system. As for the 'Price drop' notifications, by default they can be sent as many times as the price decreases; the customers remain subscribed to the notification until they choose to cancel their subscription using the unsubscribe link in one of the 'Price drop' notification email messages or are unsubscribed by the store's personnel with notification subscription management privileges.
If necessary, it is possible to change the default module behaviour regarding when and how subscriptions for product notifications should be terminated by adjusting some configuration settings in the file modules/Product_Notifications/config.php. The configuration settings that need to be adjusted use names like the following:
- prod_notif_auto_unsubscribe_<notification type>
- prod_notif_send_unsub_link_<notification type>
where the <notification type> part is one of the following notification type letter codes:
- B for 'Back in stock';
- L for 'Low stock';
- P for 'Price drop'.
prod_notif_auto_unsubscribe_<notification type> can take the following values:
- Y = Automatically unsubscribe the customer after the notification has been sent.
- N = Keep the customer subscribed.
prod_notif_send_unsub_link_<notification type> can take the following values:
- Y = Send an unsubscribe link in the notification message.
- N = Do not send an unsubscribe link in the notification message.
For example, for 'Back in stock' notifications the default subscription termination behaviour is coded as follows:
$config['Product_Notifications']['prod_notif_auto_unsubscribe_B'] = 'Y';
$config['Product_Notifications']['prod_notif_send_unsub_link_B'] = 'N';
The default values for the notification unsubscribe configuration settings for the various types of product notifications are shown in the table below:
| Notification type | Auto unsubscribe | Send unsubscribe link |
|---|---|---|
| Back in stock | Y | N |
| Low stock | Y | N |
| Price drop | N | Y |
