Difference between revisions of "X-Cart:CloudSearch"
m (→Key benefits of using CloudSearch in X-Cart:) |
|||
| (29 intermediate revisions by one other user not shown) | |||
| Line 1: | Line 1: | ||
{{XC_4.1}} | {{XC_4.1}} | ||
| − | ''The following article describes the features of X-Cart's CloudSearch module as provided by version 1. | + | ''The following article describes the features of X-Cart's CloudSearch module as provided by version 1.3.5. It may be used as a user guide for CloudSearch module versions earlier and later than 1.3.5, but please be aware that not all the described features may be available in your specific version. You can find out the version of the CloudSearch module installed at your store in the file VERSION.CLOUD_SEARCH in your X-Cart installation directory.'' |
| + | |||
==Overview== | ==Overview== | ||
| − | CloudSearch is a SaaS solution that integrates with X-Cart to enable dynamic, real-time product search in an X-Cart based store. | + | CloudSearch is a SaaS solution that integrates with X-Cart to enable dynamic, real-time product search in an X-Cart based store. CloudSearch is very fast: typing a search query produces search results immediately, without loading a new page. Searching with CloudSearch is an incremental process: the search begins as soon as the user types in the second character of the search string and goes on progressively as long as the user continues typing; a list of suggestions and search hits is generated after each key press allowing the user to adjust his or her search strategy in real time. |
| − | As its name suggests, CloudSearch runs on our company's cloud infrastructure. On | + | As its name suggests, CloudSearch runs on our company's cloud infrastructure. On the store's website, there is just a small widget needed to make CloudSearch work for customers. |
| − | |||
| − | |||
Since X-Cart version 4.5.3, the CloudSearch widget is included into X-Cart code. | Since X-Cart version 4.5.3, the CloudSearch widget is included into X-Cart code. | ||
| + | On X-Cart versions 4.1.0-4.5.2, CloudSearch can be enabled by [[#Installation and removal of the CloudSearch integration module on X-Cart versions 4.1.0-4.5.2|installing]] the CloudSearch integration module. The module is distributed free of charge to existing X-Cart store owners. | ||
| − | + | CloudSearch service is provided on subscription basis. | |
| + | <br /><br /> | ||
| + | '''Key benefits of using CloudSearch in X-Cart:''' | ||
* '''Search as you type (Incremental search)'''<br />Search results start to be displayed instantly and are refined as the user continues typing. | * '''Search as you type (Incremental search)'''<br />Search results start to be displayed instantly and are refined as the user continues typing. | ||
| Line 20: | Line 22: | ||
* '''If it is on your site, it will be found'''<br />Search through categories, manufacturers and static pages + product attributes such as product name, description, SKU, product options, extra fields, category and manufacturer. | * '''If it is on your site, it will be found'''<br />Search through categories, manufacturers and static pages + product attributes such as product name, description, SKU, product options, extra fields, category and manufacturer. | ||
| − | * '''Amazingly fast and relevant search results'''<br />Based on | + | * '''Amazingly fast and relevant search results'''<br />Based on the industry leading enterprise search technologies, CloudSearch recognizes word forms and provides other advanced full-text search capabilities. The CloudSearch widget in your store interacts directly with our cloud without increasing load on your server. |
* '''Proven to increase your conversion rate''' | * '''Proven to increase your conversion rate''' | ||
| Line 31: | Line 33: | ||
* Search statistics/analytics: Find out what your store visitors searched for, what searh terms were the most popular and what popular queries returned no results. | * Search statistics/analytics: Find out what your store visitors searched for, what searh terms were the most popular and what popular queries returned no results. | ||
* Multi language support: CloudSearch works with non-English languages, too. We have clients successfully running CloudSearch with French, Greek, Slovenian and other languages. | * Multi language support: CloudSearch works with non-English languages, too. We have clients successfully running CloudSearch with French, Greek, Slovenian and other languages. | ||
| + | * Extended query language. Support for: 1) boolean operators (AND/OR/NOT); 2) word grouping ("computer AND (mouse OR keyboard)"); 3) phrase queries (put your query in double quotes to search for an exact phrase; for example, "high tech" will find pages with the words "high" and "tech" going immediately one after another in the specified order); 4) wildcards (queries like "*ing" or "mo?use", where the asterisk ("*") matches zero or more characters, and the question mark ("?") matches exactly one character). | ||
* SaaS architecture: High performance and feature updates are available automatically without the need to upgrade your client software. | * SaaS architecture: High performance and feature updates are available automatically without the need to upgrade your client software. | ||
* Sleek Ajax GUI widget. | * Sleek Ajax GUI widget. | ||
| Line 37: | Line 40: | ||
* 30 day free trial period. | * 30 day free trial period. | ||
* Subscription-based plans. | * Subscription-based plans. | ||
| + | * (''Available to users on paid plans'') Ability to promote specific products to shoppers based on their | ||
| + | search queries and finetune their search experience through the use of synonyms. | ||
| + | <br /><br /> | ||
| − | == | + | ==Installation and removal of the CloudSearch integration module on X-Cart versions 4.1.0-4.5.2== |
| − | |||
| − | |||
| − | |||
| − | + | To be able to successfully install and use the CloudSearch integration module, you need to have a working copy of X-Cart 4.1.0-4.5.2 installed on your server. | |
| − | |||
| − | |||
| − | |||
| − | |||
| − | |||
| − | |||
| − | |||
| − | |||
| − | |||
| − | |||
| − | |||
| − | To be able to successfully install and use the CloudSearch integration module, you | ||
{{Note1|Note: If you do not remember the version of X-Cart on which your store is based, you can look it up in the <u>Environment info</u> section of the [[X-Cart:Summary_Page |Summary]] page in X-Cart Admin area.}} | {{Note1|Note: If you do not remember the version of X-Cart on which your store is based, you can look it up in the <u>Environment info</u> section of the [[X-Cart:Summary_Page |Summary]] page in X-Cart Admin area.}} | ||
| − | + | '''Important:''' Your site needs to be available from the Internet to be indexed by our server. | |
The instructions below provide guidance for installing the CloudSearch integration module. The same instructions are valid for installing CloudSearch module updates by existing CloudSearch users. | The instructions below provide guidance for installing the CloudSearch integration module. The same instructions are valid for installing CloudSearch module updates by existing CloudSearch users. | ||
'''To install the CloudSearch integration module/module update:''' | '''To install the CloudSearch integration module/module update:''' | ||
| − | # Obtain a distribution package for the module by downloading it from the File Area section of your {{QA}}, or use this direct link: | + | # Obtain a distribution package for the module by downloading it from the File Area section of your {{QA}}, or use this direct link: https://cloudsearch.x-cart.com/static/cloudsearch-xcart.tgz.<br />You will find the following packages:<br />cloudsearch-xcart-4.1.x-4.3.x.zip (tgz)<br />cloudsearch-xcart-4.4.x-4.6.x.zip (tgz)<br />Please choose the package depending on the version of your installed copy of X-Cart. |
# Copy the distribution package to the X-Cart root directory on your server or hosting account. | # Copy the distribution package to the X-Cart root directory on your server or hosting account. | ||
#* If you use a Windows-based server or a UNIX-based server without terminal access: | #* If you use a Windows-based server or a UNIX-based server without terminal access: | ||
| Line 86: | Line 77: | ||
# On the ''Uninstallation complete'' screen, click '''Next''' to leave the Wizard.<br />{{Note1|Important: After you have uninstalled the CloudSearch integration module, be sure to remove the CloudSearch integration module distribution package from your web directory as well.}} | # On the ''Uninstallation complete'' screen, click '''Next''' to leave the Wizard.<br />{{Note1|Important: After you have uninstalled the CloudSearch integration module, be sure to remove the CloudSearch integration module distribution package from your web directory as well.}} | ||
| − | ==Enabling the CloudSearch | + | <br /><br /> |
| + | ==Enabling CloudSearch in X-Cart== | ||
| + | |||
| + | '''To enable the CloudSearch module:''' | ||
| + | |||
| + | # In the X-Cart Admin area, go to the <u>Modules</u> section (Settings menu -> Modules). | ||
| + | # Locate the entry for 'CloudSearch' module.<br /> | ||
| + | # ''X-Cart versions 4.6 and later:'' Select the '''Enable''' check box to the left of the module name.<br />''X-Cart versions prior to 4.6:'' Select the check box to the left of the module name and click the '''Apply changes''' button.<br />The module will be activated.<br /><br /> | ||
| + | |||
| + | '''Important:''' To enable communication with CloudSearch service, please ensure that your store site is accessible from the Internet. CloudSearch does not work for test stores running on localhost. | ||
| + | <br /><br /> | ||
| + | If you look at the list of your store’s modules after installing CloudSearch, you will see that the entry for the CloudSearch module on this list has a <u>Configure</u> link next to it. This is the link for access to the module’s dashboard where you can view your store's account information for CloudSearch service and (on paid plans) the sections '''Promotions''' and '''Synonyms'''. | ||
| + | :[[File:cloudsearch_configure.png|border]] | ||
| + | |||
| + | <br /><br /> | ||
| + | ==How it works== | ||
| + | |||
| + | For each store connected to CloudSearch service we maintain an index of searchable data. The data is pulled from the store using the API provided by the CloudSearch connector module installed in the store. On our servers, the data is indexed (specially prepared for more efficient storage and searching), after which it can be yielded as search results in response to requests coming from the search widget. That is to say, a piece of data can be found by CloudSearch only if it is contained in the index. X-Cart's products, pages, categories and manufacturers (collectively, these are referred to as "items") are pulled from your store via the above mentioned API three times a day (every eight hours). This accounts for the 8 hours' delay between the time you update information on your site and the moment that this information becomes searchable via CloudSearch. | ||
| + | |||
| + | When a visitor of your store types text in the search field, the CloudSeach widget almost instantly displays a list of search results below the search field. This includes a list of suggestions (popular search queries beginning with the characters the user has typed) as well as products, categories, manufacturers and static pages that have been found to match the search query. | ||
| + | |||
| + | : [[File:CS-Screen0.png |border]] | ||
| + | |||
| + | The search results are sorted by relevance, with the most relevant results appearing at the top of the list. | ||
| + | |||
| + | By hovering the mouse over any item in the search results list, the user can obtain more information about the item: a fly-out panel displays a thumbnail image and a text excerpt containing the search hits. For example, for a product you will see the product's thumbnail image, name, price and a portion of the product description. | ||
| + | |||
| + | : [[File:CS-Screen1.png |border]] | ||
| + | <br /> | ||
| + | The thumbnail images used for static pages are generated from the page screenshots: | ||
| + | |||
| + | : [[File:CS-Screen_pages.png |border]] | ||
| − | + | Search hits are highlighted so the user can quickly see all occurences of the string he or she has typed. | |
| − | ''' | + | The widget can display up to 3 suggestions and up to 10 product names at a time. If the search returns more results than the widget can display, the link ''See more results for "<search_string>"'' is provided at the bottom of the widget. This link can be used to access the '<u>Search results</u>' page with all the search results for the search query. Please note that at present the results displayed by the '<u>Search results</u>' page are delivered by standard X-Cart search, not CloudSearch; due to the use of a different search algorithm, these results may differ from the ones displayed by the widget. |
| − | # In the | + | CloudSearch offers great search accuracy and flexibility: it can find not only words, but partial words, word forms, upper or lowercase, etc. |
| − | # | + | : [[File:CS-Screen3PartialWordMatch.png |border]] |
| − | # | + | <br /> |
| + | If a user makes a spelling mistake while typing a search query, CloudSearch will try to offer corrections so the user can still find what he or she is looking for. | ||
| + | : [[File:CS-SpellingCorrection.png |border]] | ||
| + | <br /> | ||
| + | |||
| + | The module provides a dashboard where the store administrator can view the store's account information for CloudSearch service: | ||
| + | : [[File:CS-Dashboard1.png |border]] | ||
| + | <br /> | ||
| + | The dashboard is available via the Configure link for CloudSearch module on the Modules page. | ||
| + | |||
| + | The central area of the page provides CloudSearch statistics for the store, including the most popular searches that returned search results and the most popular searches that returned nothing. Statistical data is available for three periods: 24 hours, 7 days and 30 days. | ||
| + | |||
| + | The panel titled '''Store API is available''' shows the current number of items (products, categories, manufacturers and pages) in the store. The panel '''Your store's index''' shows the number of items that are currently contained in the CloudSearch index for your store on our servers. | ||
| + | <br /><br /> | ||
| + | |||
| + | ==Promotions== | ||
| + | ===Promotions: what it is=== | ||
| + | Promotions is a feature available to users on paid accounts. It allows the store administrator to promote | ||
| + | specific products by prioritizing them among the search results for certain queries. To create a promotion, | ||
| + | the administrator selects a product and links it to a query. As a result, the product appears on the first line | ||
| + | of search results in the Products section of the CloudSearch widget. | ||
| + | |||
| + | ===Creating promotions=== | ||
| + | For example, you sell books and want to create a promotion for the book "Anna Karenina" by Leo Tolstoy so that a link to this book will be displayed at the top of the list of search results when someone uses CloudSearch to search for "book" or "tolstoy".<br /> | ||
| + | |||
| + | Let’s create the respective promotion: | ||
| + | # In the store’s Admin area, go to the Promotions page for CloudSearch module by clicking the '''Promotions''' tab:<br />[[File:promotions_tab.png|border]]<br /><br /> | ||
| + | # On the Promotions page, click '''Add promotion''':<br />[[File:promotion_add_button.png|border]]<br /><br />A popup window titled “Add promotion” will be displayed:<br />[[File:promotion_add.png|border]]<br /><br /> | ||
| + | # In the “Add promotion” popup window, select the product that you want to be promoted:<br />Click inside the “Select a product” field:<br />[[File:promotion_product_select.png|border]]<br /><br />and start typing the product’s name or SKU. The module will provide search results as you type. As soon as you see the item you require, click on its name:<br />[[File:promotion_product_select_anna.png|border]]<br /><br />The product will be selected:<br />[[File:promotion_product_select_anna_karenina.png|border]]<br /><br /> | ||
| + | # Specify one or more search queries for which you want the search results to include the selected product on the topmost line of the Products section of the CloudSearch widget:<br />Click inside the input field containing the words "One or more target search queries (use comma to separate them)"<br />[[File:promotion_queries.png|border]]<br /><br />and start typing the word or phrase you require (in our case, "book"):<br />[[File:promotion_queries_book.png|border]]<br /><br />When you’re done typing, type “,” (comma) or press Enter. The query will be added:<br />[[File:promotion_queries_book1.png|border]]<br /><br />If necessary, add more queries using the same method:<br />[[File:promotion_queries_book_tolstoy.png|border]]<br /><br />The result will be something like the following:<br />[[File:promotion_queries_book_tolstoy1.png|border]]<br /><br /> | ||
| + | # Click the '''Create promotion''' button at the bottom of the popup window:<br />[[File:promotion_create.png|border]]<br /><br />The promotion will be created. You should be able to see it in the Promotions list:<br />[[File:promotion_created.png|border]]<br /><br /> | ||
| + | Now if you visit the store’s front end and do a search for "book" or "tolstoy", you should be able to see a link to the book "Anna Karenina" on the first line of search results under "Products":<br /> | ||
| + | :[[File:karenina_customer.png|border]]<br /><br /> | ||
| + | |||
| + | ===Setting the order of promotions in search results=== | ||
| + | If you choose to configure multiple promotions for the same search query, you will be able to adjust the order in which the promotions should be displayed in the search results inside the CloudSearch widget in your store’s front end. | ||
| + | To adjust the order: | ||
| + | # Open the Promotions list in your store’s Admin area and use the up and down arrows to move each promotion to the position you require:<br />[[File:promotion_sort_arrows.png|border]]<br /><br /> | ||
| + | # Once you're done sorting your promotions list, click the '''Save promotion order''' button:<br />[[File:promotion_save_order.png|border]]<br /><br /> | ||
| + | The order will be saved. | ||
| + | |||
| + | ===Deleting promotions=== | ||
| + | Any promotion you no longer want to use can be deteled. | ||
| + | To delete a promotion: | ||
| + | # Click on the [x] icon for the respective entry in the Promotions list:<br />[[File:promotion_delete.png|border]]<br /><br />You will be asked to confirm the selected action:<br />[[File:promotion_delete_confirm.png|border]]<br /><br /> | ||
| + | # Select '''Delete'''. The promotion will be removed from the Promotions list and will no longer appear at the top of the list of product search results in the CloudSearch widget. | ||
| + | <br /><br /> | ||
| + | ==Synonyms== | ||
| + | ===Synonyms: what it is=== | ||
| + | Synonyms is another feature available to users on paid accounts. It can be used to finetune your customers' search experience by specifying queries that should be treated equally. For example if you want "TV", "Television", "TV set" and "Television set" to all be equivalent, just place these queries in a single synonym group. | ||
| + | While the most common use for this feature is lexical synonyms such as "sneakers" and "sport shoes", more advanced and creative scenarios are indeed possible and can be beneficial for the overall site search performance. One can use synonyms to redirect queries returning few or no results at all (Tip: use the Statistics feature to discover them) to some good results. In that sense synonyms can be thought of as a more generalized form of the Promotions feature. Another context where synonyms can be useful for enhancing site search is multilingual product (or brand) names. You can make queries with localized brand names to return correct results by just putting "correct" and "incorrect" queries in a single synonym group. | ||
| + | Also, synonyms can be used to fix incorrect but nevertheless common misspellings of product titles, brands or other names in complicated situations where automatic spelling corrections are unable to help. | ||
| + | <br /><br /> | ||
| + | ===Adding synonyms=== | ||
| + | Synonyms can be added and managed via the Synonyms section: | ||
| + | :[[File:synonyms_tab.png|border]]<br /><br /> | ||
| + | To add synonyms: | ||
| + | # Click the '''Add synonyms''' button:<br />[[File:synonyms_add_button.png|border]]<br /><br />A popup window titled “Add synonym” will be displayed:<br />[[File:synonym_add_popup.png|border]] | ||
| + | # In the popup window, click inside the input field and start typing the word or phrase you require:<br />[[File:synonym_add1.png|border]]<br /><br />Once you’re done typing your first query, type ‘,” (comma) or press Enter. The query will be added:[[File:synonym_add2.png|border]]<br /><br />Continue to add all the queries that you want to be treated as equal to the first one (at least one needs to be added):<br />[[File:synonym_add3.png|border]]<br /><br /> | ||
| + | # Click '''Add synonym group''':<br />[[File:synonym_add4.png|border]]<br /><br />The synonym group will be created:<br />[[File:synonym_group_created.png|border]]<br /><br /> | ||
| + | Now if you try searching with these queries in the store’s front end, the search results will be the same for all the queries from the group. | ||
| + | |||
| + | ===Editing synonym groups=== | ||
| + | It is possible to edit an existing synonym group by adding synonyms to it or removing synonyms from it. | ||
| + | |||
| + | To remove a synonym from a group: | ||
| + | # Click the [x] sign next to the synonym you want to remove:<br />[[File:synonym_group_edit1.png|border]]<br /><br />The synonym will disappear from the list. A button titled '''Save synonym''' will be displayed. | ||
| + | # Click on this button to save the changes:<br />[[File:synonym_group_edit2.png|border]]<br /><br />Once this happens, the synonym group will be updated.<br /><br /> | ||
| + | |||
| + | To add synonyms to an existing group: | ||
| + | # Click inside the input field and type in the queries you want to add (be sure to type “,” or press Enter after each query). | ||
| + | # Save the changes using the '''Save synonym''' button.<br /><br />The synonym group will be updated.<br /><br /> | ||
| − | The | + | ===Deleting synonym groups=== |
| + | It is possible to delete a synonym group. To do so: | ||
| + | # Click the [x] icon for the group:<br />[[File:synonym_group_delete1.png|border]]<br /><br />You will be asked to confirm the selected action:<br />[[File:synonym_group_delete2.png|border]]<br /><br /> | ||
| + | # Click '''Delete'''. The group will be removed. | ||
[[Category:X-Cart modules]] | [[Category:X-Cart modules]] | ||
[[Category:X-Cart user manual]] | [[Category:X-Cart user manual]] | ||
[[Category:X-Cart modules]] | [[Category:X-Cart modules]] | ||
Latest revision as of 13:55, 22 July 2020
The following article describes the features of X-Cart's CloudSearch module as provided by version 1.3.5. It may be used as a user guide for CloudSearch module versions earlier and later than 1.3.5, but please be aware that not all the described features may be available in your specific version. You can find out the version of the CloudSearch module installed at your store in the file VERSION.CLOUD_SEARCH in your X-Cart installation directory.
Contents
Overview
CloudSearch is a SaaS solution that integrates with X-Cart to enable dynamic, real-time product search in an X-Cart based store. CloudSearch is very fast: typing a search query produces search results immediately, without loading a new page. Searching with CloudSearch is an incremental process: the search begins as soon as the user types in the second character of the search string and goes on progressively as long as the user continues typing; a list of suggestions and search hits is generated after each key press allowing the user to adjust his or her search strategy in real time.
As its name suggests, CloudSearch runs on our company's cloud infrastructure. On the store's website, there is just a small widget needed to make CloudSearch work for customers.
Since X-Cart version 4.5.3, the CloudSearch widget is included into X-Cart code.
On X-Cart versions 4.1.0-4.5.2, CloudSearch can be enabled by installing the CloudSearch integration module. The module is distributed free of charge to existing X-Cart store owners.
CloudSearch service is provided on subscription basis.
Key benefits of using CloudSearch in X-Cart:
- Search as you type (Incremental search)
Search results start to be displayed instantly and are refined as the user continues typing.
- If it is on your site, it will be found
Search through categories, manufacturers and static pages + product attributes such as product name, description, SKU, product options, extra fields, category and manufacturer.
- Amazingly fast and relevant search results
Based on the industry leading enterprise search technologies, CloudSearch recognizes word forms and provides other advanced full-text search capabilities. The CloudSearch widget in your store interacts directly with our cloud without increasing load on your server.
- Proven to increase your conversion rate
And more:
- Search hit highlighting: Search results show the exact portions of text where the word or phrase matching the search query occurs, with the words matching the query emphasized by background highlighting.
- Real-time suggestions: The user can stop short of typing the entire word or phrase at any moment and just choose one of the suggested options.
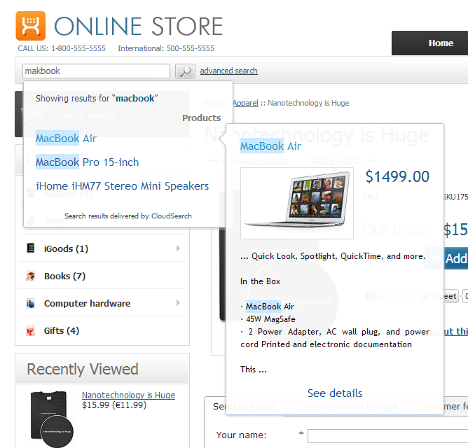
- Automatic spelling corrections: Even if a word has been misspelled, the customer can still find the product by using a closely related option from the presented list.
- Search statistics/analytics: Find out what your store visitors searched for, what searh terms were the most popular and what popular queries returned no results.
- Multi language support: CloudSearch works with non-English languages, too. We have clients successfully running CloudSearch with French, Greek, Slovenian and other languages.
- Extended query language. Support for: 1) boolean operators (AND/OR/NOT); 2) word grouping ("computer AND (mouse OR keyboard)"); 3) phrase queries (put your query in double quotes to search for an exact phrase; for example, "high tech" will find pages with the words "high" and "tech" going immediately one after another in the specified order); 4) wildcards (queries like "*ing" or "mo?use", where the asterisk ("*") matches zero or more characters, and the question mark ("?") matches exactly one character).
- SaaS architecture: High performance and feature updates are available automatically without the need to upgrade your client software.
- Sleek Ajax GUI widget.
- CSS-based layout that can be tweaked to fit any design.
- Compatible with major browsers: Internet Explorer 7 or later, Chrome, Safari (including iOS), Firefox.
- 30 day free trial period.
- Subscription-based plans.
- (Available to users on paid plans) Ability to promote specific products to shoppers based on their
search queries and finetune their search experience through the use of synonyms.
Installation and removal of the CloudSearch integration module on X-Cart versions 4.1.0-4.5.2
To be able to successfully install and use the CloudSearch integration module, you need to have a working copy of X-Cart 4.1.0-4.5.2 installed on your server.
Important: Your site needs to be available from the Internet to be indexed by our server. The instructions below provide guidance for installing the CloudSearch integration module. The same instructions are valid for installing CloudSearch module updates by existing CloudSearch users.
To install the CloudSearch integration module/module update:
- Obtain a distribution package for the module by downloading it from the File Area section of your X-Cart Account, or use this direct link: https://cloudsearch.x-cart.com/static/cloudsearch-xcart.tgz.
You will find the following packages:
cloudsearch-xcart-4.1.x-4.3.x.zip (tgz)
cloudsearch-xcart-4.4.x-4.6.x.zip (tgz)
Please choose the package depending on the version of your installed copy of X-Cart. - Copy the distribution package to the X-Cart root directory on your server or hosting account.
- If you use a Windows-based server or a UNIX-based server without terminal access:
- a) Extract the contents of the archive with the CloudSearch integration module files to a directory on your system using your favorite compression program (WinZIP or any other archiver that supports TAR files).
- b) Use an FTP client to upload all the files extracted from the archive (retaining the directory structure) to the X-Cart root directory on your server or hosting account.
- If you use a UNIX-based server with terminal access:
- a) Use an FTP client to upload the archive with the CloudSearch integration module distribution package to the X-Cart root directory on your server or hosting account.
- b) Decompress the package by typing a command like the following at the command prompt:
tar -xzvf cloudsearch-xcart-4.4.x-4.6.x.tgz
- Important: Make sure that you maintain the directory structure while unpacking and uploading the distribution package; otherwise, some critical files can be overwritten!
- In a web browser, run the installation script at httр://www.example.com/install-cloudsearch.php, replacing www.example.com with the actual domain name of your X-Cart based store.
- Enter the Auth code, accept the License Agreement and click the Next button.
- The installation script copies the files and activates the module. Click the Next button to continue.
- The installation script generates a new system fingerprint. Click the Next button to complete the installation.
- Use the CUSTOMER AREA link to go to the Customer area and try CloudSearch.
To uninstall the CloudSearch integration module:
- In a web browser, run the installation script at httр://www.example.com/install-cloudsearch.php, replacing www.example.com with the actual domain name of your X-Cart based store.
- Choose the Uninstall the module option, enter the Auth code, accept the License Agreement and click the Next button.
- Once the installation script has removed the CloudSearch integration module files and deactivated the module, click the Next button to complete the uninstallation.
- On the Uninstallation complete screen, click Next to leave the Wizard.Important: After you have uninstalled the CloudSearch integration module, be sure to remove the CloudSearch integration module distribution package from your web directory as well.
Enabling CloudSearch in X-Cart
To enable the CloudSearch module:
- In the X-Cart Admin area, go to the Modules section (Settings menu -> Modules).
- Locate the entry for 'CloudSearch' module.
- X-Cart versions 4.6 and later: Select the Enable check box to the left of the module name.
X-Cart versions prior to 4.6: Select the check box to the left of the module name and click the Apply changes button.
The module will be activated.
Important: To enable communication with CloudSearch service, please ensure that your store site is accessible from the Internet. CloudSearch does not work for test stores running on localhost.
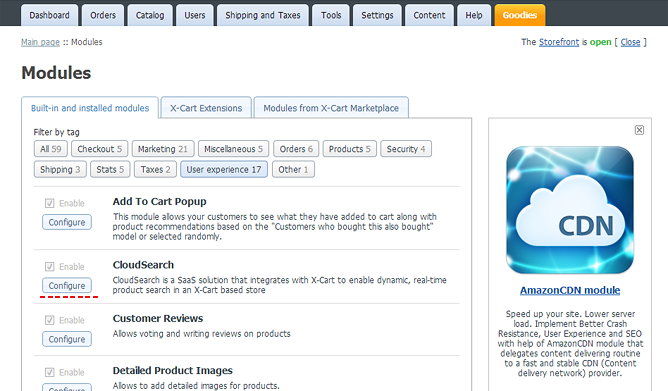
If you look at the list of your store’s modules after installing CloudSearch, you will see that the entry for the CloudSearch module on this list has a Configure link next to it. This is the link for access to the module’s dashboard where you can view your store's account information for CloudSearch service and (on paid plans) the sections Promotions and Synonyms.
How it works
For each store connected to CloudSearch service we maintain an index of searchable data. The data is pulled from the store using the API provided by the CloudSearch connector module installed in the store. On our servers, the data is indexed (specially prepared for more efficient storage and searching), after which it can be yielded as search results in response to requests coming from the search widget. That is to say, a piece of data can be found by CloudSearch only if it is contained in the index. X-Cart's products, pages, categories and manufacturers (collectively, these are referred to as "items") are pulled from your store via the above mentioned API three times a day (every eight hours). This accounts for the 8 hours' delay between the time you update information on your site and the moment that this information becomes searchable via CloudSearch.
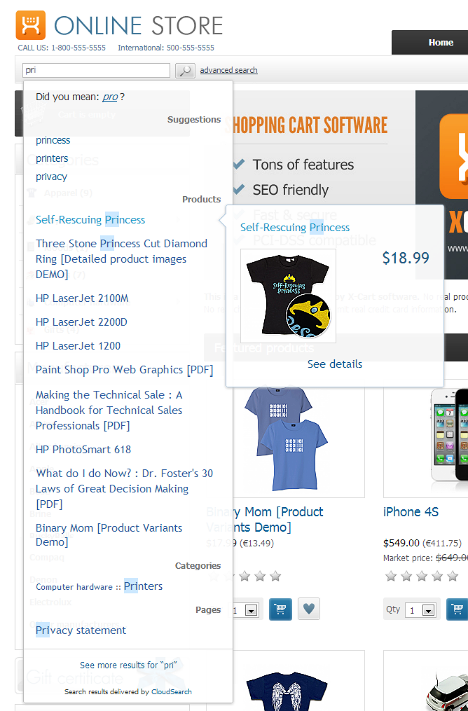
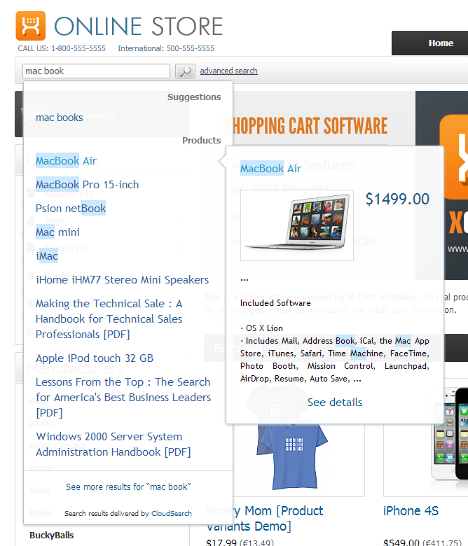
When a visitor of your store types text in the search field, the CloudSeach widget almost instantly displays a list of search results below the search field. This includes a list of suggestions (popular search queries beginning with the characters the user has typed) as well as products, categories, manufacturers and static pages that have been found to match the search query.
The search results are sorted by relevance, with the most relevant results appearing at the top of the list.
By hovering the mouse over any item in the search results list, the user can obtain more information about the item: a fly-out panel displays a thumbnail image and a text excerpt containing the search hits. For example, for a product you will see the product's thumbnail image, name, price and a portion of the product description.
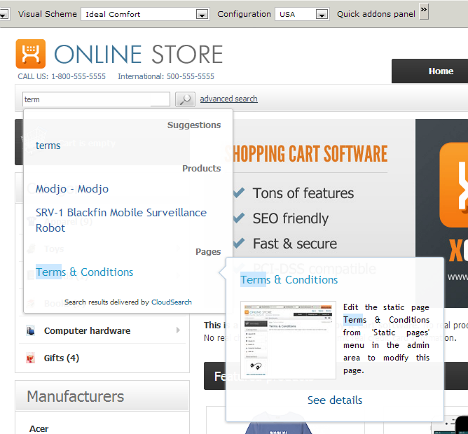
The thumbnail images used for static pages are generated from the page screenshots:
Search hits are highlighted so the user can quickly see all occurences of the string he or she has typed.
The widget can display up to 3 suggestions and up to 10 product names at a time. If the search returns more results than the widget can display, the link See more results for "<search_string>" is provided at the bottom of the widget. This link can be used to access the 'Search results' page with all the search results for the search query. Please note that at present the results displayed by the 'Search results' page are delivered by standard X-Cart search, not CloudSearch; due to the use of a different search algorithm, these results may differ from the ones displayed by the widget.
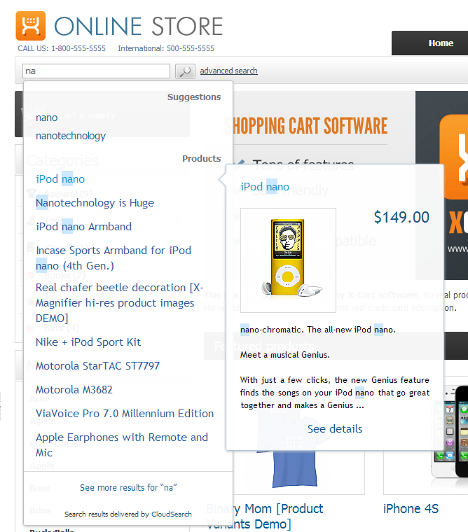
CloudSearch offers great search accuracy and flexibility: it can find not only words, but partial words, word forms, upper or lowercase, etc.
If a user makes a spelling mistake while typing a search query, CloudSearch will try to offer corrections so the user can still find what he or she is looking for.
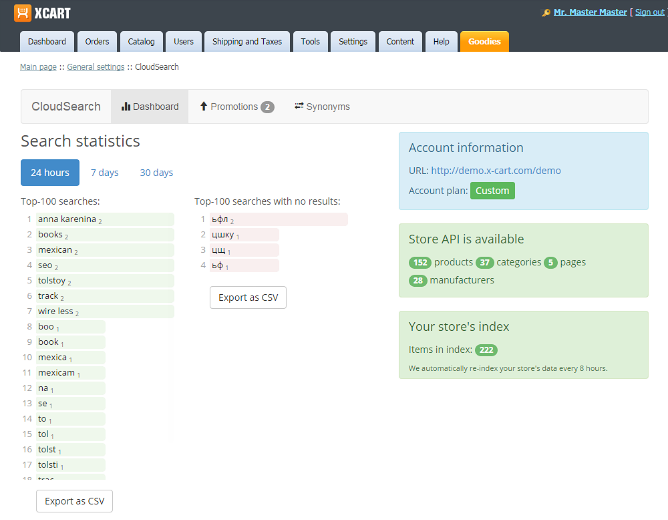
The module provides a dashboard where the store administrator can view the store's account information for CloudSearch service:
The dashboard is available via the Configure link for CloudSearch module on the Modules page.
The central area of the page provides CloudSearch statistics for the store, including the most popular searches that returned search results and the most popular searches that returned nothing. Statistical data is available for three periods: 24 hours, 7 days and 30 days.
The panel titled Store API is available shows the current number of items (products, categories, manufacturers and pages) in the store. The panel Your store's index shows the number of items that are currently contained in the CloudSearch index for your store on our servers.
Promotions
Promotions: what it is
Promotions is a feature available to users on paid accounts. It allows the store administrator to promote specific products by prioritizing them among the search results for certain queries. To create a promotion, the administrator selects a product and links it to a query. As a result, the product appears on the first line of search results in the Products section of the CloudSearch widget.
Creating promotions
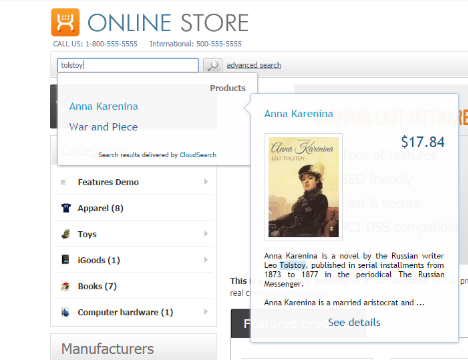
For example, you sell books and want to create a promotion for the book "Anna Karenina" by Leo Tolstoy so that a link to this book will be displayed at the top of the list of search results when someone uses CloudSearch to search for "book" or "tolstoy".
Let’s create the respective promotion:
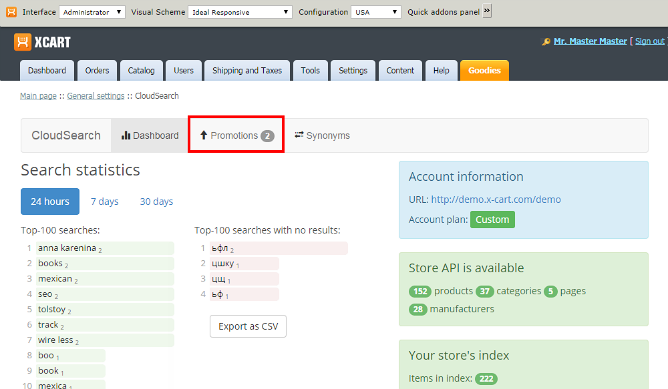
- In the store’s Admin area, go to the Promotions page for CloudSearch module by clicking the Promotions tab:
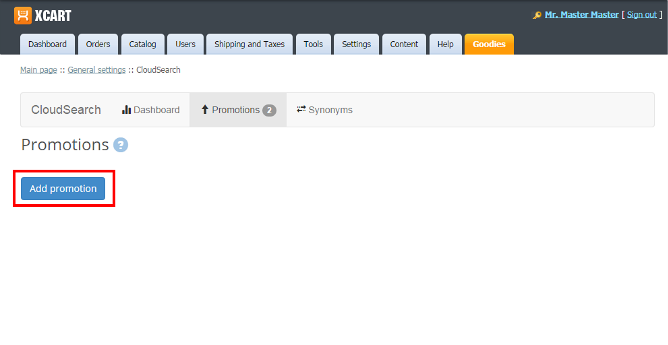
- On the Promotions page, click Add promotion:
A popup window titled “Add promotion” will be displayed: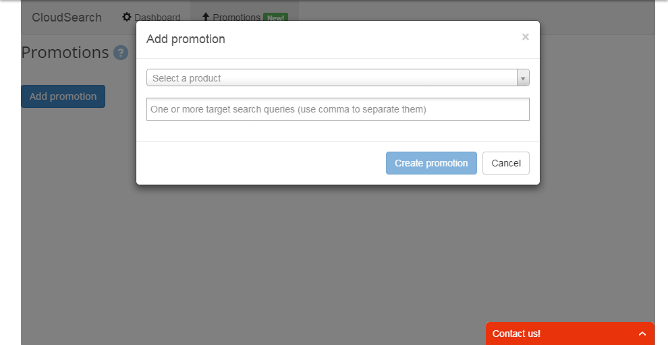
- In the “Add promotion” popup window, select the product that you want to be promoted:
Click inside the “Select a product” field: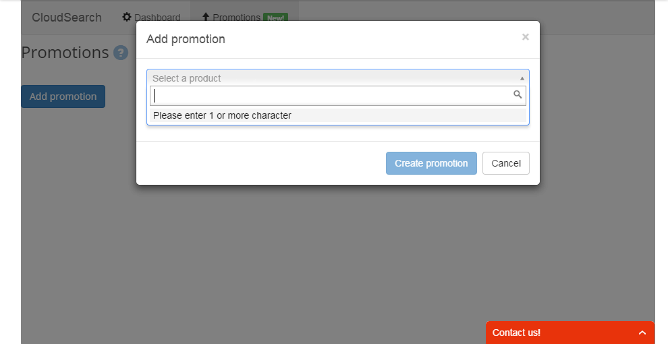
and start typing the product’s name or SKU. The module will provide search results as you type. As soon as you see the item you require, click on its name: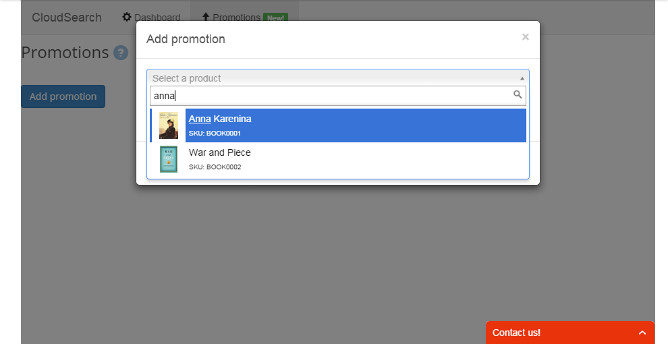
The product will be selected: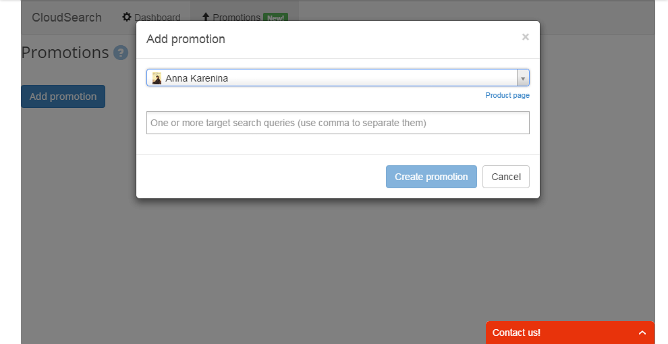
- Specify one or more search queries for which you want the search results to include the selected product on the topmost line of the Products section of the CloudSearch widget:
Click inside the input field containing the words "One or more target search queries (use comma to separate them)"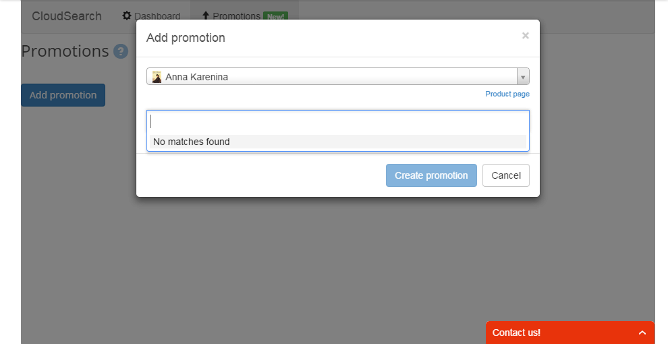
and start typing the word or phrase you require (in our case, "book"):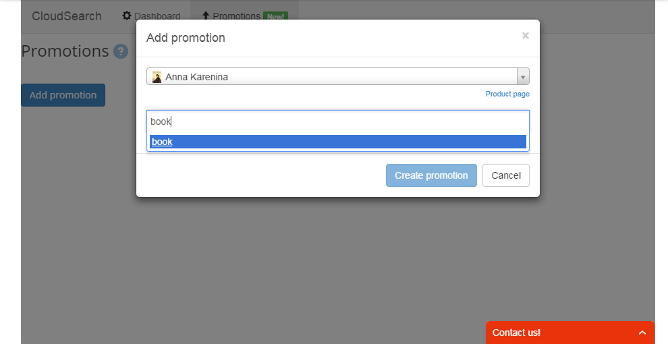
When you’re done typing, type “,” (comma) or press Enter. The query will be added: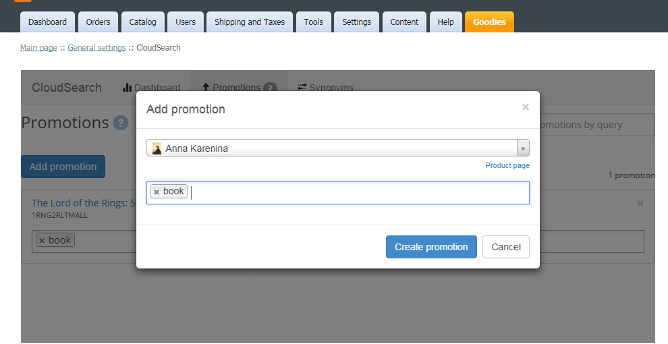
If necessary, add more queries using the same method: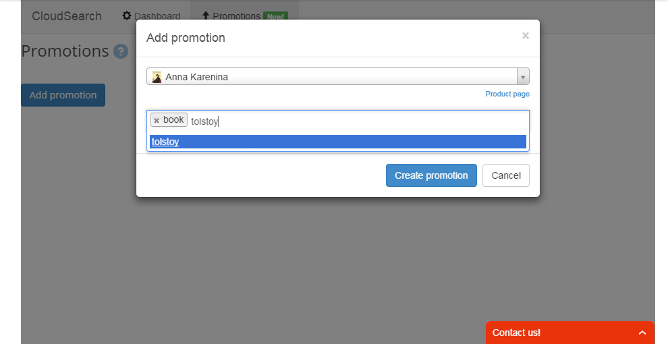
The result will be something like the following: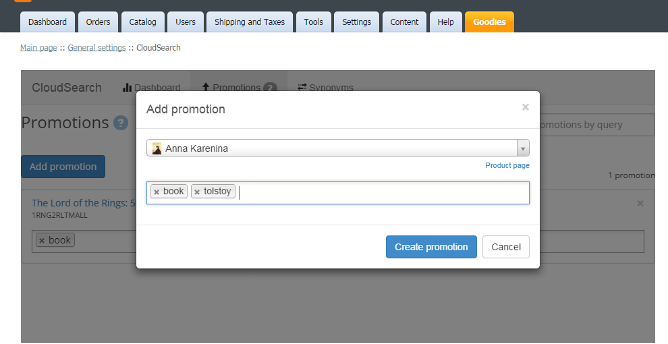
- Click the Create promotion button at the bottom of the popup window:
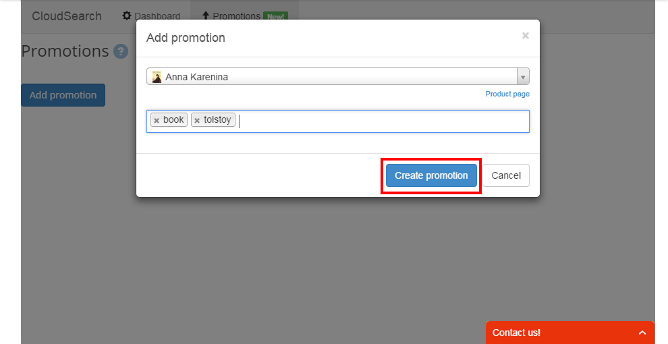
The promotion will be created. You should be able to see it in the Promotions list: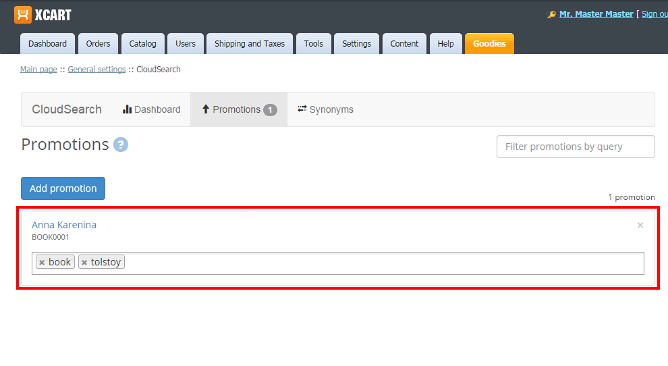
Now if you visit the store’s front end and do a search for "book" or "tolstoy", you should be able to see a link to the book "Anna Karenina" on the first line of search results under "Products":
Setting the order of promotions in search results
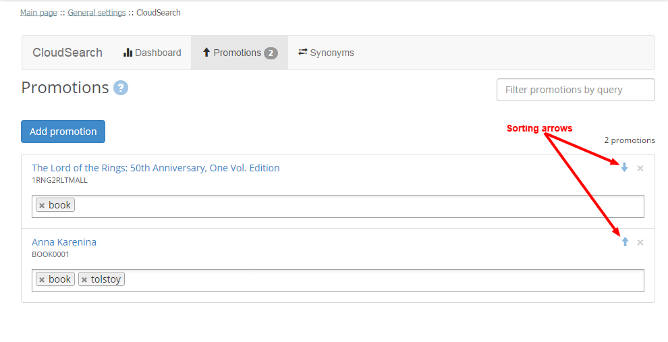
If you choose to configure multiple promotions for the same search query, you will be able to adjust the order in which the promotions should be displayed in the search results inside the CloudSearch widget in your store’s front end. To adjust the order:
- Open the Promotions list in your store’s Admin area and use the up and down arrows to move each promotion to the position you require:
- Once you're done sorting your promotions list, click the Save promotion order button:
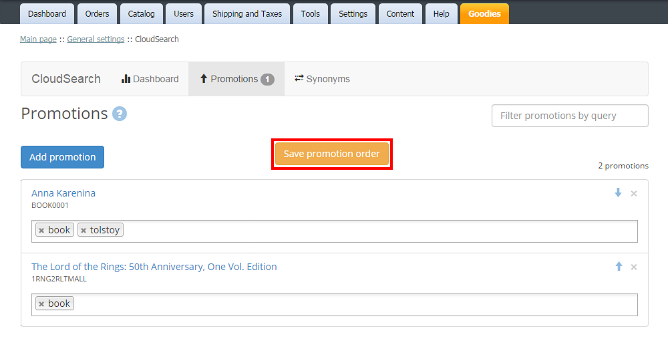
The order will be saved.
Deleting promotions
Any promotion you no longer want to use can be deteled. To delete a promotion:
- Click on the [x] icon for the respective entry in the Promotions list:
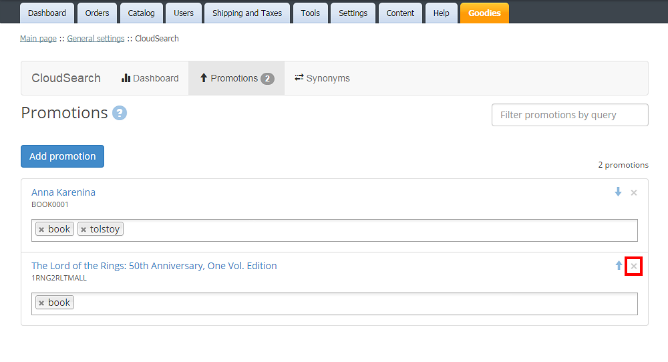
You will be asked to confirm the selected action: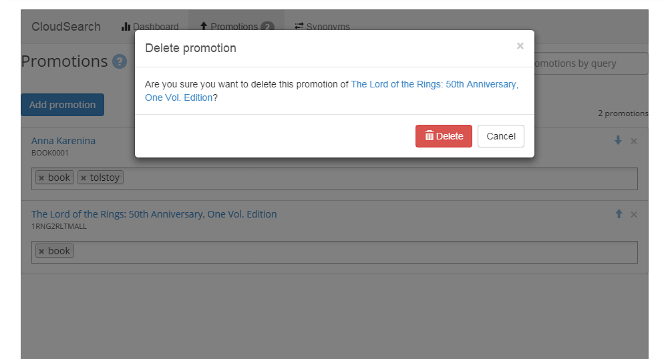
- Select Delete. The promotion will be removed from the Promotions list and will no longer appear at the top of the list of product search results in the CloudSearch widget.
Synonyms
Synonyms: what it is
Synonyms is another feature available to users on paid accounts. It can be used to finetune your customers' search experience by specifying queries that should be treated equally. For example if you want "TV", "Television", "TV set" and "Television set" to all be equivalent, just place these queries in a single synonym group.
While the most common use for this feature is lexical synonyms such as "sneakers" and "sport shoes", more advanced and creative scenarios are indeed possible and can be beneficial for the overall site search performance. One can use synonyms to redirect queries returning few or no results at all (Tip: use the Statistics feature to discover them) to some good results. In that sense synonyms can be thought of as a more generalized form of the Promotions feature. Another context where synonyms can be useful for enhancing site search is multilingual product (or brand) names. You can make queries with localized brand names to return correct results by just putting "correct" and "incorrect" queries in a single synonym group.
Also, synonyms can be used to fix incorrect but nevertheless common misspellings of product titles, brands or other names in complicated situations where automatic spelling corrections are unable to help.
Adding synonyms
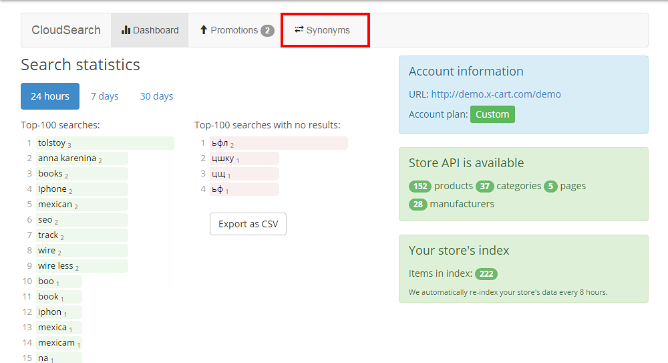
Synonyms can be added and managed via the Synonyms section:
To add synonyms:
- Click the Add synonyms button:
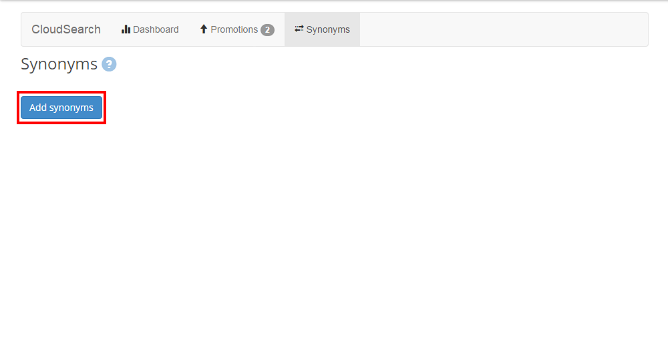
A popup window titled “Add synonym” will be displayed: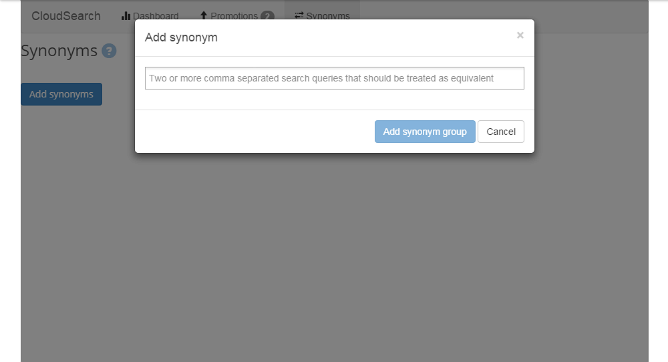
- In the popup window, click inside the input field and start typing the word or phrase you require:
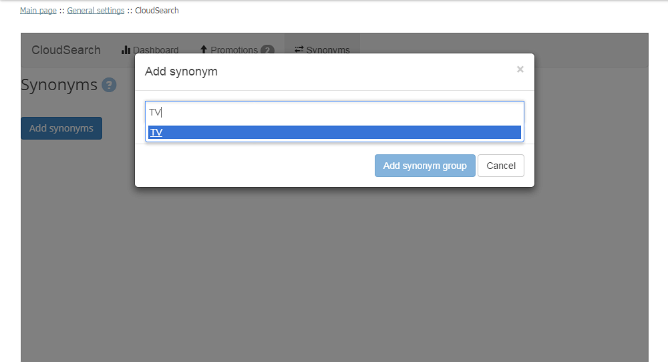
Once you’re done typing your first query, type ‘,” (comma) or press Enter. The query will be added: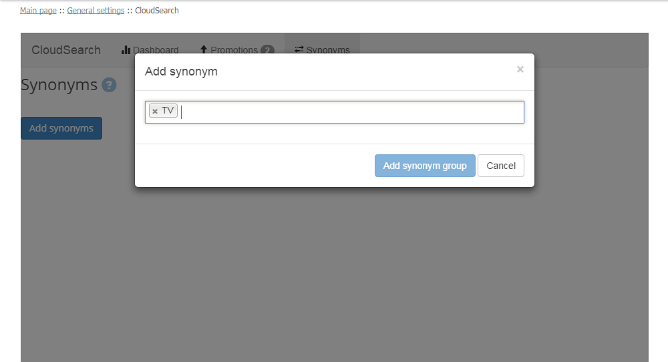
Continue to add all the queries that you want to be treated as equal to the first one (at least one needs to be added):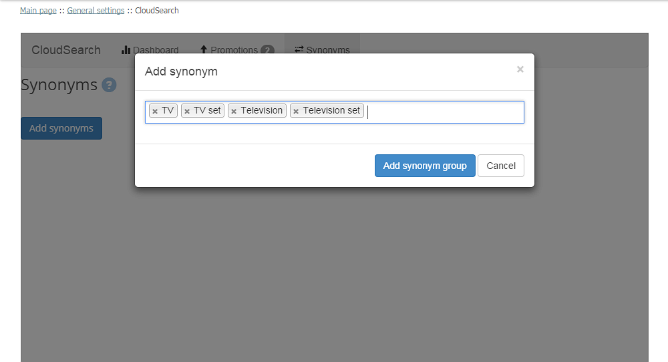
- Click Add synonym group:
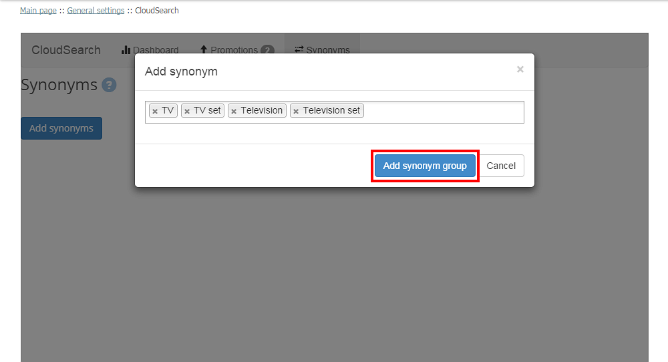
The synonym group will be created: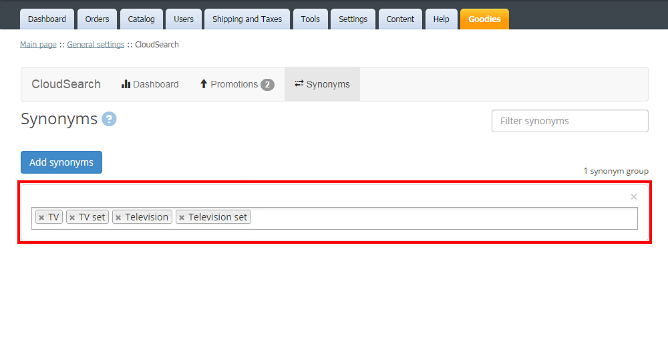
Now if you try searching with these queries in the store’s front end, the search results will be the same for all the queries from the group.
Editing synonym groups
It is possible to edit an existing synonym group by adding synonyms to it or removing synonyms from it.
To remove a synonym from a group:
- Click the [x] sign next to the synonym you want to remove:
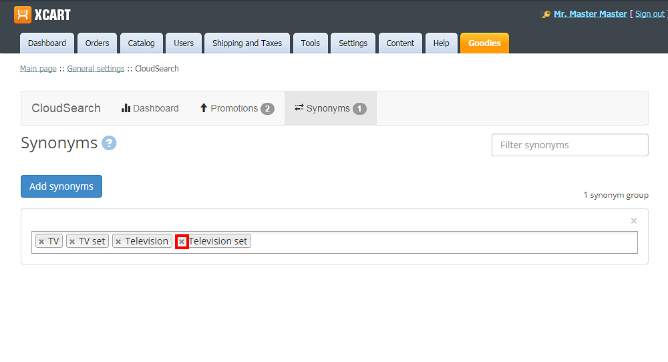
The synonym will disappear from the list. A button titled Save synonym will be displayed. - Click on this button to save the changes:
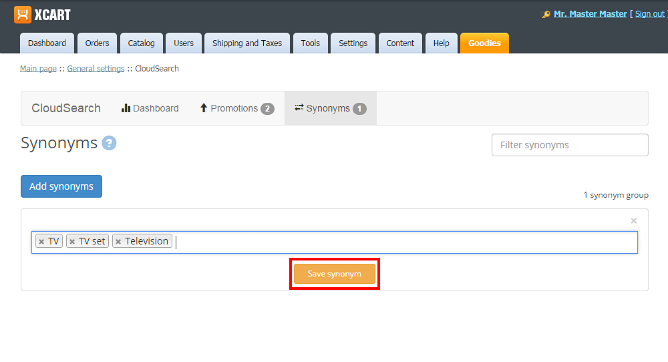
Once this happens, the synonym group will be updated.
To add synonyms to an existing group:
- Click inside the input field and type in the queries you want to add (be sure to type “,” or press Enter after each query).
- Save the changes using the Save synonym button.
The synonym group will be updated.
Deleting synonym groups
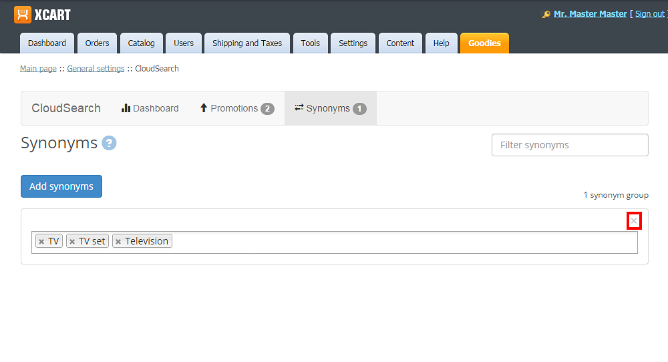
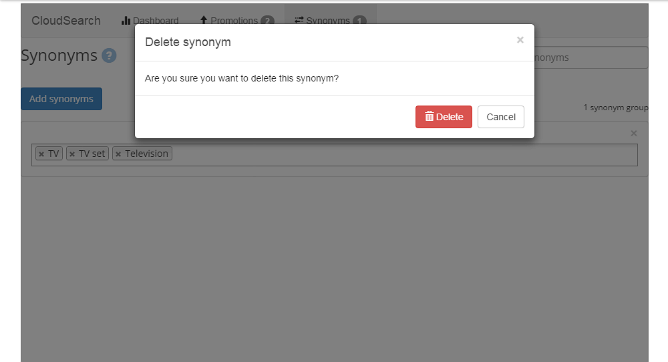
It is possible to delete a synonym group. To do so:
