Difference between revisions of "X-Cart:Braintree Integration"
m (→Installation) |
|||
| (7 intermediate revisions by one other user not shown) | |||
| Line 15: | Line 15: | ||
<br /><br /> | <br /><br /> | ||
| − | The <u>Braintree payment integration</u> module can be [ | + | The <u>Braintree payment integration</u> module can be [https://www.x-cart.com/extensions/modules/braintree-payment-integration.html purchased] and installed on all X-Cart editions. |
== System requirements == | == System requirements == | ||
| Line 60: | Line 60: | ||
Once you have installed the Braintree payments module, enable it in the X-Cart Admin area: | Once you have installed the Braintree payments module, enable it in the X-Cart Admin area: | ||
| − | # Go to the Payment methods section ('''Settings -> Payment methods'''). | + | |
| − | # On the Payment gateways tab, select "Braintree Payments" from the list and click '''Add'' to add it to | + | # Go to the Payment methods section ('''Settings -> Payment methods''').<br /> |
| + | # On the '''Payment gateways''' tab, select "Braintree Payments" from the Payment gateways list and click '''Add''' to add it to your store's list of payment methods:<br />[[File:xc4_braintree_pm_add.png|border]]<br />The payment method "Braintree Payments" will be added:<br />[[File:xc4_braintree_pm_add1.png|border]]<br /><br /> | ||
# Go to the Braintree Payments settings page: | # Go to the Braintree Payments settings page: | ||
#* Click the name of the payment method "Braintree Payments" in the list of recently added payment methods.<br />or | #* Click the name of the payment method "Braintree Payments" in the list of recently added payment methods.<br />or | ||
| − | #* Scroll down to the bottom of the list of your store's payment methods and find the "Braintree Payments" item in it; click the '''Configure''' button next to it.<br />[[File:xc4_braintree_pm_add2.png|border]]<br />The Braintree Payments settings page opens:<br />[[File:xc4_braintree_settings.png|border]]<br /> | + | #* Scroll down to the bottom of the list of your store's payment methods and find the "Braintree Payments" item in it; click the '''Configure''' button next to it.<br />[[File:xc4_braintree_pm_add2.png|border]]<br />The Braintree Payments settings page opens:<br />[[File:xc4_braintree_settings.png|border]]<br /><br /> |
# On the settings page, adjust the payment method details: | # On the settings page, adjust the payment method details: | ||
| − | #* '''Merchant ID''', '''Public key''' and '''Private key''': Specify your credentials for access to the Braintree API. | + | #* '''Merchant ID''', '''Public key''' and '''Private key''': Specify your credentials for access to the Braintree API. See [https://articles.braintreepayments.com/control-panel/important-gateway-credentials Important Gateway Credentials] for more info. |
#* '''Use vault''': Specify whether you want to enable storage of credit cards in the Braintree Vault. | #* '''Use vault''': Specify whether you want to enable storage of credit cards in the Braintree Vault. | ||
#* '''Kount merchant ID''': (This setting should be adjusted only if you use Kount) Your Kount merchant ID. | #* '''Kount merchant ID''': (This setting should be adjusted only if you use Kount) Your Kount merchant ID. | ||
#* '''Automatically settle the transaction''': Specify the mode in which transactions should be conducted via Braintree payments. "Off" = authorization to capture the funds should be obtained (The funds will need to be captured manually at a later time). "On" = the funds should be authorized and captured at once. | #* '''Automatically settle the transaction''': Specify the mode in which transactions should be conducted via Braintree payments. "Off" = authorization to capture the funds should be obtained (The funds will need to be captured manually at a later time). "On" = the funds should be authorized and captured at once. | ||
#* '''Test/Live mode''': Specify your store's payment mode. For testing purposes, set this value to "Test". For production, set to "Live". Note that the set of API access credentials for Test and Live modes should be different, so be sure to adjust the values in the "Merchant ID", "Public key" and "Private key" fields according to the mode selected. | #* '''Test/Live mode''': Specify your store's payment mode. For testing purposes, set this value to "Test". For production, set to "Live". Note that the set of API access credentials for Test and Live modes should be different, so be sure to adjust the values in the "Merchant ID", "Public key" and "Private key" fields according to the mode selected. | ||
| − | #* '''Order prefix''': Set a prefix that will allow Braintree to identify orders as originating from this store. For example, this may be useful if your Braintree account is used for more than one stores. | + | #* '''Order prefix''': Set a prefix that will allow Braintree to identify orders as originating from this store. For example, this may be useful if your Braintree account is used for more than one stores.<br /><br /> |
| − | # Click '''Update''' to apply the changes. The first time you submit your settings, the module will attempt to | + | # Click '''Update''' to apply the changes.<br /><br /> |
| − | + | # The first time you submit your settings, the module will attempt to verify the account settings you provided. You should expect to see a warning on a yellow background:<br />[[File:xc4_braintree_settings_yellow.png|border]]<br />This type of warning shows that the submitted account information has not yet been verified. If you see this warning, click the '''Check account''' button. The module will request verification of the submitted information from Braintree. If the information is incorrect, you will see the following warning on a red background:<br />[[File:xc4_braintree_settings_red.png|border]]<br />If the information is correct and can be used to access the Braintree API, you should see a success message on a green background:<br />[[File:xc4_braintree_settings_green.png|border]]<br /><br /> | |
| − | <br /><br /> | + | # Activate the payment method "Braintree Payments" on the Payment methods page: select the check box at the left of the method name and click '''Apply changes'''.<br />[[File:xc4_braintree_activate.png|border]]<br />The method will be activated:<br />[[File:xc4_braintree_activated.png|border]]<br /><br /> |
==Checkout page== | ==Checkout page== | ||
| − | Once the configuration is complete, the form to enter credit card details will be displayed right on the checkout page of your store: | + | Once the configuration is complete, the form to enter credit card details will be displayed right on the checkout page of your store:<br /> |
| − | + | [[File:xc4_braintree_checkout_s.png|border]] | |
<br /><br /> | <br /><br /> | ||
| − | |||
| − | |||
[[Category:X-Cart modules]] | [[Category:X-Cart modules]] | ||
Latest revision as of 17:49, 22 July 2020
Contents
Overview
BrainTree payment integration module allows to use BrainTree payment gateway in your store. Braintree helps online and mobile businesses process credit card payments by providing a merchant account, payment gateway and credit card storage. The company is disrupting the payments industry by providing elegant tools for developers coupled with white-glove support. Braintree works with some of the world’s most discerning online merchants, including LivingSocial, 37signals, OpenTable, GitHub, and ranked 47th in the 2011 Inc. 500.
Integration key features:
- Authorize the transaction (action "by default")
- Capture or request for settlement of the authorized transaction
- Void the authorized transaction
- Refund the captured/settled transaction
- Check for status of the transaction and update the order status accordingly
- Checkout on X-Cart side
- Cheaper than its analogues offered by 3rd party vendors
The Braintree payment integration module can be purchased and installed on all X-Cart editions.
System requirements
- PHP 5.3 or above with gd lib support
To be able to successfully install and use the Braintree payment integration module, you need a working copy of X-Cart 4.4.0 or higher installed on your server. Make sure that the version of the Braintree payment integration module matches the version of your copy of X-Cart.
Installation
To install the Braintree payment integration module:
1. Obtain a distribution package for the Braintree payment integration module by downloading it from the File Area section of your X-Cart Accountaccount. Make sure the version of the module matches the version of your copy of X-Cart.
2. Copy the distribution package to the X-Cart root directory on your server or hosting account.
- If you use a Windows-based server or a UNIX-based server without terminal access:
- a) Extract the contents of the archive with the Braintree payment integration module files to a directory on your system using your favorite compression program (WinZIP or any other archiver that supports TAR files).
- b) Use an FTP client to upload all the files extracted from the archive (retaining the directory structure) to the X-Cart root directory on your server or hosting account.
- If you use a UNIX-based server with terminal access:
- a) Use an FTP client to upload the archive with the Braintree payment integration module distribution package to the X-Cart root directory on your server or hosting account.
- b) Decompress the package by typing the following command:
tar -xzvf braintree.4.x.x.tgz
3. In a web browser, run the module installation script by visiting the following URL:
httр://<YOUR_XCART_DOMAIN>/install-braintree.php
(Be sure to replace <YOUR_XCART_DOMAIN> with the actual domain name of your X-Cart store).
4. Follow the instructions on the screen to install the module.
Once the installation has been completed, go to your store's Admin area and enable the payment method "Braitree Payments" following the instructions from the section Enabling the Braintree Payments payment method in X-Cart below.
Enabling the Braintree Payments payment method in X-Cart
Once you have installed the Braintree payments module, enable it in the X-Cart Admin area:
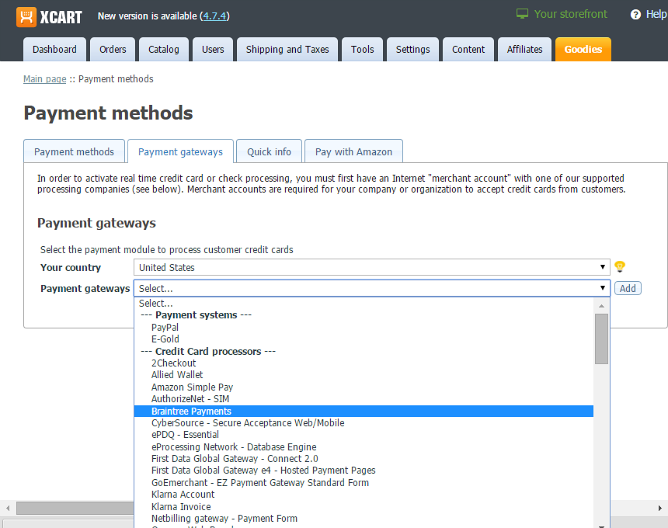
- Go to the Payment methods section (Settings -> Payment methods).
- On the Payment gateways tab, select "Braintree Payments" from the Payment gateways list and click Add to add it to your store's list of payment methods:
The payment method "Braintree Payments" will be added: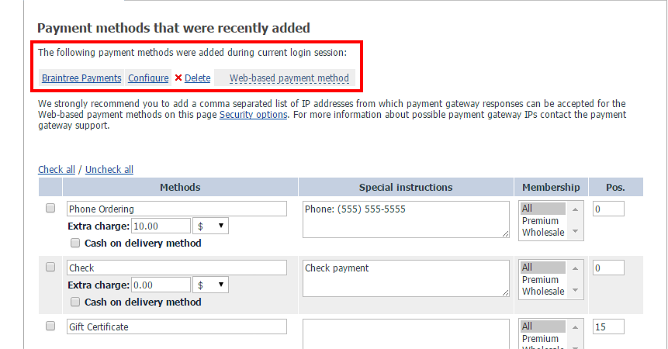
- Go to the Braintree Payments settings page:
- Click the name of the payment method "Braintree Payments" in the list of recently added payment methods.
or - Scroll down to the bottom of the list of your store's payment methods and find the "Braintree Payments" item in it; click the Configure button next to it.
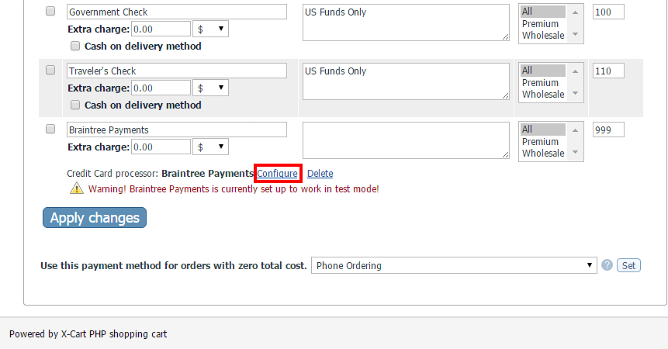
The Braintree Payments settings page opens: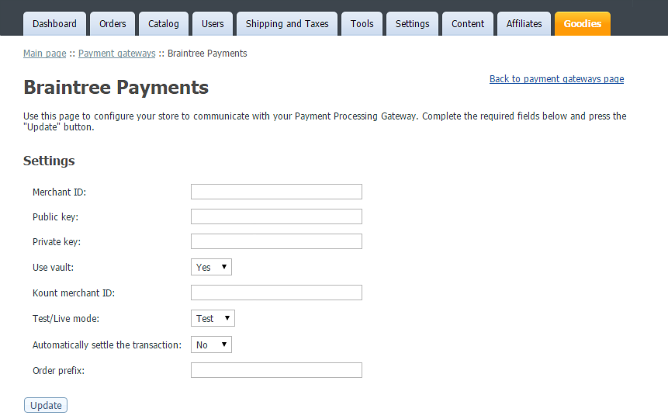
- Click the name of the payment method "Braintree Payments" in the list of recently added payment methods.
- On the settings page, adjust the payment method details:
- Merchant ID, Public key and Private key: Specify your credentials for access to the Braintree API. See Important Gateway Credentials for more info.
- Use vault: Specify whether you want to enable storage of credit cards in the Braintree Vault.
- Kount merchant ID: (This setting should be adjusted only if you use Kount) Your Kount merchant ID.
- Automatically settle the transaction: Specify the mode in which transactions should be conducted via Braintree payments. "Off" = authorization to capture the funds should be obtained (The funds will need to be captured manually at a later time). "On" = the funds should be authorized and captured at once.
- Test/Live mode: Specify your store's payment mode. For testing purposes, set this value to "Test". For production, set to "Live". Note that the set of API access credentials for Test and Live modes should be different, so be sure to adjust the values in the "Merchant ID", "Public key" and "Private key" fields according to the mode selected.
- Order prefix: Set a prefix that will allow Braintree to identify orders as originating from this store. For example, this may be useful if your Braintree account is used for more than one stores.
- Click Update to apply the changes.
- The first time you submit your settings, the module will attempt to verify the account settings you provided. You should expect to see a warning on a yellow background:
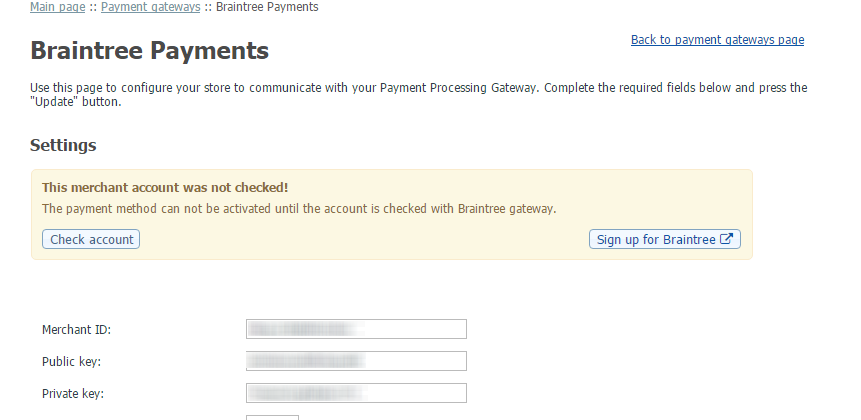
This type of warning shows that the submitted account information has not yet been verified. If you see this warning, click the Check account button. The module will request verification of the submitted information from Braintree. If the information is incorrect, you will see the following warning on a red background: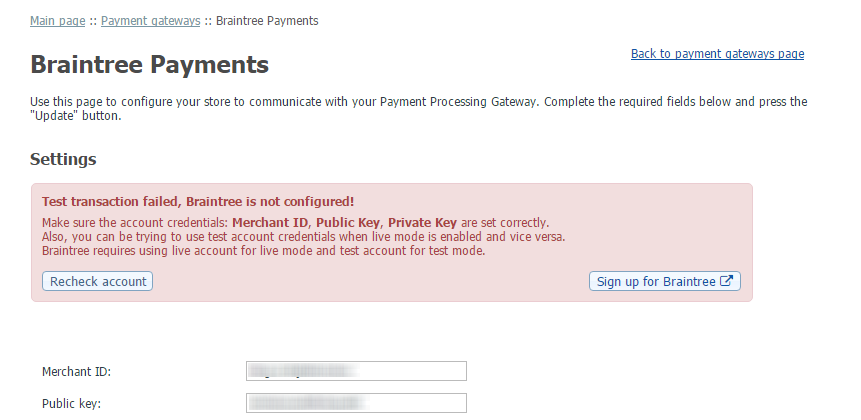
If the information is correct and can be used to access the Braintree API, you should see a success message on a green background: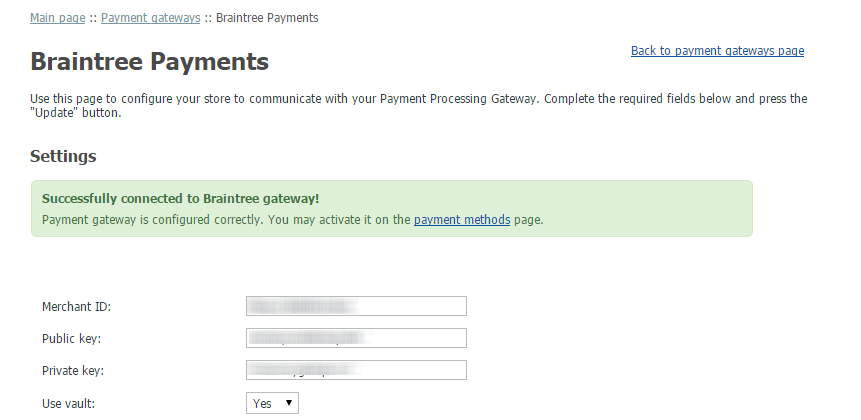
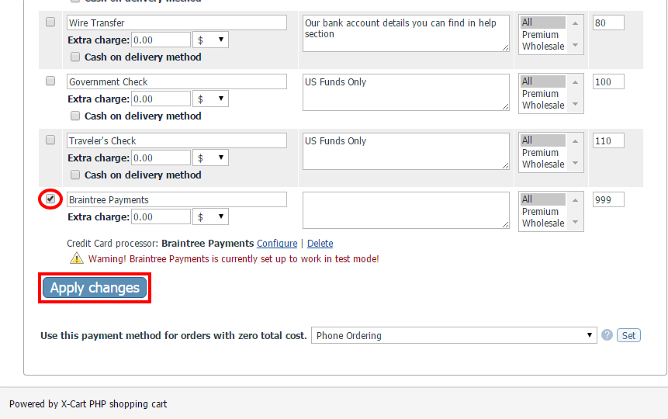
- Activate the payment method "Braintree Payments" on the Payment methods page: select the check box at the left of the method name and click Apply changes.
The method will be activated: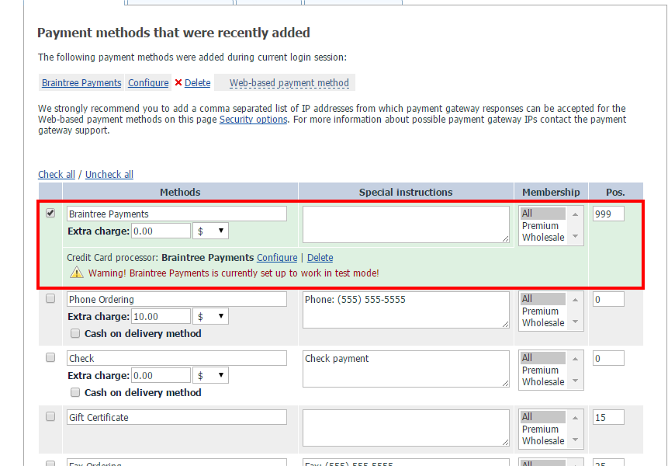
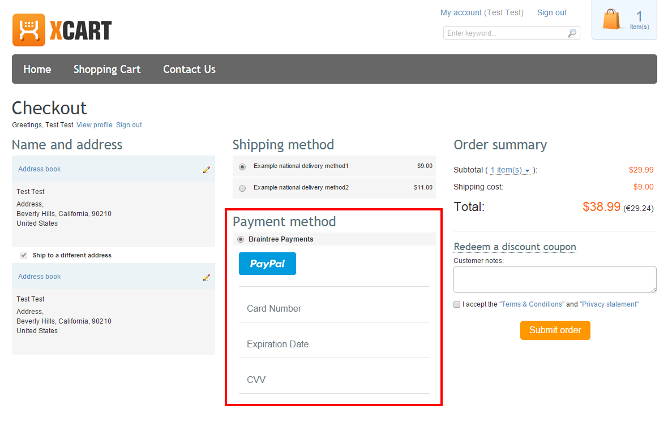
Checkout page
Once the configuration is complete, the form to enter credit card details will be displayed right on the checkout page of your store:
