Difference between revisions of "Instant SSL certificate"
| (7 intermediate revisions by one other user not shown) | |||
| Line 7: | Line 7: | ||
This guide explains how you can utilize Instant SSL to activate the core security technology available on your existing webserver. You will also learn how Instant SSL allows you to protect your customer's transactions and provide visitors with proof of your digital identity - essential factors in gaining confidence in your services and identity. | This guide explains how you can utilize Instant SSL to activate the core security technology available on your existing webserver. You will also learn how Instant SSL allows you to protect your customer's transactions and provide visitors with proof of your digital identity - essential factors in gaining confidence in your services and identity. | ||
| − | Using [ | + | Using [https://www.x-cart.com/ssl_certificates.html Instant SSL Certificates] to secure your online transactions tells your customers you take their security seriously. They will visibly see that their online transaction will be secure, confidential and integral and give them the confidence that you have removed the risk associated with trading over the Internet. |
'''Using Security helps you realize the benefits of online commerce:''' | '''Using Security helps you realize the benefits of online commerce:''' | ||
| Line 32: | Line 32: | ||
The complexities of the SSL protocol remain invisible to your customers. Instead their browsers provide them with a key indicator to let them know they are currently protected by an SSL encrypted session - the Padlock: | The complexities of the SSL protocol remain invisible to your customers. Instead their browsers provide them with a key indicator to let them know they are currently protected by an SSL encrypted session - the Padlock: | ||
| − | [[Image:ssl-introduction1.gif|216px]] | + | : [[Image:ssl-introduction1.gif|216px]] |
<div>As seen by users of Internet Explorer</div> | <div>As seen by users of Internet Explorer</div> | ||
Clicking on the Padlock displays your SSL Certificate and your details: | Clicking on the Padlock displays your SSL Certificate and your details: | ||
| − | [[Image:ssl-introduction2.gif|409px]] | + | : [[Image:ssl-introduction2.gif|409px]] |
<div>As seen by users of Internet Explorer</div> | <div>As seen by users of Internet Explorer</div> | ||
| − | All [ | + | All [https://www.x-cart.com/ssl_certificates.html SSL Certificates] are issued to either companies or legally accountable individuals. Typically an SSL Certificate will contain your domain name, your company name, your address, your city, your state and your country. It will also contain the expiry date of the Certificate and details of the Certification Authority responsible for the issuance of the Certificate. |
When a browser connects to a secure site ('''Https''') it will retrieve the site's SSL Certificate and check that it has not expired, it has been issued by a Certification Authority the browser trusts, and that it is being used by the website for which it has been issued. If it fails on any one of these checks the browser will display a warning to the end user. | When a browser connects to a secure site ('''Https''') it will retrieve the site's SSL Certificate and check that it has not expired, it has been issued by a Certification Authority the browser trusts, and that it is being used by the website for which it has been issued. If it fails on any one of these checks the browser will display a warning to the end user. | ||
| Line 54: | Line 54: | ||
=== InstantSSL benefits summary === | === InstantSSL benefits summary === | ||
| − | [ | + | [https://www.x-cart.com/ssl_certificates.html InstantSSL Certificates] are the most cost effective SSL Certificates you can buy which include: |
* Full validation conducted quickly - in many cases you can expect your SSL Certificate to be issued within minutes | * Full validation conducted quickly - in many cases you can expect your SSL Certificate to be issued within minutes | ||
| Line 64: | Line 64: | ||
InstantSSL Certificates provide you with the key to successfully using SSL on your webserver. | InstantSSL Certificates provide you with the key to successfully using SSL on your webserver. | ||
| − | === Testing your Webserver Before you Buy - | + | === Testing your Webserver Before you Buy - Try an SSL Certificate for Free === |
| − | Try an SSL Certificate for Free === | ||
Trial SSL Certificates provide full SSL functionality for 30 days and are fully supported by our expert technical support staff. Unlike test Certificates from other CAs, Instant SSL trial Certificates are issued using the same Trusted Root CA that issues our end-entity SSL Certificates and provides 99% browser ubiquity, and NOT by a different test CA. This unique service helps you fully test your system prior to your live roll out. | Trial SSL Certificates provide full SSL functionality for 30 days and are fully supported by our expert technical support staff. Unlike test Certificates from other CAs, Instant SSL trial Certificates are issued using the same Trusted Root CA that issues our end-entity SSL Certificates and provides 99% browser ubiquity, and NOT by a different test CA. This unique service helps you fully test your system prior to your live roll out. | ||
| Line 71: | Line 70: | ||
Trial SSL Certificates are ideal for anyone requiring proof of ease of installation, confirmation of high quality technical support and also confirmation of compatibility with the majority of the browsers that exist today. Trial SSL Certificates are also ideal for practicing with Certificates and learning about SSL implementation before committing to installing a Certificate on your live system. | Trial SSL Certificates are ideal for anyone requiring proof of ease of installation, confirmation of high quality technical support and also confirmation of compatibility with the majority of the browsers that exist today. Trial SSL Certificates are also ideal for practicing with Certificates and learning about SSL implementation before committing to installing a Certificate on your live system. | ||
| − | Get your free 30 day trial SSL Certificate from | + | Get your free 30 day trial SSL Certificate from www.instantssl.com/ssl-certificate-products/free-ssl-certificate.html |
| − | |||
=== Step by step instructions to set up SSL on your Apache webserver === | === Step by step instructions to set up SSL on your Apache webserver === | ||
| Line 83: | Line 81: | ||
# Displaying your Secure Site Seal | # Displaying your Secure Site Seal | ||
| − | + | ==== Generating a Certificate Signing Request (CSR) ==== | |
A CSR is a file containing your certificate application information, including your Public Key. Generate your CSR and then copy and paste the CSR file into the webform in the enrollment process: | A CSR is a file containing your certificate application information, including your Public Key. Generate your CSR and then copy and paste the CSR file into the webform in the enrollment process: | ||
| Line 126: | Line 124: | ||
Your CSR will now have been created. Open the server.csr in a text editor and copy and paste the contents into the online enrollment form when requested. | Your CSR will now have been created. Open the server.csr in a text editor and copy and paste the contents into the online enrollment form when requested. | ||
| − | ==== | + | ==== Applying for your Instant SSL Certificate Online ==== |
Visit www.instantssl.com and select your SSL Certificate product type. You will be required to submit the CSR into a webform. When you make your application, make sure you include the CSR in its entirety into the appropriate section of the enrollment form. When you view your CSR it will appear something like: | Visit www.instantssl.com and select your SSL Certificate product type. You will be required to submit the CSR into a webform. When you make your application, make sure you include the CSR in its entirety into the appropriate section of the enrollment form. When you view your CSR it will appear something like: | ||
| Line 154: | Line 152: | ||
-----BEGIN CERTIFICATE REQUEST----- and -----END CERTIFICATE REQUEST----- | -----BEGIN CERTIFICATE REQUEST----- and -----END CERTIFICATE REQUEST----- | ||
| − | ==== | + | ==== Installing your Instant SSL Certificate ==== |
Step one: Copy your certificate to file | Step one: Copy your certificate to file | ||
| Line 249: | Line 247: | ||
SSLCACertificateFile /etc/httpd/conf/ca-bundle/ca_new.txt | SSLCACertificateFile /etc/httpd/conf/ca-bundle/ca_new.txt | ||
| − | </pre> | + | </pre> |
| − | |||
| − | |||
Save your httpd.conf file and restart Apache. | Save your httpd.conf file and restart Apache. | ||
| Line 264: | Line 260: | ||
# Displaying your Secure Site Seal | # Displaying your Secure Site Seal | ||
| − | + | ====Generating a Certificate Signing Request (CSR)==== | |
A CSR is a file containing your certificate application information, including your Public Key. Generate your CSR and then copy and paste the CSR file into the webform in the enrollment process: | A CSR is a file containing your certificate application information, including your Public Key. Generate your CSR and then copy and paste the CSR file into the webform in the enrollment process: | ||
| Line 273: | Line 269: | ||
* Start Internet Services Manager | * Start Internet Services Manager | ||
| − | [[Image:ssl-iis8.gif|532px]] | + | : [[Image:ssl-iis8.gif|532px]] |
* Open the Properties window for the website the CSR is for. You can do this by right clicking on the Default Website and selecting Properties from the menu | * Open the Properties window for the website the CSR is for. You can do this by right clicking on the Default Website and selecting Properties from the menu | ||
* Open Directory Security by right clicking on the Directory Security tab | * Open Directory Security by right clicking on the Directory Security tab | ||
| − | [[Image:ssl-iis9.gif|461px]] | + | : [[Image:ssl-iis9.gif|461px]] |
* Click Server Certificate. The following Wizard will appear: | * Click Server Certificate. The following Wizard will appear: | ||
| − | [[Image:ssl-iis10.gif|482px]] | + | : [[Image:ssl-iis10.gif|482px]] |
* Click Create a new certificate and click Next. | * Click Create a new certificate and click Next. | ||
| − | [[Image:ssl-iis11.gif|482px]] | + | : [[Image:ssl-iis11.gif|482px]] |
* Select Prepare the request now, but send it later and click Next. | * Select Prepare the request now, but send it later and click Next. | ||
| − | [[Image:ssl-iis12.gif|482px]] | + | : [[Image:ssl-iis12.gif|482px]] |
* Provide a name for the certificate, this needs to be easily identifiable if you are working with multiple domains. This is for your records only. | * Provide a name for the certificate, this needs to be easily identifiable if you are working with multiple domains. This is for your records only. | ||
* If your server is 40 bit enabled, you will generate a 512 bit key. If your server is 128 bit you can generate up to 1024 bit keys. We recommend you stay with the default of 1024 bit key if the option is available. Click Next. | * If your server is 40 bit enabled, you will generate a 512 bit key. If your server is 128 bit you can generate up to 1024 bit keys. We recommend you stay with the default of 1024 bit key if the option is available. Click Next. | ||
| − | [[Image:ssl-iis13.gif|482px]] | + | : [[Image:ssl-iis13.gif|482px]] |
* Enter Organisation and Organisation Unit, these are your company name and department respectively. Click Next. | * Enter Organisation and Organisation Unit, these are your company name and department respectively. Click Next. | ||
| − | [[Image:ssl-iis14.gif|482px]] | + | : [[Image:ssl-iis14.gif|482px]] |
* The Common Name field should be the Fully Qualified Domain Name (FQDN) or the web address for which you plan to use your Certificate, e.g. the area of your site you wish customers to connect to using SSL. For example, an Instant SSL Certificate issued for comodo.net will NOT be valid for secure.comodo.net. If the web address to be used for SSL is secure.comodo.net, ensure that the common name submitted in the CSR is secure.comodo.net. Note that preceeding the FQDN with is NOT necessary. Click Next. | * The Common Name field should be the Fully Qualified Domain Name (FQDN) or the web address for which you plan to use your Certificate, e.g. the area of your site you wish customers to connect to using SSL. For example, an Instant SSL Certificate issued for comodo.net will NOT be valid for secure.comodo.net. If the web address to be used for SSL is secure.comodo.net, ensure that the common name submitted in the CSR is secure.comodo.net. Note that preceeding the FQDN with is NOT necessary. Click Next. | ||
| − | [[Image:ssl-iis15.gif|482px]] | + | : [[Image:ssl-iis15.gif|482px]] |
* Enter your Country, State and City. Click Next. | * Enter your Country, State and City. Click Next. | ||
| − | [[Image:ssl-iis16.gif|482px]] | + | : [[Image:ssl-iis16.gif|482px]] |
* Enter a filename and location to save your CSR. You will need this CSR to enroll for your Certificate. Click Next. | * Enter a filename and location to save your CSR. You will need this CSR to enroll for your Certificate. Click Next. | ||
| − | [[Image:ssl-iis17.gif|482px]] | + | : [[Image:ssl-iis17.gif|482px]] |
* Check the details you have entered. If you have made a mistake click Back and amend the details. Be especially sure to check the domain name the Certificate is to be Issued To. Your Certificate will only work on this domain. Click Next when you are happy the details are absolutely correct. | * Check the details you have entered. If you have made a mistake click Back and amend the details. Be especially sure to check the domain name the Certificate is to be Issued To. Your Certificate will only work on this domain. Click Next when you are happy the details are absolutely correct. | ||
| − | + | ==== Applying for your Instant SSL Certificate Online ==== | |
Visit www.instantssl.com and select your SSL Certificate product type. You will be required to submit the CSR into a webform. When you make your application, make sure you include the CSR in its entirety into the appropriate section of the enrollment form. When you view your CSR it will appear something like: | Visit www.instantssl.com and select your SSL Certificate product type. You will be required to submit the CSR into a webform. When you make your application, make sure you include the CSR in its entirety into the appropriate section of the enrollment form. When you view your CSR it will appear something like: | ||
| Line 333: | Line 329: | ||
-----BEGIN CERTIFICATE REQUEST----- and -----END CERTIFICATE REQUEST----- | -----BEGIN CERTIFICATE REQUEST----- and -----END CERTIFICATE REQUEST----- | ||
| − | ==== | + | ==== Installing your Instant SSL Certificate ==== |
Installing the Root & Intermediate Certificates | Installing the Root & Intermediate Certificates | ||
| Line 348: | Line 344: | ||
A. To install the GTECyberTrustRoot Certificate: | A. To install the GTECyberTrustRoot Certificate: | ||
| − | [[Image:ssl-iis18.gif|511px]] | + | : [[Image:ssl-iis18.gif|511px]] |
* Right click the Trusted Root Certification Authorities, select All Tasks, select Import. | * Right click the Trusted Root Certification Authorities, select All Tasks, select Import. | ||
| − | [[Image:ssl-iis19.gif|503px]] | + | : [[Image:ssl-iis19.gif|503px]] |
* Click Next. | * Click Next. | ||
| − | [[Image:ssl-iis20.gif|503px]] | + | : [[Image:ssl-iis20.gif|503px]] |
* Locate the GTECyberTrustRoot Certificate and click Next. | * Locate the GTECyberTrustRoot Certificate and click Next. | ||
* When the wizard is completed, click Finish. | * When the wizard is completed, click Finish. | ||
| Line 361: | Line 357: | ||
B. To install the ComodoSecurityServicesCA Certificate: | B. To install the ComodoSecurityServicesCA Certificate: | ||
| − | [[Image:ssl-iis21.gif|513px]] | + | : [[Image:ssl-iis21.gif|513px]] |
* Right click the Intermediate Certification Authorities, select All Tasks, select Import. | * Right click the Intermediate Certification Authorities, select All Tasks, select Import. | ||
| Line 373: | Line 369: | ||
* Start Internet Services Manager | * Start Internet Services Manager | ||
| − | [[Image:ssl-iis22.gif|532px]] | + | : [[Image:ssl-iis22.gif|532px]] |
* Open the properties window for the website. You can do this by right clicking on the Default Website and selecting Properties from the menu. | * Open the properties window for the website. You can do this by right clicking on the Default Website and selecting Properties from the menu. | ||
* Open Directory Security by right clicking on the Directory Security tab | * Open Directory Security by right clicking on the Directory Security tab | ||
| − | [[Image:ssl-iis23.gif|461px]] | + | : [[Image:ssl-iis23.gif|461px]] |
* Click Server Certificate. The following Wizard will appear: | * Click Server Certificate. The following Wizard will appear: | ||
| − | [[Image:ssl-iis24.gif|482px]] | + | : [[Image:ssl-iis24.gif|482px]] |
* Choose to Process the Pending Request and Install the Certificate. Click Next. | * Choose to Process the Pending Request and Install the Certificate. Click Next. | ||
* Enter the location of your certificate (you may also browse to locate your certificate), and then click Next. | * Enter the location of your certificate (you may also browse to locate your certificate), and then click Next. | ||
| Line 392: | Line 388: | ||
Open the Properties of the default website and ensure that SSL port contains the number 443 (it should default to this number automatically). You may want to test the Web site to ensure that everything is working correctly. Be sure to use when you test connectivity to the site. | Open the Properties of the default website and ensure that SSL port contains the number 443 (it should default to this number automatically). You may want to test the Web site to ensure that everything is working correctly. Be sure to use when you test connectivity to the site. | ||
| − | === | + | === Displaying your Secure Site Seal === |
| − | As a valued Instant SSL customer we encourage you to display the | + | As a valued Instant SSL customer we encourage you to display the [https://www.instantssl.com/ Instant SSL] Secure Site Seal to help promote your secure site to customers. The secure site seal is free to all Instant SSL customers. Guidelines on setting up Secure Site Seal are available at https://www.instantssl.com/ssl-certificate-support/siteseal/ssl-certificate-index.html |
[[Category:E-commerce]] | [[Category:E-commerce]] | ||
Latest revision as of 18:06, 22 July 2020
Contents
- 1 Why you need security for your site
- 2 What is SSL?
- 3 Displaying the SSL Secure Padlock
- 4 Why Should You Use an Instant SSL Certificate?
- 5 InstantSSL benefits summary
- 6 Testing your Webserver Before you Buy - Try an SSL Certificate for Free
- 7 Step by step instructions to set up SSL on your Apache webserver
- 8 Step by step instructions to set up SSL on your Microsoft IIS 5x webserver
- 9 Displaying your Secure Site Seal
Why you need security for your site
The Internet has created many new global business opportunities for enterprises conducting online commerce. However, the many security risks associated with conducting e-commerce have resulted in security becoming a major factor for online success or failure.
Over the past 7 years, consumer magazines, industry bodies and security providers have educated the market on the basics of online security. The majority of consumers now expect security to be integrated into any online service they use, as a result they expect any details they provide via the Internet to remain confidential and integral. For many customers, the only time they will ever consider buying your products or services online is when they are satisfied their details are secure.
This guide explains how you can utilize Instant SSL to activate the core security technology available on your existing webserver. You will also learn how Instant SSL allows you to protect your customer's transactions and provide visitors with proof of your digital identity - essential factors in gaining confidence in your services and identity.
Using Instant SSL Certificates to secure your online transactions tells your customers you take their security seriously. They will visibly see that their online transaction will be secure, confidential and integral and give them the confidence that you have removed the risk associated with trading over the Internet.
Using Security helps you realize the benefits of online commerce:
- Cost effectiveness of online operations and delivery
- Open global markets - gain customers from all over the world
- New and exciting ways of marketing directly to your customers
- Offer new data products and services via the Web
Only if you have visibly secured your site with SSL security technology (Https) will your customers have confidence in your online operations. Read on to learn how SSL helps you achieve the confidence essential to successful e-commerce.
What is SSL?
Secure Sockets Layer, SSL, is the standard security technology for creating an encrypted link between a web server and a browser. This link ensures that all data passed between the web server and browser remain private and integral. SSL is an industry standard and is used by millions of websites in the protection of their online transactions with their customers. In order to be able to generate an SSL link, a web server requires an SSL Certificate.
When you choose to activate SSL on your webserver you will be prompted to complete a number of questions about the identity of your website (e.g. your website's URL) and your company (e.g. your company's name and location). Your webserver then creates two cryptographic keys - a Private Key and a Public Key. Your Private Key is so called for a reason - it must remain private and secure. The Public Key does not need to be secret and is placed into a Certificate Signing Request (CSR) - a data file also containing your details. You should then submit the CSR during the SSL Certificate application process Comodo, the Instant SSL Certification Authority, who will validate your details and issue an SSL Certificate containing your details and allowing you to use SSL.
Your webserver will match your issued SSL Certificate to your Private Key. Your webserver will then be able to establish an encrypted link between the website and your customer's web browser.
For detailed application and installation instructions please refer to section "Step by step instructions to set up SSL on your webserver" of this guide.
Displaying the SSL Secure Padlock
The complexities of the SSL protocol remain invisible to your customers. Instead their browsers provide them with a key indicator to let them know they are currently protected by an SSL encrypted session - the Padlock:
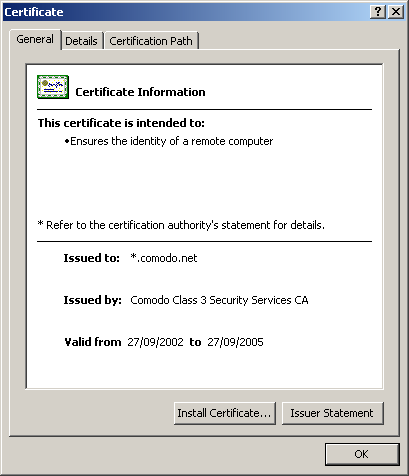
Clicking on the Padlock displays your SSL Certificate and your details:
All SSL Certificates are issued to either companies or legally accountable individuals. Typically an SSL Certificate will contain your domain name, your company name, your address, your city, your state and your country. It will also contain the expiry date of the Certificate and details of the Certification Authority responsible for the issuance of the Certificate.
When a browser connects to a secure site (Https) it will retrieve the site's SSL Certificate and check that it has not expired, it has been issued by a Certification Authority the browser trusts, and that it is being used by the website for which it has been issued. If it fails on any one of these checks the browser will display a warning to the end user.
Why Should You Use an Instant SSL Certificate?
Comodo, the Certification Authority behind InstantSSL, is the fastest growing SSL Provider in the world. Unlike other Certification Authorities, Comodo does not just provide SSL Certificates - they are a world-renowned security and cryptography service provider. When you are a customer of Comodo, you can feel safe knowing that your website security is provided by experts.
InstantSSL Certificates are the most cost-effective fully validated and fully supported 128 bit SSL Certificates you can buy today! You can contact the technical support team between 3am- 7pm EST (soon to be 24 hours). You can also feel safe in the knowledge that Comodo will validate your application in accordance with the latest digital signature legislation pertaining to Qualified Certificates. This validation is done effectively and quickly, ensuring you need not wait the traditional 3 working days normally associated with a fully validated SSL Certificate.
InstantSSL boasts industry leading browser ubiquity - comparable to Verisign and Thawte, however without the costs associated with other SSL Providers. Instant SSL Certificates are compatible with over 99% of browsers - including Internet Explorer 5.00 and above, Netscape 4.5 and above, AOL 6 and above and Opera 5.00 and above.
InstantSSL benefits summary
InstantSSL Certificates are the most cost effective SSL Certificates you can buy which include:
- Full validation conducted quickly - in many cases you can expect your SSL Certificate to be issued within minutes
- Telephone, email, web support available 3am - 7pm EST
- Over 99% browser compatibility
- 128 bit strong encryption security
- Backed by warranties ranging from $10,000 to $250,000
InstantSSL Certificates provide you with the key to successfully using SSL on your webserver.
Testing your Webserver Before you Buy - Try an SSL Certificate for Free
Trial SSL Certificates provide full SSL functionality for 30 days and are fully supported by our expert technical support staff. Unlike test Certificates from other CAs, Instant SSL trial Certificates are issued using the same Trusted Root CA that issues our end-entity SSL Certificates and provides 99% browser ubiquity, and NOT by a different test CA. This unique service helps you fully test your system prior to your live roll out.
Trial SSL Certificates are ideal for anyone requiring proof of ease of installation, confirmation of high quality technical support and also confirmation of compatibility with the majority of the browsers that exist today. Trial SSL Certificates are also ideal for practicing with Certificates and learning about SSL implementation before committing to installing a Certificate on your live system.
Get your free 30 day trial SSL Certificate from www.instantssl.com/ssl-certificate-products/free-ssl-certificate.html
Step by step instructions to set up SSL on your Apache webserver
There are four stages to setting up SSL on your Apache webserver:
- Create a Certificate Signing Request (CSR)
- Apply online
- Installing your Certificate
- Displaying your Secure Site Seal
Generating a Certificate Signing Request (CSR)
A CSR is a file containing your certificate application information, including your Public Key. Generate your CSR and then copy and paste the CSR file into the webform in the enrollment process:
Generate keys and certificate:
To generate a pair of private key and public Certificate Signing Request (CSR) for a webserver, "server", use the following command :
openssl req -new -nodes -keyout myserver.key -out server.csr
This creates two files. The file myserver.key contains a private key; do not disclose this file to anyone. Carefully protect the private key.
In particular, be sure to backup the private key, as there is no means to recover it should it be lost. The private key is used as input in the command to generate a Certificate Signing Request (CSR).
You will now be asked to enter details to be entered into your CSR.
What you are about to enter is what is called a Distinguished Name or a DN.
For some fields there will be a default value, If you enter '.', the field will be left blank.
-----
Country Name (2 letter code) [AU]: GB
State or Province Name (full name) [Some-State]: Yorks
Locality Name (eg, city) []: York
Organization Name (eg, company) [Internet Widgits Pty Ltd]: MyCompany Ltd
Organizational Unit Name (eg, section) []: IT
Common Name (eg, YOUR name) []: mysubdomain.mydomain.com
Email Address []:

Please enter the following 'extra' attributes to be sent with your certificate request

A challenge password []:
An optional company name []:
-----
Use the name of the webserver as Common Name (CN). If the domain name is mydomain.com append the domain to the hostname (use the fully qualified domain name).
The fields email address, optional company name and challenge password can be left blank for a webserver certificate.
Your CSR will now have been created. Open the server.csr in a text editor and copy and paste the contents into the online enrollment form when requested.
Applying for your Instant SSL Certificate Online
Visit www.instantssl.com and select your SSL Certificate product type. You will be required to submit the CSR into a webform. When you make your application, make sure you include the CSR in its entirety into the appropriate section of the enrollment form. When you view your CSR it will appear something like:
-----BEGIN NEW CERTIFICATE REQUEST-----
MIIDVjCCAr8CAQAwezEdMBsGA1UEAxMUd3d3Lm15ZG9tYWlubmFtZS5jb20xDDAK
BgNVBAsTA1dlYjEaMBgGA1UEChMRWW91ciBDb21wYW55IE5hbWUxEDAOBgNVBAcT
B015IENpdHkxETAPBgNVBAgTCE15IFN0YXRlMQswCQYDVQQGEwJVUzCBnzANBgkq
hkiG9w0BAQEFAAOBjQAwgYkCgYEAuev9LnSRX/6u5Iz7ckpt0IG4DwnAF/lsksJ0
n5r9w1EK9Np5/OJEt72r5es3nie5rTKo3O4yvSLovkS0vqT+iOlEZvl5B4mXTEPw
fDLjEcwcNb8SCJ4ArUAhHKJWHDKJHDKDA6587568gfhjfjFHGFHFhsgGHJGJjhhj
HFD^TGFrYTrYTrfGHI&DHJKDHkjwjkkgAgcwCgYIKoZIhvcNHKJHFrytDETR$456
AwcwEwYDVR0lBAwwCgYIKwYBBQUHAwEwgf0GCisGAQQBgjcNAgIxge4wgesCAQEe
WgBNAGkAYwByAG8AcwBvAGYAdAAgAFIAUwBBACAAUwBDAGgAYQBuAG4AZQBsAC67
QwByAHkAcAB0AG8AZwByAGEAcABoAGkAYwAgAFAAcgBvAHYAaQBkAGUAcgOBiQCq
EH3QppP7Ewuz6oh4EUXMbKdqieAcbQ52iFSXqQ/n1xAtEpVUfjIM3exr42EhyYlr
lV7cpUKbSr/eQ6c/hjiUi17EpvleBBV0BkFWsWzJoShx0BmOKvDnKINNQC3Jya+M
N/t9axyuCwdUYJiLglNnjcBLSxL/6hovXNDLuCLgMAAAAAAAAAAAMA0GCSqGSIb3
DQEBBQUAA4GBAEQT6Pwj0BHeOUw+AR0GAT30q+1OYNkr341CouMC6M7KqlKgVZDV
tRes4uz1Yf8+WRCutVvDByrey+CdgzJzHvHqS6lAj2swx8QadclVWOkZfH//k/KE
1MiOEb6c3Mp1ECorjIm+HRN20Qga+dnDBOowyRYn7Vz+NKar88mrJwk/
-----END NEW CERTIFICATE REQUEST-----
Be sure to copy the CSR text in its entirety into the application form, including the:
BEGIN CERTIFICATE REQUEST----- and -----END CERTIFICATE REQUEST-----
Installing your Instant SSL Certificate
Step one: Copy your certificate to file
You will receive an email from Comodo Security Services with the certificate in the email (yourdomainname.crt). When viewed in a text editor, your certificate will look something like:
-----BEGIN CERTIFICATE-----
MIIDVjCCAr8CAQAwezEdMBsGA1UEAxMUd3d3Lm15ZG9tYWlubmFtZS5jb20xDDAK
BgNVBAsTA1dlYjEaMBgGA1UEChMRWW91ciBDb21wYW55IE5hbWUxEDAOBgNVBAcT
B015IENpdHkxETAPBgNVBAgTCE15IFN0YXRlMQswCQYDVQQGEwJVUzCBnzANBgkq
hkiG9w0BAQEFAAOBjQAwgYkCgYEAuev9LnSRX/6u5Iz7ckpt0IG4DwnAF/lsksJ0
n5r9w1EK9Np5/OJEt72r5es3nie5rTKo3O4yvSLovkS0vqT+iOlEZvl5B4mXTEPw
fDLjEcwcNb8SCJ4ArUAhHKJWHDKJHDKDA6587568gfhjfjFHGFHFhsgGHJGJjhhj
HFD^TGFrYTrYTrfGHI&DHJKDHkjwjkkgAgcwCgYIKoZIhvcNHKJHFrytDETR$456
AwcwEwYDVR0lBAwwCgYIKwYBBQUHAwEwgf0GCisGAQQBgjcNAgIxge4wgesCAQEe
WgBNAGkAYwByAG8AcwBvAGYAdAAgAFIAUwBBACAAUwBDAGgAYQBuAG4AZQBsAC67
QwByAHkAcAB0AG8AZwByAGEAcABoAGkAYwAgAFAAcgBvAHYAaQBkAGUAcgOBiQCq
EH3QppP7Ewuz6oh4EUXMbKdqieAcbQ52iFSXqQ/n1xAtEpVUfjIM3exr42EhyYlr
lV7cpUKbSr/eQ6c/hjiUi17EpvleBBV0BkFWsWzJoShx0BmOKvDnKINNQC3Jya+M
N/t9axyuCwdUYJiLglNnjcBLSxL/6hovXNDLuCLgMAAAAAAAAAAAMA0GCSqGSIb3
DQEBBQUAA4GBAEQT6Pwj0BHeOUw+AR0GAT30q+1OYNkr341CouMC6M7KqlKgVZDV
tRes4uz1Yf8+WRCutVvDByrey+CdgzJzHvHqS6lAj2swx8QadclVWOkZfH//k/KE
1MiOEb6c3Mp1ECorjIm+HRN20Qga+dnDBOowyRYn7Vz+NKar88mrJwk/
-----END CERTIFICATE-----
Copy your Certificate into the directory that you will be using to hold your certificates. In this example we will use /etc/ssl/crt/. Both the public and private key files will already be in this directory. The private key used in the example will be labelled private.key and the public key will be yourdomainname.crt.
It is recommended that you make the directory that contains the private key file only readable by root.
Step two: Install the Intermediate Certificates
You will need to install the chain certificates (intermediates) in order for browsers to trust your certificate. As well as your SSL certificate (yourdomainname.crt) two other certificates, named GTECyberTrustRootCA.crt and ComodoClass3SecurityServicesCA.crt, are also attached to the email from Comodo Security Services.
Apache users will not require these certificates. Instead you can install the intermediate certificates using the following 'bundle' method. In the Virtual Host settings for your site, in the httpd.conf file, you will need to complete the following:
1. Copy the below ca-bundle file to the same directory as httpd.conf (this contains all of the CA certificates in the chain).
-----BEGIN CERTIFICATE-----
MIIB+jCCAWMCAgGjMA0GCSqGSIb3DQEBBAUAMEUxCzAJBgNVBAYTAlVTMRgwFgYD
VQQKEw9HVEUgQ29ycG9yYXRpb24xHDAaBgNVBAMTE0dURSBDeWJlclRydXN0IFJv
b3QwHhcNOTYwMjIzMjMwMTAwWhcNMDYwMjIzMjM1OTAwWjBFMQswCQYDVQQGEwJV
UzEYMBYGA1UEChMPR1RFIENvcnBvcmF0aW9uMRwwGgYDVQQDExNHVEUgQ3liZXJU
cnVzdCBSb290MIGfMA0GCSqGSIb3DQEBAQUAA4GNADCBiQKBgQC45k+625h8cXyv
RLfTD0bZZOWTwUKOx7pJjTUteueLveUFMVnGsS8KDPufpz+iCWaEVh43KRuH6X4M
ypqfpX/1FZSj1aJGgthoTNE3FQZor734sLPwKfWVWgkWYXcKIiXUT0Wqx73llt/5
1KiOQswkwB6RJ0q1bQaAYznEol44AwIDAQABMA0GCSqGSIb3DQEBBAUAA4GBABKz
dcZfHeFhVYAA1IFLezEPI2PnPfMD+fQ2qLvZ46WXTeorKeDWanOB5sCJo9Px4KWl
IjeaY8JIILTbcuPI9tl8vrGvU9oUtCG41tWW4/5ODFlitppK+ULdjG+BqXH/9Apy
bW1EDp3zdHSo1TRJ6V6e6bR64eVaH4QwnNOfpSXY
-----END CERTIFICATE-----
-----BEGIN CERTIFICATE-----
MIIEyDCCBDGgAwIBAgIEAgACmzANBgkqhkiG9w0BAQUFADBFMQswCQYDVQQGEwJV
UzEYMBYGA1UEChMPR1RFIENvcnBvcmF0aW9uMRwwGgYDVQQDExNHVEUgQ3liZXJU
cnVzdCBSb290MB4XDTAyMDgyNzE5MDcwMFoXDTA2MDIyMzIzNTkwMFowgdwxCzAJ
BgNVBAYTAkdCMRcwFQYDVQQKEw5Db21vZG8gTGltaXRlZDEdMBsGA1UECxMUQ29t
b2RvIFRydXN0IE5ldHdvcmsxRjBEBgNVBAsTPVRlcm1zIGFuZCBDb25kaXRpb25z
IG9mIHVzZTogaHR0cDovL3d3dy5jb21vZG8ubmV0L3JlcG9zaXRvcnkxHzAdBgNV
BAsTFihjKTIwMDIgQ29tb2RvIExpbWl0ZWQxLDAqBgNVBAMTI0NvbW9kbyBDbGFz
cyAzIFNlY3VyaXR5IFNlcnZpY2VzIENBMIIBIjANBgkqhkiG9w0BAQEFAAOCAQ8A
MIIBCgKCAQEAsR5gZuBDBp4naC8CmceI34Xr22Xs1Elnei4fzdwVLNYerPKdRjpd
A8A9BSxaGA1ZJUKjcsCtKNKtPDHiSwf7XpjrqDPWabJanuosSaYmLkzwzKtA0qre
LE6Btbp7uFzQe71H9cAG0sDk10fbYkCvoRxRAxjbuNC7lMc8eeolZK4mGeE8Zkdn
kp17Vas0wnVu2SeOnYzwHdprnIYEopC16p2Mz/s5Q6jwGC2e9xkQLJwv4dCx/9dZ
xM1AMvnXgdtRHPJBUoFBsYO4yAn+mSJHgE+cy67gKNUcrHBHsCWroThCF2v6am6N
X3n49ikDMKRuRtSFXapAmTh22x4BfeUMpQIDAQABo4IBpzCCAaMwRQYDVR0fBD4w
PDA6oDigNoY0aHR0cDovL3d3dy5wdWJsaWMtdHJ1c3QuY29tL2NnaS1iaW4vQ1JM
LzIwMDYvY2RwLmNybDAdBgNVHQ4EFgQU9lIiFxUTCANZvxiVn0i0uen++GYwgZIG
A1UdIASBijCBhzBJBgoqhkiG+GMBAgEFMDswOQYIKwYBBQUHAgEWLWh0dHA6Ly93
d3cucHVibGljLXRydXN0LmNvbS9DUFMvT21uaVJvb3QuaHRtbDA6BgwrBgEEAbIx
AQIBAwEwKjAoBggrBgEFBQcCARYcaHR0cHM6Ly9zZWN1cmUuY29tb2RvLm5ldC9D
UDBYBgNVHSMEUTBPoUmkRzBFMQswCQYDVQQGEwJVUzEYMBYGA1UEChMPR1RFIENv
cnBvcmF0aW9uMRwwGgYDVQQDExNHVEUgQ3liZXJUcnVzdCBSb290ggIBozArBgNV
HRAEJDAigA8yMDAyMDgyNzE5MDczMVqBDzIwMDUwMjIzMjM1OTAwWjAOBgNVHQ8B
Af8EBAMCAeYwDwYDVR0TBAgwBgEB/wIBADANBgkqhkiG9w0BAQUFAAOBgQC2p7B6
cYvgurOBHjYyeoYY1vGrTTkIcQZaZ6BLAeUwQG2JtZ4VqrHH9ArGXA7pN96ol8fc
zs1x+3QCB9xfFScIUwd21LkG6cJ3UB7KybDCRoGAAK1EqlzWINlVMr5WlvHqvaDj
vA2AOurM+5pX7XilNj1W6tHndMo0w8+xUengDA==
-----END CERTIFICATE-----
2. Add the following line to SSL section of the httpd.conf (assuming /etc/httpd/conf is the directory to where you have copied the ca.txt file). if the line already exists amend it to read the following:
SSLCACertificateFile /etc/httpd/conf/ca-bundle/ca.txt
If you are using a different location and certificate file names you will need to change the path and filename to reflect your server.
The SSL section of the updated httpd config file should now read similar to this example (depending on your naming and directories used):
SSLCertificateFile /etc/ssl/crt/yourdomainname.crt

SSLCertificateKeyFile /etc/ssl/crt/private.key

SSLCACertificateFile /etc/httpd/conf/ca-bundle/ca_new.txt
Save your httpd.conf file and restart Apache.
Step by step instructions to set up SSL on your Microsoft IIS 5x webserver
There are four stages to setting up SSL on your Microsoft IIS 5x webserver:
- Create a Certificate Signing Request (CSR)
- Apply online
- Installing your Certificate
- Displaying your Secure Site Seal
Generating a Certificate Signing Request (CSR)
A CSR is a file containing your certificate application information, including your Public Key. Generate your CSR and then copy and paste the CSR file into the webform in the enrollment process:
Generate keys and Certificate Signing Request:
- Select Administrative Tools from the Start Menu
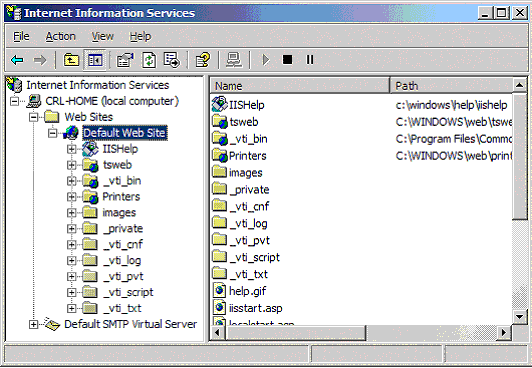
- Start Internet Services Manager
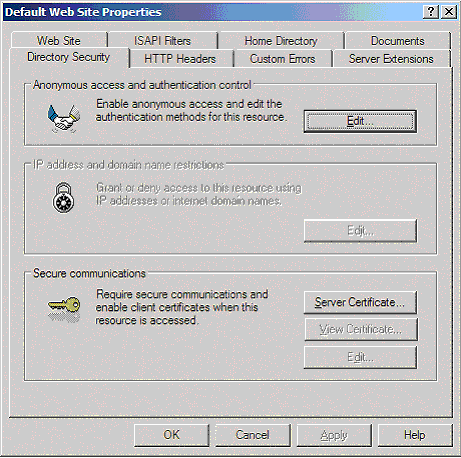
- Open the Properties window for the website the CSR is for. You can do this by right clicking on the Default Website and selecting Properties from the menu
- Open Directory Security by right clicking on the Directory Security tab
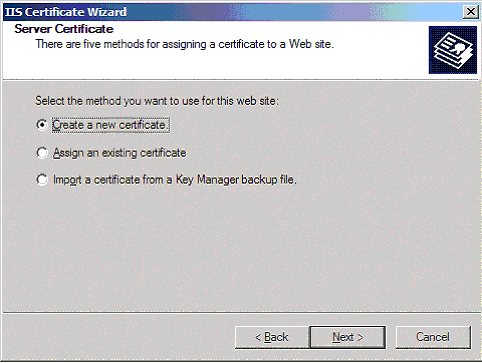
- Click Server Certificate. The following Wizard will appear:
- Click Create a new certificate and click Next.
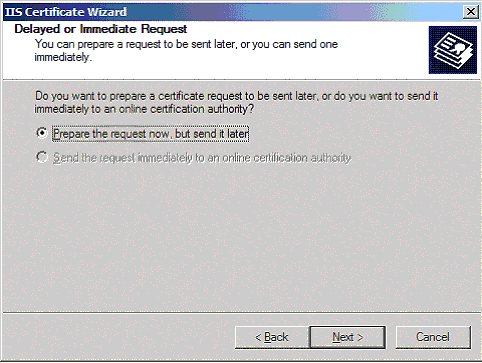
- Select Prepare the request now, but send it later and click Next.
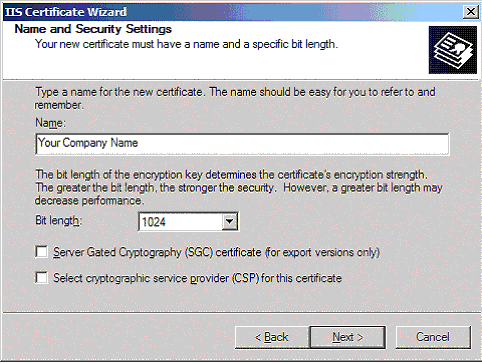
- Provide a name for the certificate, this needs to be easily identifiable if you are working with multiple domains. This is for your records only.
- If your server is 40 bit enabled, you will generate a 512 bit key. If your server is 128 bit you can generate up to 1024 bit keys. We recommend you stay with the default of 1024 bit key if the option is available. Click Next.
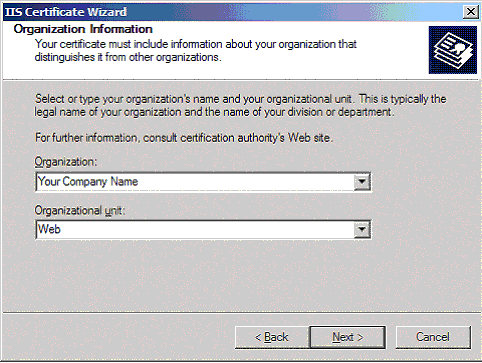
- Enter Organisation and Organisation Unit, these are your company name and department respectively. Click Next.
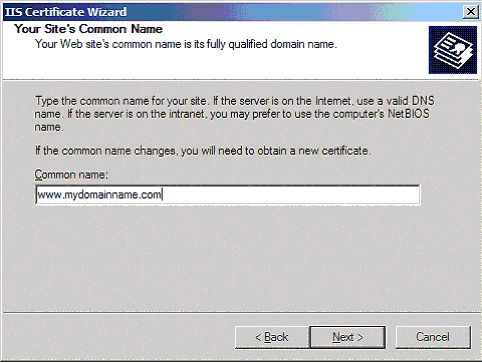
- The Common Name field should be the Fully Qualified Domain Name (FQDN) or the web address for which you plan to use your Certificate, e.g. the area of your site you wish customers to connect to using SSL. For example, an Instant SSL Certificate issued for comodo.net will NOT be valid for secure.comodo.net. If the web address to be used for SSL is secure.comodo.net, ensure that the common name submitted in the CSR is secure.comodo.net. Note that preceeding the FQDN with is NOT necessary. Click Next.
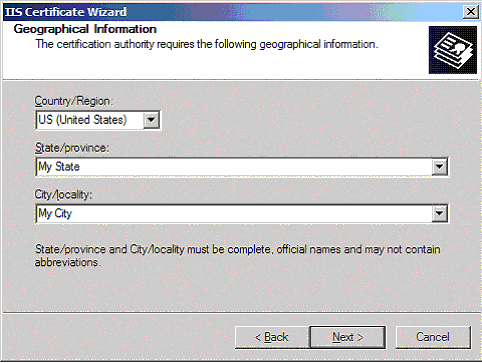
- Enter your Country, State and City. Click Next.
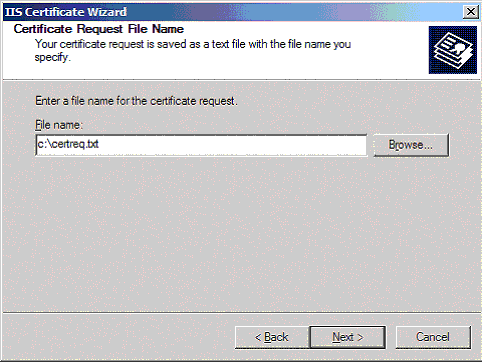
- Enter a filename and location to save your CSR. You will need this CSR to enroll for your Certificate. Click Next.
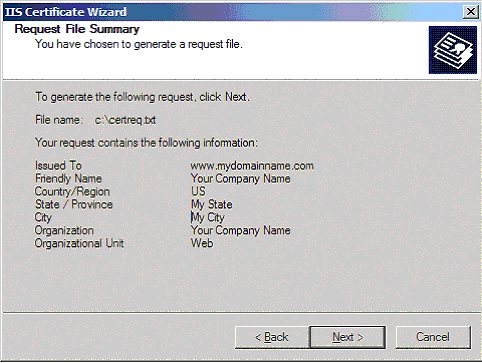
- Check the details you have entered. If you have made a mistake click Back and amend the details. Be especially sure to check the domain name the Certificate is to be Issued To. Your Certificate will only work on this domain. Click Next when you are happy the details are absolutely correct.
Applying for your Instant SSL Certificate Online
Visit www.instantssl.com and select your SSL Certificate product type. You will be required to submit the CSR into a webform. When you make your application, make sure you include the CSR in its entirety into the appropriate section of the enrollment form. When you view your CSR it will appear something like:
-----BEGIN NEW CERTIFICATE REQUEST-----
MIIDVjCCAr8CAQAwezEdMBsGA1UEAxMUd3d3Lm15ZG9tYWlubmFtZS5jb20xDDAK
BgNVBAsTA1dlYjEaMBgGA1UEChMRWW91ciBDb21wYW55IE5hbWUxEDAOBgNVBAcT
B015IENpdHkxETAPBgNVBAgTCE15IFN0YXRlMQswCQYDVQQGEwJVUzCBnzANBgkq
hkiG9w0BAQEFAAOBjQAwgYkCgYEAuev9LnSRX/6u5Iz7ckpt0IG4DwnAF/lsksJ0
n5r9w1EK9Np5/OJEt72r5es3nie5rTKo3O4yvSLovkS0vqT+iOlEZvl5B4mXTEPw
fDLjEcwcNb8SCJ4ArUAhHKJWHDKJHDKDA6587568gfhjfjFHGFHFhsgGHJGJjhhj
HFD^TGFrYTrYTrfGHI&DHJKDHkjwjkkgAgcwCgYIKoZIhvcNHKJHFrytDETR$456
AwcwEwYDVR0lBAwwCgYIKwYBBQUHAwEwgf0GCisGAQQBgjcNAgIxge4wgesCAQEe
WgBNAGkAYwByAG8AcwBvAGYAdAAgAFIAUwBBACAAUwBDAGgAYQBuAG4AZQBsAC67
QwByAHkAcAB0AG8AZwByAGEAcABoAGkAYwAgAFAAcgBvAHYAaQBkAGUAcgOBiQCq
EH3QppP7Ewuz6oh4EUXMbKdqieAcbQ52iFSXqQ/n1xAtEpVUfjIM3exr42EhyYlr
lV7cpUKbSr/eQ6c/hjiUi17EpvleBBV0BkFWsWzJoShx0BmOKvDnKINNQC3Jya+M
N/t9axyuCwdUYJiLglNnjcBLSxL/6hovXNDLuCLgMAAAAAAAAAAAMA0GCSqGSIb3
DQEBBQUAA4GBAEQT6Pwj0BHeOUw+AR0GAT30q+1OYNkr341CouMC6M7KqlKgVZDV
tRes4uz1Yf8+WRCutVvDByrey+CdgzJzHvHqS6lAj2swx8QadclVWOkZfH//k/KE
1MiOEb6c3Mp1ECorjIm+HRN20Qga+dnDBOowyRYn7Vz+NKar88mrJwk/
-----END NEW CERTIFICATE REQUEST-----
Be sure to copy the CSR text in its entirety into the application form, including the:
BEGIN CERTIFICATE REQUEST----- and -----END CERTIFICATE REQUEST-----
Installing your Instant SSL Certificate
Installing the Root & Intermediate Certificates
When your Instant SSL Certificate has been issued you will receive 3 Certificates via email from Comodo Security Services. Save these Certificates to the desktop of the webserver machine, then:
- Click the Start Button then select Run and type mmc
- Click File and select Add/Remove Snap in
- Select Add, select Certificates from the Add Standalone Snap-in box and click Add
- Select Computer Account and click Finish
- Close the Add Standalone Snap-in box, click OK in the Add/Remove Snap in
- Return to the MMC
A. To install the GTECyberTrustRoot Certificate:
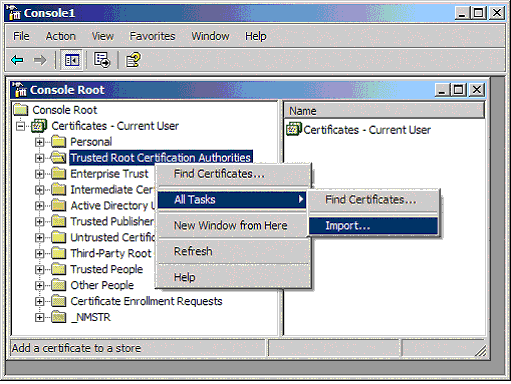
- Right click the Trusted Root Certification Authorities, select All Tasks, select Import.
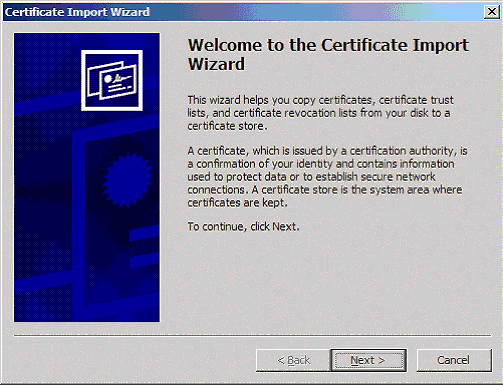
- Click Next.
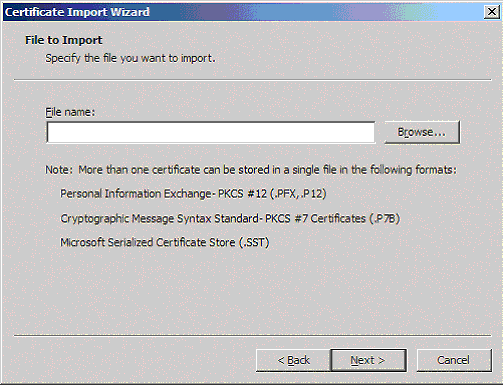
- Locate the GTECyberTrustRoot Certificate and click Next.
- When the wizard is completed, click Finish.
B. To install the ComodoSecurityServicesCA Certificate:
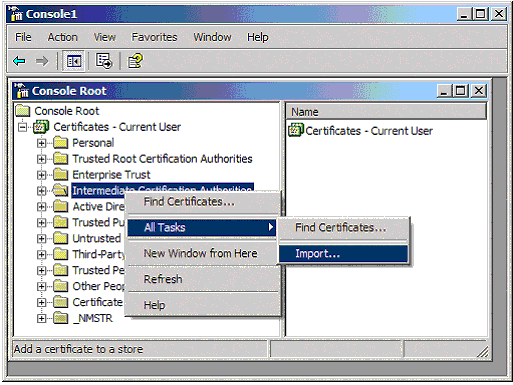
- Right click the Intermediate Certification Authorities, select All Tasks, select Import.
- Complete the import wizard again, but this time locating the ComodoSecurityServicesCA Certificate when prompted for the Certificate file.
- Ensure that the GTECyberTrustRoot certificate appears under Trusted Root Certification Authorities
- Ensure that the ComodoSecurityServicesCA appears under Intermediate Certification Authorities
C. Installing your SSL Certificate
- Select Administrative Tools
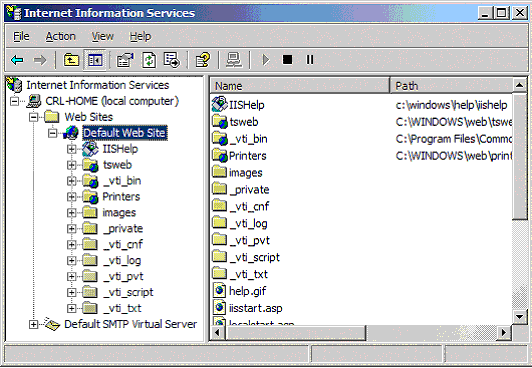
- Start Internet Services Manager
- Open the properties window for the website. You can do this by right clicking on the Default Website and selecting Properties from the menu.
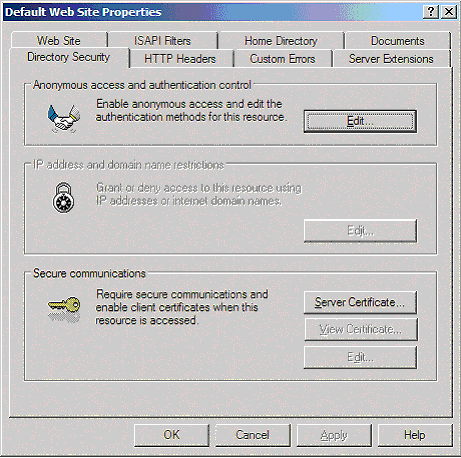
- Open Directory Security by right clicking on the Directory Security tab
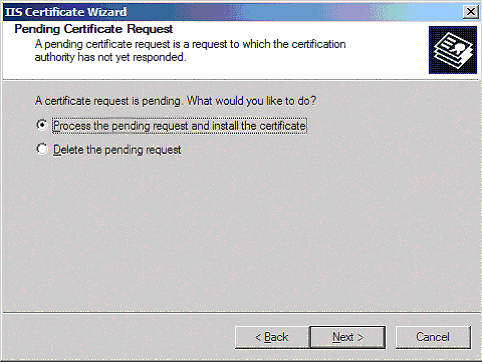
- Click Server Certificate. The following Wizard will appear:
- Choose to Process the Pending Request and Install the Certificate. Click Next.
- Enter the location of your certificate (you may also browse to locate your certificate), and then click Next.
- Read the summary screen to be sure that you are processing the correct certificate, and then click Next.
- You will see a confirmation screen. When you have read this information, click Next.
- You now have a server certificate installed.
Important: You must now restart the computer to complete the install
Open the Properties of the default website and ensure that SSL port contains the number 443 (it should default to this number automatically). You may want to test the Web site to ensure that everything is working correctly. Be sure to use when you test connectivity to the site.
Displaying your Secure Site Seal
As a valued Instant SSL customer we encourage you to display the Instant SSL Secure Site Seal to help promote your secure site to customers. The secure site seal is free to all Instant SSL customers. Guidelines on setting up Secure Site Seal are available at https://www.instantssl.com/ssl-certificate-support/siteseal/ssl-certificate-index.html
