Difference between revisions of "X-Cart:Affiliate (partner area)"
(→Summary Statistics) |
(→Referred Sales Statistics) |
||
| Line 314: | Line 314: | ||
''Detailed statistics'' | ''Detailed statistics'' | ||
| − | The '''Product''' column contains the names of referred products. The columns under the merged column '''Order''', contains order details, including ID and date. The '''Quantity''' and '''Total''' columns show the number of product items in the order and the total product cost. The '''Commission''' column tells you what commission you made out of the order. The '''Status''' column shows the commission status. The '''Commission source''' column tells you where the commission came from: is it your commission or a part of your affiliates' commission. | + | : The '''Product''' column contains the names of referred products. The columns under the merged column '''Order''', contains order details, including ID and date. The '''Quantity''' and '''Total''' columns show the number of product items in the order and the total product cost. The '''Commission''' column tells you what commission you made out of the order. The '''Status''' column shows the commission status. The '''Commission source''' column tells you where the commission came from: is it your commission or a part of your affiliates' commission. |
''Bestsellers statistics (top referred product only)'' | ''Bestsellers statistics (top referred product only)'' | ||
| − | The '''Product''' column contains the names of referred products. The '''Quantity''' and '''Total''' columns show the total number of ordered product items and the total product cost. The '''Commission''' column tells you the commission you earned for the product. | + | : The '''Product''' column contains the names of referred products. The '''Quantity''' and '''Total''' columns show the total number of ordered product items and the total product cost. The '''Commission''' column tells you the commission you earned for the product. |
===Summary Statistics=== | ===Summary Statistics=== | ||
Revision as of 12:51, 25 January 2010
Contents
Overview
The document describes the functionality of the Partner area of an X-Cart based store that utilizes the X-Affiliate add-on module. In no way the document deals with the details of a particular affiliate program, and it must not be treated as an official guide to a real-life affiliate program. The document does not also consider how the store administrator pays commissions to the members of the affiliate program, the deal is only between the store administrator and the members. The examples in this document use fake rates, figures and names.
Getting Registered
To become a member of the affiliate program, you need to get registered in the store as a partner. After that you will get access to the partner resources that include codes of affiliate banners and full affiliate statistics. Besides, depending on your affiliate plan you may be allowed to register your own affiliates and get a percentage of what they earn.
To get registered with the affiliate program:
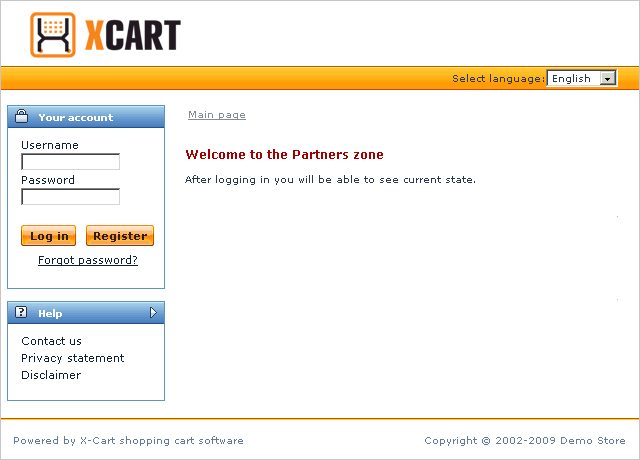
1. Go to the authorization page of the store's Partner area at http://www.example.com/store/partner/ where the http://www.example.com/store part stands for the true address of the store. The authorization page looks like in the picture below.
2. Click the Register button. This will open the registration form similar to the one in the picture above.
3. Complete the form and click the Submit button at the bottom of the form.
If the store administrator didn't force to moderate partner registration you will be able to login to the partner area immediately after submitting the form, otherwise you will need to wait until the store administrator approves your application. After you have finally got registered, you will receive an email message notification with your account details.
Overview of the Partner Area
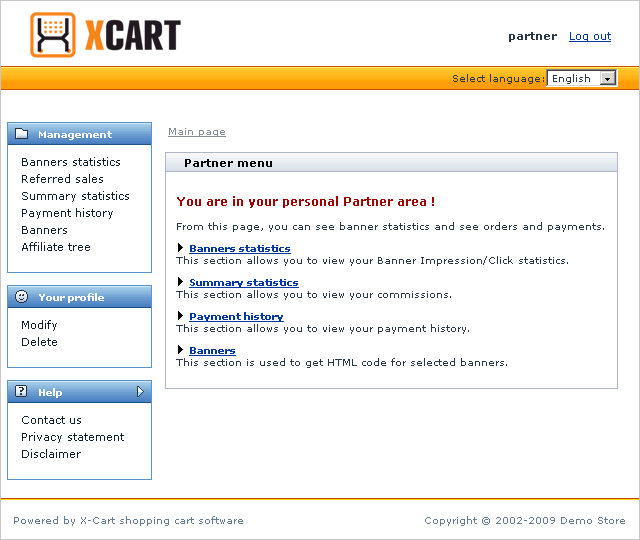
The Partner area is a special interface which provides you access to the affiliate resources that include codes of affiliate banners and different affiliate statistics. In general, the Partner area looks like in the picture below.
The Management menu provides access to the controls that you will use to manage your participation in the affiliate program. The items in the menu are used to access the following components:
- Banners statistics: The statistics on using your affiliate banners.
- Referred sales: The statistics on sales referred by your affiliates and you.
- Summary statistics: The general statistics on your sales and commissions for the whole period of your taking part in the affiliate program.
- Payment history: The log that contains the history of your commission payments.
- Banner: The section for generating banner codes and creating your own affiliate banners.
- Affiliate tree: The statistics on the commission earned by your affiliates and you.
The Your profile menu enables you to edit your partner profile.
The Help section contains links to help resources.
Handling Affiliate Banners
Overview
Although you are free to choose how exactly you will recommend the store and the products, the common practice is to win new buyers through a network of affiliate banners. This method is known to be one of the most popular and efficient techniques of the internet marketing.
In general, the idea of how the banner system works is the following: the store administrator creates a number of model banners and makes them available to registered members of the affiliate program. The affiliate partners then generate codes of the banners and put the codes to their web resources, which may include companion and subject matter websites, newsletters, forum signatures, bulletin boards, etc. Then a potential buyer clicks on the banner and gets redirected to the store. And if the visitor makes a purchase, the partner who promoted the sale gets a commission according to terms of the plan which the partner is subscribed to.
Technically, an affiliate banner can be a text, graphical or a multi-media unit linked to a certain page of the store. In contrast to simple link or banner, the affiliate banner not only leads a visitor to the store, but it also conveys the ID of the partner who placed the banner and thus referred the visitor. Commission is added to the partner's account according to the ID from the banners, that is why it is important to generate banner codes directly in the Partner area, not in third-party applications and systems.
Types of affiliate banners
The system supports several types of banners. One can generally classify them as generic banners and specific banners. Generic banners aim at promoting the store as a whole. This type of banner can be a text, graphical or media-rich banners that would always lead potential buyers to the home page of the store (e.g., http://www.example.com/store/home.php). Specific banners aim at promoting certain products and product groups. The supported types of such banners are product banners, category banners and manufacturer banners. Specific banners would always lead potential clients to the pages of certain products, categories or manufacturers. To get the best result, we recommend you use generic and specific banners conjointly.
Affiliate statistics
Along with the functionality for creating banners and generating banner codes, the system can track banner statistics that can help you estimate the efficiency of separate banners and your banner network on the whole. This section of the manual does not provide any details on how to use banners statistics. This information is covered in the #Banners statistics section further in this manual.
Generating codes of generic banners
Generic banners are the affiliate banners that aim at promoting the store as a whole. Such banners would lead potential buyers to the home page of the store, e.g., http://www.example.com/store/home.php. The available types of generic banners are text banners, graphic banners and media-rich banners.
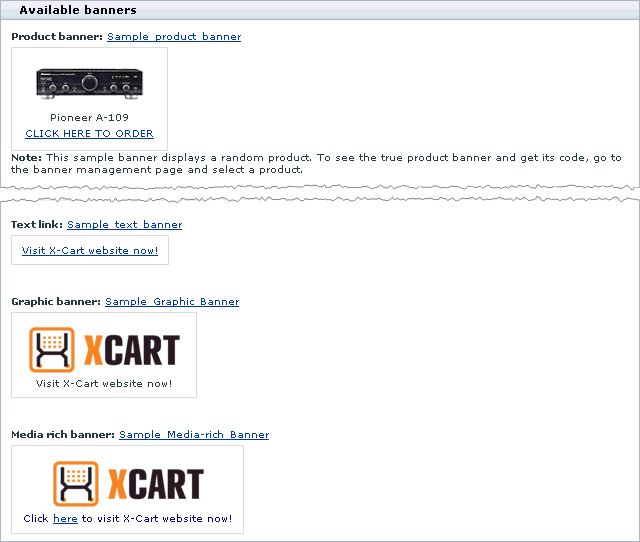
A text banner is a simple text link that can contain only plain text with no formatting or graphics. An example of a text banner is shown in the picture below.
A graphic banner is an image linked to the store's home page. The image can also be accompanied with a plain text description. An example of a graphic banner is shown in the picture below.
A media-rich banner is a banner that can include different combinations of formatted text, graphics of various formats, Flash object, etc. An example of a media-rich banner is shown in the picture below.
To generate the code of a generic banner:
1. Log in to the Partner area.
2. Go to the Banners management section (Management menu -> Banners). You will see a list of available banners (both generic and specific). Generic banners are titled Text link, Graphic banner and Media rich banner.
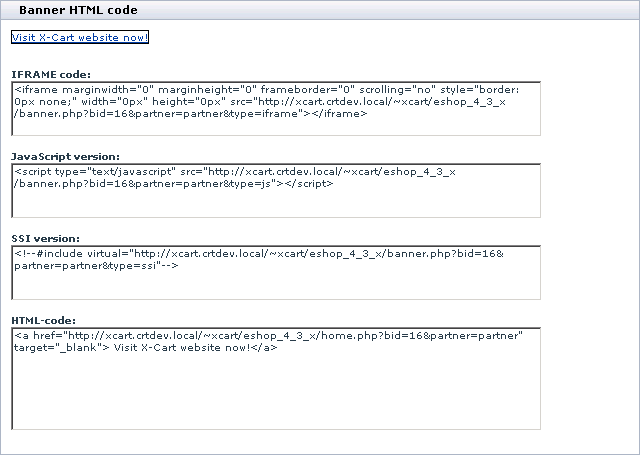
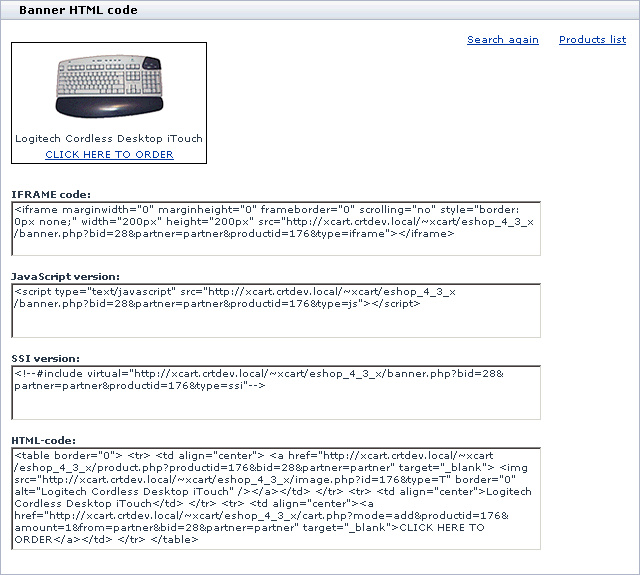
3. Click on the name of the banner for which you want to generate the code. This will open the page with the banner codes of different types: IFrame, JavaScript, SSI and HTML.
4. Copy the required code and include it into your web resource.
Generating codes of specific banners
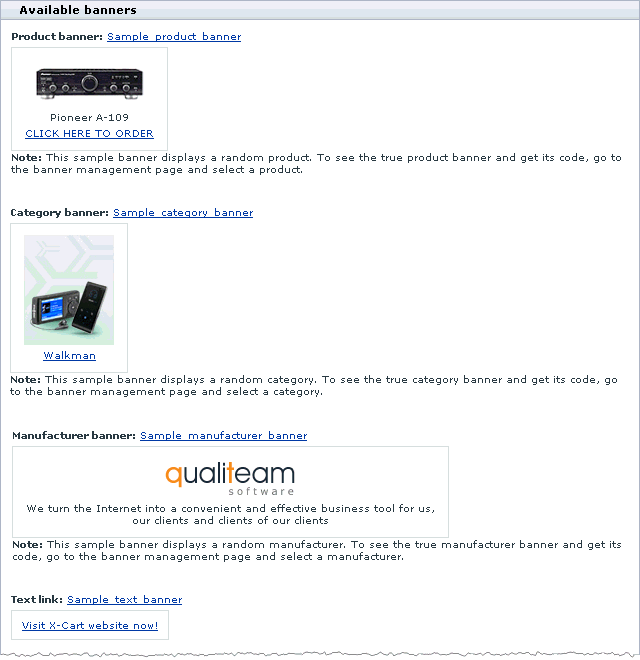
Specific banners are the affiliate banners that aim at promoting a certain product or groups of products. Such banners would lead potential buyers to specific pages of your store directly. The available types of specific banners are product banners, category banners and manufacturer banners. The store administrator can create a model banner of each type, and the affiliate partners should then generate codes of banners for particular products, categories and manufacturers.
A product banner is a banner that would lead directly to a product page, e.g., http://www.example.com/store/product.php?productid=176&cat=112&page=1. An example of a product banner is shown in the picture below.
A category banner is a banner that would lead directly to a category page, e.g., http://www.example.com/store/home.php?cat=3. An example of a category banner is shown in the picture below.
A manufacturer banner is a banner that would lead directly to a manufacturer page, e.g., http://www.example.com/store/manufacturers.php?manufacturerid=1. An example of a manufacturer banner is shown in the picture below.
To generate the code of a specific banner:
1. Log in to the Partner area.
2. Go to the Banners management section (Management menu -> Banners). You will see a list of available banners (both generic and specific). Specific banners are titled Product banner, Category banner and Manufacturer banner.
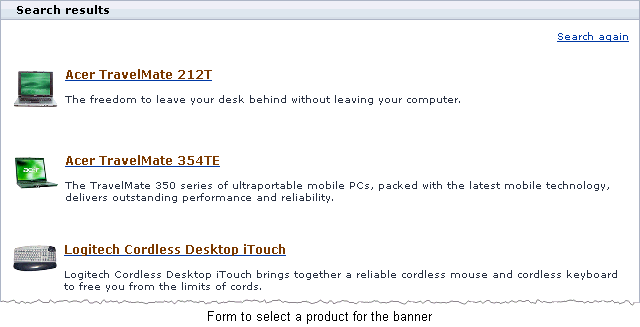
3. Click on the name of the banner for which you want to generate the code. This will open a page where you can select a particular product, category or manufacturer. Depending on the banner type, selection form will look like one of the pictures below.
or
or
4. Click on the unit you want to promote. This will open the page with the banner codes of different types: IFrame, JavaScript, SSI and HTML.
5. Copy the required code and include it into your web resource.
Creating Banners
In the Partner area you can create both generic and specific banners.
Creating generic banners
Affiliate partners can add media-rich banners that can easily replace both text and graphic banners as media-rich banners can incorporate different types of components, including formatted text, graphics of various formats, Flash object, etc.
To create a generic banner:
1. Log in to the Partner area and go to the Banners management section (Management menu -> Banners).
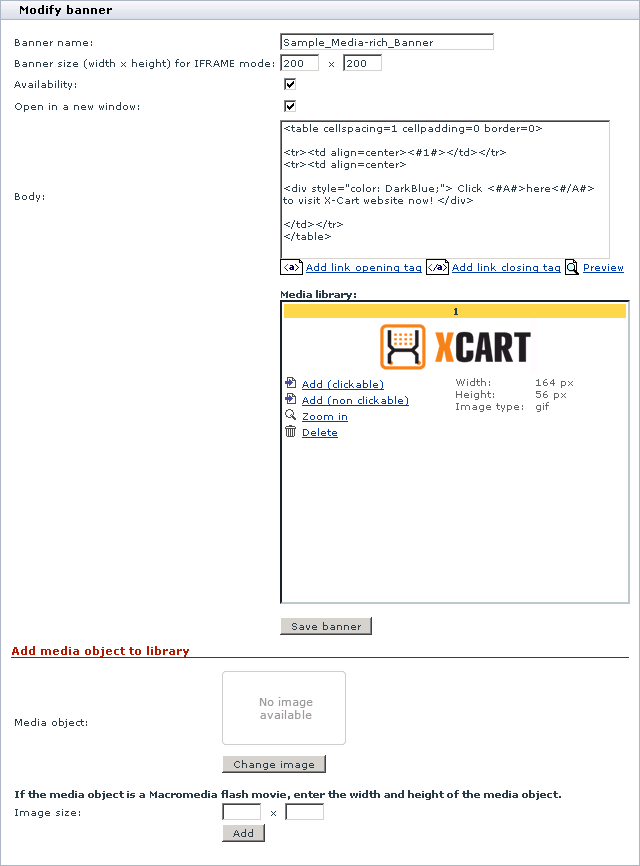
2. In the section menu, click on the Add Media rich banner link. This will open the form with banner attributes.
3. Complete the form. The meaning and purpose of the fields in the form are described below.
- Banner name: The name of the banner how it will be displayed in the list of banners.
- Banner size: The fixed width and height of the banner. Must be specified so that your partners could place the banner through an inline frame correctly.
- Availability: Availability of the banner code to your partners. Select to make the banner available, or leave it unselected to hide the banner.
- Open in new window: The attribute that specifies where to open the referred page after the banner has been clicked on. Select to open the page in a new window/tab or leave it unselected to open the page in the same window/tab.
- Body: Media-rich content of the banner that can include standard HTML formatting and components, graphic and flash objects from the built-in media library, and a few internal tags.
The components from the media library can be added either clickable or non-clickable. Clickable components appear in the form of internal tags <#A#> and </#A#> or <#A1#>, <#A2#>, <#A3#>, etc., and non-clickable components appear as internal tags <#1#>, <#2#>, <#3#>, etc. In both cases, the numbers within the tags identify the object from the media library, and the letter A means that the component is a clickable link. Unlike the standard HTML tag <a>, the links within the internal tags <#A#> and <#A1#> would always lead to the main page of your store and will convey the ID of the partner who placed the banner. Thus, if you need to place a text link in the banner, simply put the text between the start and end tags <#A#> and </#A#>.
In the example below, line 3 contains an internal tag <#1#> that means a non-clickable media object with the ID number 1. Line 7 contains internal tags #A#> and </#A#>, which means that the text between the two tags is a clickable link leading to your store's home page.
<table cellspacing=1 cellpadding=0 border=0>
<tr>
<td align=center><#1#></td>
</tr>
<tr>
<td align=center>
<div style="color:DarkBlue;">Click <#A#>here</#A#> to visit X-Cart website now!</div>
</td>
</tr>
</table>
- Media library: The media object repository. Objects are added to the library through a special interface below the banner attributes.
4. Click the Save banner button.
After a banner has been successfully created, you will be able to see it in the list of existing banners (both generic and specific).
Creating specific banners
1. Log in to the Partner area and go to the Banners management section (Management menu -> Banners).
2. In the section menu, click on the link corresponding to the banner type.
- Click on Add Product banner to create a product banner.
- Click on Add Category banner to create a category banner.
- Click on Add Manufacturer banner to create a manufacturer banner.
This will open a Modify banner form with banner attributes that differ depending on the banner type.
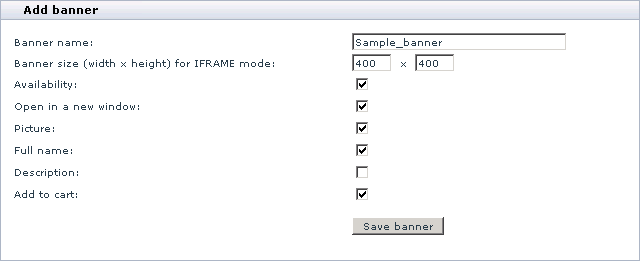
3. Complete the form. The meaning and purpose of the fields in the form are described below.
- Banner name: The name of the banner how it will be displayed in the list of banners.
- Banner size: The fixed width and height of the banner. Must be specified so that your partners could place the banner through an inline frame correctly.
- Availability: Availability of the banner code to your partners. Select to make the banner available, or leave it unselected to hide the banner.
- Open in new window: The attribute that specifies where to open the referred page after the banner has been clicked on. Select to open the page in a new window/tab or leave it unselected to open the page in the same window/tab.
- Picture: Having a product image or the category/manufacturer icon on the banner. Select to display the image on the banner, or leave it unselected to create the banner without an image.
- Full name: Having a product, category or manufacturer name on the banner. Select to display the name on the banner, or leave it unselected to create the banner without a name on it.
- Description: Having a product, category or manufacturer description on the banner. Select to display the product description on the banner, or leave it unselected to create the banner without a description.
- Add to cart: Having the add-to-cart button on the banner. Select to display the add-to-cart button on the banner and enable referred visitors to order the product in one click, or leave it unselected to create the banner without an add-to-cart button.
4. Click the Save banner button.
After a banner has been successfully created, you will be able to see it in the list of existing banners (both generic and specific).
Building Own Affiliate Network
If you are subscribed to an affiliate plan that allows for the multi-tier affiliate scheme, you can start building your own affiliate network by recruiting new affiliates. This will allow you not only earn commission for promoting sales directly, but also get a part of what your affiliate's earn. The general idea of how a multi-tier affiliate scheme works is described below.
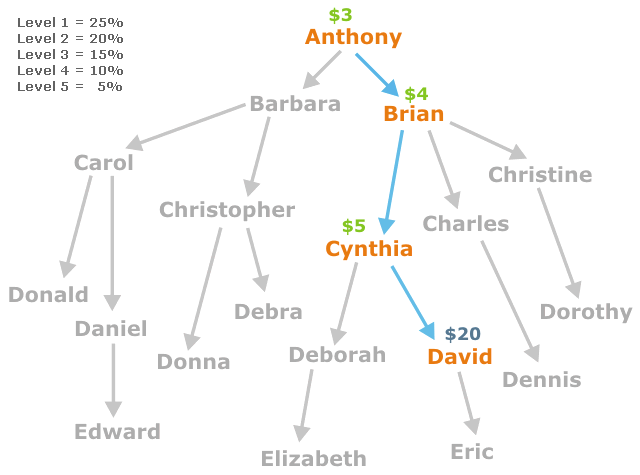
The store administrator creates a multi-tier affiliate plan. To put it simple, the plan offers a basic commission rate of 10% for any referred sale as well as the plan guarantees commission payments up to 5 levels deep. According to the plan, level 1 gets 25% of the sum originally earned by the affiliate partner who promoted the sale, level 2 gets 20% of the same sum, level 3 gets 15%, level 4 gets 10% and level 5 gets 5%. A new affiliate partner Anthony enrolls with your affiliate program and subscribes to the plan. Then Anthony starts building his own affiliate network by recruiting underneath members who, in turn, recruit their own affiliates. One day David, Anthony's affiliate partner tier 3, promotes a sale of $200 and gets his $20 as a 10% commission presumed by the plan. So, Cynthia, who recruited David, gets her 25% of David's commission ($5); Brian, who recruited Cynthia, gets his 20% of David's commission ($4); finally, Anthony, who recruited Brian, gets his 15% of David's commission ($3). In the example, the total commission of $32 goes to 4 partners.
The picture below helps you visualize the described idea. In the picture, the amount marked in blue is the direct 10% commission for promoting a $200 sale, and the amounts marked in greed are multi-tier affiliate payments.
Recruiting New Partners
Technically, recruiting new affiliates is similar to referring new buyers: an affiliate partner generates a special link and places it on a web resource, a visitor follows the links and comes to the page with the registration form. The visitor gets registered in the store and becomes a member of the affiliate program. From now, the affiliate partner, who placed the link, receives a part of the commission earned by the recruited member. The affiliation between the two members is determined according to the partner ID conveyed in the link. That is why it is important that you generate the link directly in the Partner area, not in third-party applications and systems. Remember, an inaccurate link with wrong parameters can deprive you of your commission.
To get the link:
1. Log in to the Partner area.
2. Go to the Banners management section (Management menu -> Banners). Below the section menu, you will see a text box with the link.
3. Copy the link and include it into your web resource. Now all new member who got registered in the program through your link will be marked as your affiliates, and you will get a part of their commission.
Affiliate Tree
In the Partner area you can review the whole network of your affiliates and see the amount of their commission. This information is presented in the form of a logical tree which is referred to as the Affiliate tree.
Viewing your affiliate tree
To view the tree of your affiliates:
- Log in to the Partner area.
- Go to the Affiliate tree section (Management menu -> Affiliate tree).
You will see the tree of your affiliates. A sample affiliate tree is shown in the picture below.
Understanding your affiliate tree statistics
The Partner column contains the name of partners in the multi-tier affiliate tree. You are always the root of the tree, and your affiliates are shown beneath you, with each new level shifted one tab to the right. The affiliates who yield commission to you (the root) are marked in bold.
In the example above, the root of the tree is Eric Johnson, while Dave Smith, James Brown, Anthony Jones and Patricia Davis are Eric's affiliates of different levels deep. But Eric does not receive any commission of Patricia Davis' sales because the affiliate plan to which Eric is subscribed presumes multi-tier commission of only three levels deep.
The Commission column shows you the total amount earned by a particular affiliate partner. And the Affiliate commission column shows you the total amount earned by the partner's affiliates of deeper levels.
Affiliate Statistics
Banners Statistics
Banners statistics can help you estimate the general efficiency of your banner network and the efficiency of separate banners and links. The statistics include banners' views-to-clicks and clicks-to-purchases conversion rates, the amount of money raised through all banners and per each banner.
To display banners statistics:
1. Log in to the Partner area and go to the Banners statistics section (Management menu -> Banners statistics). This will open the search form.
2. In the search form, define the period for which you want to display the statistics.
3. Click the Search button. This will display the banners statistics.
Understanding banner statistics
The Banner column contains the names of banners. The Views column tells you how many times the particular banner has been viewed, and the Clicks column tells you how many times the banner has been clicked on. The Click rate column shows the views-to-clicks conversion rate - the ratio of how many times the banner was clicked on after it had been viewed. The columns under the merged column Order show the number of orders that were placed after the banner had been clicked on and the total order amount. The Conversion rate column tells you what amount of money you raised per click.
Referred Sales Statistics
Referred sales statistics tells you what products your partners and you have promoted, and what commission you earned.
To display referred sales statistics:
1. Log in to the Partner area and go to the Referred Sales section (Management menu -> Referred sales). This will open the search form.
2. Complete the search form: Define the period for which you want to display the statistics. If necessary, specify a product's SKU number (to show statistics for that product only), select a partner (to show statistics for that partner only) and choose the order status.
To display the list of referred bestsellers only, select the Show top products check box.
3. Click the Search button. This will display the referred sales statistics.
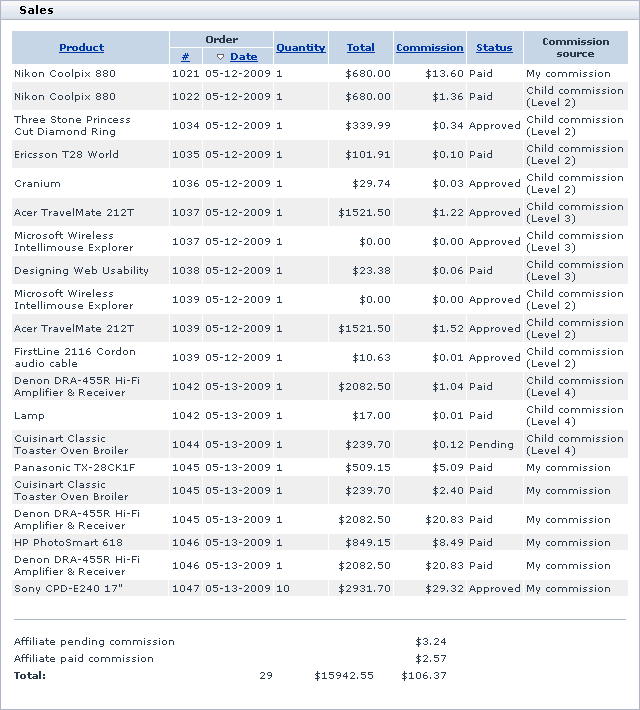
- With the Show top products check box unselected, the statistics will look like in the picture below.
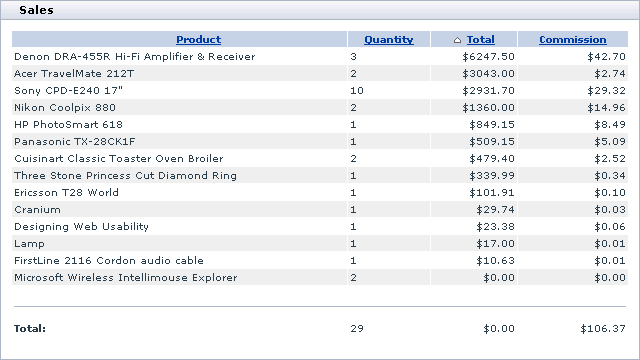
- With the Show top products check box selected, the statistics will look like in the picture below.
Understanding referred sales statistics
Detailed statistics
- The Product column contains the names of referred products. The columns under the merged column Order, contains order details, including ID and date. The Quantity and Total columns show the number of product items in the order and the total product cost. The Commission column tells you what commission you made out of the order. The Status column shows the commission status. The Commission source column tells you where the commission came from: is it your commission or a part of your affiliates' commission.
Bestsellers statistics (top referred product only)
- The Product column contains the names of referred products. The Quantity and Total columns show the total number of ordered product items and the total product cost. The Commission column tells you the commission you earned for the product.
Summary Statistics
Summary statistics provides a general overview of your activity as a participant of the affiliate program.
To display summary statistics log in to the Partner area and go to the Summary statistics section (Management menu -> Summary statistics). You will see a box with the statistics.
Understanding summary statistics
- Total sales: The number of sales referred by your affiliates and you.
- Total pending sales: The number of sales referred by your affiliates and you that have not been approved yet.
- Total approved sales: The number of sales referred by your affiliates and you that that have been approved.
- Total sales (my commissions): The number of sales referred by you.
- Total pending sales (my commissions): The number of sales referred by you that have not been approved yet.
- Total approved sales (my commissions): The number of sales referred by you that that have been approved.
- Total paid sales (my commission): The number of sales referred by you for which the commission has been paid out.
- Pending sale commissions: The commission amount for the orders that have not been approved yet. This commission cannot be paid before the respective orders are approved.
- Approved sale commissions: The commission amount for the orders that have been approved. This commission can be paid if the amount is equal to or exceeds the minimum commission payment for your affiliate plan.
- Paid sales commissions: The amount of commission that has been paid out.
