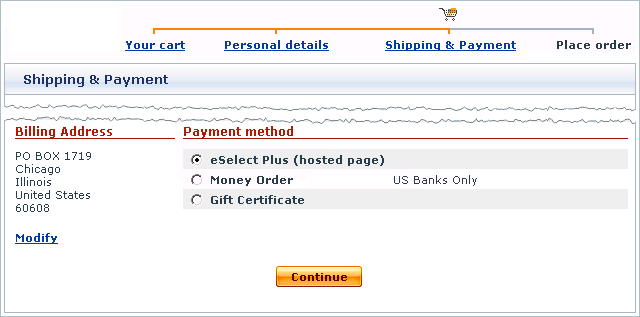
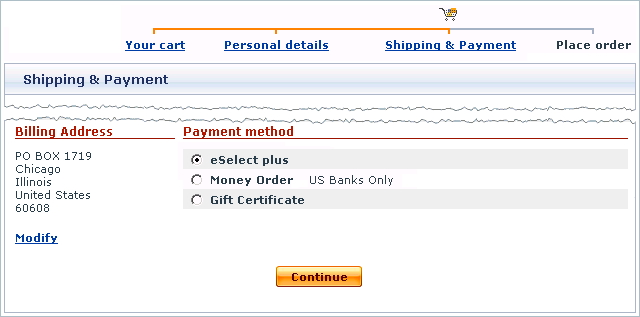
Difference between revisions of "X-Cart:ESELECTplus"
(→Setting up eSELECTplus API) |
(→Setting up eSELECTplus API) |
||
| Line 48: | Line 48: | ||
# Adjust the configuration settings for eSELECTplus API and click the Update button to apply the changes. | # Adjust the configuration settings for eSELECTplus API and click the Update button to apply the changes. | ||
#* <u>Store ID</u>: Enter the name of your merchant account with Moneris (the one you use to log in to back-office for eSELECTplus). | #* <u>Store ID</u>: Enter the name of your merchant account with Moneris (the one you use to log in to back-office for eSELECTplus). | ||
| − | #* <u>API Token</u>: Enter the value of the API Token from your Moneris account. | + | #* <u>API Token</u>: Enter the value of the API Token from your Moneris account.<br>If you do not know the value, log in to the eSELECTplus back-office at https://www3.moneris.com/mpg/ and go to Admin -> Store Setting. The API Token will be displayed on the screen. It is recommended that you copy and paste the value. |
#* <u>Account type</u>: Select your account type (USA or Canada). | #* <u>Account type</u>: Select your account type (USA or Canada). | ||
| − | #* <u>Test/Live mode</u>: Choose the mode in which the gateways must operate. | + | #* <u>Test/Live mode</u>: Choose the mode in which the gateways must operate.<br>The "test" mode means that you can submit test orders and perform test transaction. Money will not be withdrawn from credit cards. The "live" mode is the full functioning mode with real transactions and charges. It must be used when only you are ready to go live. |
| − | #* <u>Order prefix</u>: Enter a prefix that will be automatically added to IDs of orders placed in your store and paid through eSELECTplus API. | + | #* <u>Order prefix</u>: Enter a prefix that will be automatically added to IDs of orders placed in your store and paid through eSELECTplus API.<br>Having a prefix ensures that orders will have unique IDs and will never coincide with orders placed in another online store of yours that also uses eSELECTplus as a payment option. |
#* <u>Action to be performed on order placement:</u> Choose whether Authorize.Net must capture money automatically (Auth and Capture) or only freeze the funds until you capture the authorized amount manually through the X-Cart Admin area (Auth only). | #* <u>Action to be performed on order placement:</u> Choose whether Authorize.Net must capture money automatically (Auth and Capture) or only freeze the funds until you capture the authorized amount manually through the X-Cart Admin area (Auth only). | ||
| − | #* <u>3d secure</u>: Choose whether you wish to use the 3D Secure checking. | + | #* <u>3d secure</u>: Choose whether you wish to use the 3D Secure checking.<br>3-D Secure is the technology behind the Verified by Visa and MasterCard SecureCode security initiatives, which provide for an additional technique for authenticating the cardholder at the time of the purchase.{{Note1|Note: This 3-D Secure checking mechanism is completely ensured by CyberSource, and it does not relate to the X-Cart's 3D Secure Payment Authentication.}} |
# Return to the list of payment methods and activate eSELECTplus API by selecting the check box next to the gateway's name. | # Return to the list of payment methods and activate eSELECTplus API by selecting the check box next to the gateway's name. | ||
# Click the '''Update''' button. | # Click the '''Update''' button. | ||
| Line 60: | Line 60: | ||
#* Go to the section Admin -> Directpost config. | #* Go to the section Admin -> Directpost config. | ||
#* Choose to generate a new configuration or press the Edit button, which opens an existing configuration for editing. | #* Choose to generate a new configuration or press the Edit button, which opens an existing configuration for editing. | ||
| − | #* In the Response Method, select the check box Displayed as key/value pairs on our server. Leave the default values of other fields. | + | #* In the Response Method, select the check box Displayed as key/value pairs on our server. Leave the default values of other fields. |
| + | |||
| + | After you have configured and activated the gateway, your customers will be able to choose eSELECTplus API as a payment option. | ||
: [[Image:pg_eselectplus_api_04.gif|640px]] | : [[Image:pg_eselectplus_api_04.gif|640px]] | ||
[[Category:X-Cart user manual]] | [[Category:X-Cart user manual]] | ||
Revision as of 19:31, 31 January 2010
Contents
Overview
eSELECTplus is an online transaction processing engine by a Canadian payment processor Moneris Solutions Corp. eSELECTplus is one of the largest payment gateways in North America, which enables you to accept payments by major credit cards in both Canadian and U.S. dollars. X-Cart is currently integrated with two payment methods offered by eSELECTplus: eSELECTplus Application Program Interface (API) and eSELECTplus Secure Payment Page. The major difference between the two methods is where you host the payment pages for you store.
eSELECTplus Secure Payment Page
With eSELECTplus Secure Payment Page the payment pages are hosted on the side of Moneris, and Moneris provides all the necessary resources to process a transaction, including collection of payment information. Customers get redirected to a secure payment page and enter their card details there. There is no need to purchase an SSL certificate as all cardholder information is captured and protected by Moneris.
eSELECTplus Application Program Interface (API)
With eSELECTplus API the payment pages are hosted with the rest part of the store. The data is transmitted to Moneris in the background mode and customers never leave your website during the purchase. Since eSELECTplus API involves collection and transmission of sensitive cardholder data, you must ensure the security of this data by setting up secure connection with eSELECTplus. Otherwise, Moneris will reject the transaction.
Secure connection is implemented through an SSL certificate installed on your server/hosting account. For recommended SSL certificate providers please check the X-Cart marketplace at http://marketplace.x-cart.com/ . Another requirement of eSELECTplus API is that your server must provide support for any of the following HTTPS modules: Net::SSLeay, CURL, libCURL, OpenSSL or HTTPS-cli.
Obtaining a Moneris/eSELECTplus Account
If you have not yet registered an account with Moneris, you should do it before you start setting up eSELECTplus in X-Cart. To open an account, go to the Moneris website at https://www3.moneris.com/connect/en/signup/index.php and follow the instructions on the screen. After you have registered an account, you can set up eSELECTplus Application Program Interface (API) and eSELECTplus Secure Payment Page in the X-Cart Admin area.
Setting up eSELECTplus Secure Payment Page
To use eSELECTplus Secure Payment Page as one of the payment options in the store:
- Log in to the X-Cart Admin area.
- Go to the Payment methods section (Administration menu -> Payment methods) and scroll down to the Payment gateways form.
- Select eSelect Plus (hosted pages) from the drop-down list and click the Add button.

After you have clicked on Add, eSELECTplus Secure Payment Page will be added to the list of the available payment methods.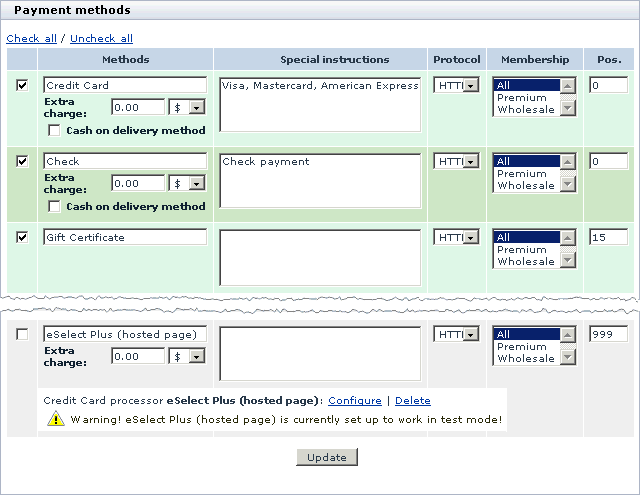
- Click on the Configure link. This opens the configuration page for eSELECTplus Secure Payment Page.
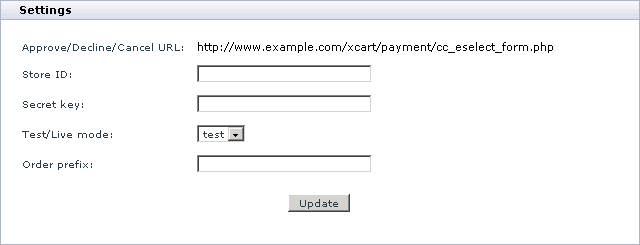
- Adjust the configuration settings for eSELECTplus Secure Payment Page and click the Update button to apply the changes.
- Approved/Declined/Cancel URL: The URL from which Moneris will receive data from X-Cart.Important: Moneris uses the URL to check whether the payment request is sent by your store, not a fake website. Make sure that all URLs in the Moneris back-office coincide with the URL in the X-Cart admin area.
- Store ID: Enter the name of your merchant account with Moneris (the one you use to log in to back-office for eSELECTplus).
- Secret key: Enter the secret key from the Moneris back-office.
The key is used to encrypt order and customer data. Make sure the secret key you enter here coincides with the one in the Moneris back-office. - Test/Live mode: Choose the mode in which the gateways must operate.
The "test" mode means that you can submit test orders and perform test transaction. Money will not be withdrawn from credit cards. The "live" mode is the full functioning mode with real transactions and charges. It must be used when only you are ready to go live. - Order prefix: Enter a prefix that will be automatically added to IDs of orders placed in your store and paid through eSELECTplus Secure Payment Page.
Having a prefix ensures that orders will have unique IDs and will never coincide with orders placed in another online store of yours that also uses eSELECTplus as a payment option.
- Approved/Declined/Cancel URL: The URL from which Moneris will receive data from X-Cart.
- Return to the list of payment methods and activate eSELECTplus Secure Payment Page by selecting the check box next to the gateway's name.
- Click the Update button.
After you have configured and activated the gateway, your customers will be able to choose eSELECTplus Secure Payment Page as a payment option.
Setting up eSELECTplus API
To use eSELECTplus Application Program Interface (API) as one of the payment options in the store:
- Log in to the X-Cart Admin area.
- Go to the Payment methods section (Administration menu -> Payment methods) and scroll down to the Payment gateways form.
- Select eSelect plus from the drop-down list and click the Add button.

After you have clicked on Add, eSELECTplus API will be added to the list of the available payment methods.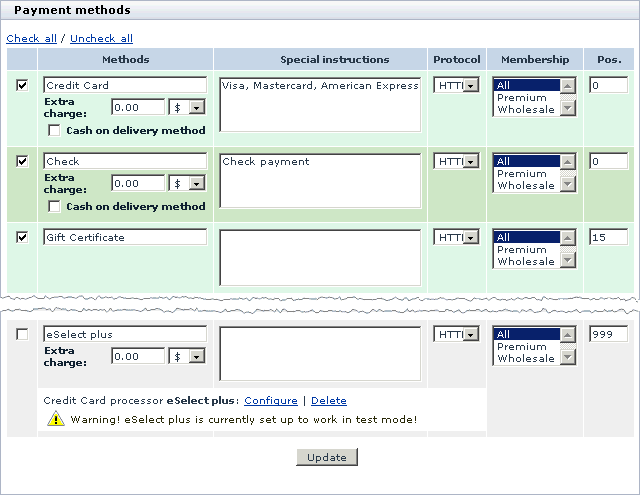
- Click on the Configure link. This opens the configuration page for eSELECTplus API.
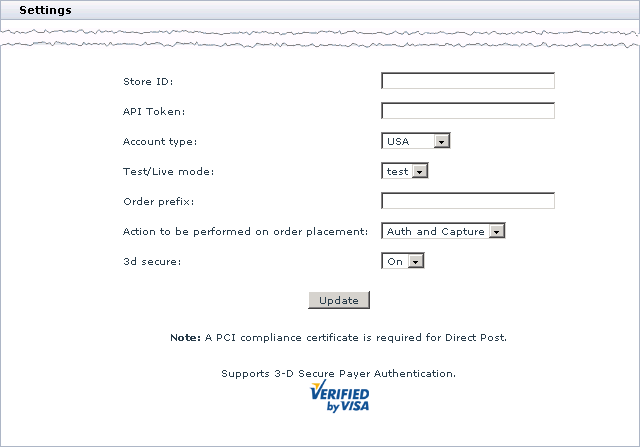
- Adjust the configuration settings for eSELECTplus API and click the Update button to apply the changes.
- Store ID: Enter the name of your merchant account with Moneris (the one you use to log in to back-office for eSELECTplus).
- API Token: Enter the value of the API Token from your Moneris account.
If you do not know the value, log in to the eSELECTplus back-office at https://www3.moneris.com/mpg/ and go to Admin -> Store Setting. The API Token will be displayed on the screen. It is recommended that you copy and paste the value. - Account type: Select your account type (USA or Canada).
- Test/Live mode: Choose the mode in which the gateways must operate.
The "test" mode means that you can submit test orders and perform test transaction. Money will not be withdrawn from credit cards. The "live" mode is the full functioning mode with real transactions and charges. It must be used when only you are ready to go live. - Order prefix: Enter a prefix that will be automatically added to IDs of orders placed in your store and paid through eSELECTplus API.
Having a prefix ensures that orders will have unique IDs and will never coincide with orders placed in another online store of yours that also uses eSELECTplus as a payment option. - Action to be performed on order placement: Choose whether Authorize.Net must capture money automatically (Auth and Capture) or only freeze the funds until you capture the authorized amount manually through the X-Cart Admin area (Auth only).
- 3d secure: Choose whether you wish to use the 3D Secure checking.
3-D Secure is the technology behind the Verified by Visa and MasterCard SecureCode security initiatives, which provide for an additional technique for authenticating the cardholder at the time of the purchase.Note: This 3-D Secure checking mechanism is completely ensured by CyberSource, and it does not relate to the X-Cart's 3D Secure Payment Authentication.
- Return to the list of payment methods and activate eSELECTplus API by selecting the check box next to the gateway's name.
- Click the Update button.
- Adjust the configuration setting in your Moneris account (the back-office for eSELECTplus).
- Log in to the gateway's back-office at https://www3.moneris.com/mpg/.
- Go to the section Admin -> Directpost config.
- Choose to generate a new configuration or press the Edit button, which opens an existing configuration for editing.
- In the Response Method, select the check box Displayed as key/value pairs on our server. Leave the default values of other fields.
After you have configured and activated the gateway, your customers will be able to choose eSELECTplus API as a payment option.
