Difference between revisions of "LiteCommerce:Integration with Payment Gateways"
| Line 61: | Line 61: | ||
class PaymentMethod_processor_class extends PaymentMethod_credit_card | class PaymentMethod_processor_class extends PaymentMethod_credit_card | ||
{ | { | ||
| − | var $processorName = "CustomModule"; | + | var $processorName = "CustomModule"; |
| − | var $configurationTemplate = "modules/CustomModule/config.tpl"; | + | var $configurationTemplate = "modules/CustomModule/config.tpl"; |
| − | var $hasConfigurationForm = true; | + | var $hasConfigurationForm = true; |
function process(&$cart) | function process(&$cart) | ||
Latest revision as of 17:08, 5 February 2010
LiteCommerce shopping cart supports the most popular payment gateways, such as AuthorizeNet, 2CheckoutCom, PayPal etc. It also provides API for easy integration with other payment gateways, both web based or using background requests.
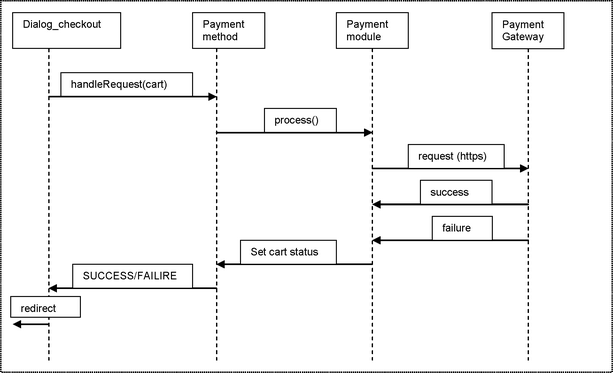
Figure 8.1 Processing payments at checkout for background payment methods
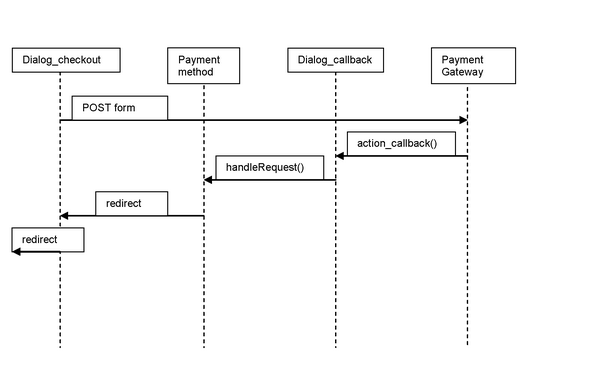
Figure 8.2 Processing payments at checkout for web-based payment methods
To integrate LiteCommerce with your specific Payment Processor, you need to follow the steps below:
1. First, check whether your Payment Gateway is supported by LiteCommerce or not. Our developers are constantly developing new Payment Gateway modules and your Payment Gateway might be already included into the supported gateways list or can be in the process of development now. If not, you can request custom development of your gateway from our development team. Please see custom development pricing for more details.
2. If you decide to develop the module by yourself, please contact us and obtain a unique module ID for your future module to avoid conflicts with third-party modules. This reduces the risk of collisions between third-party and original modules. It is also recommended for you to buy one of our existing Payment Gateway modules, module source code is the best documentation and example at once. The source code is open except for one encrypted file, which shouldn't prevent you from using the code as an example.
3. Create module repository in classes/module/CustomModule, skins/admin/en/modules/CustomModule and skins/default/en/modules/CustomModule (optional, depends on you PG needs). Assume that Payment Gateway is a Credit Card processor.
4. Create MANIFEST (see MANIFEST file format in chapter 2), top-level module class CustomModule.php and module SQL install code
Example 8.1 MANIFEST
module_id=NNNN
name=CustomModule
description=Custom credit card payment processor
enabled=1
version=2.0
dependencies=
Example 8.2 Top-level PG module class
class Module_CustomModule extends Module
{
var $minVer = "2.0";
var $isFree = true;
function init()
{
parent::init();
$pm =& func_new('PaymentMethod');
$pm->registerMethod(“processor_class_here"); // register your payment gateway here
// “processor_class” must be added to
// database from install.sql
}
}
Example 8.2 SQL install.sql code
INSERT INTO xlite_payment_methods SET payment_method = 'processor_class', name = 'Credit Card', details = 'Visa, Mastercard, American Express',
orderby = '15', class = 'processor_class', enabled = 0, params = ‘';
5. The next step is to create the kernel part of the PG processor. Create classes/modules/CustomModule/kernel/PaymentMethod/processor_class.php
Example 8.3 Payment processor code (background request)
class PaymentMethod_processor_class extends PaymentMethod_credit_card
{
  var $processorName = "CustomModule";
  var $configurationTemplate = "modules/CustomModule/config.tpl";
  var $hasConfigurationForm = true;

function process(&$cart)
{
// process method will be called when a customer clicks on the “Submit order” button from the
// checkout page
// now make a background call to PaymentGateway
// you can use HTTPS LiteCommerce core class to make PG requests
// or call external scripts, etc.
// …
// After you have made a request, you can set order status to (P)rocessed of (F)ailed
// depending on the received answer
//
$cart->set(“status”, “P”); // mark order as processed
$cart->update(); // save changes
}

}
