Difference between revisions of "X-Cart:Sage Pay"
(→Setting up Sage Pay Form) |
(→Overview) |
||
| Line 1: | Line 1: | ||
==Overview== | ==Overview== | ||
| − | Sage Pay is a large UK-based internet payment service provider which offers a range of services allowing you to securely process credit card payments online. Among the acquiring banks for the Sage Pay gateway are Lloyds TSB, Bank of Scotland, HSBC, JCB, American Express and other banking institutions. Sage Pay provides a number of different options for website payments. X-Cart is currently integrated with the following products: <u>Sage Pay</u> <u> | + | Sage Pay is a large UK-based internet payment service provider which offers a range of services allowing you to securely process credit card payments online. Among the acquiring banks for the Sage Pay gateway are Streamline (The Royal Bank of Scotland/NatWest), Lloyds TSB, Lloyd's Banking Group (Lloyds TSB & Halfax Bank of Scotland (HBOS)), HSBC, JCB, American Express and other banking institutions. Sage Pay provides a number of different options for website payments. X-Cart is currently integrated with the following products: <u>Sage Pay Form</u> and <u>Sage Pay Direct</u>, however, <u>Sage Pay Server & InFrame</u> will be supported when X-Cart 4.4 is released in June 2010. The major difference between the protocols is where you host the payment pages for you store. |
== Sage Pay Form == | == Sage Pay Form == | ||
Revision as of 09:33, 21 September 2010
Contents
Overview
Sage Pay is a large UK-based internet payment service provider which offers a range of services allowing you to securely process credit card payments online. Among the acquiring banks for the Sage Pay gateway are Streamline (The Royal Bank of Scotland/NatWest), Lloyds TSB, Lloyd's Banking Group (Lloyds TSB & Halfax Bank of Scotland (HBOS)), HSBC, JCB, American Express and other banking institutions. Sage Pay provides a number of different options for website payments. X-Cart is currently integrated with the following products: Sage Pay Form and Sage Pay Direct, however, Sage Pay Server & InFrame will be supported when X-Cart 4.4 is released in June 2010. The major difference between the protocols is where you host the payment pages for you store.
Sage Pay Form
With Sage Pay Form the payment pages are hosted on the side of Sage Pay; customers get redirected to the Sage Pay website during the purchase and enter their card details there. Sage Pay Form is generally recommended if you do not have enough resources to ensure adequate security of your your server/hosting account. You must choose Form if your shared hosting account lacks a dedicated IP address, dedicated SSL certificate and/or one of the supported HTTPS modules (Net::SSLeay, CURL, libCURL, OpenSSL or HTTPS-cli).
Sage Pay Direct
With Sage Pay Direct the payment pages are hosted together with the rest part of your store; the data is transferred to Sage Pay in the background mode and customers never leave your website during the purchase. If necessary, you can even use this advantage to white-label the payment process, although it is common practice that you tell your customers which provider is going to process their payment in case customers have concerns about card security.
To use Sage Pay Direct in your store you need:
- A dedicated IP address. Required to be able install a dedicated SSL certificate.
- A dedicated 128-bit SSL certificate to secure your payment pages. For recommended SSL certificate providers please check the X-Cart marketplace at http://marketplace.x-cart.com/.
- Any of the supported HTTPS modules (Net::SSLeay, CURL, libCURL, OpenSSL or HTTPS-cli) installed on your server.
You must also be aware that now Visa, MasterCard and other major card issuing authorities have introduced strict rules and guidelines that cover any activity on collecting and storing card details. Since with Sage Pay Direct you will be collecting sensitive card info on your website, you will need to comply these rules and guidelines and undergo an audit to ensure that the data is protected well. If you do not wish to undergo such an audit, outsource the collecting of card info to Sage Pay by using Sage Pay Form.
Obtaining a Sage Pay Account
If you have not registered an account with Sage Pay yet, you should do it before you start setting up Sage Pay in X-Cart. To open an account, go to the Sage Pay website at https://support.sagepay.com/apply/ and follow the instructions on the screen. After you have registered an account, you can set up Sage Pay Form or Sage Pay Direct in the X-Cart Admin area.
Alternatively, you can test Sage Pay without opening an account by using the gateway to the "simulator" operating mode.
Setting up Sage Pay Form
To use Sage Pay Form as one of the payment options in the store:
- Log in to the X-Cart Admin area.
- Go to the Payment methods section (Administration menu -> Payment methods) and scroll down to the Payment gateways form.
- Select Sage Pay (Form protocol) from the drop-down list and click the Add button.

After you have clicked on Add, Sage Pay Form will be added to the list of the available payment methods.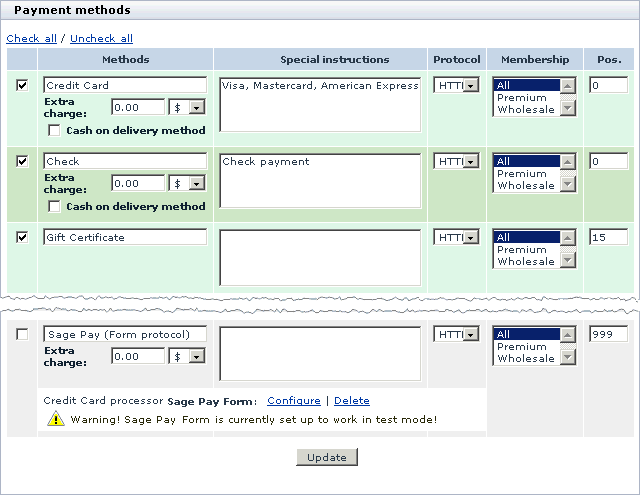
- Click on the Configure link. This opens the configuration page for Sage Pay Form.
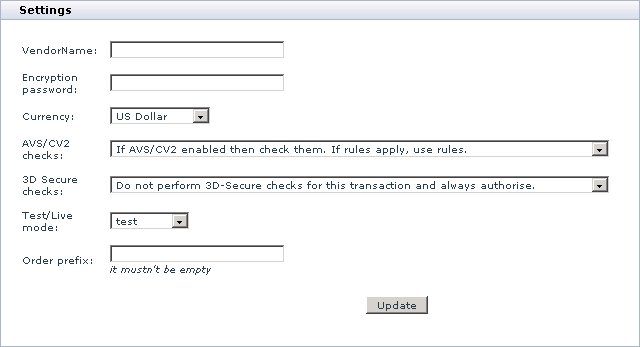
- Adjust the configuration settings for Sage Pay Form and click the Update button to apply the changes.
- VendorName: Enter the name of your merchant account with Sage Pay.
- Encryption password: Enter the code that you received from Sage Pay via email when registering an account.
The code, a mixture of 16 numbers/letters in both upper and lower case like oVPMeTE1xjXdT0nm, is used to encrypt order and customer data through a Simple XOR algorithm before it is sent to Sage Pay. Make sure that the encryption password you enter here coincides with the one in your Sage Pay back-office. - Currency: Choose the currency in which you wish to accept payments through Sage Pay Form.
- AVS/CV2 checks: Choose whether you wish to use AVS and CV2 checking mechanisms and how.
The aim of these security checks is to provide you with additional information about the orders and reduce the risk of fake transactions.
AVS (Address Verification Service) checks whether the claimed billing address provided by the store customer coincides with the registered address of the cardholder. A successful result says that the ordering customer knows the cardholder's address, which is a good indication that they are the true cardholder.
CV2 stands for the last 3 or 4 digits of the number on the signature strip on the back of all debit and credit cards. In order to enter the correct number, a person who places an order must either be the cardholder, or must have spied the CV2 number when handling the card.
The AVS/CV2 checking scheme has many benefits, but it also has a number of limitations. The most serious one is that AVS works only for the UK, and it is not possible to check AVS on overseas orders. It means that for all non-UK orders the check will always return a failure, and you can rely on the CV2 check only. Be aware that the gateway may automatically decline such orders if this behavior is forced in the AVS and CV2 Rule Base in the Sage Pay back-office. - 3D Secure checks: Choose whether you wish to use the 3D Secure checking and how.
3D Secure is the technology behind the Verified by Visa and MasterCard SecureCode security initiatives, which provide for an additional technique for authenticating the cardholder at the time of the purchase.Note: This 3D Secure checking mechanism is completely ensured by Sage Pay, and it does not relate to the X-Cart's 3-D Secure Payment Authentication. - Test/Live mode: Choose the mode in which the gateways must operate.
The "test" mode means that you can submit test orders and perform test transaction. Money will not be withdrawn from credit cards. The "simulator" mode means that you can place test orders and perform test transactions without opening a Sage Pay account. The "live" mode is the full functioning mode with real transactions and charges. It must be used when only you are ready to go live. - Order prefix: Enter a prefix that will be automatically added to IDs of orders placed in your store and paid through Sage Pay Form.
Having a prefix ensures that orders will have unique IDs and will never coincide with orders placed in another online store of yours that also uses Sage Pay as a payment option.
- Return to the list of payment methods and activate Sage Pay Form by selecting the check box next to the gateway's name.
- Click the Update button.
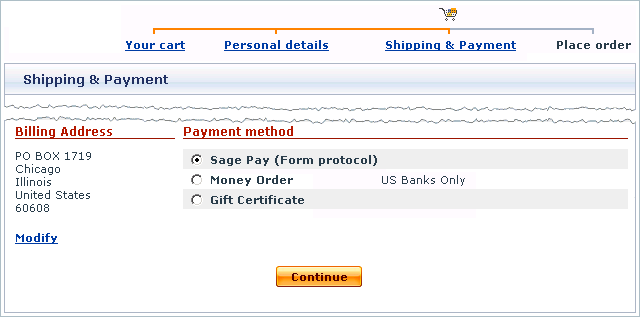
After you have configured and activated the gateway, your customers will be able to choose Sage Pay Form as a payment option.
Setting up Sage Pay Direct
To use Sage Pay Direct as one of the payment options in the store:
- Log in to the X-Cart Admin area.
- Go to the Payment methods section (Administration menu -> Payment methods) and scroll down to the Payment gateways form.
- Select Sage Pay (Direct protocol) from the drop-down list and click the Add button.

After you have clicked on Add, Sage Pay Direct will be added to the list of the available payment methods.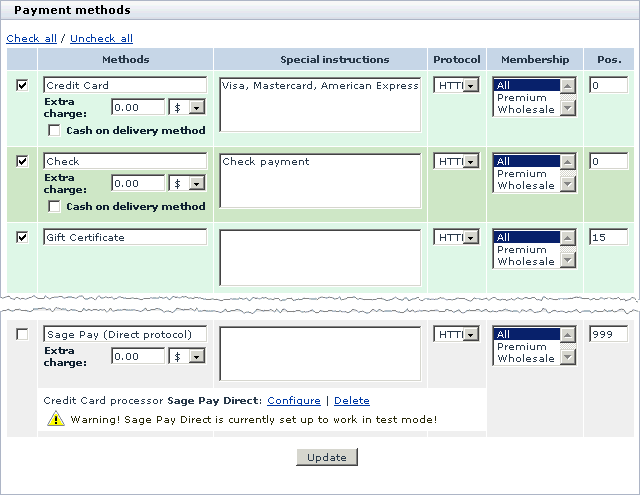
- Click on the Configure link. This opens the configuration page for Sage Pay Direct.
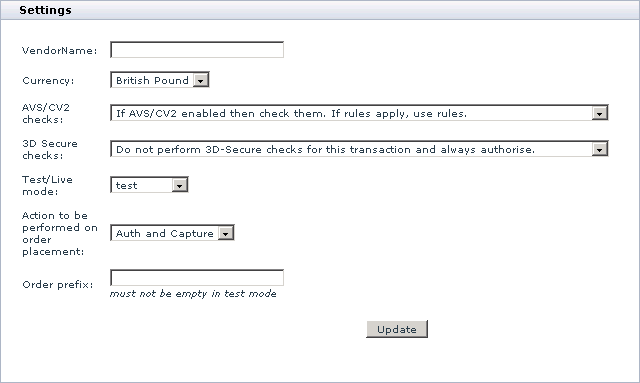
- Adjust the configuration settings for Sage Pay Direct and click Update to apply the changes.
- VendorName: Enter the name of your merchant account with Sage Pay.
- Currency: Choose the currency in which you wish to accept payments through Sage Pay Form.
- AVS/CV2 checks: Choose whether you wish to use AVS and CV2 checking mechanisms and how.
The aim of these security checks is to provide you with additional information about the orders and reduce the risk of fake transactions.
AVS (Address Verification Service) checks whether the claimed billing address provided by the store customer coincides with the registered address of the cardholder. A successful result says that the ordering customer knows the cardholder's address, which is a good indication that they are the true cardholder.
CV2 stands for the last 3 or 4 digits of the number on the signature strip on the back of all debit and credit cards. In order to enter the correct number, a person who places an order must either be the cardholder, or must have spied the CV2 number when handling the card.
The AVS/CV2 checking scheme has many benefits, but it also has a number of limitations. The most serious one is that AVS works only for the UK, and it is not possible to check AVS on overseas orders. It means that for all non-UK orders the check will always return a failure, and you can rely on the CV2 check only. Be aware that the gateway may automatically decline such orders if this behavior is forced in the AVS and CV2 Rule Base in the Sage Pay back-office. - 3D Secure checks: Choose whether you wish to use the 3D Secure checking and how.
3D Secure is the technology behind the Verified by Visa and MasterCard SecureCode security initiatives, which provide for an additional technique for authenticating the cardholder at the time of the purchase.Note: This 3D Secure checking mechanism is completely ensured by Sage Pay, and it does not relate to the X-Cart's 3D Secure Payment Authentication. - Test/Live mode: Choose the mode in which the gateways must operate.
The "test" mode means that you can submit test orders and perform test transaction. Money will not be withdrawn from credit cards. The "simulator" mode means that you can place test orders and perform test transactions without opening a Sage Pay account. The "live" mode is the full functioning mode with real transactions and charges. It must be used when only you are ready to go live. - Action to be performed on order placement: Choose whether Sage Pay must capture money automatically (Auth and Capture) or only freeze the funds until you capture the authorized amount manually through the X-Cart Admin area (Auth only).
- Order prefix: Enter a prefix that will be automatically added to IDs of orders placed in your store and paid through Sage Pay Direct.
Having a prefix ensures that orders will have unique IDs and will never coincide with orders placed in another online store of yours that also uses Sage Pay as a payment option.
- Return to the list of payment methods and activate Sage Pay Direct by selecting the check box next to the gateway's name.
- Click Update.
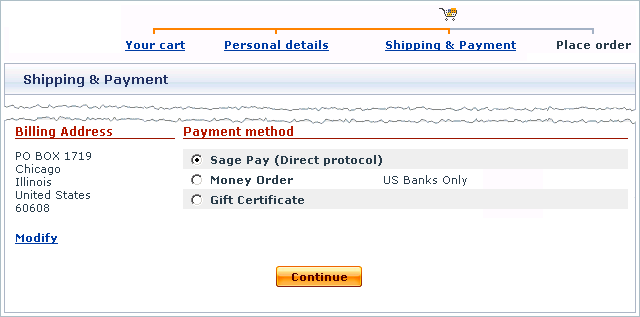
After you have configured and activated the gateway, your customers will be able to choose Sage Pay Direct as a payment option.
