Difference between revisions of "X-Cart:Virtual Merchant"
(→Complete setup in your Virtual Merchant account) |
(→Configure Virtual Merchant settings) |
||
| Line 25: | Line 25: | ||
* <u>Merchant ID</u>: your Account ID | * <u>Merchant ID</u>: your Account ID | ||
* <u>User ID</u>: your User ID. These two fields are also used when you log into your Virtual Merchant back-end. | * <u>User ID</u>: your User ID. These two fields are also used when you log into your Virtual Merchant back-end. | ||
| − | * <u>PIN</u>: this is a special value, which can be pulled from the Virtual Merchant back-end. You should log into your Virtual Mechant account and go to the <u>User -> Change PIN</u> section. There you will see you the current PIN. | + | * <u>PIN</u>: this is a special value, which can be pulled from the Virtual Merchant back-end. You should log into your Virtual Mechant account and go to the <u>User -> Change PIN</u> section. There you will see you the current PIN.<br><br>[[Image:Virtual_merchant3.gif|center|border]]<br><br> |
* <u>Test/Live mode</u>: Select whether you wish to use test or live mode. | * <u>Test/Live mode</u>: Select whether you wish to use test or live mode. | ||
* <u>Order prefix</u>: Enter a prefix that will be automatically added to IDs of orders placed in your store and paid through Virtual Merchant.<br>Having a prefix ensures that orders have unique IDs and never coincide with orders placed in another online store of yours that also uses Virtual Merchant as a payment option. | * <u>Order prefix</u>: Enter a prefix that will be automatically added to IDs of orders placed in your store and paid through Virtual Merchant.<br>Having a prefix ensures that orders have unique IDs and never coincide with orders placed in another online store of yours that also uses Virtual Merchant as a payment option. | ||
Revision as of 10:18, 15 November 2010
Contents
Setting up Virtual Merchant
To use Virtual Merchant as one of the payment options in the store:
Add Virtual Merchant as a payment method
- Log in to the X-Cart Admin area.
- Go to the Payment methods section (Settings menu -> Payment methods) and scroll down to the Payment gateways form.
- Select one of Virtual Merchant solutions from the drop-down list:
- Virtual Merchant - Merchant Provided Form (background payment method, i.e. the form to input the credit card number is placed on the X-Cart side. You has to use X-Payments to be PCI Compliant in this case)\
- Virtual Merchant - Virtual Merchant Provided Form (web-based payment method, i.e. the customer inputs the credit card number on the Virtual Merchant side).
- Click the Add button.
- Virtual Merchant - Merchant Provided Form is available since X-Cart 4.2.0
- Virtual Merchant - Virtual Merchant Provided Form is available since X-Cart 4.3.0
Configure Virtual Merchant settings
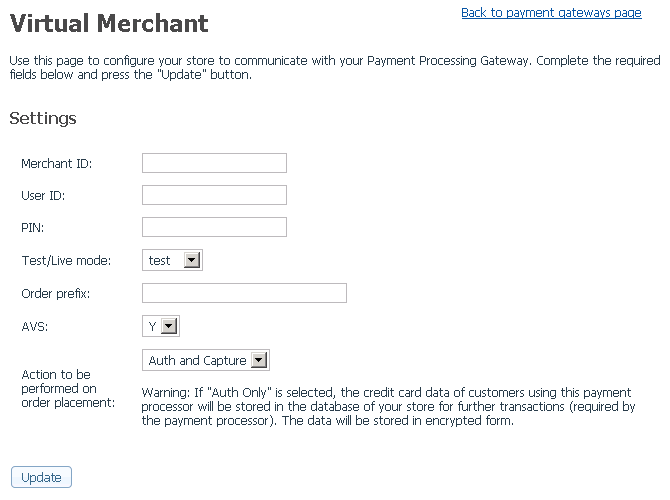
Click on the Configure link. This opens the configuration page for Virtual Merchant. Adjust the configuration settings for Virtual Merchant and click the Update button to apply the changes.
- Merchant ID: your Account ID
- User ID: your User ID. These two fields are also used when you log into your Virtual Merchant back-end.
- PIN: this is a special value, which can be pulled from the Virtual Merchant back-end. You should log into your Virtual Mechant account and go to the User -> Change PIN section. There you will see you the current PIN.
- Test/Live mode: Select whether you wish to use test or live mode.
- Order prefix: Enter a prefix that will be automatically added to IDs of orders placed in your store and paid through Virtual Merchant.
Having a prefix ensures that orders have unique IDs and never coincide with orders placed in another online store of yours that also uses Virtual Merchant as a payment option. - AVS: select Y.
- Action to be performed on order placement: Choose whether Virtual Merchant must capture money automatically (Auth and Capture) or only freeze the funds until you capture the authorized amount manually through the X-Cart Admin area (Auth only).
After you complete the necessary fields, click Update.
Complete setup in your Virtual Merchant account
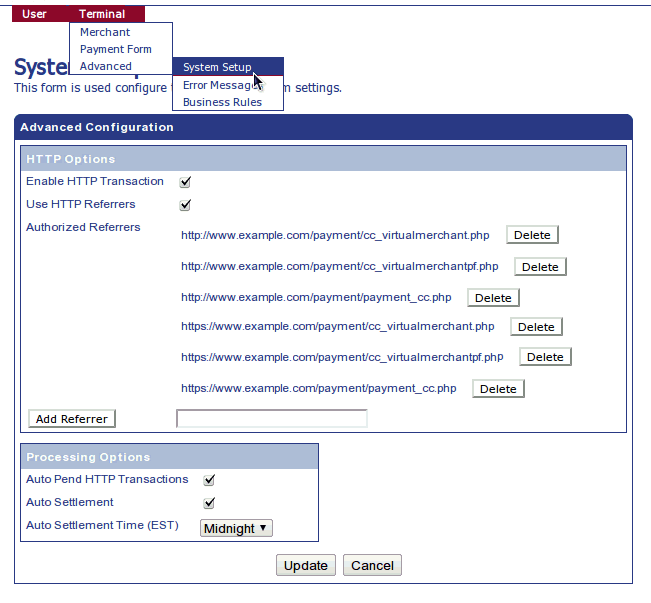
The final step to make Virtual Merchant working with you X-Cart is to set the correct 'Authorized Referrers'. To do so in your Virtual Merchant account go to the Terminal -> Advanced -> System Setup page.
On that page add the following Authorized Referrers:
http://www.example.com/xcart_dir/payment/payment_cc.php
https://www.example.com/xcart_dir/payment/payment_cc.php
replacing the host name and directory name with your actual one.


