Difference between revisions of "X-Cart:Banner System"
m (→Page 3) |
(Final edit) |
||
| Line 1: | Line 1: | ||
== What is Banner System? == | == What is Banner System? == | ||
| − | [http://mods.x-cart.com/Banner-System.html Banner System] is an X-Cart add-on that allows administrator to place both images and HTML-code banners (including JavaScript) anywhere within X-Cart by using a special interface under the admin area. This module is useful for promoting products, events and offers. | + | [http://mods.x-cart.com/Banner-System.html Banner System] is an X-Cart add-on that allows administrator to place both images and HTML-code banners (including JavaScript) anywhere within X-Cart by using a special interface under the admin area. This module is useful for promoting products, events and special offers. |
== Customer area of the Banner System == | == Customer area of the Banner System == | ||
| − | [http://mods.x-cart.com/Banner-System.html This] is only an example of how the Banner System may look | + | [http://mods.x-cart.com/Banner-System.html This] is only an example of how the Banner System may look at your online store: |
[http://mods.x-cart.com/Banner-System.html http://mods.x-cart.com/Banner-System.html] | [http://mods.x-cart.com/Banner-System.html http://mods.x-cart.com/Banner-System.html] | ||
| − | With the Banner System, you can place banners wherever you want. Banners are usually placed at | + | With the Banner System, you can place banners wherever you want. Banners are usually placed at 4 common locations: top and bottom of the site and the left and right columns of the site. By the way, you can place several banners at one location; for example, 2 banners at the top, 3 at the bottom, 5 on the left side, etc. |
== Admin area of the Banner System == | == Admin area of the Banner System == | ||
| Line 16: | Line 16: | ||
: [[Image:BannerS1.png]] | : [[Image:BannerS1.png]] | ||
| − | The 'Banner System' page has 4 sections: Top banners, Bottom banners, Left banners and Right Banners. | + | The '<u>Banner System</u>' page has 4 sections: Top banners, Bottom banners, Left banners and Right Banners. The number of sections can be reduced to 3 for 2-column websites. |
=== Page 2 === | === Page 2 === | ||
| − | Once the banner location is selected, the system brings up | + | Once the banner location is selected, the system brings up this <u>banner management page</u>: |
[[Image:BannerS2.png]] | [[Image:BannerS2.png]] | ||
| − | It has 2 sections: a list of created banners and a section for adding of a new banner. You can set banner position (the order of the sequence of banners located at the same place) and location (by default: top, left, bottom, right). | + | It has 2 sections: a list of created banners and a section for adding of a new banner. You can set banner position (the order of the sequence of banners located at the same place) and '''location''' (by default: top, left, bottom, right). |
| − | You can also define a banner for a certain list of categories, home and secondary pages (one location for pages like “Contact us”, “Register”, “My account”, etc.) | + | You can also define a banner for a certain list of '''categories''', home and secondary pages (one location for pages like “Contact us”, “Register”, “My account”, etc.) |
| − | + | The next options — '''Banner width''' and '''Banner height''' — affect the banner size. | |
| − | You can as well set the banner life as | + | Banner life period means that the banner will be shown in the customer area within the specified period of time: from the value set in the '''Start date''' to the one set in the '''End date''' field. |
| − | You can show a banner with navigation. Here is an example of a banner with activated navigation option: | + | |
| + | Besides, you can define different animation '''effects'''. The complete list of available effects can be seen on the [http://www.malsup.com/jquery/cycle/browser.html Effects Browser] page. | ||
| + | |||
| + | You can as well set the banner life as '''Unlimited'''; in this case, the start and end dates are not applicable for such a banner. | ||
| + | You can show a banner with '''navigation'''. Here is an example of a banner with activated navigation option: | ||
[[Image:BannerS3.png]] | [[Image:BannerS3.png]] | ||
| − | We can change the navigation | + | We can change the appearance of the navigation bar for you or replace it with the “Start” and “Pause” icons. |
=== Page 3 === | === Page 3 === | ||
| − | + | Once a banners is created, it gets a “<u>fill in the banner</u>” link. Clicking on that link brings you to the '<u>Banner filling</u>' page: | |
[[Image:BannerS4.png]] | [[Image:BannerS4.png]] | ||
| − | On this page you can manage | + | On this page, you can manage banner content. Both image and HTML code can be added to a banner; simply select the <u>Upload image</u> or <u>Upload HTML code</u> tab respectively in the '<u>Fill in the banner section</u>'. |
| − | On top of that, module has a number of general settings: General settings -> Banner System. Here you can set the banner rotation delay and default banner size or mark all banners as “Unlimited”. | + | On top of all that, the module has a number of general settings: '''General settings''' -> '''Banner System'''. Here you can set the banner rotation delay and default banner size or mark all banners as “Unlimited”. |
[[Image:BannerS5.png]] | [[Image:BannerS5.png]] | ||
| − | If you have any questions feel free to ask us. | + | If you have any questions feel free to [http://www.x-cart.com/contact_us.html ask us]. |
Revision as of 23:44, 19 June 2011
Contents
What is Banner System?
Banner System is an X-Cart add-on that allows administrator to place both images and HTML-code banners (including JavaScript) anywhere within X-Cart by using a special interface under the admin area. This module is useful for promoting products, events and special offers.
Customer area of the Banner System
This is only an example of how the Banner System may look at your online store: http://mods.x-cart.com/Banner-System.html
With the Banner System, you can place banners wherever you want. Banners are usually placed at 4 common locations: top and bottom of the site and the left and right columns of the site. By the way, you can place several banners at one location; for example, 2 banners at the top, 3 at the bottom, 5 on the left side, etc.
Admin area of the Banner System
Page 1
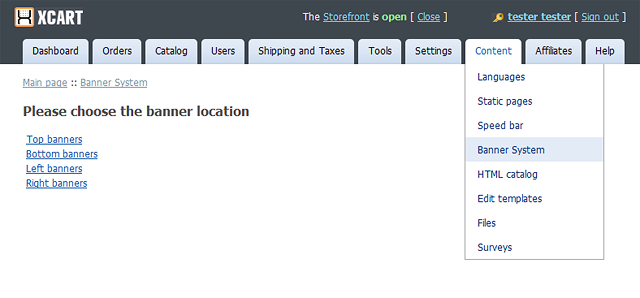
The 'Banner System' page has 4 sections: Top banners, Bottom banners, Left banners and Right Banners. The number of sections can be reduced to 3 for 2-column websites.
Page 2
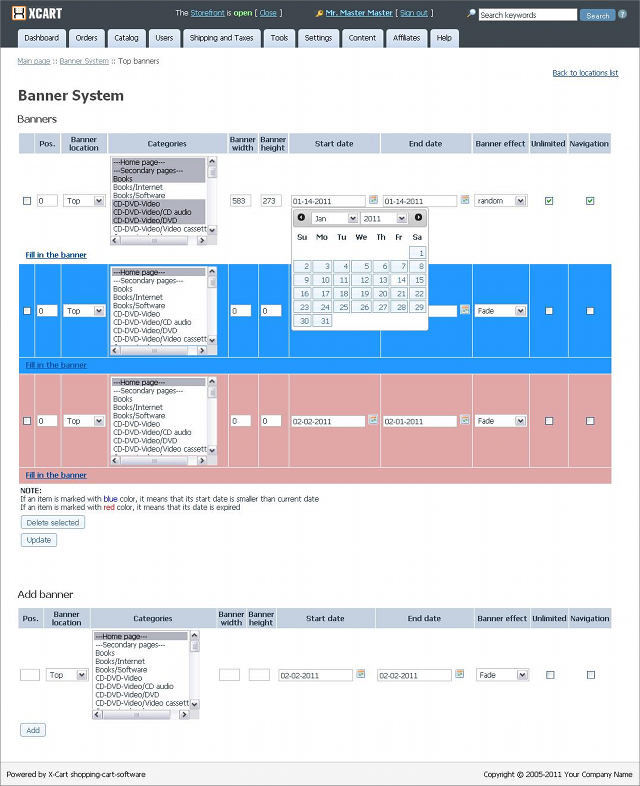
Once the banner location is selected, the system brings up this banner management page:
It has 2 sections: a list of created banners and a section for adding of a new banner. You can set banner position (the order of the sequence of banners located at the same place) and location (by default: top, left, bottom, right).
You can also define a banner for a certain list of categories, home and secondary pages (one location for pages like “Contact us”, “Register”, “My account”, etc.)
The next options — Banner width and Banner height — affect the banner size.
Banner life period means that the banner will be shown in the customer area within the specified period of time: from the value set in the Start date to the one set in the End date field.
Besides, you can define different animation effects. The complete list of available effects can be seen on the Effects Browser page.
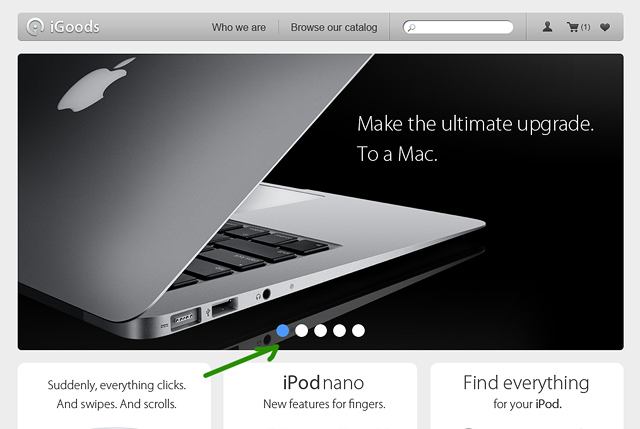
You can as well set the banner life as Unlimited; in this case, the start and end dates are not applicable for such a banner. You can show a banner with navigation. Here is an example of a banner with activated navigation option:
We can change the appearance of the navigation bar for you or replace it with the “Start” and “Pause” icons.
Page 3
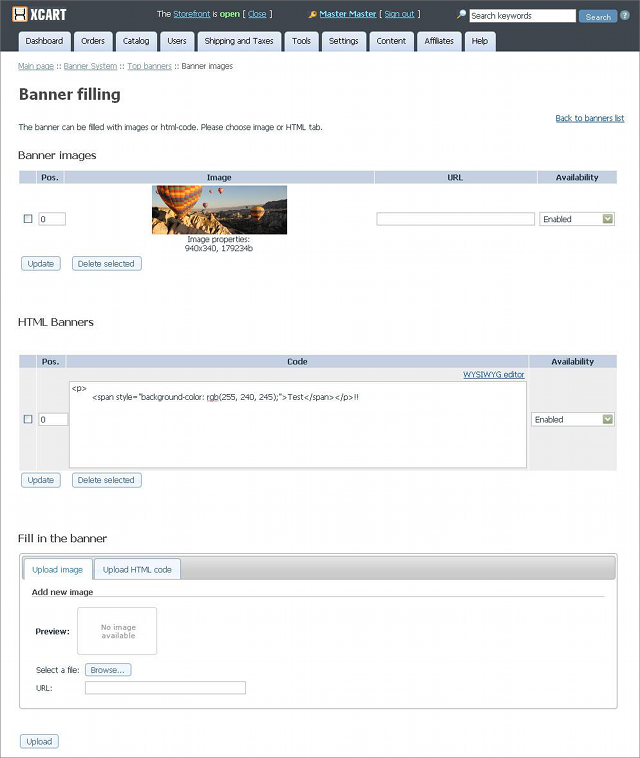
Once a banners is created, it gets a “fill in the banner” link. Clicking on that link brings you to the 'Banner filling' page:
On this page, you can manage banner content. Both image and HTML code can be added to a banner; simply select the Upload image or Upload HTML code tab respectively in the 'Fill in the banner section'.
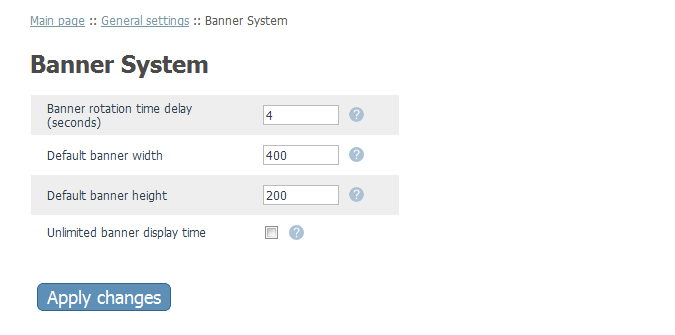
On top of all that, the module has a number of general settings: General settings -> Banner System. Here you can set the banner rotation delay and default banner size or mark all banners as “Unlimited”.
If you have any questions feel free to ask us.
