Difference between revisions of "LiteCommerce:AdvancedSearch"
(Created page with '==Introduction== '''LiteCommerce Advanced Search add-on module''' introduces advanced product search capabilities to the customer front end of your LiteCommerce-based online sto…') |
m |
||
| (3 intermediate revisions by one other user not shown) | |||
| Line 1: | Line 1: | ||
| + | {{LC2_disclaimer}}<br /><br /> | ||
==Introduction== | ==Introduction== | ||
| Line 18: | Line 19: | ||
Select the 'Modules' section in the 'Settings' menu of the Administrator Zone. The list of currently installed modules will appear. To install a module (Advanced Search in our case) click on the ''''Browse…'''' button, select the module's ''''.tar'''' file and click on the ''''Install'''' button to add the module to your store setup (Figure 1). | Select the 'Modules' section in the 'Settings' menu of the Administrator Zone. The list of currently installed modules will appear. To install a module (Advanced Search in our case) click on the ''''Browse…'''' button, select the module's ''''.tar'''' file and click on the ''''Install'''' button to add the module to your store setup (Figure 1). | ||
| − | [[Image:Lc-as-01.gif|555px|<br> Figure 1: New module installation]] | + | : [[Image:Lc-as-01.gif|555px|<br> Figure 1: New module installation]] |
''''Advanced Search'''' module will appear in the list (Figure 2); it will be activated automatically. | ''''Advanced Search'''' module will appear in the list (Figure 2); it will be activated automatically. | ||
| − | [[Image:lc-as-02.gif|555px|<br> <br> Figure 2: AdvancedSearch module installed]] | + | : [[Image:lc-as-02.gif|555px|<br> <br> Figure 2: AdvancedSearch module installed]] |
To deactivate the module, clear the 'Active' check box against the module title and click on the ''''Update'''' button. To completely uninstall the module, click on the ''''Uninstall'''' button. | To deactivate the module, clear the 'Active' check box against the module title and click on the ''''Update'''' button. To completely uninstall the module, click on the ''''Uninstall'''' button. | ||
| Line 30: | Line 31: | ||
After you have successfully installed the '''Advanced Search module''', you can define advanced search settings. In the 'Modules' section click on the ''''Advanced Search'''' module link to enter the module's settings page (Figure 3). | After you have successfully installed the '''Advanced Search module''', you can define advanced search settings. In the 'Modules' section click on the ''''Advanced Search'''' module link to enter the module's settings page (Figure 3). | ||
| − | [[Image:lc-as-03.gif|496px|<br> Figure 3: Configuring AdvancedSearch module settings]] | + | : [[Image:lc-as-03.gif|496px|<br> Figure 3: Configuring AdvancedSearch module settings]] |
Two search options require configuring, namely 'Product price ranges' and 'Weight ranges'. | Two search options require configuring, namely 'Product price ranges' and 'Weight ranges'. | ||
| Line 36: | Line 37: | ||
To define a new product price range, in the 'Add new price range' section (Figure 4) specify the price range label (optional) and the range's beginning and ending prices, then click on the ''''Add'''' button. | To define a new product price range, in the 'Add new price range' section (Figure 4) specify the price range label (optional) and the range's beginning and ending prices, then click on the ''''Add'''' button. | ||
| − | [[Image:lc-as-04.gif|496px|<br> Figure 4: Defining price ranges]] | + | : [[Image:lc-as-04.gif|496px|<br> Figure 4: Defining price ranges]] |
The price range will now appear under the 'Product price ranges' section. It can be deactivated/reactivated by placing a checkmark in the 'Active' field of the price range record and clicking on the ''''Update'''' button. You can change price range settings by modifying the parameter fields and clicking on the ''''Update'''' button. To delete a price range, place a checkmark in the box on the right side of the price range record and click on the ''''Delete checked'''' button. | The price range will now appear under the 'Product price ranges' section. It can be deactivated/reactivated by placing a checkmark in the 'Active' field of the price range record and clicking on the ''''Update'''' button. You can change price range settings by modifying the parameter fields and clicking on the ''''Update'''' button. To delete a price range, place a checkmark in the box on the right side of the price range record and click on the ''''Delete checked'''' button. | ||
| Line 42: | Line 43: | ||
To define a new product weight range, in the 'Add new weight range' section (Figure 5) specify the weight range label (optional) and the range's beginning and ending weights, then click on the ''''Add'''' button. | To define a new product weight range, in the 'Add new weight range' section (Figure 5) specify the weight range label (optional) and the range's beginning and ending weights, then click on the ''''Add'''' button. | ||
| − | [[Image:lc-as-05.gif|496px|<br> Figure 5: Defining weight ranges]] | + | : [[Image:lc-as-05.gif|496px|<br> Figure 5: Defining weight ranges]] |
The weight range will now appear under the 'Product weight ranges' section. It can be deactivated/reactivated by placing a checkmark in the 'Active' field of the weight range record and clicking on the ''''Update'''' button. You can change weight range settings by modifying the parameter fields and clicking on the ''''Update'''' button. To delete a weight range, place a checkmark in the box on the right side of the weight range record and click on the ''''Delete checked'''' button. | The weight range will now appear under the 'Product weight ranges' section. It can be deactivated/reactivated by placing a checkmark in the 'Active' field of the weight range record and clicking on the ''''Update'''' button. You can change weight range settings by modifying the parameter fields and clicking on the ''''Update'''' button. To delete a weight range, place a checkmark in the box on the right side of the weight range record and click on the ''''Delete checked'''' button. | ||
| Line 60: | Line 61: | ||
While you can still type in a word or phrase and click on the ''''Go'''' button to search for it using the advanced search capability, you can also click on the ''''Advanced'''' link and enter the advanced search screen where you can specify search filters to refine your search for products in the store. | While you can still type in a word or phrase and click on the ''''Go'''' button to search for it using the advanced search capability, you can also click on the ''''Advanced'''' link and enter the advanced search screen where you can specify search filters to refine your search for products in the store. | ||
| − | : [[Image:lc-as-07.gif|580px|<br> Figure 7: Advanced product search screen]] | + | : [[Image:lc-as-07.gif|border|580px|<br> Figure 7: Advanced product search screen]] |
By default, the '''Advanced Search module''' performs search through product titles, descriptions, meta tags, extra fields and product options. This can be changed by removing checkmarks against respective areas (Figure 7). You can also refine your search by applying search filters to SKUs, product price and weight ranges, and choosing specific categories to be searched. | By default, the '''Advanced Search module''' performs search through product titles, descriptions, meta tags, extra fields and product options. This can be changed by removing checkmarks against respective areas (Figure 7). You can also refine your search by applying search filters to SKUs, product price and weight ranges, and choosing specific categories to be searched. | ||
| Line 66: | Line 67: | ||
If a price range has a label, the label will appear in the drop-down list of prices; if there is no label, then the price range itself will be displayed (Figure 8 illustrates the price ranges defined in Figure 4). If there is no price range defined, the price range search filter will not appear in the Customer Zone. | If a price range has a label, the label will appear in the drop-down list of prices; if there is no label, then the price range itself will be displayed (Figure 8 illustrates the price ranges defined in Figure 4). If there is no price range defined, the price range search filter will not appear in the Customer Zone. | ||
| − | : [[Image:lc-as-04x.gif|323px|<br> Figure 8: Sample price ranges]] | + | : [[Image:lc-as-04x.gif|border|323px|<br> Figure 8: Sample price ranges]] |
If a weight range has a label, the label will appear in the drop-down list of weights; if there is no label, then the weight range itself will be displayed (Figure 9 illustrates weight ranges defined in Figure 5). If there is no weight range defined, the weight range search filter will not appear in the Customer Zone. | If a weight range has a label, the label will appear in the drop-down list of weights; if there is no label, then the weight range itself will be displayed (Figure 9 illustrates weight ranges defined in Figure 5). If there is no weight range defined, the weight range search filter will not appear in the Customer Zone. | ||
| − | : [[Image:lc-as-05x.gif|343px|<br> Figure 9: Sample weight ranges]] | + | : [[Image:lc-as-05x.gif|border|343px|<br> Figure 9: Sample weight ranges]] |
Enter the necessary filters and click on the ''''Search'''' button to see the search results. | Enter the necessary filters and click on the ''''Search'''' button to see the search results. | ||
Latest revision as of 12:54, 31 May 2012
|
Introduction
LiteCommerce Advanced Search add-on module introduces advanced product search capabilities to the customer front end of your LiteCommerce-based online store. With Advanced Search module installed and activated, the store customers can:
- search through product titles, descriptions, meta tags, extra fields and product options;
- apply additional filters to their search queries in order to refine their searches;
- save search filters and settings for future use;
- reset search filters.
The store administrator can customize advanced search options by defining price and weight range groups specific to your store.
This manual will guide you through the process of Advanced Search add-on module installation and use.
Installing the Module
To successfully install Advanced Search add-on module version 2.5, your shopping system requires LiteCommerce shopping cart software version 2.1 Service Pack 1 or later to be installed.
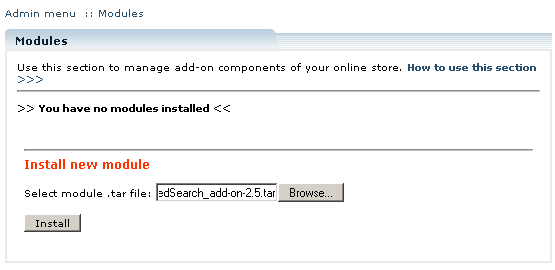
Select the 'Modules' section in the 'Settings' menu of the Administrator Zone. The list of currently installed modules will appear. To install a module (Advanced Search in our case) click on the 'Browse…' button, select the module's '.tar' file and click on the 'Install' button to add the module to your store setup (Figure 1).
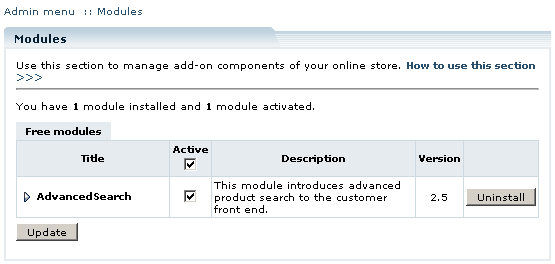
'Advanced Search' module will appear in the list (Figure 2); it will be activated automatically.
To deactivate the module, clear the 'Active' check box against the module title and click on the 'Update' button. To completely uninstall the module, click on the 'Uninstall' button.
Configuring the Module
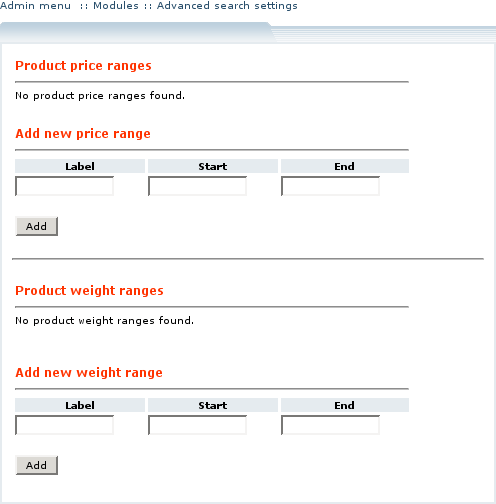
After you have successfully installed the Advanced Search module, you can define advanced search settings. In the 'Modules' section click on the 'Advanced Search' module link to enter the module's settings page (Figure 3).
Two search options require configuring, namely 'Product price ranges' and 'Weight ranges'.
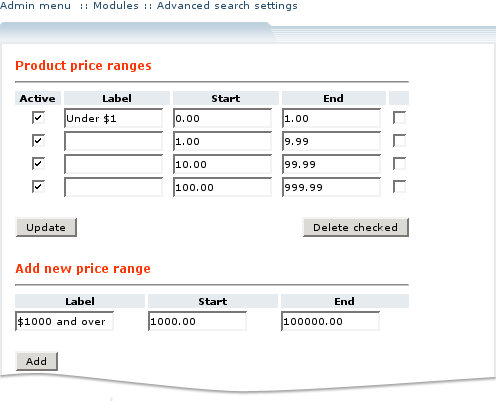
To define a new product price range, in the 'Add new price range' section (Figure 4) specify the price range label (optional) and the range's beginning and ending prices, then click on the 'Add' button.
The price range will now appear under the 'Product price ranges' section. It can be deactivated/reactivated by placing a checkmark in the 'Active' field of the price range record and clicking on the 'Update' button. You can change price range settings by modifying the parameter fields and clicking on the 'Update' button. To delete a price range, place a checkmark in the box on the right side of the price range record and click on the 'Delete checked' button.
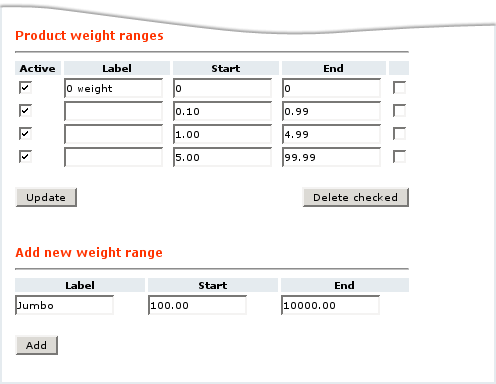
To define a new product weight range, in the 'Add new weight range' section (Figure 5) specify the weight range label (optional) and the range's beginning and ending weights, then click on the 'Add' button.
The weight range will now appear under the 'Product weight ranges' section. It can be deactivated/reactivated by placing a checkmark in the 'Active' field of the weight range record and clicking on the 'Update' button. You can change weight range settings by modifying the parameter fields and clicking on the 'Update' button. To delete a weight range, place a checkmark in the box on the right side of the weight range record and click on the 'Delete checked' button.
Customer Zone
This section demonstrates the features introduced by the Advanced Search add-on module.
When the module is enabled, the appearance of the 'Search' field at the Customer Front End becomes different with the '[+]' sign and the 'Advanced' link added:

|

|
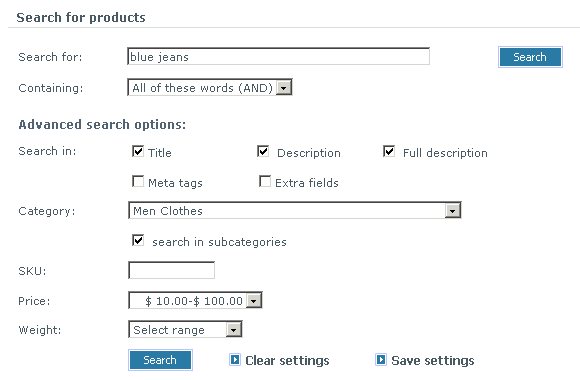
While you can still type in a word or phrase and click on the 'Go' button to search for it using the advanced search capability, you can also click on the 'Advanced' link and enter the advanced search screen where you can specify search filters to refine your search for products in the store.
By default, the Advanced Search module performs search through product titles, descriptions, meta tags, extra fields and product options. This can be changed by removing checkmarks against respective areas (Figure 7). You can also refine your search by applying search filters to SKUs, product price and weight ranges, and choosing specific categories to be searched.
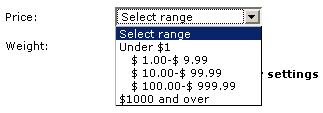
If a price range has a label, the label will appear in the drop-down list of prices; if there is no label, then the price range itself will be displayed (Figure 8 illustrates the price ranges defined in Figure 4). If there is no price range defined, the price range search filter will not appear in the Customer Zone.
If a weight range has a label, the label will appear in the drop-down list of weights; if there is no label, then the weight range itself will be displayed (Figure 9 illustrates weight ranges defined in Figure 5). If there is no weight range defined, the weight range search filter will not appear in the Customer Zone.
Enter the necessary filters and click on the 'Search' button to see the search results.
You can reset the filters by clicking on the 'Clear settings' link or save the filters for future use by clicking on the 'Save settings' link.
