Difference between revisions of "LiteCommerce:AuthorizeNet"
(→Configuring the Module) |
m |
||
| (One intermediate revision by one other user not shown) | |||
| Line 1: | Line 1: | ||
| + | {{LC2_disclaimer}}<br /><br /> | ||
| + | {{LC_2.x}} | ||
| + | |||
'''Authorize.Net''' is one of the online credit card payment processors supported by LiteCommerce. If this module is enabled the corresponding online payment methods are available for your store. Then you can easily define your payment gateway for real time credit card and check processing. All you need is a merchant account with Authorize.Net to accept your customer’s credit card. | '''Authorize.Net''' is one of the online credit card payment processors supported by LiteCommerce. If this module is enabled the corresponding online payment methods are available for your store. Then you can easily define your payment gateway for real time credit card and check processing. All you need is a merchant account with Authorize.Net to accept your customer’s credit card. | ||
Latest revision as of 12:56, 31 May 2012
|
Authorize.Net is one of the online credit card payment processors supported by LiteCommerce. If this module is enabled the corresponding online payment methods are available for your store. Then you can easily define your payment gateway for real time credit card and check processing. All you need is a merchant account with Authorize.Net to accept your customer’s credit card.
Contents
Configuring the Module
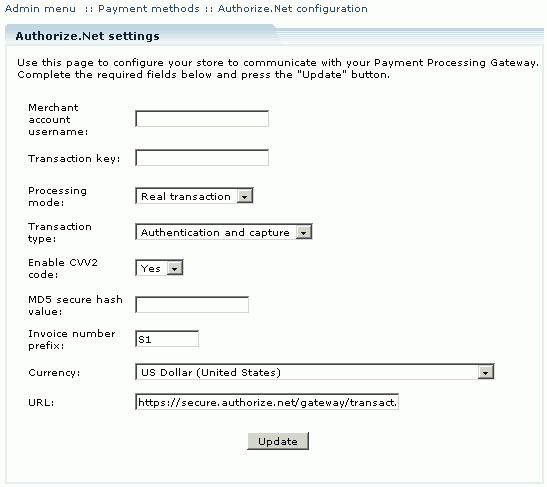
In the list of activated modules select the 'Authorize.Net' link to move to the module settings page.
If you do not have a merchant account with Authorize.Net you can find more information and sign up at http://www.Authorize.Net.com/. If you already have the merchant account configure the settings given below to set up your payment gateway.
1. Merchant account username: enter your API Login ID.
2. Transaction key: enter the transaction key you have received from Authorize.Net. To obtain the transaction key from the Merchant Interface, do the following:
- 1. Log into the merchant’s Authorize.Net account at: https://secure.authorize.net.
- 2. Click on Settings and Profile.
- 3. Under the Security heading, click on Obtain Transaction Key.
- 4. You will be prompted to submit the Secret Question/Answer for the account in order to receive your transaction key.
3. Processing mode: select the processing mode you want. Use ‘Test mode’ for testing the system but do not forget to change it to ‘Real transaction’ later.
4. Transaction type: select from 'Authentication only' and 'Authentication and capture'.
- Authentication only
- A credit card transaction request to only authorize, or reserve, funds for a purchase. The payment gateway submits the request to the card issuing bank for authorization, but no further action is taken. In other words, this transaction type just validates the card and does not take the money. Also called "Auth-Only" or "Pre-Auth".
- Authentication and capture
- A credit card transaction request to authorize and capture, or settle, funds for a purchase. The payment gateway submits the request to the card issuing bank for authorization and upon approval, will automatically submit the transaction for settlement. This transaction type validates the card AND takes the money. Also called "Post-auth".
5. Enable CVV2 code: if this option is enabled then a customer making a payment by a credit card has to enter the CVV2 number at transaction time to verify that the card is present on hand. To configure the filter to reject certain Card Code responses, do the following:
- 1. Log into the Merchant Interface.
- 2. Select 'Settings' from the Main Menu.
- 3. Click on the Card Code Verification link from the 'Security' section.
- 4. Check the box(es) next to the Card Codes that the system should reject.
- 5. Click Submit to save changes.
6. MD5 secure hash value: enter the MD5 Hash Value to use the MD5 security checks. You have to set the same MD5 Hash Value in your Merchant Interface:
- 1. Log into the Merchant Interface;
- 2. Select 'Settings' from the Main Menu;
- 3. Click on MD5 Hash in the 'Security' section;
- 4. Enter the MD5 Hash Value;
- 5. Confirm the MD5 Hash Value entered;
- 6. Click Submit to save changes.
6. Invoice number prefix: this prefix will be added to all your invoices. If you have multiple online stores operating through one Authorize.Net merchant account the prefix helps to distinguish between orders from different stores.
7. Currency: from the drop-down list select the currency to be used in Authorize.Net transactions.
8. URL: enter the URL to communicate with Authorize.Net: https://secure.authorize.net/gateway/transact.dll by default.
Click Update to complete the configuration.
Activating Authorize.Net Payment Method
When you have configured Authorize.Net payment gateway settings, you need to activate Authorize.Net payment method in order to make it available to your customers:
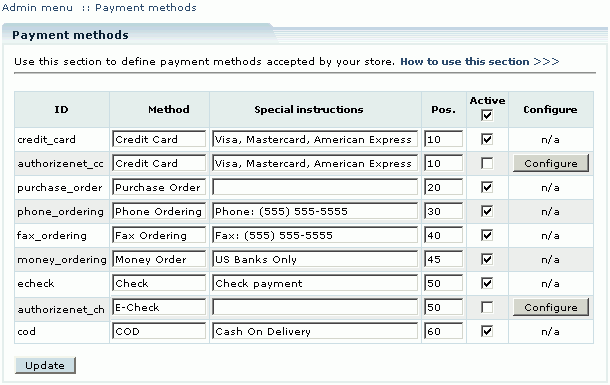
- Click on the 'Payment methods' link in the 'Settings' menu of the Administrator Zone.
- Two new payment methods with IDs 'Authorize.Net_cc' and 'Authorize.Net_ch' are now available in the list of existing payment methods. Activate them by placing checkmarks in the corresponding 'Active' fields.
- Click on the 'Update' button to finalize the setup.
Customer zone
The functionality of the Authorize.Net add-on module is transparent to your customers. When a customer submits his order, transaction request is processed in the background. For the details on how Authorize.Net payment gateway processes the transactions, please refer to the detailed documentation at Authorize.Net website: http://www.Authorize.Net.com/.
Troubleshooting
Getting "The merchant login ID or password is invalid or the account is inactive" error
Solution: Make sure you have valid API Login ID entered in the "Merchant account username" field (Authorize.net module configuration page).

