Difference between revisions of "LiteCommerce:ProductOptions"
(Created page with ''''LiteCommerce Product Options add-on module''' introduces complete support for product options to your online store catalog. This module provides you with the following advance…') |
m |
||
| Line 1: | Line 1: | ||
| + | {{LC2_disclaimer}}<br /><br /> | ||
'''LiteCommerce Product Options add-on module''' introduces complete support for product options to your online store catalog. This module provides you with the following advanced capabilities: | '''LiteCommerce Product Options add-on module''' introduces complete support for product options to your online store catalog. This module provides you with the following advanced capabilities: | ||
Latest revision as of 13:08, 31 May 2012
|
LiteCommerce Product Options add-on module introduces complete support for product options to your online store catalog. This module provides you with the following advanced capabilities:
- you can define option classes to reflect all existing varieties of one product - no more need to make multiple copies (clones) of existing products for each and every product size and color available at your store;
- having a choice of product options rather than a list of similar products is also more convenient and intuitive to your customers, which leads to a higher satisfaction with your store;
- different product options can be set up to vary in price and weight;
- product option classes can be defined individually for a particular product or jointly for a category or a group of categories;
- product options import/export capability allows you to use CVS file format for bulk product options updates;
- the Product Options module supplements the functionality of the Inventory Tracking, Wholesale Trading, Wish List and Product Adviser modules.
This article will guide you through the process of Product Options add-on module configuration and use.
Contents
Configuring the module
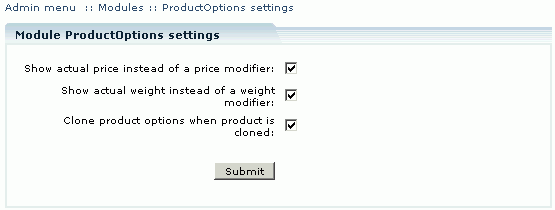
After you have successfully installed the Product Options module, click on the 'Product Options' module link to enter the module's settings page (Figure 3).
The following settings are configured here:
- Show actual price instead of a price modifier: this setting has an effect on how product prices of different product options are displayed in the Customer Zone. If you select this option, the calculated price will be shown; otherwise the difference with the basic price is shown.
- Show actual weight instead of a weight modifier: this setting has an effect on how product weights of different product options are displayed in the Customer Zone. If you select this option, the calculated weight will be shown; otherwise the difference with the basic weight is shown.
- Clone product options when product is cloned: select this option if you would like product options to be cloned when a product is cloned; clear the check box to clone product details without product options.
Click on the 'Update' button for new settings to take effect.
Product options for individual products
Product Options module provides the possibility to define as many product options as needed. Related product options are grouped into classes (a good example of a product option class is 'ShoeSize', where each size is an individual option in that class). Multiple option classes can be defined for one product. If more than one product option class is defined, a customer can choose any available combination of product options from different classes (if we add a 'ShoeWidth' class with a set of width variants, a customer will be able to choose any shoe width available for his size).
Defining product option classes
In order to define a class of product options for an individual product, follow the instructions below:
1. Search for the product and proceed to its details page. The 'Product Info' screen appears.
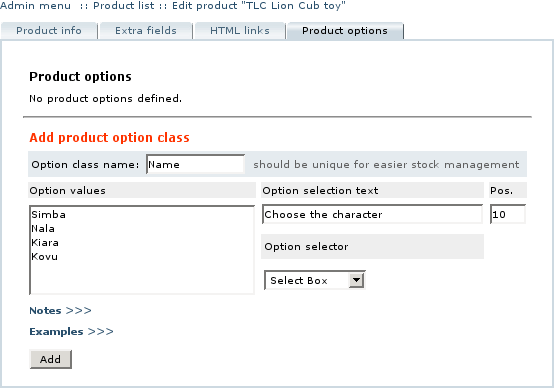
2. Click on the 'Product Options' tab to display the product options page (Figure 4).
3. In the 'Add product option' section, provide the details of the product option you are about to define:
- In the 'Option class name' field type in the name of the option class as it will appear on the shopping cart page and in the catalog database. This name must be unique (E.g.: 'ShoeSize', 'ProductColor', 'ToolVoltage').
- In the 'Option values' field type in the names of the options as they will appear in the Customer zone. Each option must be listed on a new line.
- In the 'Option selection text' field type in the message that will appear at the customer front-end when a customer is offered to choose from the range of available options (E.g.: 'Choose your shoe size', 'Specify color', 'What is your voltage').
- 'Option selector' setting specifies how the options will be presented to a customer. You can choose from the following variants: 'Select Box' (default type), 'Radio Button', 'Text' and 'Text Area'.
If you choose 'Text' or 'Text Area' option type, the 'Option values' field must be empty.
When you choose 'Text' and 'Text Area' variants of option type, additional 'Size' parameter appears allowing you to define the size of the text box.
- 'Pos.' field is used to sort options in case there is more than one option defined for the product. Option classes with lower 'Pos.' values will appear at the beginning of the list of option classes.
4. Click on the 'Add' button to save the new product option class definition.
Modifying product option classes
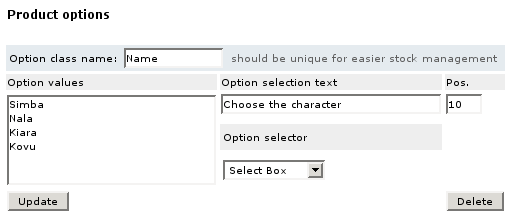
To update parameters of a product option class, make the necessary modifications in the fields defining the product option class and click on the corresponding 'Update' button to commit the changes (Figure 5).
To delete a product option class, click on the corresponding 'Delete' button.
Defining option-specific product prices and product weights
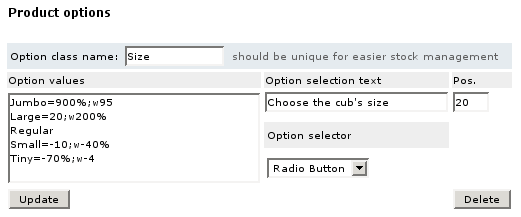
The flexibility of the Product Options module allows you to set specific prices and/or weights on individual product options. This can be done by specifying product option modifiers. The modifiers are set by placing an equality sign after the option value and specifying product price variations in the following format:
- '+X' or 'X': to add X to the basic price of a product, where X is a fixed value in the store's default currency;
- '-X': to subtract X from the basic price of a product, where X is a fixed value in the store's default currency;
- '+X%' or 'X%': to add X percent to the basic price of a product;
- '-X%': to subtract X percent from the basic price of a product;
and product weight variations in the following format:
- 'w+Y' or 'wY': to add Y to the basic weight of a product, where Y is a fixed value in the store's default weight units;
- 'w-Y': to subtract Y from the basic weight of a product, where Y is a fixed value in the store's default weight units;
- 'w+Y%' or 'wY%': to add Y percent to the basic weight of a product;
- 'w-Y%': to subtract Y percent from the basic weight of a product.
If a product option has both weight and price modifiers, they must be separated by a semi-colon.
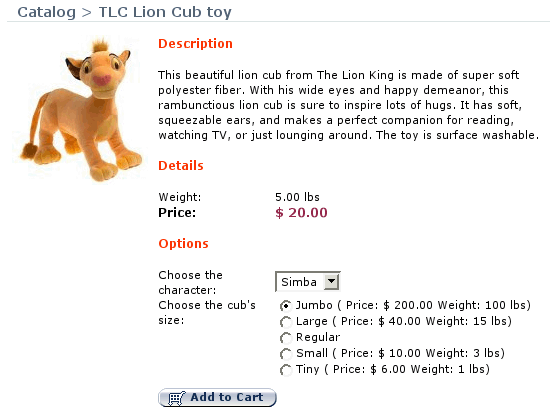
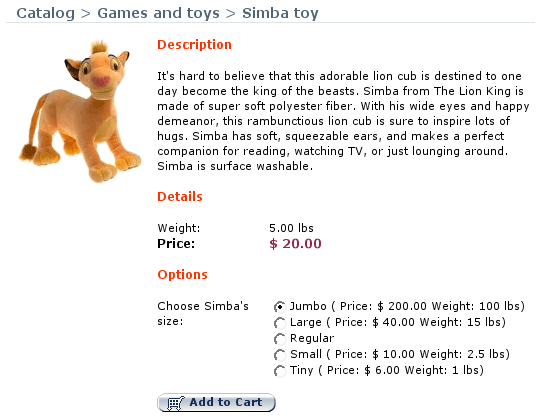
If our store specializes in plush toys and offers plush 'TLC Lion Cub toy' in five sizes, the list of options might look like shown in Figure 6. With the basic price of the toy being equal to $20 and the weight being 5lbs, the customer will see the list of options as shown in Figure 16.
Excluding option combinations
You can exclude from the list of available options those combinations of product options that are not possible or not provided at your store. Your customers will not be able to add such combinations to their shopping carts: attempting to do so will produce a message, informing the customer that this combination cannot be chosen.
To define a combination of options to be excluded, under the 'Exclude option combination' choose the combination of options to be excluded and click on the 'Add' button next to it (Figure 7). The newly defined combination will appear under the list of' Excluded option combinations'. Multiple combinations can be defined.
To delete the combination from the list, click on the 'Delete' button located to the right from it.
Using JavaScript enhancements
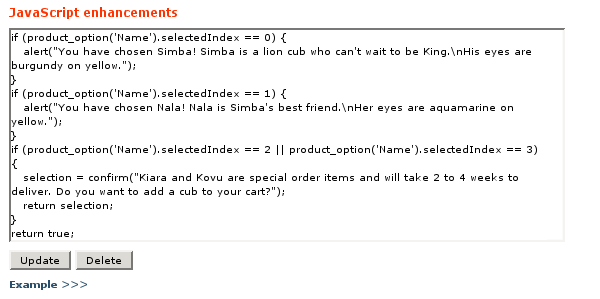
Moreover, the Product Options module allows you to write your own JavaScript code to validate complex product options rules, set up additional conditions, provide important details on selected options or introduce other enhancements. The code you provide will be executed when a customer makes an attempt to add a certain product option to his shopping cart. If the code returns the 'true' exit code, the product is being added to the customer's shopping cart, otherwise it is not.
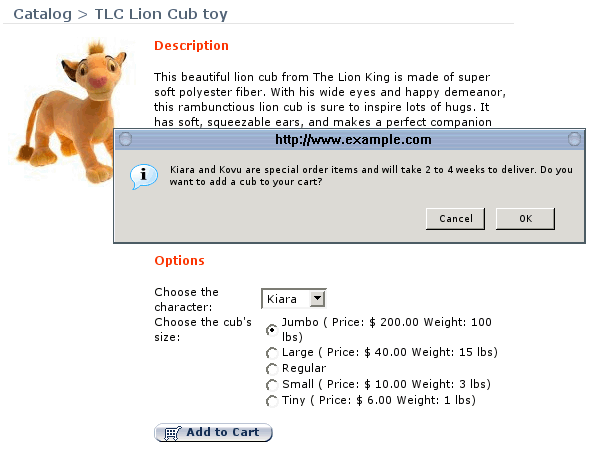
Type the JavaScript code in the text box provided under the 'JavaScript enhancements' sub-title, and click on the 'Add' button to commit the code. Figure 8 demonstrates typical use of JavaScript code (for the definition of the product class used in Figure 8 see Figure 5).
JavaScript code can be used in combination with other product options, for example, text fields.
Example:
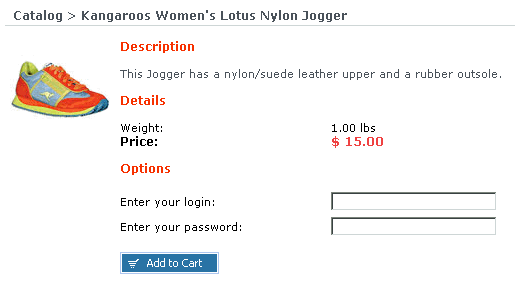
This example shows how to use JavaScript together with text fields. Customers will see two text fields on the product page: Login and Password. If they try to order the product without entering their login and password an alert box pops up with a request to complete the corresponding text fields.
Follow the instructions below to achieve the described effect.
Add 2 text fields as product options (for detailed instructions see the 'Defining product option classes' section). Name the fields Login and Password. Using the JavaScript enhancement form enter the following JavaScript code, making these fields required.
// obtaining the value of the Login option
var elm = product_option('Login');
// stripping all space symbols
var loginOpt = elm.value.replace(/ /g, '');
// checking the length of the Login option without space symbols
if (loginOpt.length == 0) {
alert('Please fill in the Login field!');
return false;
}
// obtaining the value of the Password option
var elm = product_option('Password');
// stripping all space symbols
var passwordOpt = elm.value.replace(/ /g, '');
// checking the length of the Password option without space symbols
if (passwordOpt.length == 0) {
alert('Please fill in the Password field!');
return false;
}
// all fields pass OK
return true;
Global product options
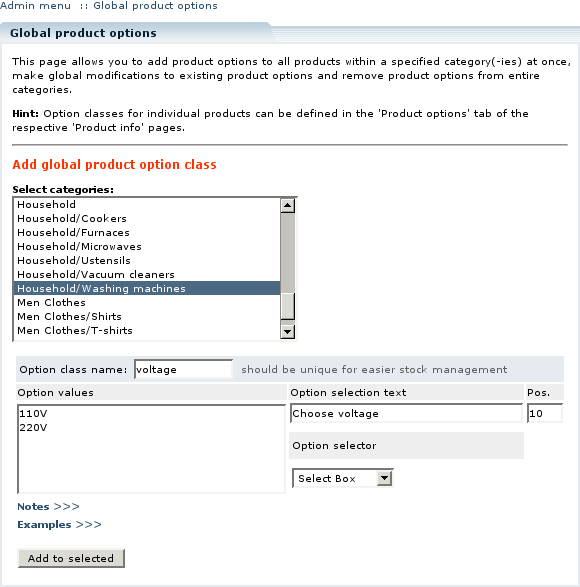
Product option classes can also be defined and managed globally using 'Global Product Options' section of the 'Catalog' menu. This section allows you to add identical sets of product options to all products within a specified category(-ies) at once and remove global product options from entire categories.
The interface used to manage global product option classes is essentially the same as that of individual product option classes.
Defining global product options classes
In order to define a new global product option class, provide the following settings:
1. Under the 'Add global product option' subtitle (Figure 9), provide the details of the global product option class you are defining:
- Select a category to which the new global product option class will be added. You can select multiple categories in the list by clicking on the category names while holding the <CTRL> button.
- In the 'Option class name' field type in the name of the option class as it will appear at the Customer Zone and in the catalog database. This name must be unique (E.g.: 'ShoeSize', 'ProductColor', 'ToolVoltage').
- In the 'Option values' field type in the names of the options as they will appear at the Customer Front-End. Each option must be listed on a new line.
- In the 'Option selection text' field type in the message that will appear at the customer front-end when a customer is offered to choose from the range of available options (E.g.: 'Choose your shoe size', 'Specify color', 'What is your voltage').
- 'Option selector' setting specifies how the options will be presented to a customer. You can choose from the following variants: 'Select Box' (default type), 'Radio Button', 'Text' and 'Text Area'.
If you choose 'Text' or 'Text Area' option type, the 'Option values' field must be empty.
When you choose 'Text' and 'Text Area' variants of option type, additional 'Option size' parameter appears allowing you to define the size of the text box.
- 'Pos.' field is used to sort options in case there is more than one option defined for a product. Option classes with lower 'Pos.' values will appear at the beginning of the list of option classes.
2. Click on the 'Add to selected' button to save the definition of the new global product option class.
Changing the set of categories
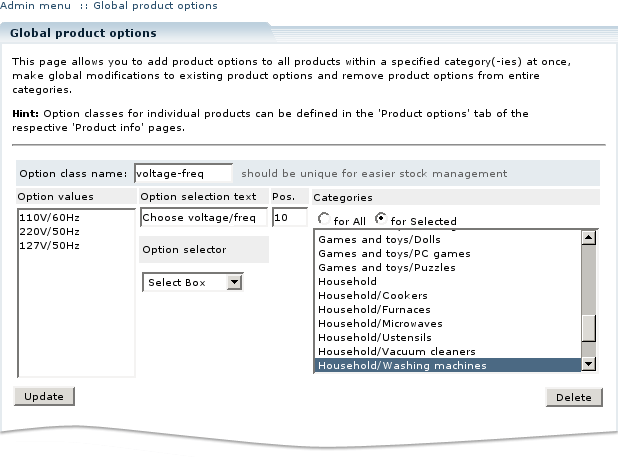
To modify the list of categories to which a global option class applies, select the necessary categories and click the 'Update' button below the option values (Figure 10).
To delete a global product option class click on the 'Delete' button to the right from the option class definition.
Customizing global product options for individual product
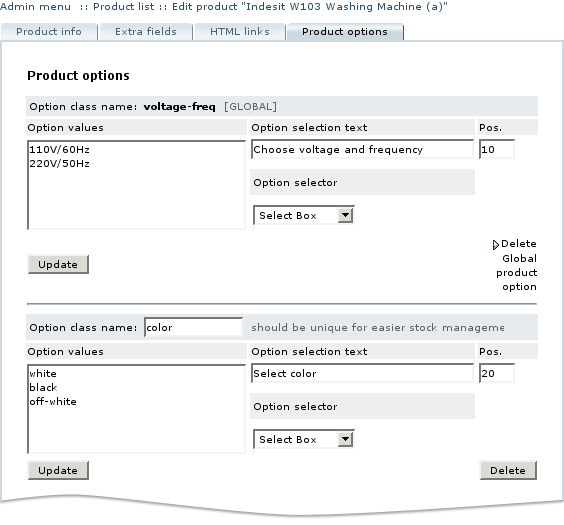
When you have defined a global product option class, it is added to the list of available product option classes of each product in the category (Figure 11). In the 'Product options' tab of a product it looks exactly the same as product's own option classes except that its name appears in bold font and cannot be modified. Additionally, you see a 'Delete global product option' link instead of a 'Delete' button next to the global product option class definition.
You can customize global product option class parameters for individual product; any parameter can be changed except for the option class name, which always remains the same. Find the product and choose the 'Product options' tab. Modify the parameters of the global product option class as you would do it for a regular product option class and click on the 'Update' button next to the definition to save the changes.
If you click on the 'Delete Global product option' link, you will be redirected to the 'Global product options' page where you will be able to delete or otherwise modify the global product option class. Deleting a class there will remove it from all associated categories. Since you cannot delete a global product option class from an individual product page only, there is a work-around if you want to hide that option class from your customers' view. In the 'Product options' tab find the global product option class you want to disable and remove all the option values, change option selector type to 'Select Box' or 'Radio button', and then click on the 'Update' button.
Importing/Exporting product options
The list of product options can be exported into a CSV file and imported from a CSV file for ease of stock management. Both individual product options and global product options can be imported and exported. In a CSV file, each line provides a definition of a separate option class, product-specific or global.
In order to better understand LiteCommerce CSV import/export procedures, see the corresponding sections of LiteCommerce Reference Manual.
Importing product options
When preparing a CSV file for import:
- In order to import a global product option class, place empty strings in the 'sku' and 'name' fields (described below) in global product option class definition lines.
- If your CSV file contains global product option class definition and also a customized definition of the same class for an individual product, the line with the global product option class definition must precede the customized definition. Moreover, it is recommended to place all global product option class definitions at the beginning of the CSV file, to be followed by product-specific option class definitions.
To import product option classes from a CSV file, take the following steps (Figure 12):
1. In the Administrator Zone, choose 'Import catalog' section in the 'Catalog' menu.
2. Select the 'Import product options' tab.
3. Specify the order of product option detail fields as they appear in the CSV file. The following field types can be used:
- sku – for product SKU number;
- name – for product name;
- optclass – for option class name;
- opttext – for option selection text;
- options – for the list of available options;
- opttype – for option selector type;
- cols – for the width of a text area if the 'Text Area' or 'Text' type of selector is used;
- rows – for amount of rows in a text area if the 'Text Area' type of selector is used;
- orderby – for 'Pos.' value;
- categories – for the list of categories (used with global product option classes).
4. Select the delimiter and the text qualifier used in the CSV file.
5. Choose the CSV file to import. If the file is located on the server, enter its location in the 'File (CSV) local' field. If the CSV file is located on your local computer, click on the 'Browse…' button next to the 'File (CSV) for upload' field to locate the file.
6. Click on the 'Import' button to import the product options data from the CSV file.
Exporting product options
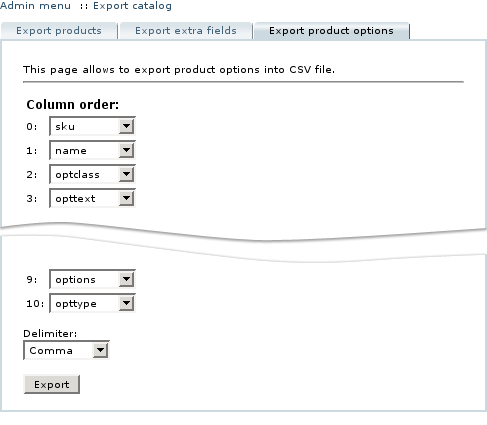
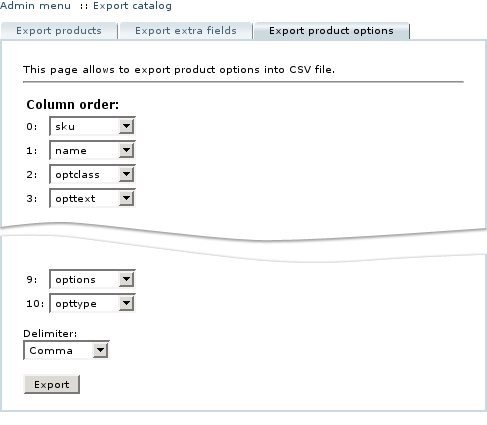
To export product options into a CSV file, follow the instructions below (Figure 13):
1. In the Administrator Zone, choose 'Export catalog' section in the 'Catalog' menu.
2. Select the 'Export product options' tab.
3. In the 'Column order' form specify the order in which data fields should appear in the resulting CSV file. The following field types are available:
- sku – for product SKU number;
- name – for product name;
- optclass – for option class name;
- opttext – for option selection text;
- options – for the list of available options;
- opttype – for option selector type;
- cols – for the width of a text area if the 'Text Area' or 'Text' type of selector is used;
- rows – for amount of rows in a text area if the 'Text Area' type of selector is used;
- orderby – for 'Pos.' value;
- categories – for the list of categories (used with global product option classes).
4. Select the field delimiter conforming to the CSV file format you are using.
5. Click on the 'Export' button to export wholesale pricing data into a CSV file.
The default name of the exported file is 'product_options.csv'. If a file with this name already exists, the newly generated file will be named 'product_options-N.csv', where 'N' is the first integer number to form a file name which is not in use.
In the resulting CSV file, global product option class definitions are listed first, followed by product-specific option class definitions.
Customer zone
This section demonstrates how the features introduced by the Product Options add-on module are reflected in the Customer Zone.
First of all, defining product options affects product pages of those products that have product options defined. A customer is now given a choice of available options for a product (Figure 16).
Defining product options also influences the category listing pages. A customer who clicks the 'Buy now' button of a product which has product options, is directed to the product details page, where he needs to select one or a combination of options before adding a product to cart. Only after a customer selects one of the options (or a combination of options if more than one option class is defined for the product) he can add the product to his shopping cart.
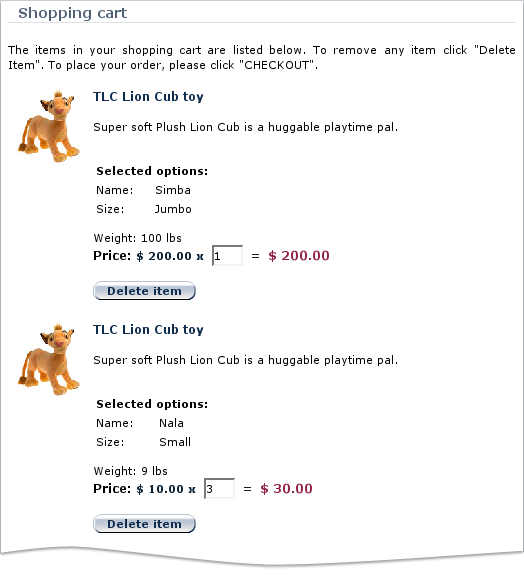
If a customer decides to buy different variants of the same product, each option appears separately in the customer's shopping cart (Figure 17). Quantities of different product options can be changed independently.
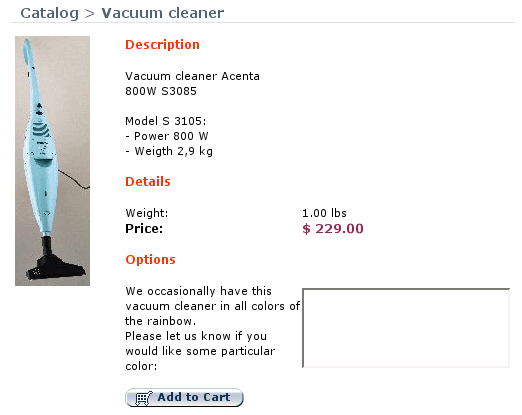
Figure 16 demonstrates how 'Select Box' and 'Radio Button' option selector types can be used for product option selection. The below figure demonstrates the use of the 'Text Area' selector type (Figure 18).
The next example (Figure 19) demonstrates the use of JavaScript enhancements as described in Section 'Using JavaScript enhancements'.
In the example below (Figure 20) product options are displayed on the product details page as a list of variants. This example corresponds to the setting discussed in the WholesaleTrading section.
See also:
