Difference between revisions of "X-Cart:Categories"
(→Deleting categories) |
m (→Roles in category management) |
||
| (7 intermediate revisions by 2 users not shown) | |||
| Line 1: | Line 1: | ||
| − | == | + | == Overview == |
Finding products in an e-commerce store is easier when the products are categorized. Categories provide a centralized structure for the product catalog and help customers locate the products they need in mere seconds. | Finding products in an e-commerce store is easier when the products are categorized. Categories provide a centralized structure for the product catalog and help customers locate the products they need in mere seconds. | ||
| − | X-Cart allows you to create an unlimited number of | + | X-Cart allows you to create an unlimited number of categories and populate them with products. Categories are used to categorize products on the basis of any property. |
'''Examples''': | '''Examples''': | ||
| Line 39: | Line 39: | ||
== Roles in category management == | == Roles in category management == | ||
| − | If you are an X-Cart GOLD administrator/provider or an X-Cart PRO administrator: | + | If you are an X-Cart GOLD/GOLD PLUS administrator/provider or an X-Cart PLATINUM/PRO administrator: |
| − | * You can create custom product categories/subcategories ( | + | * You can create custom product categories/subcategories (study the [[#Adding Categories]] section). |
| − | * You can manage custom product categories/subcategories ( | + | * You can manage custom product categories/subcategories (see [[#Managing Existing Categories]] section): |
** [[#Changing Category order|change the order of categories on the storefront]] | ** [[#Changing Category order|change the order of categories on the storefront]] | ||
** [[#Disabling/enabling categories|enable/disable categories]] | ** [[#Disabling/enabling categories|enable/disable categories]] | ||
| Line 49: | Line 49: | ||
** [[#Deleting Categories|delete categories]] | ** [[#Deleting Categories|delete categories]] | ||
| − | If you are an X-Cart PRO provider: | + | If you are an X-Cart PLATINUM/PRO provider: |
| − | * You can define, in which category (or categories) each of your products should be located ( | + | * You can define, in which category (or categories) each of your products should be located (see the [[#Product Management]] section). |
* You cannot add, delete, rename, disable/enable categories or change the order in which they appear on the storefront. | * You cannot add, delete, rename, disable/enable categories or change the order in which they appear on the storefront. | ||
| Line 208: | Line 208: | ||
==Defining Category Details== | ==Defining Category Details== | ||
| + | |||
| + | The details of a category (including the category location, description, category icon, etc) are defined in the '<u>Add</u> <u>category</u>' dialog box. | ||
| + | |||
| + | [[Image:add_category.gif|587px|center]] | ||
| + | |||
| + | To define the details of a category: | ||
| + | |||
| + | 1. Use the '<u>Category icon</u>' section of the ‘<u>Add category</u>’ dialog box to add an icon for the category. | ||
| + | |||
| + | If you choose not to add an icon for the category, the category will use the icon of its parent category (or - if the parent category does not have an icon of its own - of its grandparent category). If the category is located at the root level, it will not use any icon. | ||
| + | |||
| + | 2. Complete the following fields: | ||
| + | |||
| + | * <u>Position</u>: The position of the category in the list of categories. The position of a category is defined relative to the positions of the other categories of the same level and branch of the category tree and is expressed by a whole number. Categories with smaller position numbers are placed closer to the top of the list. | ||
| + | |||
| + | : If you choose to leave the '<u>Position</u>' field empty, the category will be automatically assigned the position 0 (zero). Please note that, if more than one categories are created on the same level with the same position number, they will be arranged in the order of creation. | ||
| + | |||
| + | * <u>Category</u>: The name by which you and your customers will be able to identify the category. | ||
| + | * <u>Clean URL</u>: The clean URL value for this category. Instructions for adjusting this field are available in the section [[X-Cart:Clean URLs]] of this manual. | ||
| + | |||
| + | {{Note|The field 'Clean URL' needs to be adjusted only if X-Cart's Clean URLs functionality is enabled in your store. If the Clean URLs functionality is disabled, the field 'Clean URL' is inactive.}} | ||
| + | |||
| + | * <u>Description</u>: The description of this category (will be displayed to customers). | ||
| + | |||
| + | {{Note|You can enter the description in WYSIWYG mode if your store has the module HTML Editor enabled. For details, see the section [[X-Cart:HTML Editor]] in this manual.}} | ||
| + | |||
| + | * <u>Membership</u>: The membership level(s) that you wish to be able to view this category. All means that the category will be visible to all the visitors of your store, including non-members and users who are not logged in. Selecting a specific membership level makes the category visible only to the members of this level; non-members and users of other membership levels will not be able to see this category. | ||
| + | |||
| + | * <u>Availability</u>: This option allows you to specify whether this category must be visible in the Customer area. Enabled means that the category will be visible to all the visitors of the Customer area who meet the membership requirement. Disabled means that the category will not visible to anyone. | ||
| + | |||
| + | * <u>Title tag</u>: The title to be used in the title bar of this category details page. | ||
| + | |||
| + | * <u>META keywords</u>: The keywords to be used in the keywords meta tag on the pages of this category. | ||
| + | * <u>META description</u>: The description to be used in the description meta tag on the pages of this category. | ||
| + | |||
| + | : For more information on using the description and keywords meta tags, see the section [[X-Cart:Configuring Page Titles and Meta Tags]] of this manual. | ||
| + | |||
| + | * <u>Use the META data of this category for all the subcategories and products contained in this category</u>: This option allows you to specify whether the meta keywords and meta description of this category must be used for the subcategories and products contained in this category. If this option is enabled, the subcategories and products of this category which do not have meta keywords of their own will use the meta keywords of this category, whereas the subcategories and products which do not have a meta description of their own will use the meta description of this category. If this option is disabled, the subcategories and products of this category which do not have meta keywords of their own will use the global meta keywords defined on the '<u>General settings/SEO options</u>' page, whereas the subcategories and products of this category which do not have a meta description of their own will use the global meta description defined on the '<u>General settings/SEO options</u>' page. | ||
==Defining International Category Descriptions== | ==Defining International Category Descriptions== | ||
| + | |||
| + | If your store supports more than one languages, you must provide names and descriptions for your categories in all the languages supported by your store. In X-Cart, a combination of the name and description of a category in a language other than default is called the category's international description. | ||
| + | |||
| + | To add an international description for a category: | ||
| + | |||
| + | 1. Find the category for which you wish to add an international description and open it for editing. | ||
| + | 2. Click on link '<u>International descriptions</u>' in the section menu. This displays a dialog box titled '<u>International descriptions</u>'. | ||
| + | |||
| + | |||
| + | [[Image:int_descr_cat.gif|581px|center]] | ||
| + | |||
| + | |||
| + | 3. In the '<u>International descriptions</u>' dialog box, switch the language selector to the language in which you wish to add an international description. The language of the interface changes to the selected language. | ||
| + | 4. Edit the name and description of the category translating them into the selected language. | ||
| + | 5. Click the '''Save''' button. | ||
| + | |||
| + | When you click on '''Save''', the international description is added. A message is displayed confirming that the international description has been updated successfully. | ||
| + | |||
| + | '''To edit an international description of a category:''' | ||
| + | |||
| + | # Find the category whose international description you wish to edit and open it for editing. | ||
| + | # To open the '<u>International descriptions</u>' dialog box, use the link '<u>International descriptions</u>' in the section menu. | ||
| + | # In the '<u>International descriptions</u>' dialog box, switch the language selector to the language of the international description that you wish to edit. The language of the interface changes to the selected language. | ||
| + | # Edit the name and/or description of the manufacturer category. | ||
| + | # Click the '''Save''' button. | ||
| + | |||
| + | When you click '''Save''', the international description is updated. A message is displayed confirming that the international description has been updated successfully. | ||
| + | |||
| + | '''To delete an international description of a category:''' | ||
| + | |||
| + | # Find the category whose international description you wish to delete and open it for editing. | ||
| + | # To open the '<u>International descriptions</u>' dialog box, use the link '<u>International descriptions</u>' in the section menu. | ||
| + | # In the '<u>International descriptions</u>' dialog box, switch the language selector to the language of the international description that you wish to delete. The language of the interface changes to the selected language. | ||
| + | # Click the '''Delete''' button. | ||
| + | |||
| + | When you click '''Delete''', the international description is deleted. A message is displayed confirming that the international description has been deleted successfully. | ||
[[Category:X-Cart user manual]] | [[Category:X-Cart user manual]] | ||
Latest revision as of 18:13, 8 October 2012
Contents
Overview
Finding products in an e-commerce store is easier when the products are categorized. Categories provide a centralized structure for the product catalog and help customers locate the products they need in mere seconds.
X-Cart allows you to create an unlimited number of categories and populate them with products. Categories are used to categorize products on the basis of any property.
Examples:
- Custom product categories for a bookstore might be 'Fiction', 'Non-Fiction', 'Audiobooks', etc.
- A shop specializing in clothing and accessories might have categories 'Men', 'Women', 'Teens', 'Kids & Baby'.
In X-Cart, products cannot be created outside custom product categories, so you need to have at least one custom product category to be able to add products.
Any category may have subcategories, which, in their turn, may have their own subcategories (The number of subcategories and levels of subcategories is unlimited).
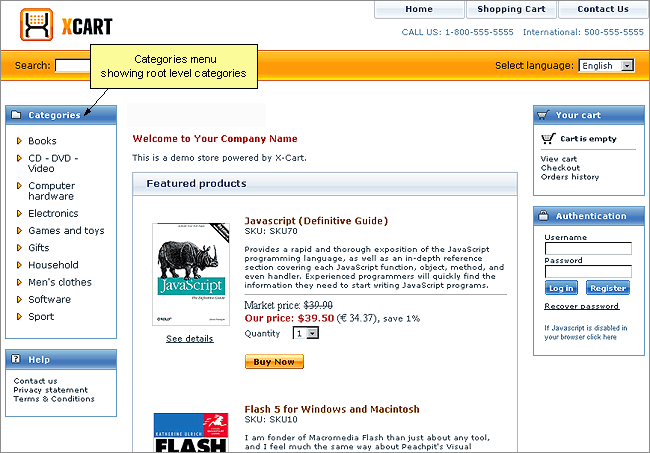
On the Customer area main page, categories of the root level are listed in the Categories menu.
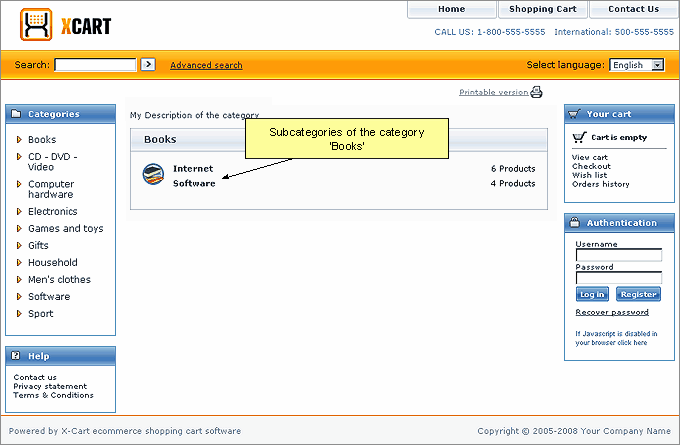
Subcategories and products contained in a root level category outside subcategories become available for viewing in the central area of the site page when a customer clicks on the name of the corresponding root level category in the Categories menu.
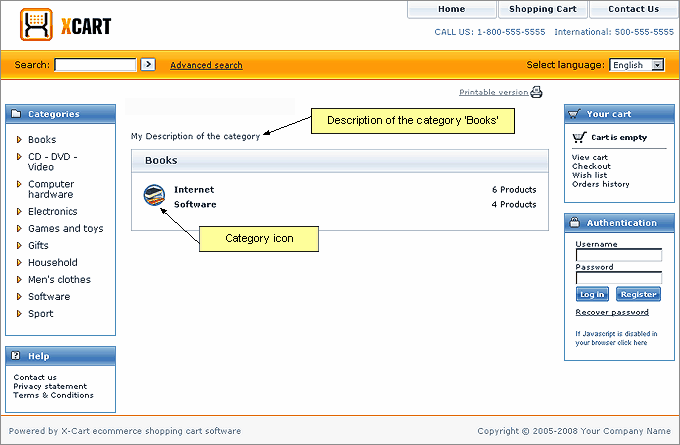
Every category/subcategory in a store can have an icon and a short description providing information as to what kind of products is contained there:
Custom product categories can be created and managed through the 'Categories Management' section of the Admin area (Catalog menu->Categories).
Roles in category management
If you are an X-Cart GOLD/GOLD PLUS administrator/provider or an X-Cart PLATINUM/PRO administrator:
- You can create custom product categories/subcategories (study the #Adding Categories section).
- You can manage custom product categories/subcategories (see #Managing Existing Categories section):
If you are an X-Cart PLATINUM/PRO provider:
- You can define, in which category (or categories) each of your products should be located (see the #Product Management section).
- You cannot add, delete, rename, disable/enable categories or change the order in which they appear on the storefront.
Managing Categories
To perform any operation on a category (for example, to modify or delete a category, or to view the products contained in a category), you first need to locate this category. As categories in your store may be located on more than one levels, you need to be able to navigate the category tree to locate categories.
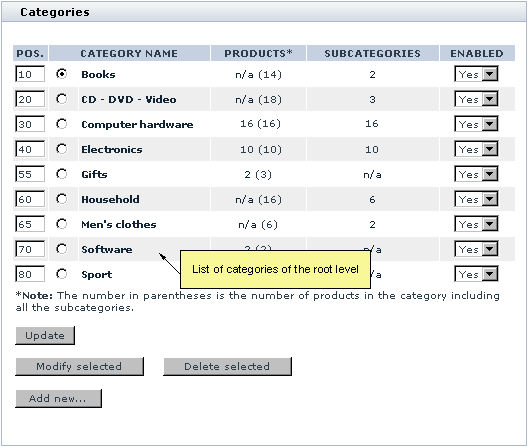
No navigation is required to locate a category on the root level: a list of all the categories of the root level becomes immediately visible in the 'Categories' form as soon as you enter the 'Categories Management' section of the Admin area (Catalog menu->Categories):
The list is sorted alphabetically. The POS. column shows the order in which the categories appear on the storefront. The column PRODUCTS shows the number of products contained in each of the categories (outside subcategories). The column SUBCATEGORIES shows the number of subcategories in each of the categories. The column ENABLED demonstrates the status of the categories (enabled or disabled).
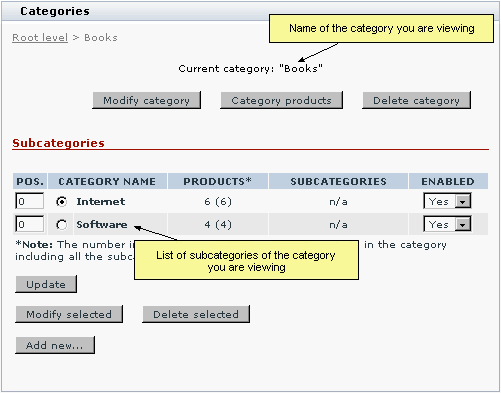
To locate a category on any level other than 'root', you need to navigate to that level of the category tree. If the desired category is a subcategory of a root level category, simply click on the name of the root level category. If the desired category is located several levels apart from the root level, consecutively click on the names of categories leading to this category until you reach the desired location. In any case, a click on a category name takes you to the level of that category and allows you to view the list of the category's subcategories (if the category has any subcategories). With regard to the category set shown in the screenshot above, a click on the root level category 'Books' will produce the following:
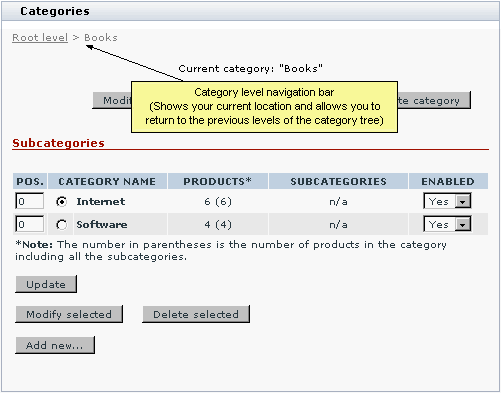
The name of the current category will be shown at the top of the 'Categories' form (Current category: "Books"). A list of the category's subcategories will be given below.
On any level except 'root', the top left-hand corner of the 'Categories' form will have a category level navigation bar. This bar will not only show the path to your current location, but will also allow you to return to any of the previously visited levels of the category tree with a single click.
Changing the order in which categories appear on the storefront
To change the order in which your categories appear on the storefront, do the following:
- Go to the 'Categories Management' section of the Admin area (Catalog menu->Categories). You should see a form titled 'Categories'.
- In the 'Categories' form, edit the position numbers of the categories that need to be moved (POS. column).
- Click the Update button. The order of the categories in the Customer area should change.
Disabling/enabling categories
It is possible to temporarily disable categories. A disabled category does not appear in the category tree on the storefront and is removed from the 'Search in category' drop-down box of the 'Search for products' form in the Customer area.
To disable one or more categories:
- Go to the 'Categories Management' section of the Admin area (Catalog menu->Categories). You should see a form titled 'Categories'.
- Use the 'Categories' form to locate the categories which you want to disable.
- In the ENABLED column, select No for each of these categories.
- Click the Update button. The disabled categories should disappear from the storefront.
To disable all the products in a disabled category, you need to do a product search based on the name of that category and use [X-Cart:Managing Products#Group product editing]] to assign the status Disabled to every product listed in the search results.
To re-enable previously disabled categories, re-set the value in the ENABLED column to Yes for these categories and click on Update. The categories should re-appear on the storefront.
Viewing the products contained in a category
To view the products contained in a category (outside subcategories):
1. Go to the 'Categories Management' section of the Admin area (Catalog menu->Categories). You should see a form titled 'Categories'.
2. Use the 'Categories' form to locate the category whose products you wish to view.
3. Do one of the following:
- In the categories list, click on the product number link (PRODUCTS column) opposite the name of the category.
- or
- Click on the name of the category in the categories list; when the category page opens, click the button Category products below the title 'Current category: Name'.
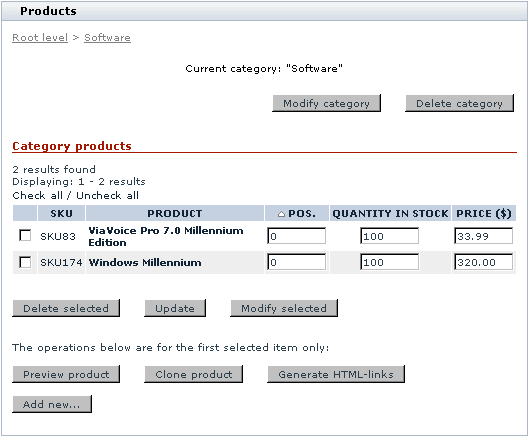
- A form titled 'Products' will be opened.
- The list of products will be displayed in the 'Category products' section of the 'Products' form. Titles of the products for which the current category is main will be displayed in bold font. Titles of the products for which the current category is additional will use a non-bold font.
- For each of the products, you will be able to see an SKU, a position number, a quantity and a price.
- The 'Category products' section allows you to manage the category products very much like the 'Search results' form in the 'Products Management' section: you can delete, preview, modify and clone products, as well as update the products' quantities and prices and generate HTML links.
- In addition to that, you can change the order in which the products appear within the category and add new products.
- To change the order of products in the category, edit the position numbers of the products that need to be moved (POS. column), then click on Update.
- To add a new product, click the Add new... button at the bottom of the 'Products' form.
Modifying categories
If you want to rename a category, to move it to a different location, to change its icon, membership availability or any other parameter(s), do the following:
1. Go to the 'Categories Management' section of the Admin area (Catalog menu->Categories). You should see a form titled 'Categories'.
2. Use the 'Categories' form to locate the category you wish to modify.
3. Do one of the following:
- Select a radio button next to the name of the category in the categories list and click the Modify selected button at the bottom of the 'Categories' form.
- or
- Click on the name of the category in the categories list; when the category page opens, click the button Modify category below the title 'Current category: Name'.
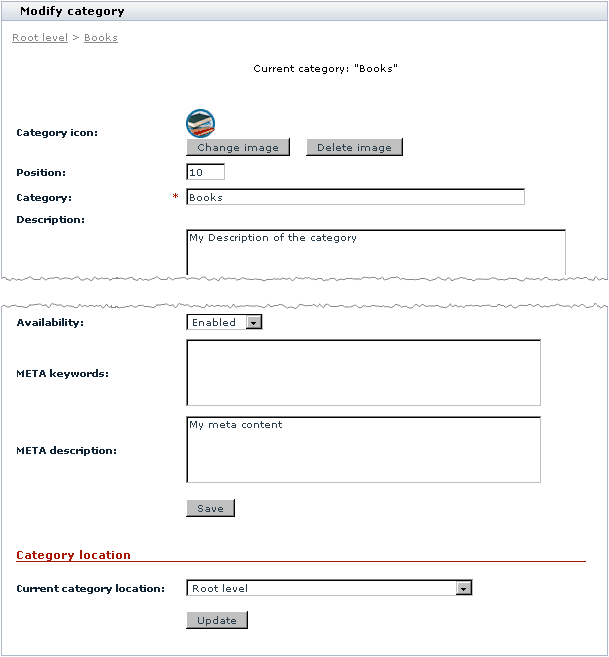
- A form titled 'Modify category' will be opened.
- Below the 'Modify category' form there will also be a form with international descriptions of the category.
4. Use the 'Modify category' form to readjust the parameters of the category.
- After editing any fields, be sure to click the Save button to save the changes.
- To move the category to another location, scroll down to the 'Category location' section of the 'Modify category' form, select the desired location from the 'Current category location' drop-down box and click the Update button.
- If you have moved the category, its location in the list of categories should change.
5. If necessary, add, edit or delete international descriptions for the category.
Deleting categories
If you want to completely remove a category (including all its subcategories and products), do the following:
1. Go to the 'Categories Management' section of the Admin area (Catalog menu->Categories). You should see a form titled 'Categories'.
2. Use the 'Categories' form to locate the category you wish to delete.
3. Do one of the following:
- Select a radio button next to the name of the category in the categories list and click the Delete selected button at the bottom of the 'Categories' form.
- or
- Click on the name of the category in the categories list; when the category page opens, click the button Delete category below the title 'Current category: Name'.
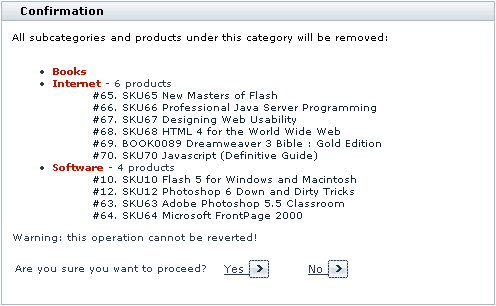
- A confirmation box will appear. The confirmation box will provide a list of all the categories, subcategories and products that will be removed if you choose to proceed with the deletion.
4. Click Yes to confirm your desire to delete the category. The category and all the subcategories and products contained in it will be removed. Please be aware that this operation cannot be reverted. (To cancel the operation, click No).
- If you have chosen to delete the category, after an automatic page refresh, you should see an information box with a confirmation message.
Defining Category Details
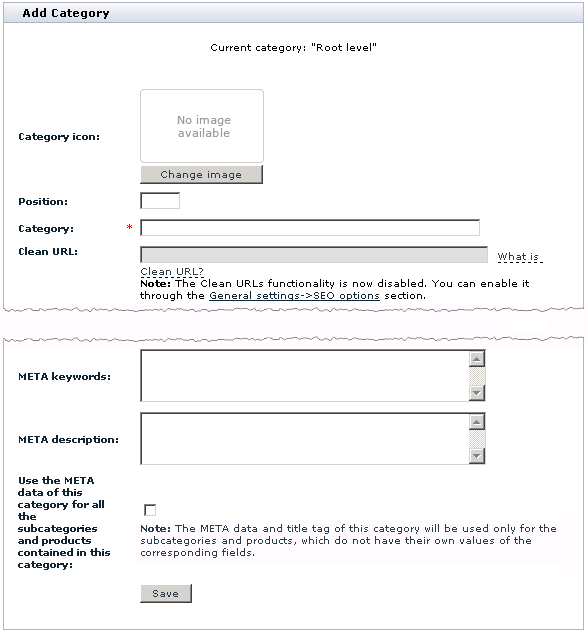
The details of a category (including the category location, description, category icon, etc) are defined in the 'Add category' dialog box.
To define the details of a category:
1. Use the 'Category icon' section of the ‘Add category’ dialog box to add an icon for the category.
If you choose not to add an icon for the category, the category will use the icon of its parent category (or - if the parent category does not have an icon of its own - of its grandparent category). If the category is located at the root level, it will not use any icon.
2. Complete the following fields:
- Position: The position of the category in the list of categories. The position of a category is defined relative to the positions of the other categories of the same level and branch of the category tree and is expressed by a whole number. Categories with smaller position numbers are placed closer to the top of the list.
- If you choose to leave the 'Position' field empty, the category will be automatically assigned the position 0 (zero). Please note that, if more than one categories are created on the same level with the same position number, they will be arranged in the order of creation.
- Category: The name by which you and your customers will be able to identify the category.
- Clean URL: The clean URL value for this category. Instructions for adjusting this field are available in the section X-Cart:Clean URLs of this manual.
- Description: The description of this category (will be displayed to customers).
- Membership: The membership level(s) that you wish to be able to view this category. All means that the category will be visible to all the visitors of your store, including non-members and users who are not logged in. Selecting a specific membership level makes the category visible only to the members of this level; non-members and users of other membership levels will not be able to see this category.
- Availability: This option allows you to specify whether this category must be visible in the Customer area. Enabled means that the category will be visible to all the visitors of the Customer area who meet the membership requirement. Disabled means that the category will not visible to anyone.
- Title tag: The title to be used in the title bar of this category details page.
- META keywords: The keywords to be used in the keywords meta tag on the pages of this category.
- META description: The description to be used in the description meta tag on the pages of this category.
- For more information on using the description and keywords meta tags, see the section X-Cart:Configuring Page Titles and Meta Tags of this manual.
- Use the META data of this category for all the subcategories and products contained in this category: This option allows you to specify whether the meta keywords and meta description of this category must be used for the subcategories and products contained in this category. If this option is enabled, the subcategories and products of this category which do not have meta keywords of their own will use the meta keywords of this category, whereas the subcategories and products which do not have a meta description of their own will use the meta description of this category. If this option is disabled, the subcategories and products of this category which do not have meta keywords of their own will use the global meta keywords defined on the 'General settings/SEO options' page, whereas the subcategories and products of this category which do not have a meta description of their own will use the global meta description defined on the 'General settings/SEO options' page.
Defining International Category Descriptions
If your store supports more than one languages, you must provide names and descriptions for your categories in all the languages supported by your store. In X-Cart, a combination of the name and description of a category in a language other than default is called the category's international description.
To add an international description for a category:
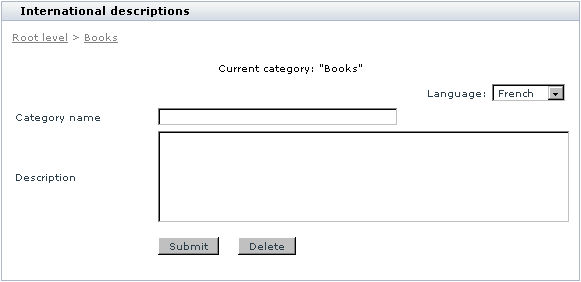
1. Find the category for which you wish to add an international description and open it for editing. 2. Click on link 'International descriptions' in the section menu. This displays a dialog box titled 'International descriptions'.
3. In the 'International descriptions' dialog box, switch the language selector to the language in which you wish to add an international description. The language of the interface changes to the selected language.
4. Edit the name and description of the category translating them into the selected language.
5. Click the Save button.
When you click on Save, the international description is added. A message is displayed confirming that the international description has been updated successfully.
To edit an international description of a category:
- Find the category whose international description you wish to edit and open it for editing.
- To open the 'International descriptions' dialog box, use the link 'International descriptions' in the section menu.
- In the 'International descriptions' dialog box, switch the language selector to the language of the international description that you wish to edit. The language of the interface changes to the selected language.
- Edit the name and/or description of the manufacturer category.
- Click the Save button.
When you click Save, the international description is updated. A message is displayed confirming that the international description has been updated successfully.
To delete an international description of a category:
- Find the category whose international description you wish to delete and open it for editing.
- To open the 'International descriptions' dialog box, use the link 'International descriptions' in the section menu.
- In the 'International descriptions' dialog box, switch the language selector to the language of the international description that you wish to delete. The language of the interface changes to the selected language.
- Click the Delete button.
When you click Delete, the international description is deleted. A message is displayed confirming that the international description has been deleted successfully.
