Difference between revisions of "X-Cart:X-Monitoring"
m (→How it works) |
m (→Enabling the X-Monitoring integration module in X-Cart) |
||
| Line 74: | Line 74: | ||
# In the list of modules, choose the "X-Monitoring" item by selecting the respective check box on the left. | # In the list of modules, choose the "X-Monitoring" item by selecting the respective check box on the left. | ||
# Click the '''Apply changes''' button. This activates the module. | # Click the '''Apply changes''' button. This activates the module. | ||
| + | <br /><br /> | ||
== Configuring the X-Monitoring integration module== | == Configuring the X-Monitoring integration module== | ||
Revision as of 14:14, 11 November 2012
Contents
Overview
X-Monitoring is a SaaS solution that integrates with X-Cart to enable 24/7/365 online monitoring of your website and X-Cart store. This service can help you minimize the period of downtime for your site to as little as several minutes. You, but not your customers, will be the first to know if your site is down or having problems.
X-Monitoring runs on our company's infrastructure, so you do not have to install any 3rd party software or create accounts in any systems. All you need to start using this service is install X-Cart's X-Monitoring add-on to add the monitoring widget to your site.
X-Monitoring service is provided on subscription basis.
Key benefits of using X-Monitoring in X-Cart
- 24/7/365 online monitoring: We will do periodic checks of your store website to ensure that it is up and running correctly.
- Instant email notifications: If your website is down, you will instantly receive an alert at the email address you have specified in the module settings.
- Website response measurement: If you website response time is too slow, you will be notified as well.
- Detailed availability reports: At any time you will be able to view detailed reports on the availability of your store website for the past two weeks right in X-Cart's admin area.
- SaaS architecture: High performance and feature updates are available automatically without the need to upgrade your client software.
- 30-day free trial period.
- Monthly subscription plan.
How it works
As soon as you install the X-Monitoring module to your X-Cart store, your website is automatically added to our monitoring system, and the 30-day free trial period begins. From this moment on our service will monitor your store website's uptime and performance.
Email notifications
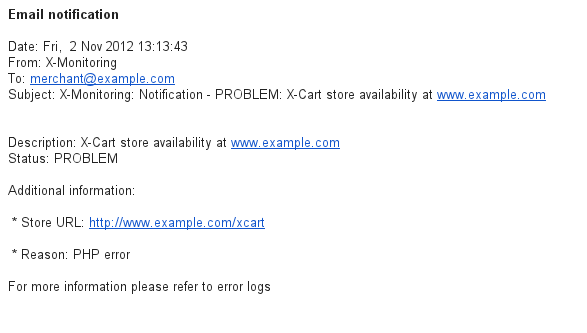
If your website becomes unavailable or experiences performance problems, you will be notified via email at the address specified on the X-Monitoring module settings page. Below is an axample of an email notification message you can get if your X-Cart store is down:
Availability reports
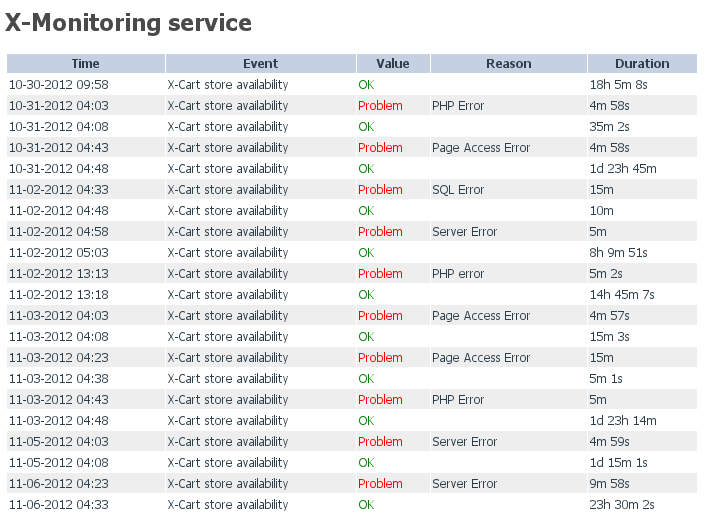
X-Monitoring collects data on your store's availability and problems that occur on your site and is capable of presenting this data in the form of availability reports. You can access the availability reports for the past two weeks of your store's operation via the "Tools"->"X-Monitoring service" section of X-Cart's admin area.
The Availability diagram presents data on X-Cart and web server availability in diagram view:
The Availability reports provide detailed data on X-Cart and web server availability in table view:
X-Monitoring integration module system requirements
To be able to successfully install and use the X-Monitoring add-on module, you need to have an installed working copy of X-Cart v4.5.0 or later. Make sure that the version of the module is the same as the version of your installed copy of X-Cart.
Installation and removal
The X-Monitoring integration module installation process is the same for all X-Cart editions.
To install the X-Monitoring integration module:
- Obtain a distribution package for the module by downloading it from the File Area section of your X-Cart Account or from this page: http://www.x-cart.com/extensions/modules/monitoring.html. The distribution package you need is archived in the file xmonitoring-x.y.z.tgz, where x, y and z indicate the version of the module. Make sure the version of the module matches the version of your copy of X-Cart.
- Copy the distribution package to the X-Cart root directory on your server or hosting account.
- If you use a Windows-based server or a UNIX-based server without terminal access:
- a) Extract the contents of the archive with the X-Monitoring integration module files to a directory on your system using your favorite compression program (WinZIP or any other archiver that supports TAR files).
- b) Use an FTP client to upload all the files extracted from the archive (retaining the directory structure) to the X-Cart root directory on your server or hosting account.
- If you use a UNIX-based server with terminal access:
- a) Use an FTP client to upload the archive with the X-Monitoring integration module distribution package to the X-Cart root directory on your server or hosting account.
- b) Decompress the package using the following command:
tar -xzvf xmonitoring-x.y.z.tgz
- Important: Make sure that you maintain the directory structure while unpacking and uploading the distribution package; otherwise, some critical files can be overwritten!
- In a web browser, run the installation script at httр://www.example.com/install-xmonitoring.php, replacing www.example.com with the actual domain name of your X-Cart based store.
- Enter the Auth code, accept the License Agreement and click the Next button.
- The installation script copies the files and activates the module. Click the Next button to continue.
- The installation script generates a new system fingerprint. Click the Next button to complete the installation.
- Use the ADMIN AREA link to go to the Admin area and configure X-Monitoring.
To uninstall the X-Monitoring integration module:
- In a web browser, run the installation script at httр://www.example.com/install-xmonitoring.php, replacing www.example.com with the actual domain name of your X-Cart based store.
- Choose the Uninstall the module option, enter the Auth code, accept the License Agreement and click the Next button.
- Once the installation script has removed the X-Monitoring integration module files and deactivated the module, click the Next button to complete the uninstallation.
- On the Uninstallation complete screen, click Next to leave the Wizard.Important: After you have uninstalled the X-Monitoring integration module, be sure to remove the X-Monitoring integration module distribution package from your web directory as well.
Enabling the X-Monitoring integration module in X-Cart
To enable the X-Monitoring integration module:
- In the X-Cart Admin area, go to the Modules section (Settings menu -> Modules).
- In the list of modules, choose the "X-Monitoring" item by selecting the respective check box on the left.
- Click the Apply changes button. This activates the module.
Configuring the X-Monitoring integration module
After the X-Monitoring integration module has been enabled in your store, you can check and adjust its configuration:
- In the Modules section (Settings menu->Modules), click the Configure link opposite the module name ('X-Monitoring'):

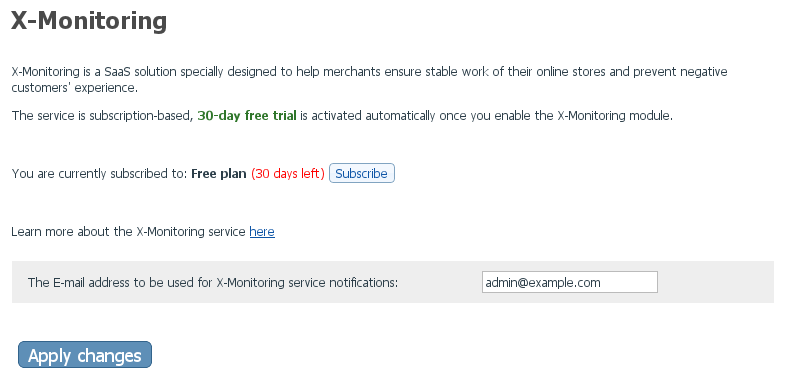
The module configuration page (titled by the name of the module) opens:
- Check your subscription plan settings:
- You are currently subscribed to: This line shows the name of the subscription plan you are currently on. During your free trial period this shows 'Free plan', and you can see the number of days left before the free trial period expiration. Depending on the plan you are currently on, you should be able to subscribe to a paid plan or upgrade your subscription plan if necessary.
- Check your email notification settings:
- The email address to be used for X-Monitoring service notifications: This line shows the email address to which the monitoring service will send email alerts in case of problems on your store website. By default the module uses the email address taken from the General settings -> Company options page (Site administrator email address). However, if you prefer to receive email alerts at a different address, you can change it. To save your updated email notification settings, be sure to click Apply changes.


