Difference between revisions of "X-Cart:Email Account Activation"
(→How it works) |
|||
| (5 intermediate revisions by the same user not shown) | |||
| Line 1: | Line 1: | ||
| + | {{XC version|version=4.5.3|color=#FFB62F|comment={{{1|or above}}}}} | ||
| + | |||
| + | |||
== Overview == | == Overview == | ||
| − | <b>Email account activation</b> feature ensures that your customers sign in using real email addresses. This feature is very helpful for spam prevention, password retrieval, etc. | + | <b>Email account activation</b> feature ensures that your customers sign in using real email addresses. This feature is very helpful for spam prevention, password retrieval, etc. |
As soon as a user registers in your store, he gets a link to the e-mail address he specified during registration. He should follow this link in order to activate his account in your store. | As soon as a user registers in your store, he gets a link to the e-mail address he specified during registration. He should follow this link in order to activate his account in your store. | ||
Email account activation module is available as built-in in X-Cart Gold Plus and Platinum. It does not require installation and can be enabled in the Modules section of X-Cart Admin area. | Email account activation module is available as built-in in X-Cart Gold Plus and Platinum. It does not require installation and can be enabled in the Modules section of X-Cart Admin area. | ||
| Line 17: | Line 20: | ||
'''To configure the module:''' | '''To configure the module:''' | ||
# In the Modules section (Settings -> Modules), click the 'Configure' link opposite the module name ('Email account activation').<br>The "Email Account Activation" module configuration page opens.<br>[[Image:Configure_email_account_activation.png|border|600px]] | # In the Modules section (Settings -> Modules), click the 'Configure' link opposite the module name ('Email account activation').<br>The "Email Account Activation" module configuration page opens.<br>[[Image:Configure_email_account_activation.png|border|600px]] | ||
| − | # Use this page to set the module preferences. There are two settings available. | + | # Use this page to set the module preferences. There are two settings available. |
#*<u>Usertypes for email account activation</u> Choose usertypes to which you wish to enable email account activation feature: administrator, customer, partner, provider (provider usertype is available only in multi-vendor edition). To select more than one usertype keep Ctrl key on your keybord pressed while selecting. | #*<u>Usertypes for email account activation</u> Choose usertypes to which you wish to enable email account activation feature: administrator, customer, partner, provider (provider usertype is available only in multi-vendor edition). To select more than one usertype keep Ctrl key on your keybord pressed while selecting. | ||
#*<u>Do not send 'Profile is created' notifications to profile owners before account activation</u> Select this check box in case you don't want your customers to recieve a notificiation on profile creation. With this setting unselected a user will recieve only account activation notification. | #*<u>Do not send 'Profile is created' notifications to profile owners before account activation</u> Select this check box in case you don't want your customers to recieve a notificiation on profile creation. With this setting unselected a user will recieve only account activation notification. | ||
| Line 26: | Line 29: | ||
#A user clicks “'''Register'''” link in the header of your store | #A user clicks “'''Register'''” link in the header of your store | ||
#A profile registration form opens. <u>Email</u> field is one of mandatory fields. As soon as a user points a cursor into this field in order to type the address, a note appears. This note states that the email address must be a valid one.<br> [[Image:Profile_creation_email.png|border|600px]] | #A profile registration form opens. <u>Email</u> field is one of mandatory fields. As soon as a user points a cursor into this field in order to type the address, a note appears. This note states that the email address must be a valid one.<br> [[Image:Profile_creation_email.png|border|600px]] | ||
| − | # | + | #A user clicks the “'''Submit'''” button after filling all mandatory fields, a pop up message appears, stating that a profile has been created and that activation is required.<br> [[Image:Account activation popup.png|border|600px]] |
# A message with account activation link is sent to the email address specified by the user in process of registration. | # A message with account activation link is sent to the email address specified by the user in process of registration. | ||
# The user should follow that link in order to activate his account, otherwise it will be marked as suspended in the admin area. | # The user should follow that link in order to activate his account, otherwise it will be marked as suspended in the admin area. | ||
| + | |||
| + | [[Category:X-Cart user manual]] | ||
| + | [[Category:X-Cart modules]] | ||
Latest revision as of 14:32, 26 October 2014
X-Cart 4.5.3or above
Overview
Email account activation feature ensures that your customers sign in using real email addresses. This feature is very helpful for spam prevention, password retrieval, etc. As soon as a user registers in your store, he gets a link to the e-mail address he specified during registration. He should follow this link in order to activate his account in your store. Email account activation module is available as built-in in X-Cart Gold Plus and Platinum. It does not require installation and can be enabled in the Modules section of X-Cart Admin area.
Enabling and Configuring Email account activation module
To begin using the module, you should enable and configure it.
To enable the module:
- In Admin area, go to the Modules section (Settings -> Modules).
- Select the 'Enable' check box to the left of the module name.
- Click Apply changes.
Now the Email account activation module is enabled and can be configured.
To configure the module:
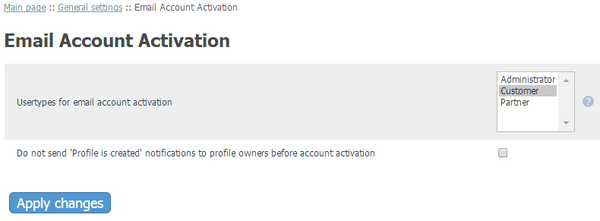
- In the Modules section (Settings -> Modules), click the 'Configure' link opposite the module name ('Email account activation').
The "Email Account Activation" module configuration page opens.
- Use this page to set the module preferences. There are two settings available.
- Usertypes for email account activation Choose usertypes to which you wish to enable email account activation feature: administrator, customer, partner, provider (provider usertype is available only in multi-vendor edition). To select more than one usertype keep Ctrl key on your keybord pressed while selecting.
- Do not send 'Profile is created' notifications to profile owners before account activation Select this check box in case you don't want your customers to recieve a notificiation on profile creation. With this setting unselected a user will recieve only account activation notification.
- Click Apply changes to save the changes. The module is configured and ready for use.
How it works
- A user clicks “Register” link in the header of your store
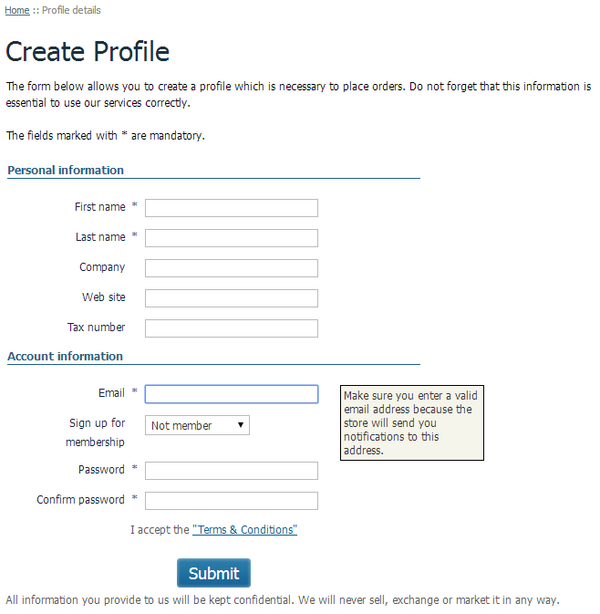
- A profile registration form opens. Email field is one of mandatory fields. As soon as a user points a cursor into this field in order to type the address, a note appears. This note states that the email address must be a valid one.

- A user clicks the “Submit” button after filling all mandatory fields, a pop up message appears, stating that a profile has been created and that activation is required.

- A message with account activation link is sent to the email address specified by the user in process of registration.
- The user should follow that link in order to activate his account, otherwise it will be marked as suspended in the admin area.