Difference between revisions of "X-Cart:EBay Integration"
m (→Configuring the module) |
(Attention! The article is outdated.) |
||
| (55 intermediate revisions by 3 users not shown) | |||
| Line 1: | Line 1: | ||
{{XC version|version=4.7.3|color=#FFB62F|comment={{{1|or above}}}}} | {{XC version|version=4.7.3|color=#FFB62F|comment={{{1|or above}}}}} | ||
| + | {{Note1| <b>Attention!</b> The article is outdated.}} | ||
==Overview== | ==Overview== | ||
| − | The [ | + | The [https://www.x-cart.com/extensions/modules/ebay-integration.html eBay Integration] module for X-Cart 4 creates a new sales channel for your business by automatically integrating your existing X-Cart store with eBay. The integration allows you get your products listed on eBay in as little as a few minutes using the product titles, images, descriptions, prices, inventory levels, variants and attributes from your X-Cart store. It also allows you to import your eBay orders back into X-Cart and manage all your sales from the X-Cart Admin area so the order information on eBay is updated in real time. The data can be synchronized between the two systems either manually or automatically according to your preferred schedule. The information of your eBay buyers such as names and addresses is also imported from eBay and becomes available in your X-Cart store's Admin back end as customer profiles. |
Your store can be connected to any single eBay marketplace site, including the sites for United States, Canada (English or French), UK, Australia, Austria, Belgium (French), France, Germany, Italy, Belgium (Dutch), Netherlands, Spain, Switzerland, Hong Kong, India, Ireland, Malaysia, Philippines, Poland and Singapore. | Your store can be connected to any single eBay marketplace site, including the sites for United States, Canada (English or French), UK, Australia, Austria, Belgium (French), France, Germany, Italy, Belgium (Dutch), Netherlands, Spain, Switzerland, Hong Kong, India, Ireland, Malaysia, Philippines, Poland and Singapore. | ||
The integration is provided as a service. Subscription plans for merchants of any size are available. | The integration is provided as a service. Subscription plans for merchants of any size are available. | ||
| Line 10: | Line 11: | ||
==System requirements== | ==System requirements== | ||
| − | To be able to successfully install and use the eBay Integration module, you must have a working copy of X-Cart | + | To be able to successfully install and use the eBay Integration module, you must have the following components installed on your server: |
| + | :* a working copy of X-Cart;<br />(The eBay Integration module is currently supported by X-Cart versions 4.7.3 and later. Upon request, we may be able to provide a module version compatible with earlier X-Cart versions.) | ||
| + | :* an SSL certificate.<br />(An SSL certificate is required because the module needs to establish a secure https connection to our service to get a token. Without an SSL certificate, such a connection will not be possible, so you will get an error saying that you have a problem with your SSL certificate.) | ||
<br /><br /> | <br /><br /> | ||
| Line 53: | Line 56: | ||
==Configuring the module== | ==Configuring the module== | ||
| − | To start using eBay Integration, you need to configure the eBay Integration module. This can be done via the eBay Configuration section (Settings > eBay Configuration) | + | To start using eBay Integration, you need to configure the eBay Integration module. This can be done via the eBay Configuration section (Settings > eBay Configuration). |
| − | + | The process includes the following steps: | |
| − | The process includes | ||
:* [[#Obtaining an eBay user token | Obtain your eBay user token]]. | :* [[#Obtaining an eBay user token | Obtain your eBay user token]]. | ||
:* [[#Setting your business policies | Set your business policies]]. | :* [[#Setting your business policies | Set your business policies]]. | ||
:* [[#Choosing your default eBay categories | Choose your default eBay categories]]. | :* [[#Choosing your default eBay categories | Choose your default eBay categories]]. | ||
:* [[#Configuring the General settings for the eBay Integration module | Configure the General settings for the eBay Integration module]]. | :* [[#Configuring the General settings for the eBay Integration module | Configure the General settings for the eBay Integration module]]. | ||
| + | :* (''Optional'') [[#Configuring eBay options for products and categories|Configure eBay options for products and categories]]. | ||
Let's look at each of the steps more closely.<br /><br /> | Let's look at each of the steps more closely.<br /><br /> | ||
===Obtaining an eBay user token=== | ===Obtaining an eBay user token=== | ||
| − | To configure your eBay Integration, the first thing you should do is create a new [ | + | To configure your eBay Integration, the first thing you should do is create a new [https://developer.ebay.com/devzone/guides/ebayfeatures/Basics/Tokens-About.html user token] (also known as "Auth Token) that will allow eBay Integration to connect to your eBay account: |
# In your store's Admin area, go to eBay Configuration page ('''Settings''' > '''eBay Configuration''') and make sure it is open at the '''Get User Token''' tab.<br />[[File:xc4_ebay_get_user_token.png |border]]<br /> | # In your store's Admin area, go to eBay Configuration page ('''Settings''' > '''eBay Configuration''') and make sure it is open at the '''Get User Token''' tab.<br />[[File:xc4_ebay_get_user_token.png |border]]<br /> | ||
# Adjust the following settings: | # Adjust the following settings: | ||
| − | #* '''Select eBay Site''': Select the eBay site | + | #* '''Select eBay Site''': Select the eBay site where you will be selling your products. The products and orders in your X-Cart store will be synchronized with this eBay site. |
| + | #* '''eBay Motors''': Enable this option to sell on eBay Motors. Note that the previous setting ('''Select eBay Site''') determines the country of the eBay Motors site where you will be able to sell. | ||
#* '''Select mode''': Specify the mode in which your store will be interacting with eBay: select Test to use the eBay Sandbox or Live to use the production environment.<br /> | #* '''Select mode''': Specify the mode in which your store will be interacting with eBay: select Test to use the eBay Sandbox or Live to use the production environment.<br /> | ||
| − | # Click the '''Create new token''' button:<br />[[File:xc4_ebay_create_new_token.png |border]]<br />This launches the user sign-in and consent process: you will be redirected to the eBay site where you will need to log in to the eBay account for which you need the token and grant the application the permission to access your account on your behalf.<br />[[File:ebay_login.png|border]]<br />After signing in, provide your consent to share your eBay data by clicking "I agree":<br />[[File:ebay_app_access_grant.png|border]]<br />'''Important''': If you are creating a Sandbox user token, enter the credentials for a [https://developer.ebay.com/DevZone/sandboxuser/default.aspx Sandbox User]. If it is a token for Production, use the credentials for a user created on the [ | + | # Click the '''Create new token''' button:<br />[[File:xc4_ebay_create_new_token.png |border]]<br />This launches the user sign-in and consent process: you will be redirected to the eBay site where you will need to log in to the eBay account for which you need the token and grant the application the permission to access your account on your behalf.<br />[[File:ebay_login.png|border]]<br />After signing in, provide your consent to share your eBay data by clicking "I agree":<br />[[File:ebay_app_access_grant.png|border]]<br />'''Important''': If you are creating a Sandbox user token, enter the credentials for a [https://developer.ebay.com/DevZone/sandboxuser/default.aspx Sandbox User]. If it is a token for Production, use the credentials for a user created on the [https://www.ebay.com/ Production eBay site] (the one you will use to sell items on eBay). Remember that User IDs for Sandbox users begin with "TESTUSER_".<br />Once application access has been granted, eBay will generate a new token, and you will be automatically redirected back to X-Cart. On the '''Get User Token''' screen, you should now be able to see the '''User Token''' field populated with your token value. Below this field you should be able to see information about the current status of your token ('''Token Status''') and token expiration date ('''Token Expiration'''):<br />[[File:xc4_ebay_user_token.png|border]]<br />When your token is about to expire, you will be notified and provided with a button to create a new one. |
| − | # Now that your token has been generated, click '''Next''' to save your changes and head over to the next step of configuring your eBay Integration: [[#Setting your business policies |Setting your business policies]].<br />[[File:xc4_ebay_get_user_token_next.png]]<br /><br /> | + | # Now that your token has been generated, click '''Next''' to save your changes and head over to the next step of configuring your eBay Integration: [[#Setting your business policies |Setting your business policies]].<br />[[File:xc4_ebay_get_user_token_next.png|border]]<br /><br /> |
===Setting your business policies=== | ===Setting your business policies=== | ||
| − | Once you have created an eBay user token to connect your X-Cart store to your eBay seller account, you can set business policies for your eBay listings. Business policies typically include information on how buyers can pay you; the shipping services you offer, and shipping costs; whether you accept returns, any return conditions, etc. All eBay listings must include this information. To provide information on your business policies for the listings that will be created from the | + | Once you have created an eBay user token to connect your X-Cart store to your eBay seller account, you can set business policies for your eBay listings. Business policies typically include information on how buyers can pay you; the shipping services you offer, and shipping costs; whether you accept returns, any return conditions, etc. All eBay listings must include this information. To provide information on your business policies for the listings that will be created from the products you sell via your X-Cart store, follow the steps below: |
| − | # If you haven't yet done so, configure your business policies in your eBay account (More information is available here). | + | # If you haven't yet done so, configure your business policies in your eBay account (More information is available [https://pages.ebay.com/help/sell/business-policies.html here]; [https://pages.ebay.ca/sellerinformation/news/springupdate2013/businesspolicies.html see also]). |
# In X-Cart Admin, after creating your eBay token in the '''Get User Token''' section of the eBay Configuration page ('''Settings''' > '''eBay Configuration'''), click '''Next''' to go to the '''Business policies''' section:<br />[[File:xc4_ebay_get_user_token_next.png |border]]<br />If you have configured your business policies earlier, it is possible to simply click the '''Business policies''' tab:<br />[[File:xc4_ebay_business_policies.png |border]]<br /> | # In X-Cart Admin, after creating your eBay token in the '''Get User Token''' section of the eBay Configuration page ('''Settings''' > '''eBay Configuration'''), click '''Next''' to go to the '''Business policies''' section:<br />[[File:xc4_ebay_get_user_token_next.png |border]]<br />If you have configured your business policies earlier, it is possible to simply click the '''Business policies''' tab:<br />[[File:xc4_ebay_business_policies.png |border]]<br /> | ||
# Use the drop-down policy selectors to set the business policies you would like to use for your eBay listings: | # Use the drop-down policy selectors to set the business policies you would like to use for your eBay listings: | ||
| Line 79: | Line 83: | ||
#* '''Payment Policy'''; | #* '''Payment Policy'''; | ||
#* '''Shipping Policy'''.<br />[[File:xc4_ebay_business_policies1.png |border]]<br />The names of business policies displayed to you on this page are pulled from your eBay account to which you have linked your application at the [[#Obtaining an eBay user token | previous step]]. If you do not see the policy you require in any of the selectors, it may be due to the fact that the policy was added after the information on the policies had been pulled into X-Cart. To resolve the problem, click the '''Refresh Business Policies''' button - the list of policies will be updated. | #* '''Shipping Policy'''.<br />[[File:xc4_ebay_business_policies1.png |border]]<br />The names of business policies displayed to you on this page are pulled from your eBay account to which you have linked your application at the [[#Obtaining an eBay user token | previous step]]. If you do not see the policy you require in any of the selectors, it may be due to the fact that the policy was added after the information on the policies had been pulled into X-Cart. To resolve the problem, click the '''Refresh Business Policies''' button - the list of policies will be updated. | ||
| − | # Use the '''PayPal email address''' field to enter your valid PayPal email address. eBay will use this address to identify the correct PayPal account when the buyer pays you via PayPal. | + | # Use the '''PayPal email address''' field to enter your valid PayPal email address. eBay will use this address to identify the correct PayPal account when the buyer pays you via PayPal.<br />[[File:xc4_ebay_business_policies_paypal_address.png |border]]<br /> |
# Click '''Next''' to save your changes and head over to the next step of configuring your eBay Integration: [[#Choosing your default eBay categories | Choosing your default eBay categories]].<br />[[File:xc4_ebay_business_policies_next.png |border]]<br /><br /> | # Click '''Next''' to save your changes and head over to the next step of configuring your eBay Integration: [[#Choosing your default eBay categories | Choosing your default eBay categories]].<br />[[File:xc4_ebay_business_policies_next.png |border]]<br /><br /> | ||
===Choosing your default eBay categories=== | ===Choosing your default eBay categories=== | ||
| − | Every product you export to eBay has to be placed in at least one of eBay categories. When using eBay Integration, the eBay categories to which your products will be exported need to be set before the export actually takes place. The '''Categories''' section of the eBay Configuration page in X-Cart allows you to set the default eBay categories for your listings: one main and one additional category. The main category is required, the additional one is optional. The categories you specify here will be your store's default eBay categories - the ones that will be used for any products for which eBay categories are not set [[at the product or category level]]. | + | Every product you export to eBay has to be placed in at least one of eBay categories. When using eBay Integration, the eBay categories to which your products will be exported need to be set before the export actually takes place. The '''Categories''' section of the eBay Configuration page in X-Cart allows you to set the default eBay categories for your listings: one main and one additional category. The main category is required, the additional one is optional. The categories you specify here will be your store's default eBay categories - the ones that will be used for any products for which eBay categories are not set [[#Configuring eBay options for products and categories|at the product or category level]]. |
To set your store's default eBay categories: | To set your store's default eBay categories: | ||
# In X-Cart Admin, after setting your business policies in the '''Business Policies''' section of the eBay Configuration page ('''Settings''' > '''eBay Configuration'''), click '''Next''' to go to the '''Categories''' section:<br />[[File:xc4_ebay_business_policies_next.png |border]]<br />If you have configured your default eBay categories previously, you can simply click the '''Categories''' tab:<br />[[File:xc4_ebay_categories.png |border]]<br /> | # In X-Cart Admin, after setting your business policies in the '''Business Policies''' section of the eBay Configuration page ('''Settings''' > '''eBay Configuration'''), click '''Next''' to go to the '''Categories''' section:<br />[[File:xc4_ebay_business_policies_next.png |border]]<br />If you have configured your default eBay categories previously, you can simply click the '''Categories''' tab:<br />[[File:xc4_ebay_categories.png |border]]<br /> | ||
| − | # Set the default main category for your products:<br />Use the '''Main eBay Category''' selector to select the eBay category that best describes the products you are going to sell on eBay. If not all your products are going to be in the same category, just select the category you intend to use for the majority of your eBay listings; for the products that do not fit well into the eBay category selected here, you will be able to choose an eBay category [[at the product or category level]].<br />[[File:xc4_ebay_categories1.png|border]]<br />Note that category selection is a multi-step process: at first, the selector will show only top level eBay categories; once you select one of them, another selector will be displayed right below the first one so you can continue to select a nested category. You must continue selecting categories until you reach the lowest level of the eBay category hierarchy where you will be able to select the category that provides the most precise description of your products.<br />[[File:xc4_ebay_categories2.png|border]]<br/> | + | # Set the default main category for your products:<br />Use the '''Main eBay Category''' selector to select the eBay category that best describes the products you are going to sell on eBay. If not all your products are going to be in the same category, just select the category you intend to use for the majority of your eBay listings; for the products that do not fit well into the eBay category selected here, you will be able to choose an eBay category [[#Configuring eBay options for products and categories|at the product or category level]].<br />[[File:xc4_ebay_categories1.png|border]]<br />Note that category selection is a multi-step process: at first, the selector will show only top level eBay categories; once you select one of them, another selector will be displayed right below the first one so you can continue to select a nested category. You must continue selecting categories until you reach the lowest level of the eBay category hierarchy where you will be able to select the category that provides the most precise description of your products. At this point you should see a note "Allowed to select", which means the category selection process has been completed.<br />[[File:xc4_ebay_categories2.png|border]]<br/> |
| − | # (Optional step) In a similar way, use the '''Additional eBay Category''' selector to set | + | # (Optional step) In a similar way, use the '''Additional eBay Category''' selector to set a default additional category for your products.<br />[[File:xc4_ebay_categories3.png|border]]<br/> |
# Once you are happy with your default category settings, click '''Next''' to save your changes and head over to the next step of configuring your eBay Integration: [[#Configuring the General settings for the eBay Integration module | Configuring the General settings for the eBay Integration module]].<br />[[File:xc4_ebay_categories_next.png|border]]<br /><br /> | # Once you are happy with your default category settings, click '''Next''' to save your changes and head over to the next step of configuring your eBay Integration: [[#Configuring the General settings for the eBay Integration module | Configuring the General settings for the eBay Integration module]].<br />[[File:xc4_ebay_categories_next.png|border]]<br /><br /> | ||
===Configuring the General settings for the eBay Integration module=== | ===Configuring the General settings for the eBay Integration module=== | ||
| − | + | Before you start exporting products to eBay, you need to adjust the module's General settings.<br /> | |
| + | To adjust the General settings for the eBay Integration module: | ||
# Go to the '''General Settings''' section of the eBay Configuration page in your store's Admin area (Settings > eBay Configuration): | # Go to the '''General Settings''' section of the eBay Configuration page in your store's Admin area (Settings > eBay Configuration): | ||
| − | #* After setting the default eBay categories for your products in the | + | #* After setting the default eBay categories for your products in the '''Categories''' section, click '''Next''':<br />[[File:xc4_ebay_categories_next.png|border]]<br />If you have configured your eBay General Settings previously, you can simply click the '''General Settings''' tab:<br />[[File:xc4_ebay_general_settings.png |border]]<br /> |
| − | # Adjust the settings in the Product options section:<br />[[File: |border]]<br /> | + | # Adjust the settings in the Product options section:<br />[[File:xc4_ebay_general_settings1.png |border]]<br />The settings in this section will apply to all the products in your X-Cart store, for which similar settings have not been set [[#Configuring_eBay_options_for_products_and_categories | at the level of categories or individual products]].<br /> |
| − | #* '''Listing duration''': Select a duration for your store's eBay listings. Ebay help on listing duration is available here. | + | #* '''Listing duration''': Select a duration for your store's eBay listings. Ebay help on listing duration is available [https://pages.ebay.com/help/sell/duration.html here]. |
#* '''Product condition''': Select the condition of the products you are going to export to eBay. Click the <u>Condition help</u> link for help on item condition for your category. | #* '''Product condition''': Select the condition of the products you are going to export to eBay. Click the <u>Condition help</u> link for help on item condition for your category. | ||
| − | #* '''Product price modifier''': If necessary, the price of items sold via eBay can be made higher or lower than the price of these items in your X-Cart store. The price difference can be implemented by setting a product price modifier.<br />For example, to add a $1 per item processing fee for eBay orders, you should set the price modifier as "[1.00] + [ $ ]":<br />[[File: |border]]<br />This way all your items sold on eBay will be $1 more expensive than the items in your X-Cart store.<br />To reduce the price of items sold on eBay by 10% of their price in your X-Cart store, you should set the price modifier as "[-10.00] + [ % ]":<br />[[File: |border]]<br />(Note the minus sign before "10.00"; it shows that the price of items on eBay will be lower than the original item price in the X-Cart store).<br />The price modifier defined in the eBay Integration General Settings applies to your entire X-Cart store (i.e. all the products that will be exported to eBay). If you need a price modifier only for some of the products, you should set the modifier at the level of specific [[products or categories]]. | + | #* '''Product price modifier''': If necessary, the price of items sold via eBay can be made higher or lower than the price of these items in your X-Cart store. The price difference can be implemented by setting a product price modifier.<br />For example, to add a $1 per item processing fee for eBay orders, you should set the price modifier as "[1.00] + [ $ ]":<br />[[File:xc4_ebay_general_settings2.png |border]]<br />This way all your items sold on eBay will be $1 more expensive than the items in your X-Cart store.<br />To reduce the price of items sold on eBay by 10% of their price in your X-Cart store, you should set the price modifier as "[-10.00] + [ % ]":<br />[[File:xc4_ebay_general_settings3.png |border]]<br />(Note the minus sign before "10.00"; it shows that the price of items on eBay will be lower than the original item price in the X-Cart store).<br />The price modifier defined in the eBay Integration General Settings applies to your entire X-Cart store (i.e. all the products that will be exported to eBay). If you need a price modifier only for some of the products, you should set the modifier at the level of specific [[#Configuring eBay options for products and categories|products or categories]]. |
#* '''Exchange rate''': If the type of currency you use in your X-Cart store is different from the currency that will be used for your eBay listings (for example, if the prices at your X-Cart store are in Australian dollars, and the prices on eBay need to be specified in US dollars), use this field to set the exchange rate. The exchange rate will be used both when exporting your products from your X-Cart store to eBay and when importing orders from eBay back to your X-Cart store. | #* '''Exchange rate''': If the type of currency you use in your X-Cart store is different from the currency that will be used for your eBay listings (for example, if the prices at your X-Cart store are in Australian dollars, and the prices on eBay need to be specified in US dollars), use this field to set the exchange rate. The exchange rate will be used both when exporting your products from your X-Cart store to eBay and when importing orders from eBay back to your X-Cart store. | ||
| − | #* '''Export product description''': In X-Cart, a product can have two types of description: a short description and a detailed description. EBay listings can have just one description. So, before you export any products to eBay, you need to specify | + | #* '''Export product description''': In X-Cart, a product can have two types of description: a short description and a detailed description. EBay listings can have just one description. So, before you export any products to eBay, you need to specify what type of description should be used for eBay. Here you set the type of product description that should be exported to eBay by default. The available options are ''Short'' and ''Full''. These correspond to X-Cart's short and detailed product descriptions, respectively. There is also an option not to use the X-Cart's short and detailed product descriptions, but create your own HTML description instead; to do so, use the option "Use the following pattern as eBay item description" below. Note that when the option "Use the following pattern as eBay item description" is enabled, and the text area below contains any kind of text/html, the selection in the "Export product description" field is ignored (Neither the detailed or short descriptions is exported). If the option "Use the following pattern as eBay item description" is enabled, but the text area below is empty, the selected type of description will be exported.<br /> If any of your products need to use a different type of description on eBay, you can adjust this setting individually for these products in their [[#Configuring eBay options for products and categories|eBay product options]]. |
| + | #* '''Use x-cart URL of the product images on eBay''': Enable this option if you want product images on eBay to be displayed by linking to the same images on your X-Cart store website, rather than saving copies of the images on eBay. Disable this option if you want product images to be saved on eBay. | ||
| + | #* '''Use the following pattern as eBay item description''': Enable this option to use your own HTML description for your eBay listings instead of X-Cart's short/detailed product description. The pattern must be provided in the text area below. | ||
#* '''Max amount of item on eBay''': If you stock large quantities of items in your store, or the stock quantities are unlimited, you are probably used to setting the Quantity in stock (items) field of your product details in X-Cart to large numbers (like 1000 items in stock). It may not be a good idea to show these numbers on eBay. The setting "Max amount of item on eBay" allows you to set the maximum number of items in stock that should be shown as available for sale to your eBay buyers. For example, if you set this value to "3", for any products from your X-Cart store of which you have 3 or more left, eBay will show the available quantity as "3 available"; for products with an inventory level of less than 3 items, eBay will show the actual quantity available. | #* '''Max amount of item on eBay''': If you stock large quantities of items in your store, or the stock quantities are unlimited, you are probably used to setting the Quantity in stock (items) field of your product details in X-Cart to large numbers (like 1000 items in stock). It may not be a good idea to show these numbers on eBay. The setting "Max amount of item on eBay" allows you to set the maximum number of items in stock that should be shown as available for sale to your eBay buyers. For example, if you set this value to "3", for any products from your X-Cart store of which you have 3 or more left, eBay will show the available quantity as "3 available"; for products with an inventory level of less than 3 items, eBay will show the actual quantity available. | ||
| − | # Adjust the settings in the System options section:<br />[[File: |border]]<br /> | + | # Adjust the settings in the System options section:<br />[[File:xc4_ebay_general_settings4.png |border]]<br /> |
#* '''Show eBay warning messages in admin area''': When exporting products to eBay or importing orders from eBay, you may get eBay warnings. Unlike errors, warnings are conditions that are not fatal to the module operation, but they alert you to some minor problems that you may want to fix. Any warnings your store gets from eBay are written to log files in your X-Cart store. If, in addition to that, you also wish to have eBay warning messages displayed in your store's Admin area, enable this option. | #* '''Show eBay warning messages in admin area''': When exporting products to eBay or importing orders from eBay, you may get eBay warnings. Unlike errors, warnings are conditions that are not fatal to the module operation, but they alert you to some minor problems that you may want to fix. Any warnings your store gets from eBay are written to log files in your X-Cart store. If, in addition to that, you also wish to have eBay warning messages displayed in your store's Admin area, enable this option. | ||
#* '''Save eBay API requests/responses in the log file''': If you need eBay API requests/responses to be written to log file (for example, if you need this information for debugging purposes), enable this option. | #* '''Save eBay API requests/responses in the log file''': If you need eBay API requests/responses to be written to log file (for example, if you need this information for debugging purposes), enable this option. | ||
| − | # Click '''Save''' to save your changes. | + | # Click '''Save''' to save your changes.<br />[[File:xc4_ebay_general_settings5.png |border]]<br /><br />You should see a success message like the following:<br />[[File:xc4_ebay_general_settings6.png |border]]<br /> |
| − | That is all. | + | That is all; you have completed the basic configuration of your eBay Integration and can now start selling on eBay. However, if you require a more nuanced approach to publishing your products on eBay (for example, if you need to map your products to eBay categories more accurately than simply by setting one common default category for all your products), we recommend you take a couple more steps to complete your store's eBay related configuration. For more info, see the sections on configuring [[#Configuring eBay options for products and categories|eBay options for categories and products]]. |
| + | |||
| + | ===Configuring eBay options for products and categories=== | ||
| + | The sections '''Categories''' and '''General Settings''' of the eBay Configuration page allow you to set the most basic rules for how your product information should be exported to eBay. This includes which eBay category your products should be exported to, whether a price modifier should be used to increase or decrease the product price on eBay, and so on. By default, these rules will apply to all your products. However, if you want different products in your store to be treated differently (for example, if you want to publish different products in different eBay categories, or use a price modifier just for a couple of products), you will need to fine-tune your eBay export by adding more rules at the level of specific products and/or categories. The rules in question can be set by configuring the eBay options for these products/categories. The eBay options set at the level of a specific product will apply to that product only. The eBay options set at the level of a category will apply to the products in that category and the products in all the subcategories of that category. | ||
| + | <br /> | ||
| + | To set eBay options for a category: | ||
| + | # In the Categories management section of your X-Cart store's Admin area ('''Catalog''' > '''Categories'''), find the category for which you need to set eBay options. | ||
| + | # Select this category in the list of your store's categories and click the '''Modify selected''' button below to go to the category details page:<br />[[File:xc4_ebay_category_ebayoptions1.png|border]] | ||
| + | # On the category details page, click the <u>eBay category options</u> link in the "In this section" menu:<br />[[File:xc4_ebay_category_ebayoptions2.png|border]]<br />The eBay category options page opens:<br />[[File:xc4_ebay_category_ebayoptions3.png|border]] | ||
| + | # Adjust the eBay options for the selected category:<br /> | ||
| + | #* '''Allow export to eBay''': Specify whether the products from this category and the subcategories of this category should be exported to eBay. If you do not intend to sell products from this category and its subcategories on eBay, you can forbid the export of this category to eBay by deactivating this option. | ||
| + | #* '''Main eBay Category''': Set the main eBay category for the products from the selected X-Cart category and the subcategories of this category. | ||
| + | #* '''Additional eBay Category''': Set the additional eBay category for the products from the selected X-Cart category and the subcategories of this category. | ||
| + | #* '''Product price modifier''': If the price of the products in the selected X-Cart category and its subcategories needs to be different from the price of these products on eBay, set a price modifier. | ||
| + | #* If you have set up [https://pages.ebay.com/help/sell/store-categories.html Store categories] to better organize your eBay listings, specify which of these Store categories the products from the selected X-Cart category and its subcategories need to be exported to. The button '''Update Store Categories List''' allows you to reload information about your eBay Store categories in X-Cart. | ||
| + | # Once you are done configuring the eBay options for the selected category, click '''Apply changes''' to save your changes.<br />[[File:xc4_ebay_category_ebayoptions4.png|border]]<br />The eBay options for the category will be saved.<br /><br /> | ||
| + | To set eBay options for a product: | ||
| + | # In the Products management section of your X-Cart store's Admin area ('''Catalog''' > '''Products'''), find the product for which you need to set eBay options. | ||
| + | # Choose to edit the details of the product that has been found: | ||
| + | #* In the list of search results, click on the name of the product.<br />[[File:xc4_ebay_product_ebayoptions0.png|border]]<br />OR:<br /> In the list of search results, select the check box next to the name of the product and click the '''Modify selected''' button below.<br />[[File:xc4_ebay_product_ebayoptions1.png|border]] | ||
| + | # On the product details page that opens, click the <u>eBay product options</u> link in the "In this section" menu:<br />[[File:xc4_ebay_product_ebayoptions2.png|border]]<br />The eBay product options section of the product details page opens:<br />[[File:xc4_ebay_product_ebayoptions3.png|border]] | ||
| + | # Adjust the eBay options for the selected product:<br /> | ||
| + | #* '''Allow export to eBay''': Specify whether the product should be exported to eBay. If you do not intend to sell this product on eBay, you can forbid the export of this product to eBay by deactivating this option. | ||
| + | #* '''Main eBay Category''': Set the main eBay category for the product. | ||
| + | #* '''Additional eBay Category''': Set the additional eBay category for the product. | ||
| + | #* If you have set up [https://pages.ebay.com/help/sell/store-categories.html Store categories] to better organize your eBay listings, specify which of these Store categories the product needs to be exported to. The button '''Update Store Categories List''' allows you to reload information about your eBay Store categories in X-Cart. | ||
| + | #* '''Listing duration''': Set a duration for the eBay listing that will be based on this product. Ebay help on listing duration is available [https://pages.ebay.com/help/sell/duration.html here]. | ||
| + | #* '''Product condition''': Select the condition of the product (will be used for the respective eBay listing). Click the <u>Condition help</u> link for help on item condition for your selected category. | ||
| + | #* '''Product price modifier''': If the price of the product on eBay needs to be different from the price of this product in your X-Cart store, set a price modifier. | ||
| + | #* '''Export product description''': In X-Cart, a product can have two types of description: a short description and a detailed description. EBay listings can have just one description. So, before you export any products to eBay, you need to specify what type of description should be used for the eBay listing that will be based on the selected product. The available options are ''Short'' and ''Full''. These correspond to X-Cart's short and detailed product descriptions, respectively. There is also an option not to use the X-Cart's short and detailed product descriptions, but create your own HTML description of the product instead; to do so, use the option "Use the following pattern as eBay item description" below. Note that when the option "Use the following pattern as eBay item description" is enabled, and the text area below contains any kind of text/html, the selection in the "Export product description" field is ignored (Neither the detailed or short descriptions is exported). If the option "Use the following pattern as eBay item description" is enabled, but the text area below is empty, the selected type of description will be exported. | ||
| + | #* '''Use the following pattern as eBay item description''': Enable this option to use your own HTML description for the eBay listing instead of X-Cart's short/detailed product description. The pattern must be provided in the text area below. | ||
| + | #* '''eBay item ID''': Leave this field be; it will be populated with an item ID value automatically after the product is exported to eBay. | ||
| + | # Once you are done configuring the eBay options for the selected product, click '''Apply changes''' to save your changes.<br />[[File:xc4_ebay_product_ebayoptions4.png|border]]<br />The eBay options for the product will be saved.<br /><br /> | ||
| + | |||
| + | ===Setting up automated export of products to eBay and automated import of orders from eBay=== | ||
| + | Export of products from your X-Cart store to eBay and import of orders into your X-Cart store from eBay can be set up to run automatically via cron. Here's the recommended setup: | ||
| + | * Automated export of products every 20 minutes: | ||
| + | <pre> | ||
| + | * / 20 * * * * cd <xcart_dir>; php ebay_cron.php --operation=products_export --key=<Secure key for launching the cron.php script from the “General” page> | ||
| + | </pre> | ||
| + | * Automated import of orders every 20 minutes: | ||
| + | <pre> | ||
| + | * / 20 * * * * cd <xcart_dir>; php ebay_cron.php --operation=orders_import --key=<Secure key for launching the cron.php script from the “General” page> | ||
| + | </pre> | ||
| + | |||
| + | ==Using the module== | ||
| + | ===Exporting products to eBay=== | ||
| + | The eBay Integration module allows you to export product information from your store to eBay. When exported to eBay, product information is used to form a new eBay listing, or to update an existing eBay listing created previously (for example, to update the available quantity of the product in the listing or to end a listing). You can export the information of just some specific products or all the products in your store at once. The export can be initiated from the details page of a specific product or from a product list in X-Cart Admin.<br /> | ||
| + | '''To export product information to eBay from a product list''': | ||
| + | # Go to the Products management section of your X-Cart store's back end ('''Catalog''' > '''Products'''). | ||
| + | # If you need to export to eBay just some of the products in your store, do a search to find these products and select the products that need to be exported by clicking the checkboxes to the left of their names.<br />[[File:xc4_ebay_export_productset.png|border]]<br />If you need to export all the products in your store, do a search with an empty search box to find all the products in the store and go to the next step (no need to select any products). | ||
| + | # Select the operation that needs to be performed: | ||
| + | #* ''Export of items'' - Select this to export all the information pertaining to the products; | ||
| + | #* ''Export of inventories'' - Select this to update the product quantities in your eBay listings (only inventory data will be exported); | ||
| + | #* ''Export of images'' - Select this to update only the images of the products; | ||
| + | #* ''End of items'' - Select this to end the existing eBay listings.<br />[[File:xc4_ebay_export_productset1.png|border]]<br /> | ||
| + | # Depending on whether you need to export all the products that have been found or just the products you have selected, click either '''for selected''' or '''for all found''':<br />[[File:xc4_ebay_export_productset2.png|border]]<br />The products will be exported to eBay:<br />[[File:xc4_ebay_export_productset3.png|border]]<br /> | ||
| + | <br /> | ||
| + | '''To export product information to eBay from a product details page''': | ||
| + | # Go to the Products management section of your X-Cart store's back end ('''Catalog''' > '''Products'''). | ||
| + | # Do a search to find the product whose information you want to export to eBay and click on the product name to go to the product's details page.<br />[[File:xc4_ebay_product_ebayoptions0.png|border]]<br /> | ||
| + | # On the product details page, click the <u>eBay product options</u> link in the "In this section" menu:<br />[[File:xc4_ebay_product_ebayoptions2.png|border]]<br /> | ||
| + | # Scroll down to the bottom of the page and click the '''Export of item''' button:<br />[[File:xc4_ebay_export_product.png|border]]<br />The product will be exported to eBay:<br />[[File:xc4_ebay_export_product1.png|border]]<br />After the product has been exported to eBay for the first time, you get more eBay export options for the product:<br />[[File:xc4_ebay_export_product2.png|border]]<br />Depending on the type of data that you want to export, you can perfrom further exports of product information for this product using the following buttons: | ||
| + | #* '''Export of item''' - will export the entire scope of product information; | ||
| + | #* '''Export inventory''' - will export only the product inventory information; | ||
| + | #* '''Export of images''' - will export just the product images; | ||
| + | #* '''End item''' - will end the item listing on eBay. | ||
| + | |||
| + | ===Viewing and managing your product listings on eBay=== | ||
| + | In your X-Cart store's Admin area, products that have been successfully exported to eBay are marked with the "EBAY" icons when seen in a product list:<br />[[File:xc4_ebay_product_icons.png|border]]<br />This way you can easily tell them from the rest of your store's products. By clicking a product's "EBAY" icon, you can access the page of the respective product listing on eBay.<br /><br /> | ||
| + | Each of the products from your X-Cart store that is exported to eBay gets a unique eBay item ID. Once a product has been successfully exported to eBay, its eBay item ID is passed to X-Cart and stored in the '''eBay item ID''' field on the product details page in X-Cart Admin (in the eBay product options section). Below this field a link is provided that allows you to access the page of the respective listing on eBay (See the line that says "Current Item"):<br />[[File:xc4_ebay_item_id.png|border]]<br /> | ||
| + | |||
| + | After a product has been published on eBay, you may need to change the information of the respective eBay listing. For example, you may need to update the product quantity, the product description or the product images. In this case you need to export to eBay the product information that needs to be updated. It is possible to export the entire item or just some of the information (inventory or images). The scope of export is determined by the eBay export options: | ||
| + | * '''Export of item''' allows to export the entire scope of product information; | ||
| + | * '''Export inventory''' allows to export only the product inventory information; | ||
| + | * '''Export of images''' allows to export just the product images.<br />[[File:xc4_ebay_export_3opts.png|border]]<br /> | ||
| + | |||
| + | There may be times when you need to change a product's eBay item ID - that is when you need to associate a product in X-Cart with a different eBay listing. The '''eBay item ID''' field is edit protected to prevent the product owner from changing the ID accidentally. To change the eBay item ID, use the <u>Change eBay item ID</u> link located on the right-hand side of the '''eBay item ID''' field:<br />[[File:xc4_ebay_item_id_change.png|border]]<br />Clicking on this link will make the field editable; you will be able to enter a new eBay item ID and save the changes using the '''Apply changes''' button.<br />[[File:xc4_ebay_item_id_change1.png|border]]<br /> | ||
| + | |||
| + | To end a product listing on eBay before it expires naturally, use the '''End item''' eBay export option.<br />[[File:xc4_ebay_item_ended1.png|border]]<br />Once the item has been ended, a note thereof will be added to the product information:<br />[[File:xc4_ebay_item_ended.png|border]]<br /><br /> | ||
| + | |||
| + | ===Importing orders from eBay=== | ||
| + | Orders from eBay can be managed inside your X-Cart store. For that, you will need to import orders created on eBay into X-Cart: | ||
| + | # In the '''Orders''' menu, select the '''Upload eBay orders''' item.<br />[[File:xc4_ebay_upload_orders.png|border]]<br />The Upload eBay orders page opens.<br />[[File:xc4_ebay_upload_orders1.png|border]]<br /> | ||
| + | # From the '''Upload eBay order for''' drop-down box, select the period for which you would like to import orders. | ||
| + | # Click the '''Upload orders''' button to launch the upload process.<br />While the upload is in progress, you may see a page like the following:<br />[[File:xc4_ebay_uploading_orders.png|border]]<br />If you've had any orders on eBay during the specified period, in a few moments you should get a list of eBay orders uploaded to your X-Cart store. For example, on our demo installation, we had just one order from eBay during the past 6 hours, so the list of uploaded orders contains only one item:<br />[[File:xc4_ebay_orders.png|border]]<br /> | ||
| + | In your X-Cart store's general list of orders, orders created on eBay are marked with the "EBAY" icon so you can easily tell them from the rest of the orders in your store.<br />[[File:xc4_ebay_order_icons.png]] | ||
| + | |||
| + | [[Category:X-Cart user manual]] | ||
| + | [[Category:X-Cart modules]] | ||
Latest revision as of 12:33, 18 November 2022
Contents
- 1 Overview
- 2 System requirements
- 3 Installation
- 4 Activating and deactivating the module
- 5 Configuring the module
- 5.1 Obtaining an eBay user token
- 5.2 Setting your business policies
- 5.3 Choosing your default eBay categories
- 5.4 Configuring the General settings for the eBay Integration module
- 5.5 Configuring eBay options for products and categories
- 5.6 Setting up automated export of products to eBay and automated import of orders from eBay
- 6 Using the module
Overview
The eBay Integration module for X-Cart 4 creates a new sales channel for your business by automatically integrating your existing X-Cart store with eBay. The integration allows you get your products listed on eBay in as little as a few minutes using the product titles, images, descriptions, prices, inventory levels, variants and attributes from your X-Cart store. It also allows you to import your eBay orders back into X-Cart and manage all your sales from the X-Cart Admin area so the order information on eBay is updated in real time. The data can be synchronized between the two systems either manually or automatically according to your preferred schedule. The information of your eBay buyers such as names and addresses is also imported from eBay and becomes available in your X-Cart store's Admin back end as customer profiles.
Your store can be connected to any single eBay marketplace site, including the sites for United States, Canada (English or French), UK, Australia, Austria, Belgium (French), France, Germany, Italy, Belgium (Dutch), Netherlands, Spain, Switzerland, Hong Kong, India, Ireland, Malaysia, Philippines, Poland and Singapore.
The integration is provided as a service. Subscription plans for merchants of any size are available.
System requirements
To be able to successfully install and use the eBay Integration module, you must have the following components installed on your server:
- a working copy of X-Cart;
(The eBay Integration module is currently supported by X-Cart versions 4.7.3 and later. Upon request, we may be able to provide a module version compatible with earlier X-Cart versions.) - an SSL certificate.
(An SSL certificate is required because the module needs to establish a secure https connection to our service to get a token. Without an SSL certificate, such a connection will not be possible, so you will get an error saying that you have a problem with your SSL certificate.)
- a working copy of X-Cart;
Installation
To install the module:
- Obtain a distribution package for the eBay Integration module: Download >>
- X-Cart versions 4.7.3 and later: Download a file named like XeBayIntegration-X.Y.Zgold.tgz;
- Earlier X-Cart versions: Download a file named like ebay-X.Y.Zgold.tgz.
(X, Y and Z in the distribution file name are version numbers; they must match the version of your installed X-Cart. Note: If you do not remember the version of your installed X-Cart, you can find it in the Environment info section of the Summary page in X-Cart Admin area.)
- Copy the contents of the module archive to the X-Cart root directory on your server or hosting account.
- If you are using a Windows-based server, or a UNIX-based server without terminal access:
- a) Unpack the module archive to a directory on your system using your favorite compression program (WinZIP, 7-Zip or any other archiver with support for TAR files).
- b) Use an FTP client to upload all the files contained in this directory (retaining the directory structure) to the X-Cart root directory on your server or your hosting account.
- If you are using a UNIX-based server with terminal access:
- a) Use an FTP client to upload the module archive to the X-Cart root directory on your server or your hosting account.
- b) Unpack the archive using the following command:
tar -xzvf filename.tgz
- (Replace filename.tgz with the actual name of your module distribution file; for example, XeBayIntegration-4.7.3gold.tgz).
- Important: Make sure you keep the directory structure while unpacking and uploading the module archive, otherwise some necessary files may be overwritten!
- In a web browser, run the installation script httр://<YOUR_XCART_DOMAIN>/install-ebay.php replacing <YOUR_XCART_DOMAIN> with the actual domain name of your X-Cart store. This will start the installation wizard.
- Follow the installation wizard instructions to install the module.
- Once the installation has been completed, you should see the "Installation complete" screen with a link for access to the Admin area of your store with the installed module. Before you proceed, please remove the module archive file if you put it in a web accessible directory; this is needed to protect the module from unauthorized copying.
Important: At the final step of the installation process, the installation script install-ebay.php is automatically renamed as an additional measure to protect the module installation. Please take note of the filename to which the installation script was renamed. If you decide to re-install or uninstall the module later on, you will need to rename the installation script back to install-ebay.php before launching the installation process in your web browser.
Once the module has been installed, it needs to be configured.
Activating and deactivating the module
If the module eBay Integration is installed, but not active, you can enable (activate) it.
To enable the module:
- Go to the Modules section of your store's Admin area (Settings menu -> Modules). This opens the list of your store's installed modules.
- Locate the entry for the eBay Integration module and select the Enable check box on the left.
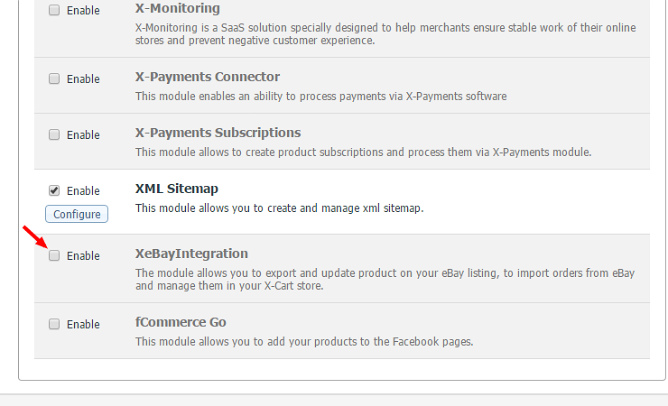
The module will be activated.
It is possible to temporarily disable (deactivate) the installed eBay Integration module. Deactivation stops the module from operation, but it does not remove any settings you made to the module configuration nor clear any data that was generated during the period that the module was in operation. If you wish to completely remove all the data related to using the module, you need to uninstall it.
To disable the module:
- Go to the Modules section of your store's Admin area (Settings menu -> Modules).
- Locate the entry for the eBay Integration module and unselect the Enable check box on the left.
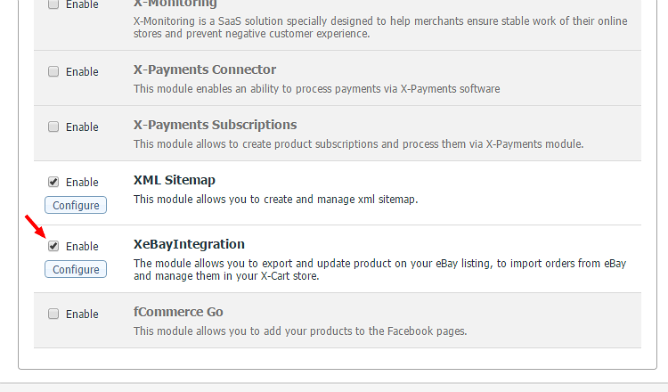
The module will be disabled.
Configuring the module
To start using eBay Integration, you need to configure the eBay Integration module. This can be done via the eBay Configuration section (Settings > eBay Configuration). The process includes the following steps:
Let's look at each of the steps more closely.
Obtaining an eBay user token
To configure your eBay Integration, the first thing you should do is create a new user token (also known as "Auth Token) that will allow eBay Integration to connect to your eBay account:
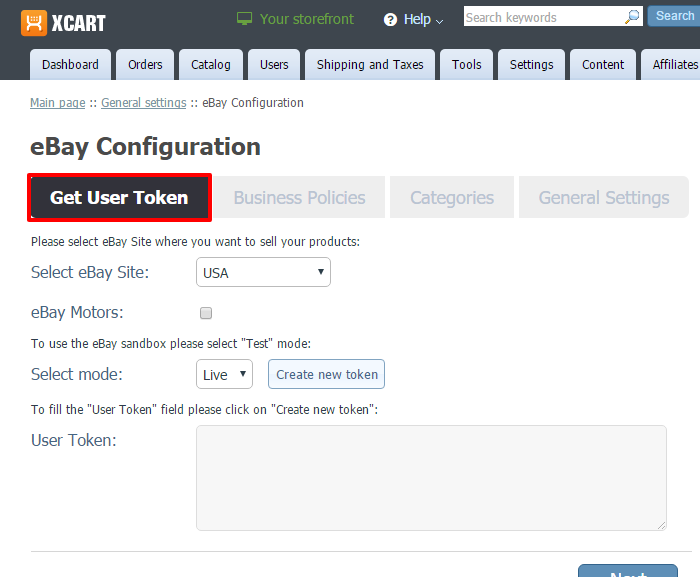
- In your store's Admin area, go to eBay Configuration page (Settings > eBay Configuration) and make sure it is open at the Get User Token tab.
- Adjust the following settings:
- Select eBay Site: Select the eBay site where you will be selling your products. The products and orders in your X-Cart store will be synchronized with this eBay site.
- eBay Motors: Enable this option to sell on eBay Motors. Note that the previous setting (Select eBay Site) determines the country of the eBay Motors site where you will be able to sell.
- Select mode: Specify the mode in which your store will be interacting with eBay: select Test to use the eBay Sandbox or Live to use the production environment.
- Click the Create new token button:
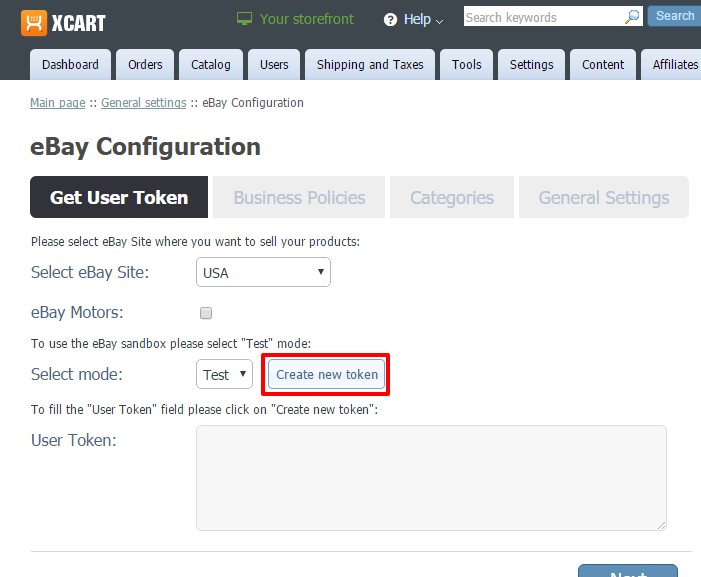
This launches the user sign-in and consent process: you will be redirected to the eBay site where you will need to log in to the eBay account for which you need the token and grant the application the permission to access your account on your behalf.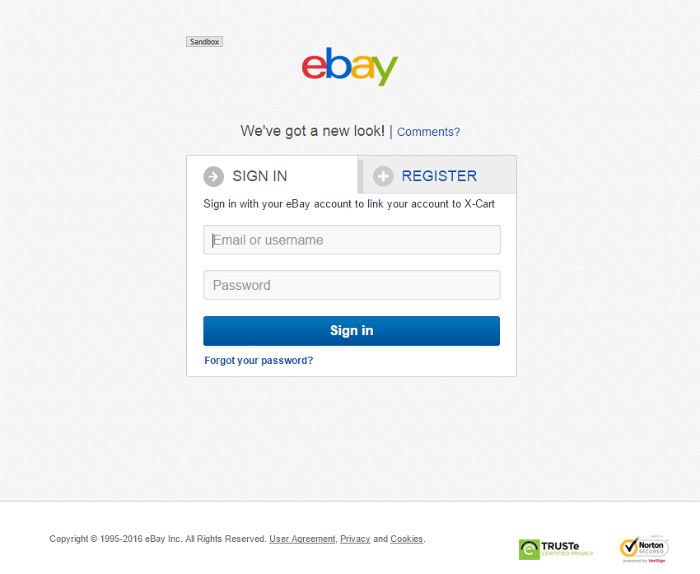
After signing in, provide your consent to share your eBay data by clicking "I agree":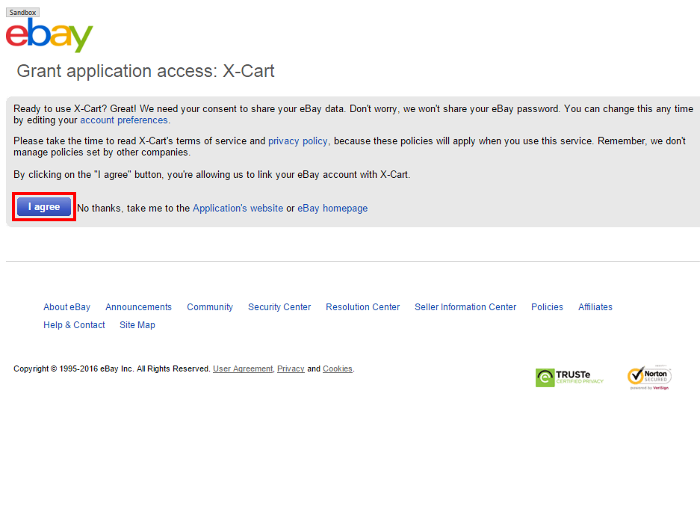
Important: If you are creating a Sandbox user token, enter the credentials for a Sandbox User. If it is a token for Production, use the credentials for a user created on the Production eBay site (the one you will use to sell items on eBay). Remember that User IDs for Sandbox users begin with "TESTUSER_".
Once application access has been granted, eBay will generate a new token, and you will be automatically redirected back to X-Cart. On the Get User Token screen, you should now be able to see the User Token field populated with your token value. Below this field you should be able to see information about the current status of your token (Token Status) and token expiration date (Token Expiration):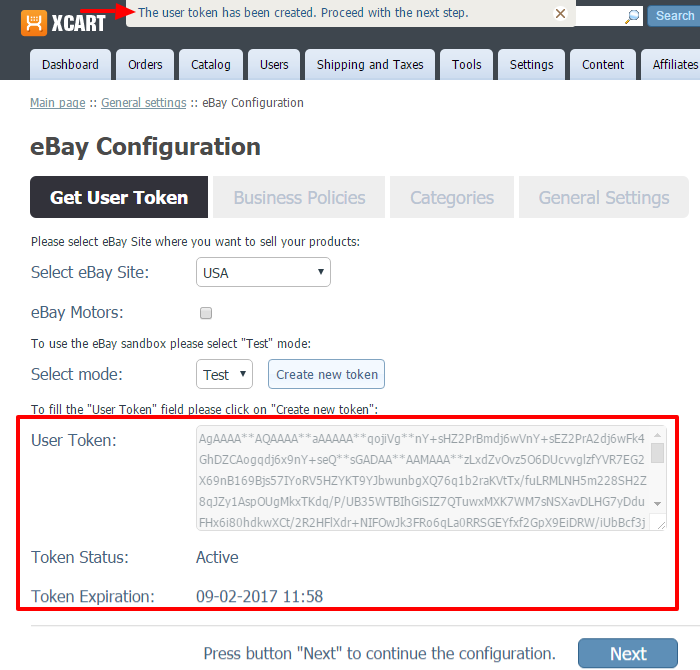
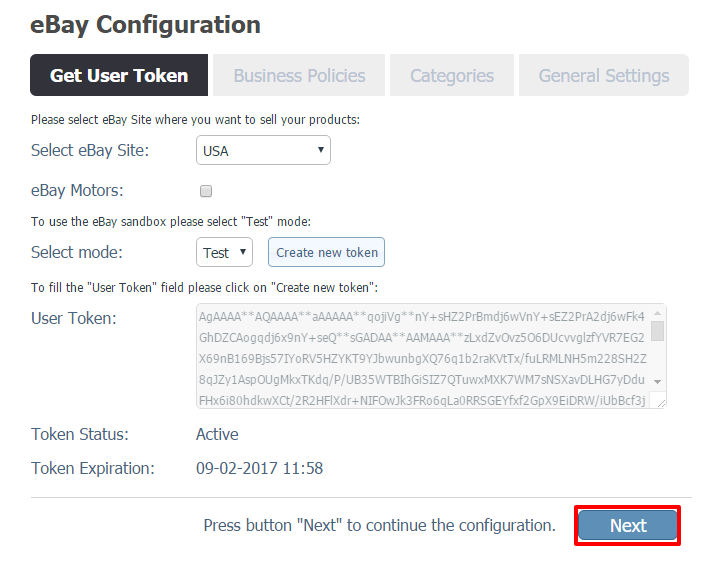
When your token is about to expire, you will be notified and provided with a button to create a new one. - Now that your token has been generated, click Next to save your changes and head over to the next step of configuring your eBay Integration: Setting your business policies.
Setting your business policies
Once you have created an eBay user token to connect your X-Cart store to your eBay seller account, you can set business policies for your eBay listings. Business policies typically include information on how buyers can pay you; the shipping services you offer, and shipping costs; whether you accept returns, any return conditions, etc. All eBay listings must include this information. To provide information on your business policies for the listings that will be created from the products you sell via your X-Cart store, follow the steps below:
- If you haven't yet done so, configure your business policies in your eBay account (More information is available here; see also).
- In X-Cart Admin, after creating your eBay token in the Get User Token section of the eBay Configuration page (Settings > eBay Configuration), click Next to go to the Business policies section:

If you have configured your business policies earlier, it is possible to simply click the Business policies tab: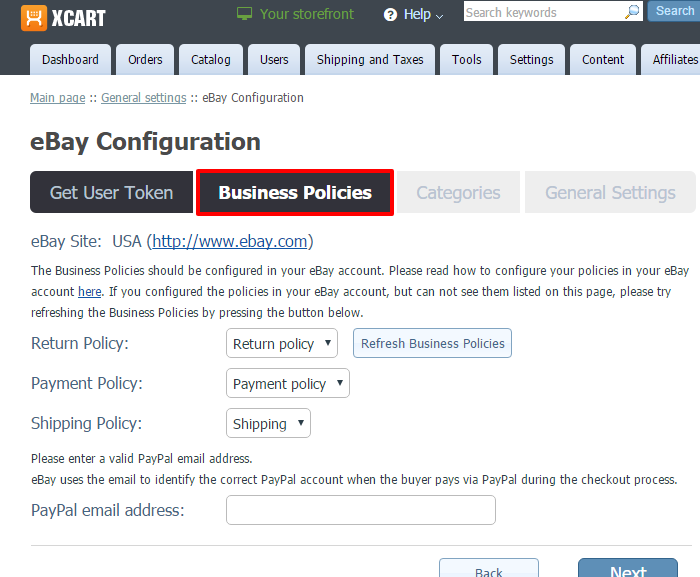
- Use the drop-down policy selectors to set the business policies you would like to use for your eBay listings:
- Return Policy;
- Payment Policy;
- Shipping Policy.
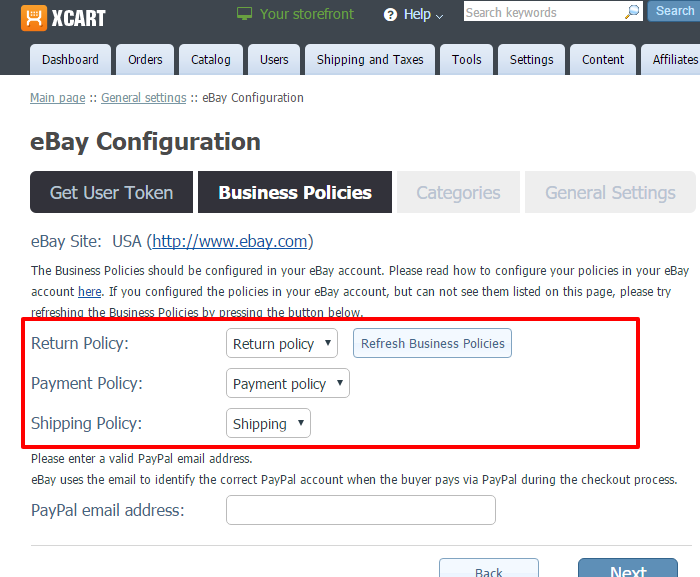
The names of business policies displayed to you on this page are pulled from your eBay account to which you have linked your application at the previous step. If you do not see the policy you require in any of the selectors, it may be due to the fact that the policy was added after the information on the policies had been pulled into X-Cart. To resolve the problem, click the Refresh Business Policies button - the list of policies will be updated.
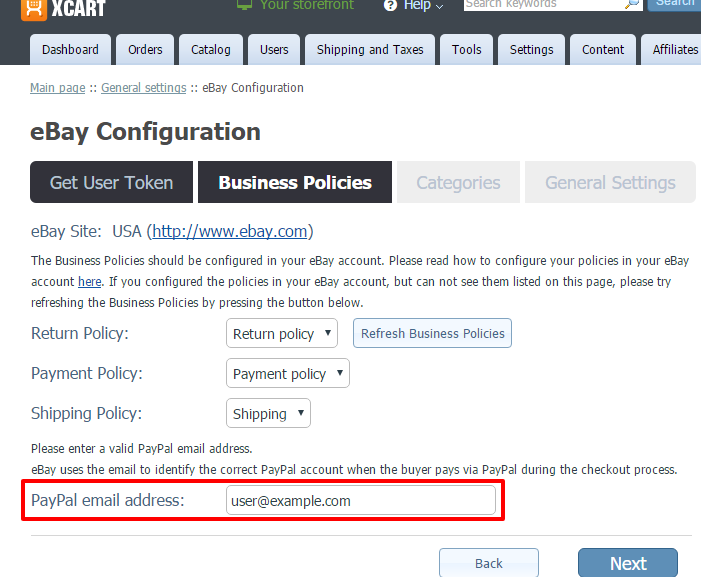
- Use the PayPal email address field to enter your valid PayPal email address. eBay will use this address to identify the correct PayPal account when the buyer pays you via PayPal.
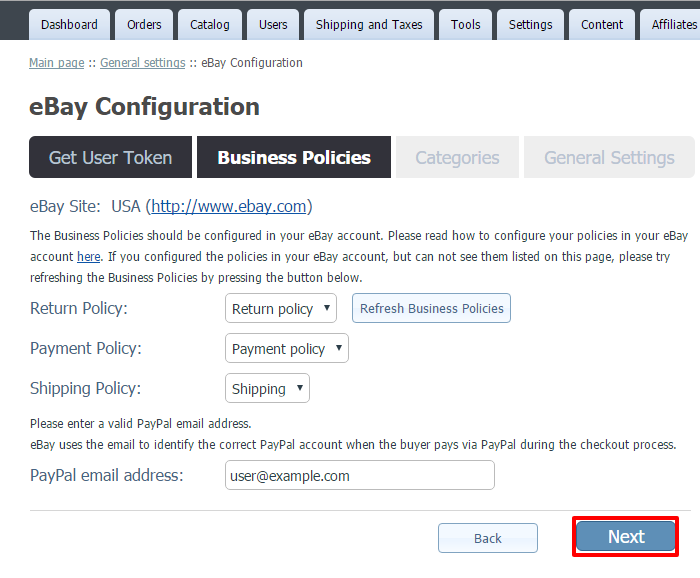
- Click Next to save your changes and head over to the next step of configuring your eBay Integration: Choosing your default eBay categories.
Choosing your default eBay categories
Every product you export to eBay has to be placed in at least one of eBay categories. When using eBay Integration, the eBay categories to which your products will be exported need to be set before the export actually takes place. The Categories section of the eBay Configuration page in X-Cart allows you to set the default eBay categories for your listings: one main and one additional category. The main category is required, the additional one is optional. The categories you specify here will be your store's default eBay categories - the ones that will be used for any products for which eBay categories are not set at the product or category level. To set your store's default eBay categories:
- In X-Cart Admin, after setting your business policies in the Business Policies section of the eBay Configuration page (Settings > eBay Configuration), click Next to go to the Categories section:

If you have configured your default eBay categories previously, you can simply click the Categories tab: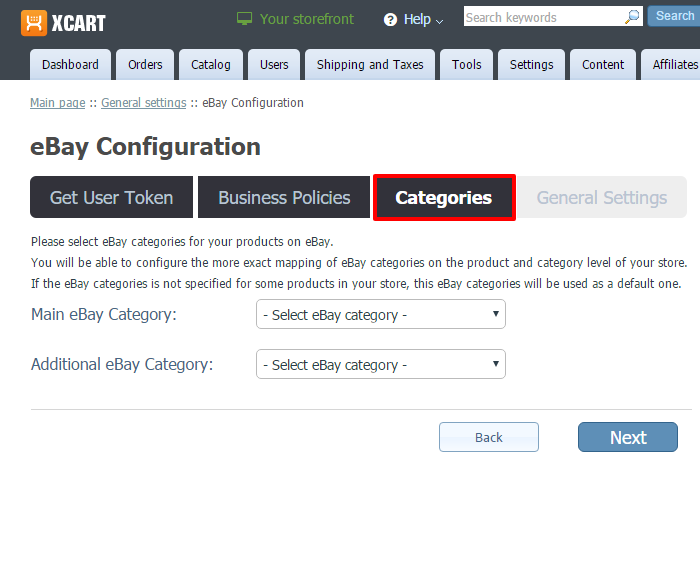
- Set the default main category for your products:
Use the Main eBay Category selector to select the eBay category that best describes the products you are going to sell on eBay. If not all your products are going to be in the same category, just select the category you intend to use for the majority of your eBay listings; for the products that do not fit well into the eBay category selected here, you will be able to choose an eBay category at the product or category level.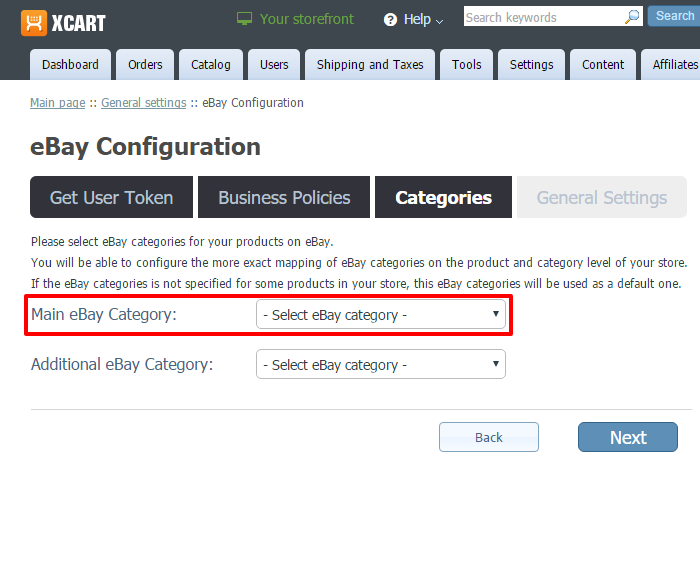
Note that category selection is a multi-step process: at first, the selector will show only top level eBay categories; once you select one of them, another selector will be displayed right below the first one so you can continue to select a nested category. You must continue selecting categories until you reach the lowest level of the eBay category hierarchy where you will be able to select the category that provides the most precise description of your products. At this point you should see a note "Allowed to select", which means the category selection process has been completed.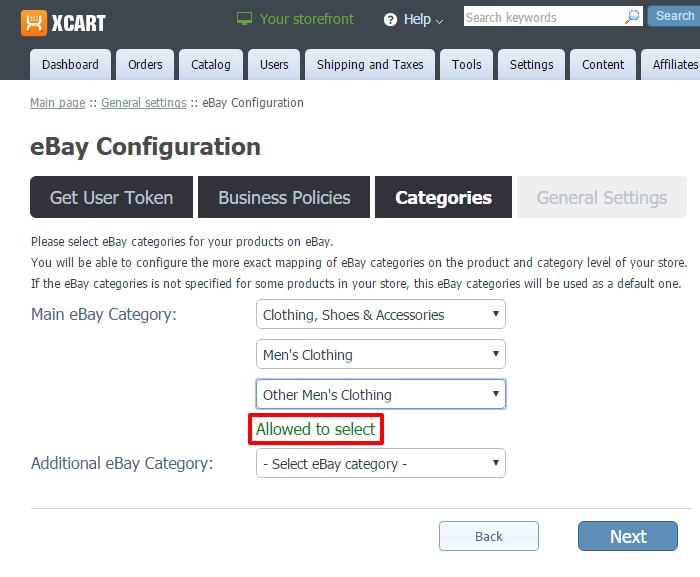
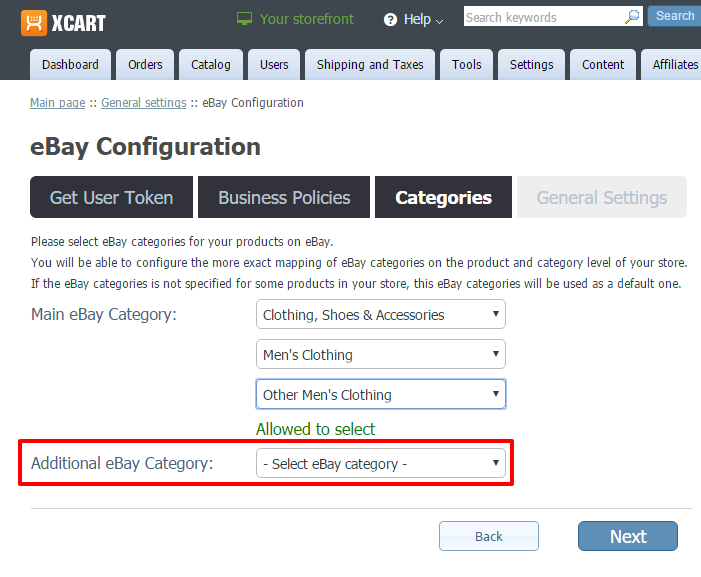
- (Optional step) In a similar way, use the Additional eBay Category selector to set a default additional category for your products.
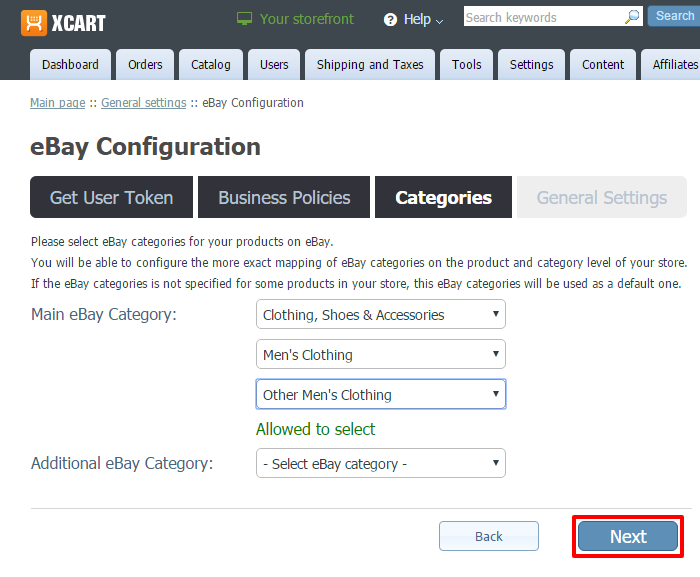
- Once you are happy with your default category settings, click Next to save your changes and head over to the next step of configuring your eBay Integration: Configuring the General settings for the eBay Integration module.
Configuring the General settings for the eBay Integration module
Before you start exporting products to eBay, you need to adjust the module's General settings.
To adjust the General settings for the eBay Integration module:
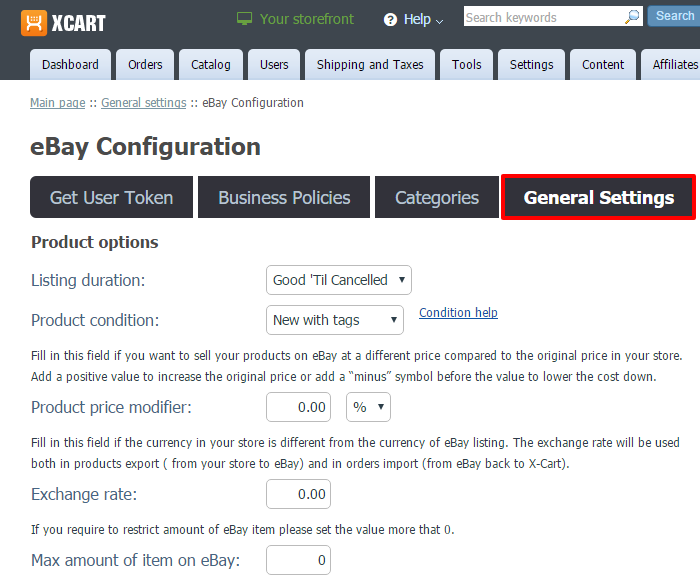
- Go to the General Settings section of the eBay Configuration page in your store's Admin area (Settings > eBay Configuration):
- Adjust the settings in the Product options section:
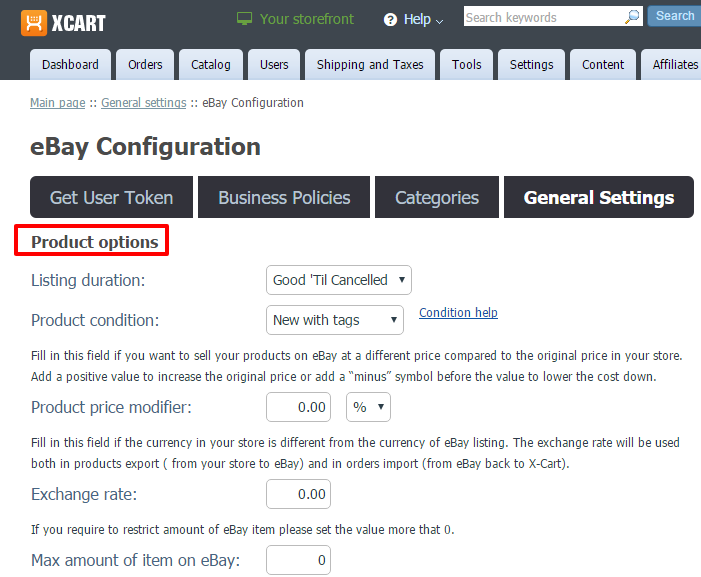
The settings in this section will apply to all the products in your X-Cart store, for which similar settings have not been set at the level of categories or individual products.
- Listing duration: Select a duration for your store's eBay listings. Ebay help on listing duration is available here.
- Product condition: Select the condition of the products you are going to export to eBay. Click the Condition help link for help on item condition for your category.
- Product price modifier: If necessary, the price of items sold via eBay can be made higher or lower than the price of these items in your X-Cart store. The price difference can be implemented by setting a product price modifier.
For example, to add a $1 per item processing fee for eBay orders, you should set the price modifier as "[1.00] + [ $ ]":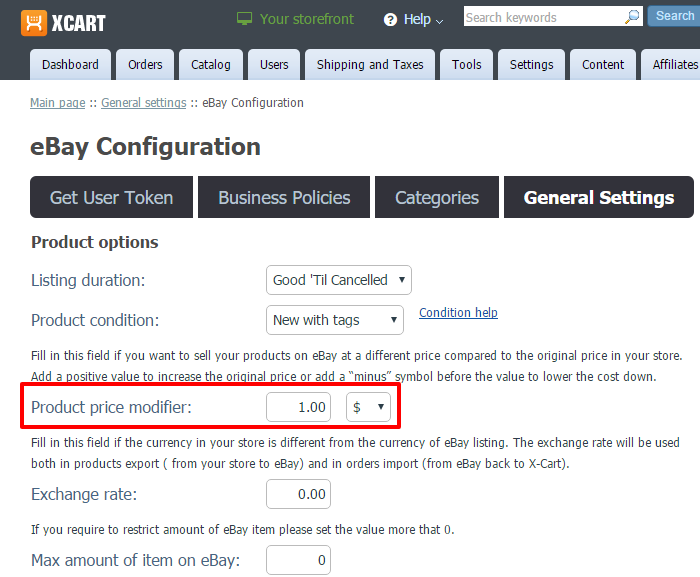
This way all your items sold on eBay will be $1 more expensive than the items in your X-Cart store.
To reduce the price of items sold on eBay by 10% of their price in your X-Cart store, you should set the price modifier as "[-10.00] + [ % ]":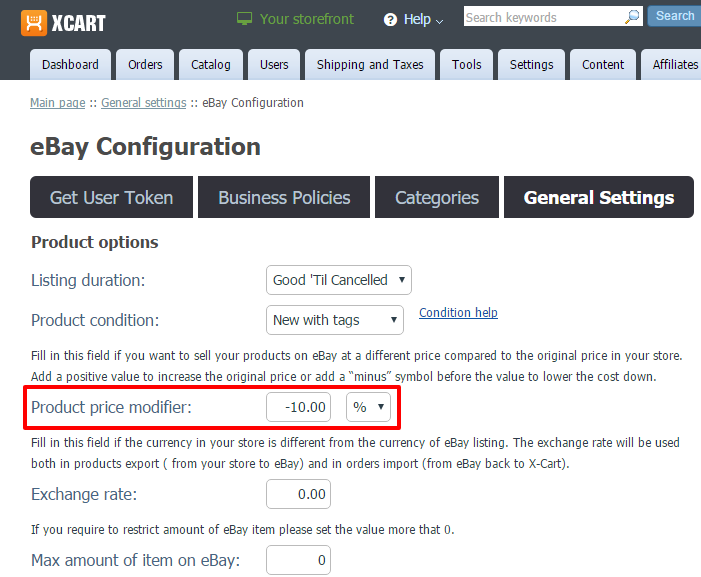
(Note the minus sign before "10.00"; it shows that the price of items on eBay will be lower than the original item price in the X-Cart store).
The price modifier defined in the eBay Integration General Settings applies to your entire X-Cart store (i.e. all the products that will be exported to eBay). If you need a price modifier only for some of the products, you should set the modifier at the level of specific products or categories. - Exchange rate: If the type of currency you use in your X-Cart store is different from the currency that will be used for your eBay listings (for example, if the prices at your X-Cart store are in Australian dollars, and the prices on eBay need to be specified in US dollars), use this field to set the exchange rate. The exchange rate will be used both when exporting your products from your X-Cart store to eBay and when importing orders from eBay back to your X-Cart store.
- Export product description: In X-Cart, a product can have two types of description: a short description and a detailed description. EBay listings can have just one description. So, before you export any products to eBay, you need to specify what type of description should be used for eBay. Here you set the type of product description that should be exported to eBay by default. The available options are Short and Full. These correspond to X-Cart's short and detailed product descriptions, respectively. There is also an option not to use the X-Cart's short and detailed product descriptions, but create your own HTML description instead; to do so, use the option "Use the following pattern as eBay item description" below. Note that when the option "Use the following pattern as eBay item description" is enabled, and the text area below contains any kind of text/html, the selection in the "Export product description" field is ignored (Neither the detailed or short descriptions is exported). If the option "Use the following pattern as eBay item description" is enabled, but the text area below is empty, the selected type of description will be exported.
If any of your products need to use a different type of description on eBay, you can adjust this setting individually for these products in their eBay product options. - Use x-cart URL of the product images on eBay: Enable this option if you want product images on eBay to be displayed by linking to the same images on your X-Cart store website, rather than saving copies of the images on eBay. Disable this option if you want product images to be saved on eBay.
- Use the following pattern as eBay item description: Enable this option to use your own HTML description for your eBay listings instead of X-Cart's short/detailed product description. The pattern must be provided in the text area below.
- Max amount of item on eBay: If you stock large quantities of items in your store, or the stock quantities are unlimited, you are probably used to setting the Quantity in stock (items) field of your product details in X-Cart to large numbers (like 1000 items in stock). It may not be a good idea to show these numbers on eBay. The setting "Max amount of item on eBay" allows you to set the maximum number of items in stock that should be shown as available for sale to your eBay buyers. For example, if you set this value to "3", for any products from your X-Cart store of which you have 3 or more left, eBay will show the available quantity as "3 available"; for products with an inventory level of less than 3 items, eBay will show the actual quantity available.
- Adjust the settings in the System options section:
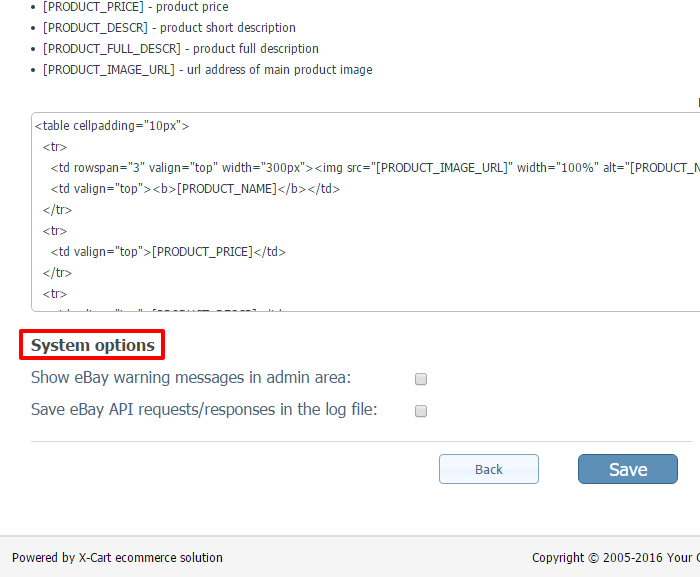
- Show eBay warning messages in admin area: When exporting products to eBay or importing orders from eBay, you may get eBay warnings. Unlike errors, warnings are conditions that are not fatal to the module operation, but they alert you to some minor problems that you may want to fix. Any warnings your store gets from eBay are written to log files in your X-Cart store. If, in addition to that, you also wish to have eBay warning messages displayed in your store's Admin area, enable this option.
- Save eBay API requests/responses in the log file: If you need eBay API requests/responses to be written to log file (for example, if you need this information for debugging purposes), enable this option.
- Click Save to save your changes.
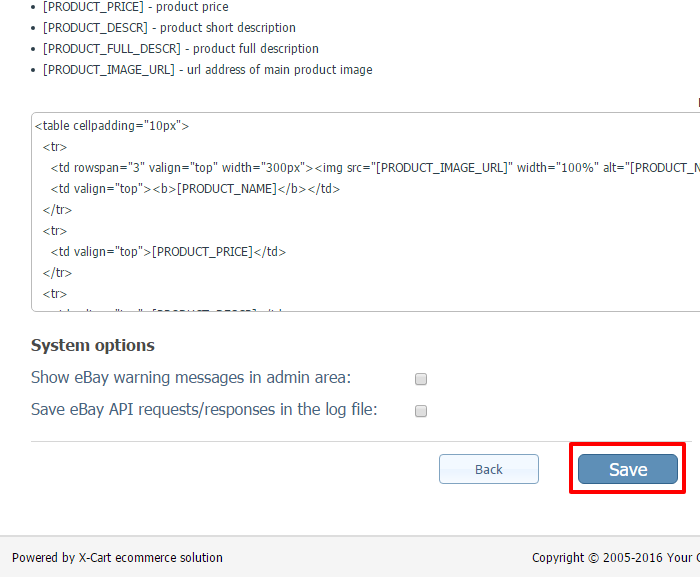
You should see a success message like the following: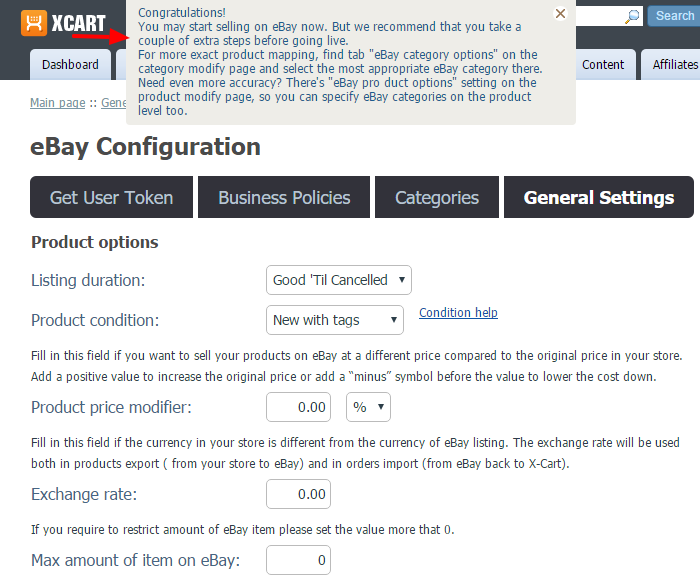
That is all; you have completed the basic configuration of your eBay Integration and can now start selling on eBay. However, if you require a more nuanced approach to publishing your products on eBay (for example, if you need to map your products to eBay categories more accurately than simply by setting one common default category for all your products), we recommend you take a couple more steps to complete your store's eBay related configuration. For more info, see the sections on configuring eBay options for categories and products.
Configuring eBay options for products and categories
The sections Categories and General Settings of the eBay Configuration page allow you to set the most basic rules for how your product information should be exported to eBay. This includes which eBay category your products should be exported to, whether a price modifier should be used to increase or decrease the product price on eBay, and so on. By default, these rules will apply to all your products. However, if you want different products in your store to be treated differently (for example, if you want to publish different products in different eBay categories, or use a price modifier just for a couple of products), you will need to fine-tune your eBay export by adding more rules at the level of specific products and/or categories. The rules in question can be set by configuring the eBay options for these products/categories. The eBay options set at the level of a specific product will apply to that product only. The eBay options set at the level of a category will apply to the products in that category and the products in all the subcategories of that category.
To set eBay options for a category:
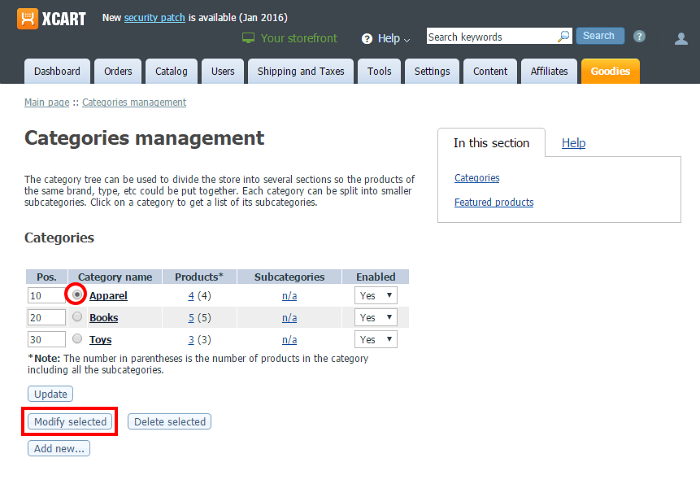
- In the Categories management section of your X-Cart store's Admin area (Catalog > Categories), find the category for which you need to set eBay options.
- Select this category in the list of your store's categories and click the Modify selected button below to go to the category details page:
- On the category details page, click the eBay category options link in the "In this section" menu:
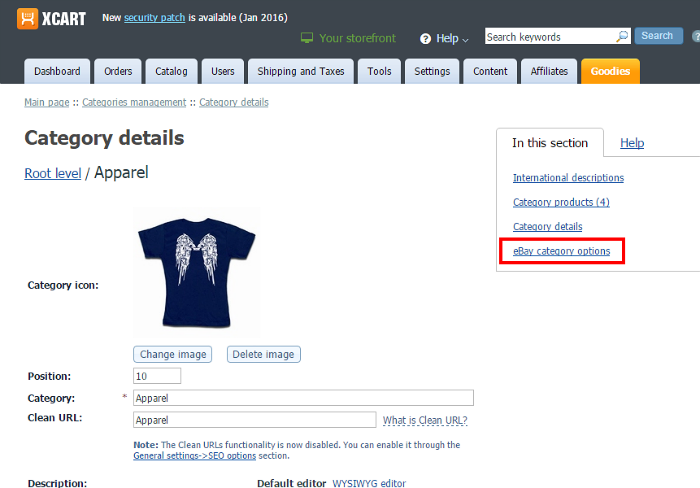
The eBay category options page opens: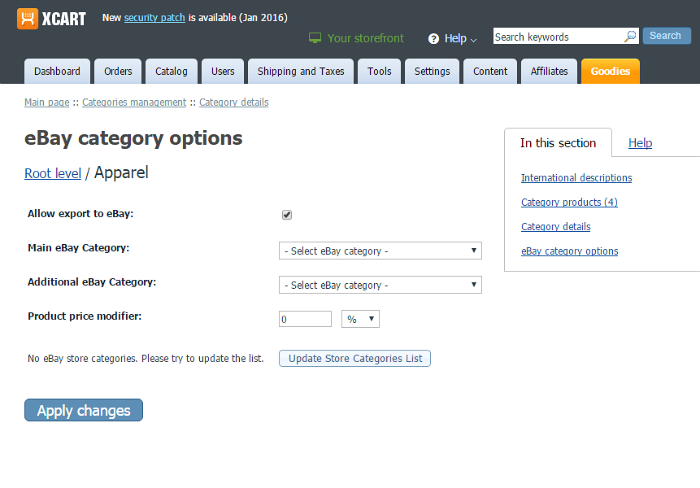
- Adjust the eBay options for the selected category:
- Allow export to eBay: Specify whether the products from this category and the subcategories of this category should be exported to eBay. If you do not intend to sell products from this category and its subcategories on eBay, you can forbid the export of this category to eBay by deactivating this option.
- Main eBay Category: Set the main eBay category for the products from the selected X-Cart category and the subcategories of this category.
- Additional eBay Category: Set the additional eBay category for the products from the selected X-Cart category and the subcategories of this category.
- Product price modifier: If the price of the products in the selected X-Cart category and its subcategories needs to be different from the price of these products on eBay, set a price modifier.
- If you have set up Store categories to better organize your eBay listings, specify which of these Store categories the products from the selected X-Cart category and its subcategories need to be exported to. The button Update Store Categories List allows you to reload information about your eBay Store categories in X-Cart.
- Once you are done configuring the eBay options for the selected category, click Apply changes to save your changes.
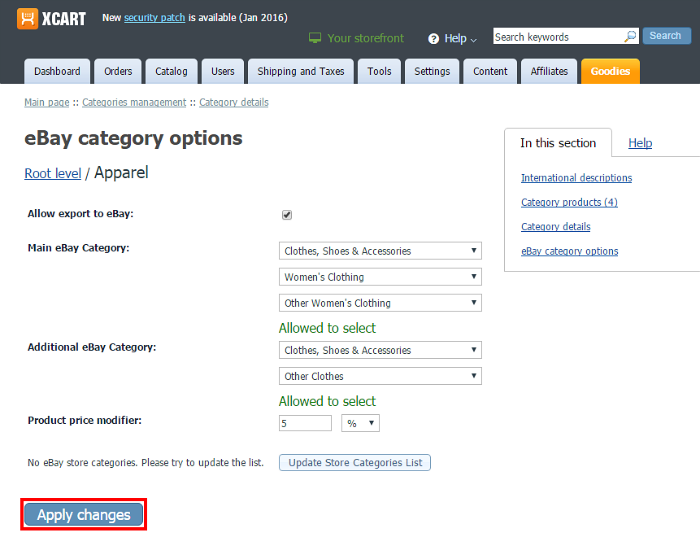
The eBay options for the category will be saved.
To set eBay options for a product:
- In the Products management section of your X-Cart store's Admin area (Catalog > Products), find the product for which you need to set eBay options.
- Choose to edit the details of the product that has been found:
- On the product details page that opens, click the eBay product options link in the "In this section" menu:
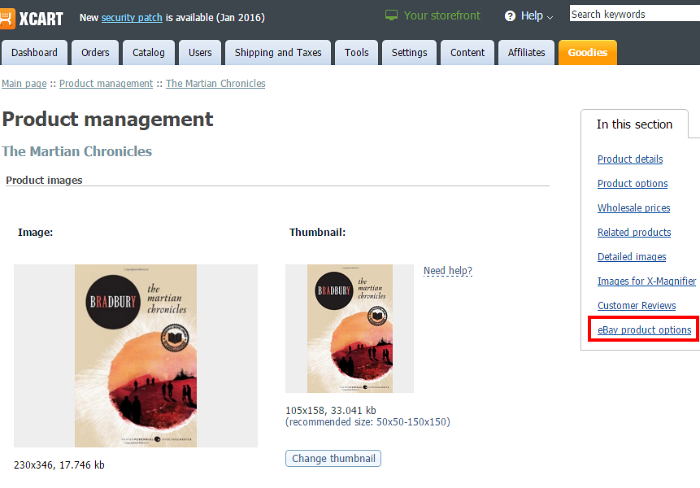
The eBay product options section of the product details page opens: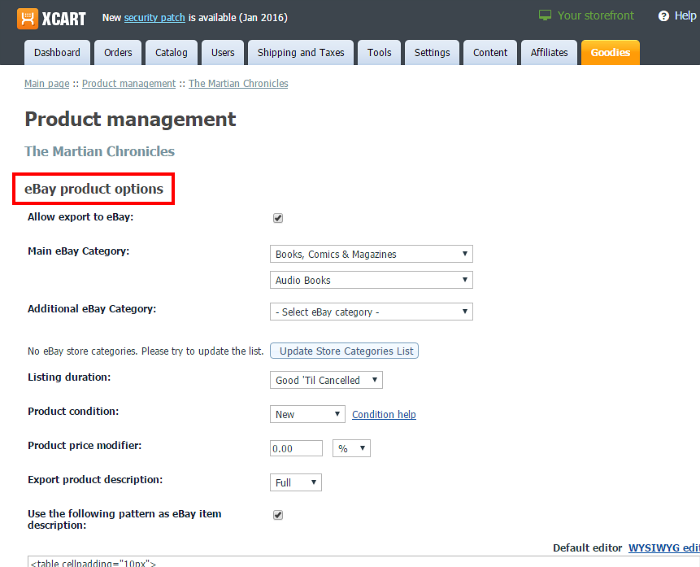
- Adjust the eBay options for the selected product:
- Allow export to eBay: Specify whether the product should be exported to eBay. If you do not intend to sell this product on eBay, you can forbid the export of this product to eBay by deactivating this option.
- Main eBay Category: Set the main eBay category for the product.
- Additional eBay Category: Set the additional eBay category for the product.
- If you have set up Store categories to better organize your eBay listings, specify which of these Store categories the product needs to be exported to. The button Update Store Categories List allows you to reload information about your eBay Store categories in X-Cart.
- Listing duration: Set a duration for the eBay listing that will be based on this product. Ebay help on listing duration is available here.
- Product condition: Select the condition of the product (will be used for the respective eBay listing). Click the Condition help link for help on item condition for your selected category.
- Product price modifier: If the price of the product on eBay needs to be different from the price of this product in your X-Cart store, set a price modifier.
- Export product description: In X-Cart, a product can have two types of description: a short description and a detailed description. EBay listings can have just one description. So, before you export any products to eBay, you need to specify what type of description should be used for the eBay listing that will be based on the selected product. The available options are Short and Full. These correspond to X-Cart's short and detailed product descriptions, respectively. There is also an option not to use the X-Cart's short and detailed product descriptions, but create your own HTML description of the product instead; to do so, use the option "Use the following pattern as eBay item description" below. Note that when the option "Use the following pattern as eBay item description" is enabled, and the text area below contains any kind of text/html, the selection in the "Export product description" field is ignored (Neither the detailed or short descriptions is exported). If the option "Use the following pattern as eBay item description" is enabled, but the text area below is empty, the selected type of description will be exported.
- Use the following pattern as eBay item description: Enable this option to use your own HTML description for the eBay listing instead of X-Cart's short/detailed product description. The pattern must be provided in the text area below.
- eBay item ID: Leave this field be; it will be populated with an item ID value automatically after the product is exported to eBay.
- Once you are done configuring the eBay options for the selected product, click Apply changes to save your changes.
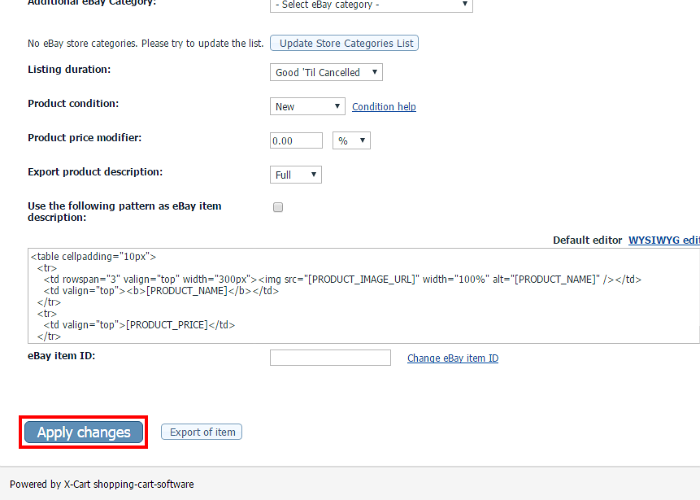
The eBay options for the product will be saved.
Setting up automated export of products to eBay and automated import of orders from eBay
Export of products from your X-Cart store to eBay and import of orders into your X-Cart store from eBay can be set up to run automatically via cron. Here's the recommended setup:
- Automated export of products every 20 minutes:
* / 20 * * * * cd <xcart_dir>; php ebay_cron.php --operation=products_export --key=<Secure key for launching the cron.php script from the “General” page>
- Automated import of orders every 20 minutes:
* / 20 * * * * cd <xcart_dir>; php ebay_cron.php --operation=orders_import --key=<Secure key for launching the cron.php script from the “General” page>
Using the module
Exporting products to eBay
The eBay Integration module allows you to export product information from your store to eBay. When exported to eBay, product information is used to form a new eBay listing, or to update an existing eBay listing created previously (for example, to update the available quantity of the product in the listing or to end a listing). You can export the information of just some specific products or all the products in your store at once. The export can be initiated from the details page of a specific product or from a product list in X-Cart Admin.
To export product information to eBay from a product list:
- Go to the Products management section of your X-Cart store's back end (Catalog > Products).
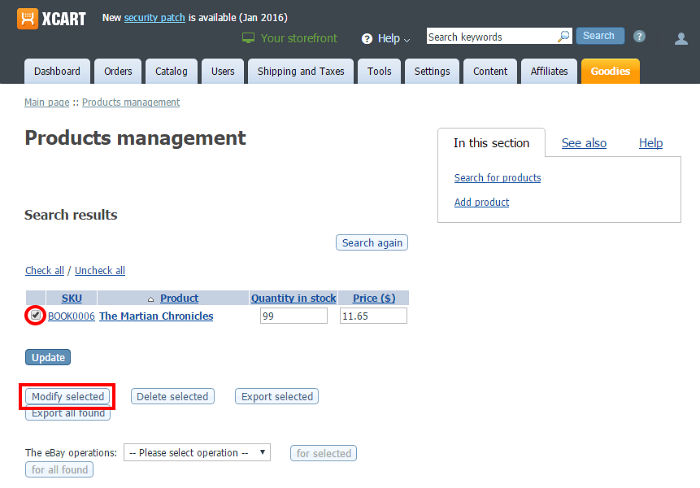
- If you need to export to eBay just some of the products in your store, do a search to find these products and select the products that need to be exported by clicking the checkboxes to the left of their names.
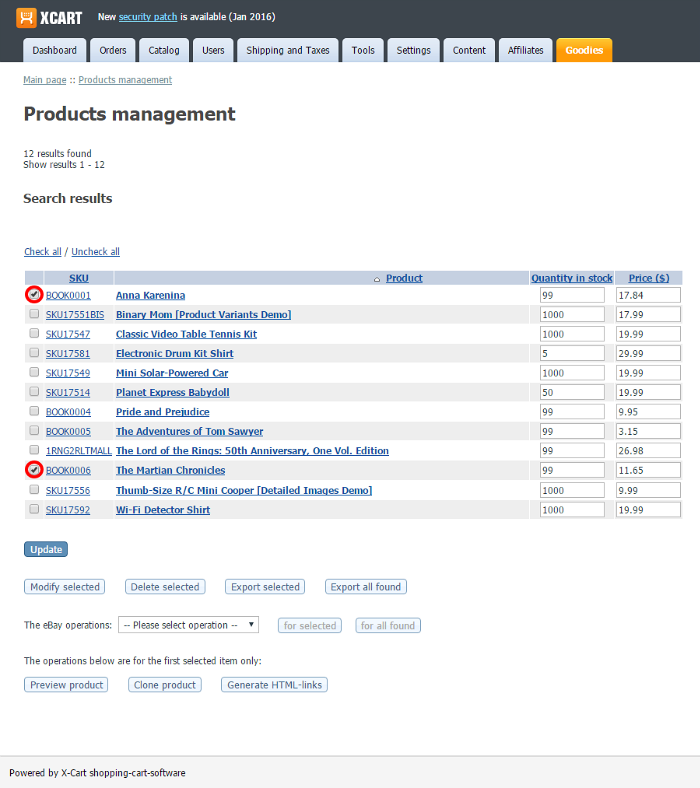
If you need to export all the products in your store, do a search with an empty search box to find all the products in the store and go to the next step (no need to select any products). - Select the operation that needs to be performed:
- Export of items - Select this to export all the information pertaining to the products;
- Export of inventories - Select this to update the product quantities in your eBay listings (only inventory data will be exported);
- Export of images - Select this to update only the images of the products;
- End of items - Select this to end the existing eBay listings.
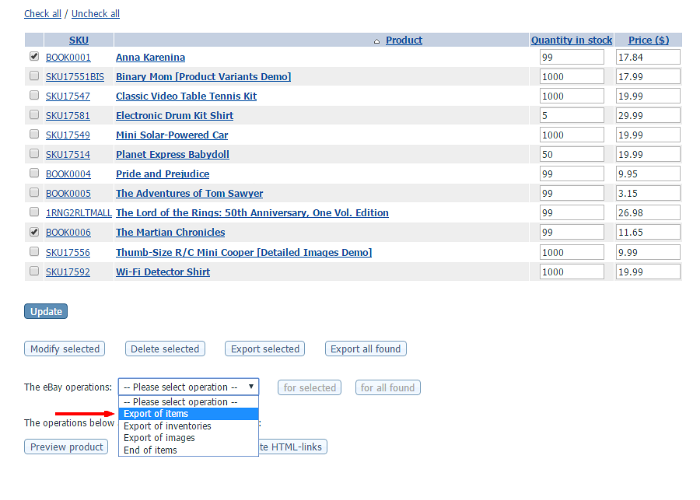
- Depending on whether you need to export all the products that have been found or just the products you have selected, click either for selected or for all found:
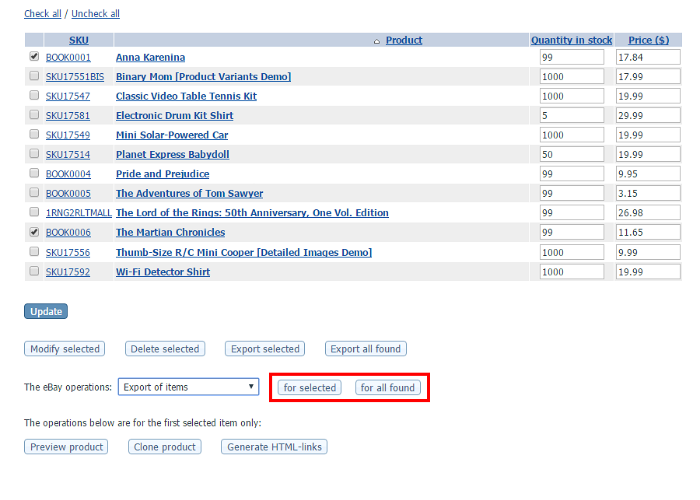
The products will be exported to eBay: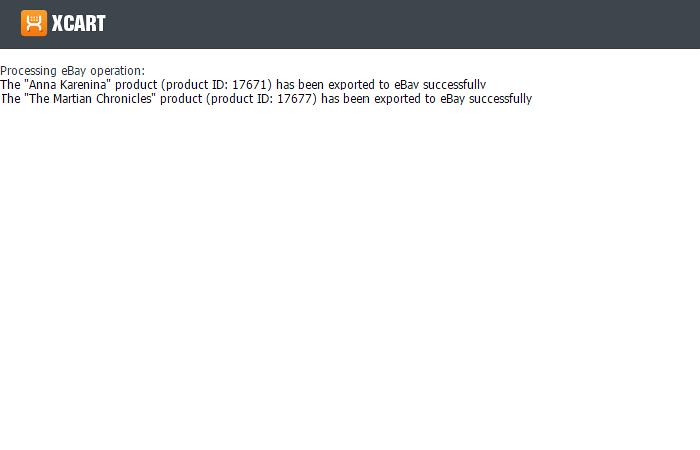
To export product information to eBay from a product details page:
- Go to the Products management section of your X-Cart store's back end (Catalog > Products).
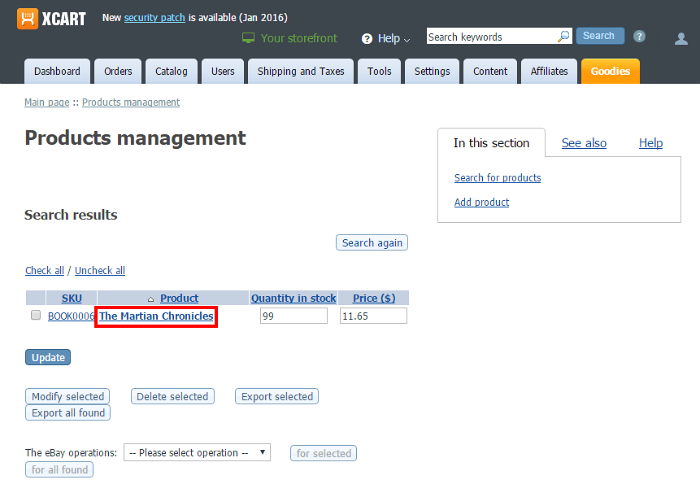
- Do a search to find the product whose information you want to export to eBay and click on the product name to go to the product's details page.
- On the product details page, click the eBay product options link in the "In this section" menu:

- Scroll down to the bottom of the page and click the Export of item button:
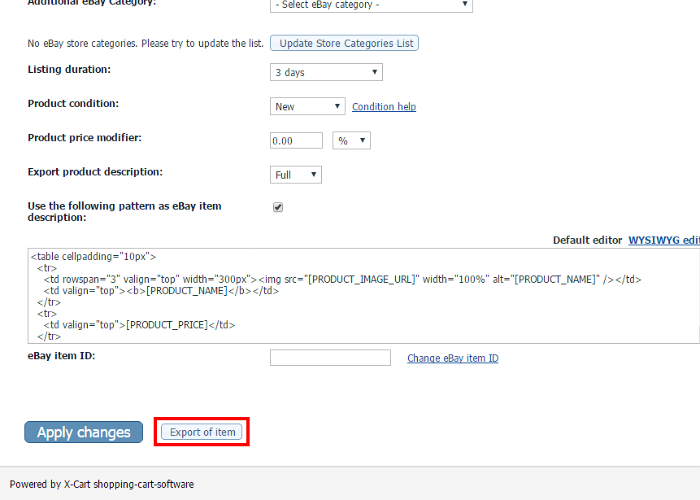
The product will be exported to eBay: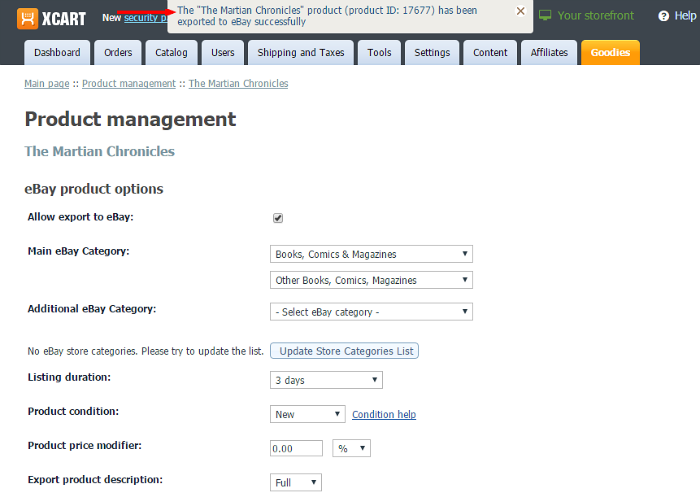
After the product has been exported to eBay for the first time, you get more eBay export options for the product: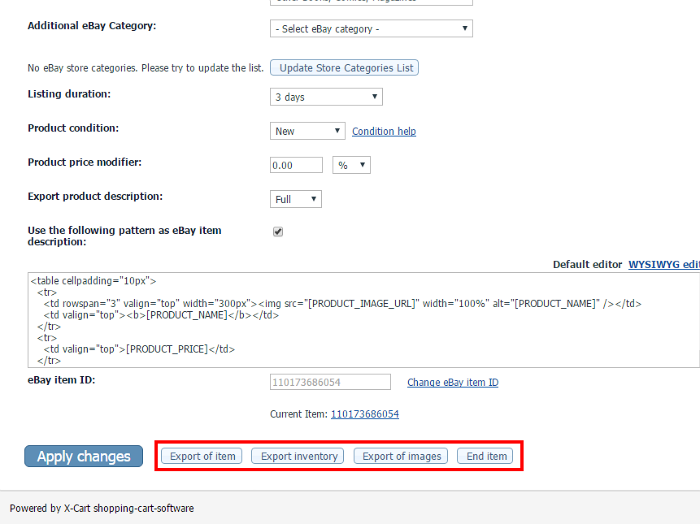
Depending on the type of data that you want to export, you can perfrom further exports of product information for this product using the following buttons:- Export of item - will export the entire scope of product information;
- Export inventory - will export only the product inventory information;
- Export of images - will export just the product images;
- End item - will end the item listing on eBay.
Viewing and managing your product listings on eBay
In your X-Cart store's Admin area, products that have been successfully exported to eBay are marked with the "EBAY" icons when seen in a product list:![]()
This way you can easily tell them from the rest of your store's products. By clicking a product's "EBAY" icon, you can access the page of the respective product listing on eBay.
Each of the products from your X-Cart store that is exported to eBay gets a unique eBay item ID. Once a product has been successfully exported to eBay, its eBay item ID is passed to X-Cart and stored in the eBay item ID field on the product details page in X-Cart Admin (in the eBay product options section). Below this field a link is provided that allows you to access the page of the respective listing on eBay (See the line that says "Current Item"):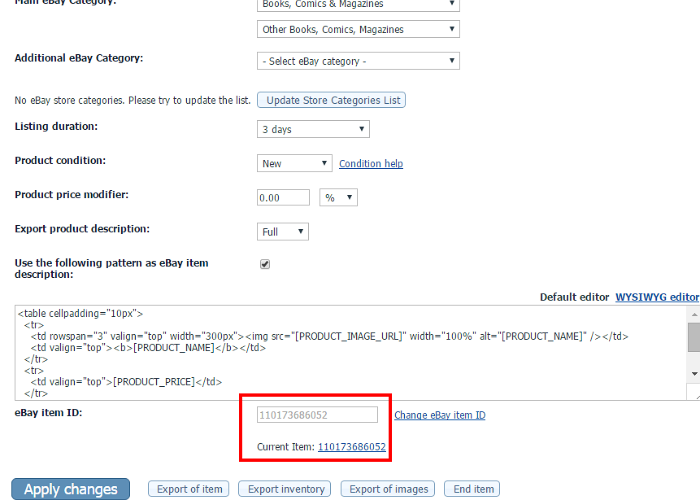
After a product has been published on eBay, you may need to change the information of the respective eBay listing. For example, you may need to update the product quantity, the product description or the product images. In this case you need to export to eBay the product information that needs to be updated. It is possible to export the entire item or just some of the information (inventory or images). The scope of export is determined by the eBay export options:
- Export of item allows to export the entire scope of product information;
- Export inventory allows to export only the product inventory information;
- Export of images allows to export just the product images.
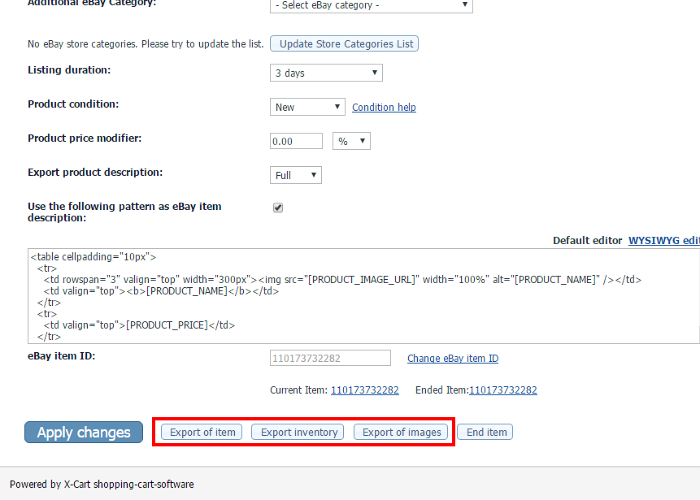
There may be times when you need to change a product's eBay item ID - that is when you need to associate a product in X-Cart with a different eBay listing. The eBay item ID field is edit protected to prevent the product owner from changing the ID accidentally. To change the eBay item ID, use the Change eBay item ID link located on the right-hand side of the eBay item ID field: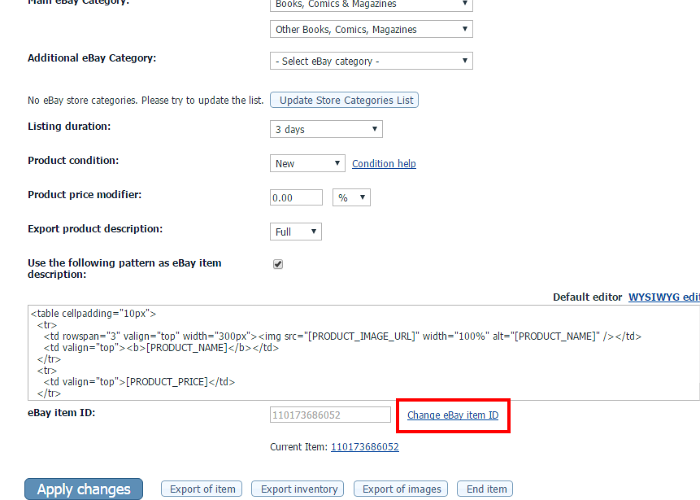
Clicking on this link will make the field editable; you will be able to enter a new eBay item ID and save the changes using the Apply changes button.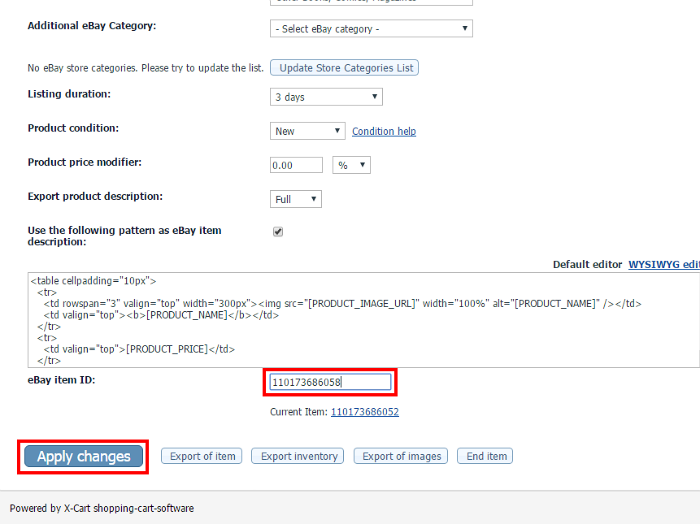
To end a product listing on eBay before it expires naturally, use the End item eBay export option.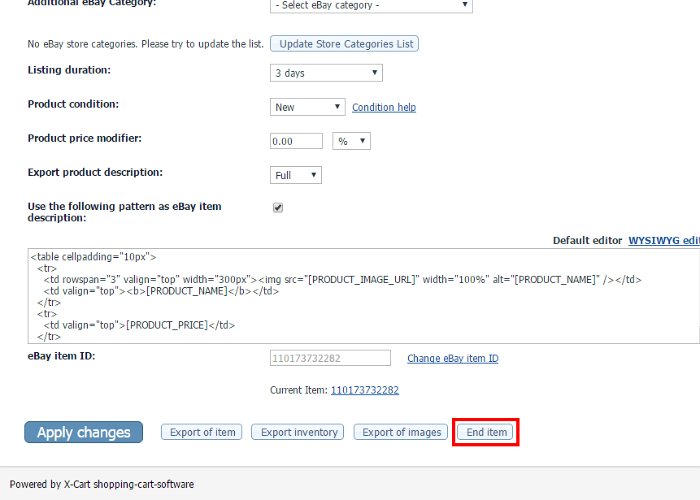
Once the item has been ended, a note thereof will be added to the product information: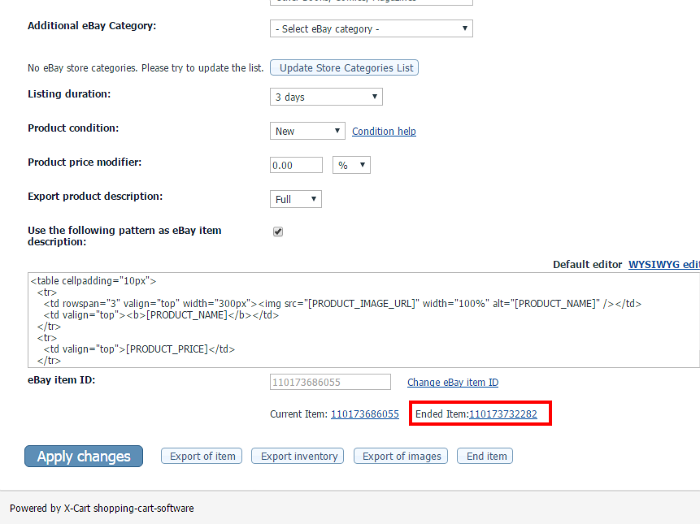
Importing orders from eBay
Orders from eBay can be managed inside your X-Cart store. For that, you will need to import orders created on eBay into X-Cart:
- In the Orders menu, select the Upload eBay orders item.
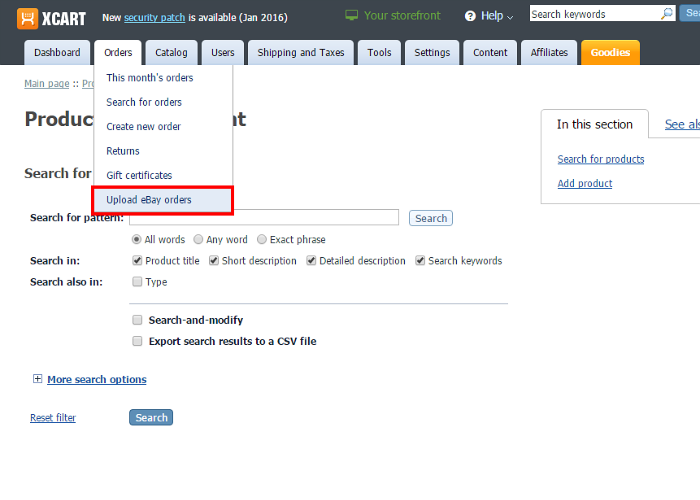
The Upload eBay orders page opens.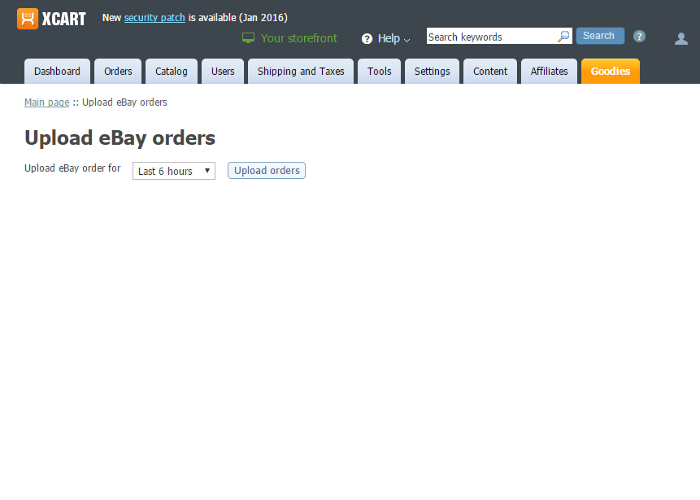
- From the Upload eBay order for drop-down box, select the period for which you would like to import orders.
- Click the Upload orders button to launch the upload process.
While the upload is in progress, you may see a page like the following: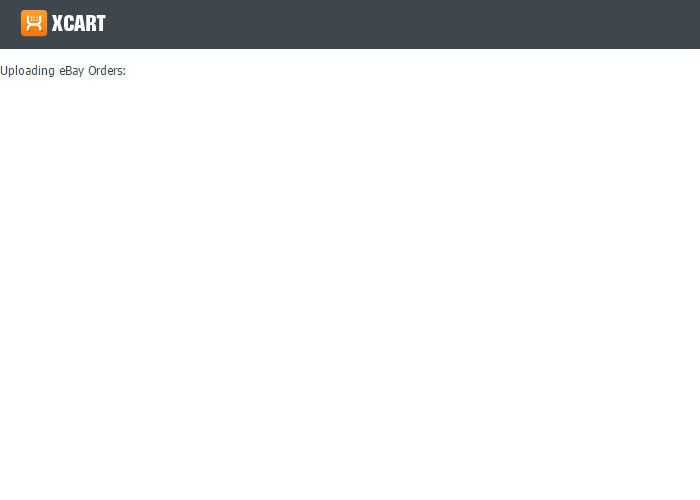
If you've had any orders on eBay during the specified period, in a few moments you should get a list of eBay orders uploaded to your X-Cart store. For example, on our demo installation, we had just one order from eBay during the past 6 hours, so the list of uploaded orders contains only one item: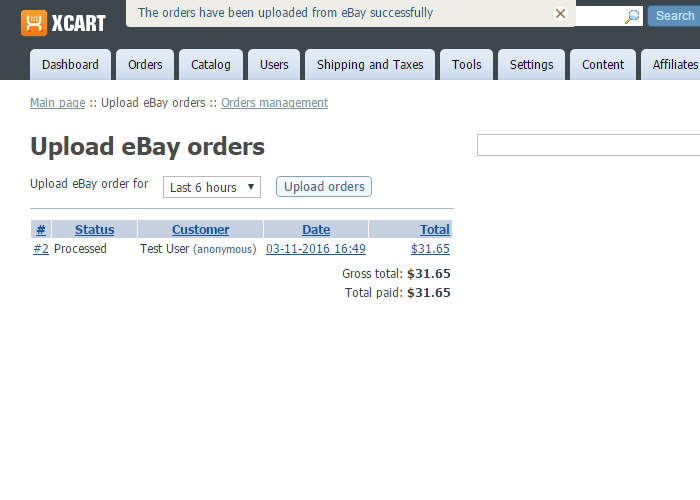
In your X-Cart store's general list of orders, orders created on eBay are marked with the "EBAY" icon so you can easily tell them from the rest of the orders in your store.![]()
