Difference between revisions of "X-Cart:Stop List"
(Created page with '== What Stop List module does == <u>Stop List</u> module can help you to protect your store from an external attack involving usage of stolen credit cards. It allows you to crea…') |
|||
| (5 intermediate revisions by one other user not shown) | |||
| Line 2: | Line 2: | ||
<u>Stop List</u> module can help you to protect your store from an external attack involving usage of stolen credit cards. It allows you to create a list of IP addresses supposedly used by holders of stolen credit cards. Customers using IP addresses stored in the Stop List are blocked on the Checkout page. | <u>Stop List</u> module can help you to protect your store from an external attack involving usage of stolen credit cards. It allows you to create a list of IP addresses supposedly used by holders of stolen credit cards. Customers using IP addresses stored in the Stop List are blocked on the Checkout page. | ||
| + | |||
| + | <u>Stop List</u> is available as a built-in module in all X-Cart editions. It does not require installation and can be enabled in the <u>Modules</u> section of X-Cart Admin area. | ||
== Roles in Stop List module management == | == Roles in Stop List module management == | ||
| − | If you are an X-Cart GOLD administrator/provider or an X-Cart PRO administrator: | + | If you are an X-Cart GOLD or GOLD PLUS administrator/provider or an X-Cart PLATINUM or PRO administrator: |
* You can enable/disable the module and adjust its configuration settings | * You can enable/disable the module and adjust its configuration settings | ||
| Line 25: | Line 27: | ||
==Using the Stop List== | ==Using the Stop List== | ||
| − | To access the '<u>Stop list</u>' section | + | To access the '<u>Stop list</u>' section (<u>Users</u> > <u>Stop List</u>). |
Before you add any IP addresses to the Stop list, it is empty. | Before you add any IP addresses to the Stop list, it is empty. | ||
| Line 34: | Line 36: | ||
# Click on '<u>Add IP address</u>' in the '<u>Stop list</u>' section menu. A dialog box titled '<u>Add IP address</u>' opens:<br><br>[[Image:add_ip_address.gif|649px]]<br><br> | # Click on '<u>Add IP address</u>' in the '<u>Stop list</u>' section menu. A dialog box titled '<u>Add IP address</u>' opens:<br><br>[[Image:add_ip_address.gif|649px]]<br><br> | ||
| − | # Enter the IP address into the provided form. | + | # Enter the IP address/IP address mask for the trusted IP range into the provided form. |
| + | # Select the status for the entered IP address or IP range (''Blocked'' or ''Trusted''). "Blocked" means that access to checkout from the specified IP address(es) will be denied. "Trusted" means that the IP address should be considered safe.<br />{{Note1|Please make sure you use the "Trusted" status only for the IP addresses you actually trust. The "Trusted" status of an IP address or IP range means that no further checks will be used for these IP addresses.}} | ||
# Click the '''Add''' button. | # Click the '''Add''' button. | ||
| Line 41: | Line 44: | ||
: [[Image:stop_list.gif|584px]] | : [[Image:stop_list.gif|584px]] | ||
| − | + | The REASON column displays the reason why this address was included into the Stop list. The DATE column shows when the address was included into the Stop list. More IP addresses can be added to the list at any time. | |
'''To remove one or more IP addresses from the Stop list, do the following:''' | '''To remove one or more IP addresses from the Stop list, do the following:''' | ||
| Line 58: | Line 61: | ||
: [[Image:lookup_addr.gif|609px]] | : [[Image:lookup_addr.gif|609px]] | ||
| − | The '<u>City</u>', '<u>State</u>', '<u>Country</u>' and '<u>Zip/Postal code</u>' fields in the '<u>Lookup address</u>' dialog show you the company address set under [ | + | The '<u>City</u>', '<u>State</u>', '<u>Country</u>' and '<u>Zip/Postal code</u>' fields in the '<u>Lookup address</u>' dialog show you the company address set under [https://www.x-cart.com/xcart_manual/online/company_options.htm General settings/Company options]. If necessary, you can enter a different address into these fields (for example, the address provided by the customer as his billing address). |
The '<u>IP</u>' field shows the IP address of your customer. Clicking on the '''Lookup address''' button allows you to get Antifraud service to find out the factual location of this IP address. The customer's address received from Antifraud service appears below the '<u>IP</u>' field. | The '<u>IP</u>' field shows the IP address of your customer. Clicking on the '''Lookup address''' button allows you to get Antifraud service to find out the factual location of this IP address. The customer's address received from Antifraud service appears below the '<u>IP</u>' field. | ||
Latest revision as of 17:47, 22 July 2020
Contents
What Stop List module does
Stop List module can help you to protect your store from an external attack involving usage of stolen credit cards. It allows you to create a list of IP addresses supposedly used by holders of stolen credit cards. Customers using IP addresses stored in the Stop List are blocked on the Checkout page.
Stop List is available as a built-in module in all X-Cart editions. It does not require installation and can be enabled in the Modules section of X-Cart Admin area.
Roles in Stop List module management
If you are an X-Cart GOLD or GOLD PLUS administrator/provider or an X-Cart PLATINUM or PRO administrator:
- You can enable/disable the module and adjust its configuration settings
- You can add IP addresses to your store's Stop list and remove IP addresses from the Stop list
Enabling and Configuring 'Stop List'
To begin using the module:
- Enable Stop List module (Administration menu->Modules).
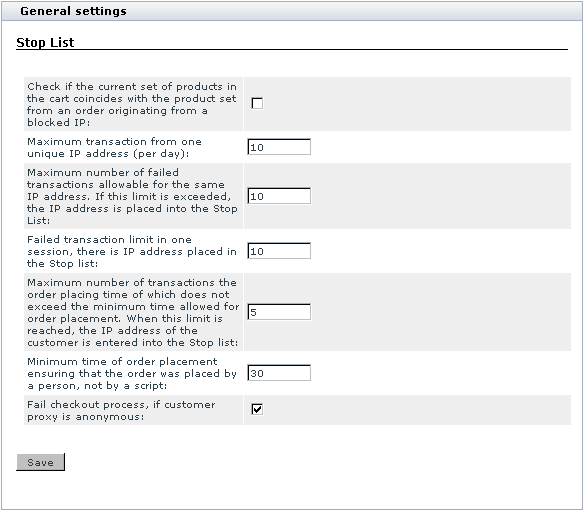
- Adjust the module settings via General settings/Modules options->Stop List options:
Using the Stop List
To access the 'Stop list' section (Users > Stop List).
Before you add any IP addresses to the Stop list, it is empty.
To add an IP address to the Stop list, do the following:
- Click on 'Add IP address' in the 'Stop list' section menu. A dialog box titled 'Add IP address' opens:

- Enter the IP address/IP address mask for the trusted IP range into the provided form.
- Select the status for the entered IP address or IP range (Blocked or Trusted). "Blocked" means that access to checkout from the specified IP address(es) will be denied. "Trusted" means that the IP address should be considered safe.Please make sure you use the "Trusted" status only for the IP addresses you actually trust. The "Trusted" status of an IP address or IP range means that no further checks will be used for these IP addresses.
- Click the Add button.
When you click on Add, the IP address is added to the Stop list:
The REASON column displays the reason why this address was included into the Stop list. The DATE column shows when the address was included into the Stop list. More IP addresses can be added to the list at any time.
To remove one or more IP addresses from the Stop list, do the following:
- In the Stop list, select the check boxes next to the IP addresses that need to be removed. You can select or unselect all the check boxes by clicking on the Check all / Uncheck all links.
- Click the Delete selected button.
When you click on Delete selected, the selected IP addresses are removed from the list.
If Antifraud module is activated, DETAILS column appears in the 'Stop list':
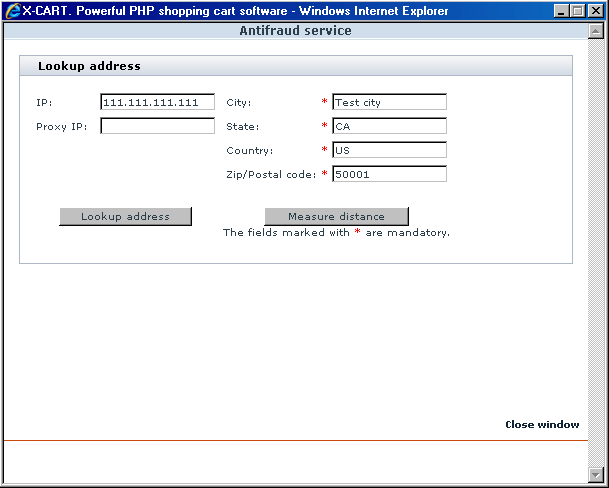
Clicking the '>>' link in the DETAILS column opens a new window containing the 'Lookup address' dialog that allows you to find out information about the IP address (City, State, Country, Postal code) from Antifraud service.
The 'City', 'State', 'Country' and 'Zip/Postal code' fields in the 'Lookup address' dialog show you the company address set under General settings/Company options. If necessary, you can enter a different address into these fields (for example, the address provided by the customer as his billing address).
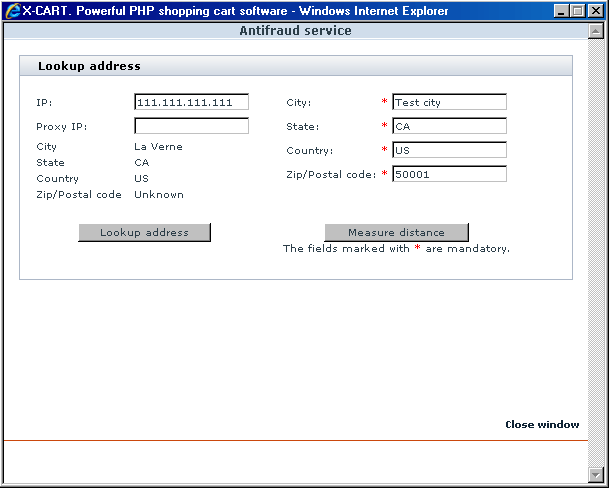
The 'IP' field shows the IP address of your customer. Clicking on the Lookup address button allows you to get Antifraud service to find out the factual location of this IP address. The customer's address received from Antifraud service appears below the 'IP' field.
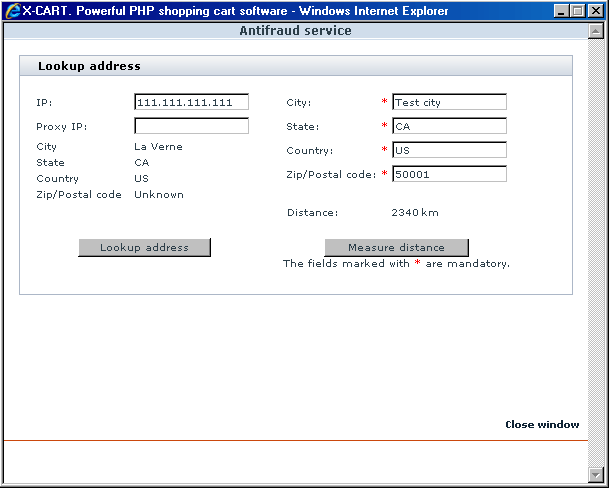
Clicking on Measure distance allows you to get information about the distance between the location of the IP address of your customer and your company address (or any other known address, specified in the right side of the form).


