Difference between revisions of "X-Cart:Managing User Profiles"
(Created page with '== Finding user profiles == You can search for users registered with your store. Once you have found a user, you can modify or suppress his account. '''Basic search''' 1. Clic…') |
m (→How do I change or reset my admin password? (I lost it)) |
||
| (21 intermediate revisions by 7 users not shown) | |||
| Line 8: | Line 8: | ||
| − | [[Image:search_users.gif | + | : [[Image:search_users.gif|565px]] |
| Line 27: | Line 27: | ||
| − | [[Image:advanced_user_search.gif | + | : [[Image:advanced_user_search.gif|595px]] |
It is not necessary to fill out all the fields in the <u>'More search options</u>' section. Specify only the parameters relevant to your search. The more information you provide about the user, the more accurate the search results will be. | It is not necessary to fill out all the fields in the <u>'More search options</u>' section. Specify only the parameters relevant to your search. The more information you provide about the user, the more accurate the search results will be. | ||
| − | 1.You can specify user type by selecting the appropriate | + | 1.You can specify [[X-Cart:Types_of_User_Accounts | user type]], as well as [[X-Cart:User_Memberships | user membership]], by selecting the appropriate option from the '<u>Search for user type</u>' drop-down list: |
* All (users belonging to all user types will be found) | * All (users belonging to all user types will be found) | ||
| Line 40: | Line 40: | ||
: - Pending membership (all administrators signed up for a different membership level will be found) | : - Pending membership (all administrators signed up for a different membership level will be found) | ||
| − | : - Fulfillment staff (all fulfillment staff administrators will be found) | + | : - [[X-Cart:User_Memberships | Fulfillment staff]] (all fulfillment staff administrators will be found) |
* Provider (all providers will be found) | * Provider (all providers will be found) | ||
| Line 46: | Line 46: | ||
: - Pending membership (all providers signed up for a different membership level will be found) | : - Pending membership (all providers signed up for a different membership level will be found) | ||
| − | : - Root provider (all root providers will be found) | + | : - [[X-Cart:User_Memberships | Root provider]] (all root providers will be found) |
* Customer (all customers will be found) | * Customer (all customers will be found) | ||
| Line 52: | Line 52: | ||
: - Pending membership (all customers signed up for a different membership level will be found) | : - Pending membership (all customers signed up for a different membership level will be found) | ||
| − | : - Premium (all customers with premium membership level will be found) | + | : - [[X-Cart:User_Memberships | Premium]] (all customers with premium membership level will be found) |
| − | : - Wholesale (all customers with wholesale membership level will be found) | + | : - [[X-Cart:User_Memberships | Wholesale]] (all customers with wholesale membership level will be found) |
* Partner (all partners will be found) | * Partner (all partners will be found) | ||
| Line 77: | Line 77: | ||
| − | [[Image:search_results.gif | + | : [[Image:search_results.gif|626px]] |
| Line 116: | Line 116: | ||
'<u>Signup for membership</u>' box shows the membership level the user wishes to get. (Customers can sign up for a more privileged membership level through the '<u>Profile details</u>' form at the time of registration or at any other time when they choose to modify their profile. If a customer signs up for some membership level, it will not be granted to him automatically. First, the desired level will appear in the customer's <u>'Profile details</u>' form for the administrator to see. The administrator then will decide if he should approve this customer for the new level or not). To grant a new level to a user, select this level from the '<u>Membership</u>' drop-down box. | '<u>Signup for membership</u>' box shows the membership level the user wishes to get. (Customers can sign up for a more privileged membership level through the '<u>Profile details</u>' form at the time of registration or at any other time when they choose to modify their profile. If a customer signs up for some membership level, it will not be granted to him automatically. First, the desired level will appear in the customer's <u>'Profile details</u>' form for the administrator to see. The administrator then will decide if he should approve this customer for the new level or not). To grant a new level to a user, select this level from the '<u>Membership</u>' drop-down box. | ||
| − | {{Note1|Note (for users of X-Cart PRO only): When modifying a provider profile, you can add or edit the Seller address for this provider. See [[X-Cart: | + | {{Note1|Note (for users of X-Cart PRO only): When modifying a provider profile, you can add or edit the Seller address for this provider. See [[X-Cart:Defining_a_Provider's_Seller_Address_(X-Cart_PRO)| Defining a Provider's Seller Address]].}} |
4. Click the '''Save''' button. | 4. Click the '''Save''' button. | ||
| Line 133: | Line 133: | ||
| − | [[Image:delete_profile.gif | + | : [[Image:delete_profile.gif|568px]] |
| Line 146: | Line 146: | ||
# In the '<u>Search results</u>' dialog box, select the user profiles you wish to export (Select the respective check boxes). | # In the '<u>Search results</u>' dialog box, select the user profiles you wish to export (Select the respective check boxes). | ||
# Click the '''Export selected''' button. This opens your store's 'Export data' section. | # Click the '''Export selected''' button. This opens your store's 'Export data' section. | ||
| − | # Use the '<u>Export data</u>' section to export the user profiles (See [[X-Cart: | + | # Use the '<u>Export data</u>' section to export the user profiles (See [[X-Cart:Importing_and_Exporting_Data#Exporting_Data | Exporting Data]]). |
To export all the found user profiles from the search results to a CSV file: | To export all the found user profiles from the search results to a CSV file: | ||
# In the '<u>Search results</u>' dialog box, click the Export all found button. This opens your store's 'Export data' section. | # In the '<u>Search results</u>' dialog box, click the Export all found button. This opens your store's 'Export data' section. | ||
| − | # Use the '<u>Export data</u>' section to export the user profiles (See [[X-Cart: | + | # Use the '<u>Export data</u>' section to export the user profiles (See [[X-Cart:Importing_and_Exporting_Data#Exporting_Data | Exporting Data]]). |
| + | |||
| + | == Troubleshooting == | ||
| + | |||
| + | |||
| + | ===How do I change or reset my admin password? (I lost it)=== | ||
| + | |||
| + | {{X-Cart:How do I change or reset my admin password? (I lost it)}} | ||
| + | |||
| + | == See also == | ||
| + | * [[X-Cart:Types_of_User_Accounts | Types of User Accounts]] | ||
| + | * [[X-Cart:User_Memberships | User Memberships]] | ||
| + | |||
| + | [[Category:X-Cart user manual]] | ||
| + | |||
| + | [[Category:X-Cart user manual]] | ||
[[Category:X-Cart user manual]] | [[Category:X-Cart user manual]] | ||
Latest revision as of 12:45, 19 April 2013
Contents
Finding user profiles
You can search for users registered with your store. Once you have found a user, you can modify or suppress his account.
Basic search
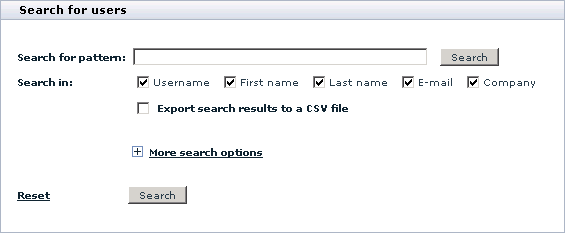
1. Click on Users in the Management menu. The search form will appear:
(If 'Users Management' section is already opened, you can click on Search for users link in the section menu to open the search form).
2. In the provided search form specify the necessary search parameters:
- Enter your pattern into the 'Search for pattern' field. A pattern is a fragment of the username, first name, last name, email or company by which the system will be able to identify the user.
- Specify where the system should search for this fragment by selecting 'Username', 'First Name', 'Last Name', 'email' and/or 'Company' check box(es).
- If you wish to immediately export the search results to a CSV file, select the 'Export search results to a CSV file' check box.
- If you want the system just to list all the users in the store, skip step 2.
3. Click on Search. The search results will be displayed in the 'Search results' form.
Advanced search
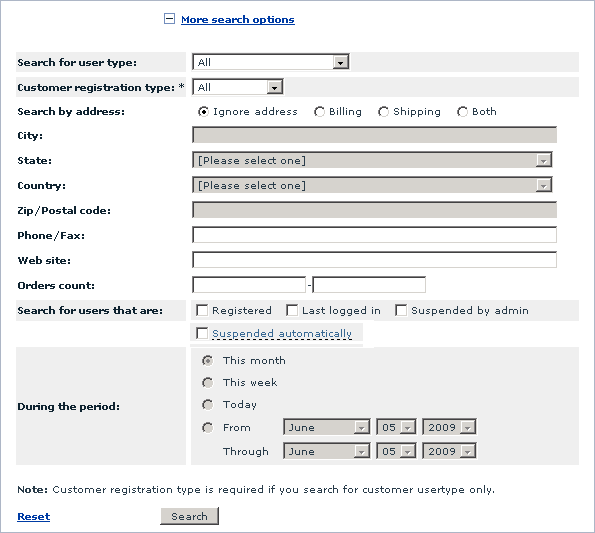
The section 'More search options' enables you to be more specific in setting the parameters for your search. To expand the 'More search options' section, click on the [+] More search options link.
It is not necessary to fill out all the fields in the 'More search options' section. Specify only the parameters relevant to your search. The more information you provide about the user, the more accurate the search results will be.
1.You can specify user type, as well as user membership, by selecting the appropriate option from the 'Search for user type' drop-down list:
- All (users belonging to all user types will be found)
- Pending membership (all users whose signup for membership and actual membership are different will be found)
- Administrator (all administrators will be found)
- - Pending membership (all administrators signed up for a different membership level will be found)
- - Fulfillment staff (all fulfillment staff administrators will be found)
- Provider (all providers will be found)
- - Pending membership (all providers signed up for a different membership level will be found)
- - Root provider (all root providers will be found)
- Customer (all customers will be found)
- - Pending membership (all customers signed up for a different membership level will be found)
- - Premium (all customers with premium membership level will be found)
- - Wholesale (all customers with wholesale membership level will be found)
- Partner (all partners will be found)
2. If you are searching for customer user type, select Customer registration type (All, Anonymous, Registered) from the drop-down list
3. In the 'Search by address' line select 'Billing', 'Shipping' or 'Both' if you want the user's address to be taken into consideration. Select 'Ignore address' if the address must be ignored.
4. If you have chosen to search by address, enter the user's address into the appropriate fields: specify the city by typing its name into the 'City' field, select the state and the country from the 'State' and 'Country' drop-down lists, enter the Postal/Zip code.
5. If known, enter the user's Phone/Fax number and Website address.
6. You can search for users who got registered, last logged in, suspended by the administrator or automatically during a certain period. Select 'Registered', 'Last logged in', 'Suspended by admin' or 'Suspended automatically', then specify the period (select 'This month', 'This week', 'Today' or 'From - Through' and set the dates)
7. Click the Search button.
Search results
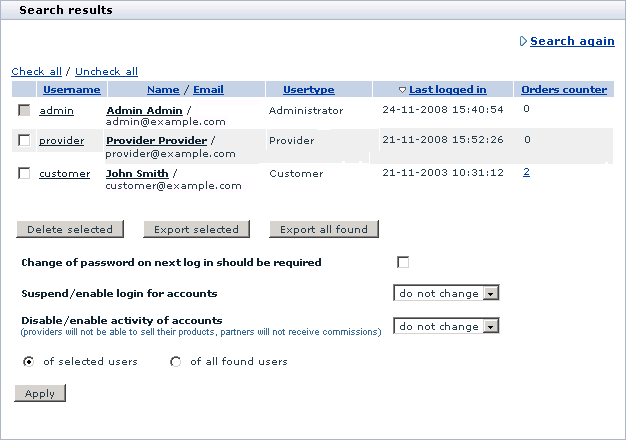
The search results are displayed in the 'Search results' form:
For each found user you can see his username, name, email address, user type, date and time of the last log in, the number of orders made.
The search results may be sorted by clicking on the column headers (for example, if you want the results list to be sorted according to the order of the users' last logins, click on the LAST LOGGED IN column header).
Clicking on the username or name link of a user allows you to modify his profile details.
The buttons below the list of found user profiles allow you to perform various operations on the found profiles: you can delete selected profiles, as well as export all or some of the found profiles to a CSV file. Use the Check all / Uncheck all links to select or unselect all the boxes.
Clicking on the Search again link takes you back to the 'Search form' and enables you to start a new search.
You can also select to perform the following actions:
- To require users to change their passwords: select 'Change of password on next log in should be required'.
- To suspend/enable login: select 'suspend' or 'enable' from the drop-down list. Select 'do not change' to keep everything as is.
- To disable/enable activity: select 'disable' or 'enable' from the drop-down list. If you disable activity, providers will not be able to sell their products, partners will not receive commissions. Select 'do not change' to keep everything as is.
Using the corresponding radio buttons, specify if the selected actions should be applied only to selected users or to all found users. Click the Apply button.
Page navigation
Pagination is provided for more convenient navigation in cases when the list of results delivered by the search engine is too long. The number of users per page and the maximum number of navigation pages can be defined through the Settings menu of the Admin area ('Users per page (admin)' and 'Maximum navigation pages' in General Settings->Appearance Options).
Modifying user profiles
Any user can modify his own profile information. The shop administrator can modify the profile information of any user, including his password and membership information. Only the administrator can set the membership option.
1. Find the user profile you wish to modify.
2. In the 'Search results' form click on the username or name link of the user. The 'Profile details' form will be opened containing the user's personal information, billing/shipping addresses, contact information and username & password information.
3. Edit the profile information.
'Signup for membership' box shows the membership level the user wishes to get. (Customers can sign up for a more privileged membership level through the 'Profile details' form at the time of registration or at any other time when they choose to modify their profile. If a customer signs up for some membership level, it will not be granted to him automatically. First, the desired level will appear in the customer's 'Profile details' form for the administrator to see. The administrator then will decide if he should approve this customer for the new level or not). To grant a new level to a user, select this level from the 'Membership' drop-down box.
4. Click the Save button.
To return to the list of user profiles, click Go to users lists link in the top right corner of the 'Profile details' dialog.
Deleting user profiles
Every user can delete his own profile. The administrator can delete any profile.
To delete one or more user profiles:
- Find the user profiles that need to be deleted.
- In the 'Search results' form, select the check boxes next to these user profiles.
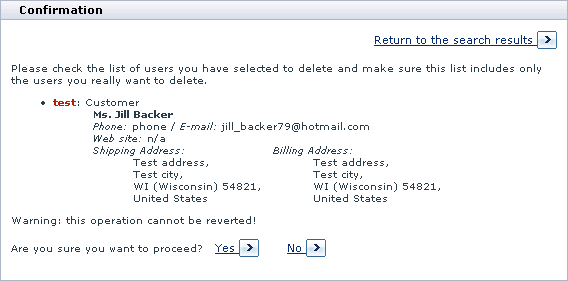
- Click the Delete selected button. When prompted, confirm the deletion.
After you confirm the deletion, the selected user profiles are removed.
Exporting user profiles
You can export some or all of the user profiles from the search results to a CSV file.
To export specific user profiles from the search results to a CSV file:
- In the 'Search results' dialog box, select the user profiles you wish to export (Select the respective check boxes).
- Click the Export selected button. This opens your store's 'Export data' section.
- Use the 'Export data' section to export the user profiles (See Exporting Data).
To export all the found user profiles from the search results to a CSV file:
- In the 'Search results' dialog box, click the Export all found button. This opens your store's 'Export data' section.
- Use the 'Export data' section to export the user profiles (See Exporting Data).
Troubleshooting
How do I change or reset my admin password? (I lost it)
If you happen to have another admin account, use this account to reset your lost password:
- Log in to your store's admin area using a working admin account.
- Open for editing the profile of the admin user whose password was lost.
- Change the password as needed.
Alternatively, if you remember your admin username/admin email address, you can use X-Cart's reset password functionality:
- In Admin area, go to the Password Recovery page:
- On the Admin area home page (httр://<YOUR_XCART_DOMAIN>/admin/home.php), click the "Forgot password?" link.
OR - Enter the following address in your browser's address bar: httр://<YOUR_XCART_DOMAIN>/admin/help.php?section=Password_Recovery.
- On the Admin area home page (httр://<YOUR_XCART_DOMAIN>/admin/home.php), click the "Forgot password?" link.
- Enter your admin username or email address and click Submit. An email message with a password reset link will be mailed to your admin email address.
- Use the password reset link to rest your password.
If for some reason the above methods do not work for you (for example, you lost access to you admin email box), there's still hope. You can create a temporary admin account and use it to regain access to your store's Admin area. As soon as you are logged in as admin, you will be able to either reset the password (and, if necessary, the email address) for the admin user whose password was lost or to get rid of that admin user account making the temporary admin account your permanent one.
Here's how you can create a temporary admin account:
X-Cart versions 4.5.4 and earlier:
Decide on the username and password you would like to use for your temporary admin account; for example, mytempadmin/mytempadmin. Open your phpMyAdmin (supplied by your hosting company), click the "SQL" tab and run the following query using the username and password you thought up:
X-Cart GOLD or GOLD PLUS edition
DELETE FROM xcart_customers WHERE login = 'mytempadmin';
INSERT INTO xcart_customers (login, password, usertype)
VALUES ('mytempadmin', 'mytempadmin', 'P');
X-Cart PLATINUM or PRO edition
DELETE FROM xcart_customers WHERE login = 'mytempadmin';
INSERT INTO xcart_customers (login, password, usertype)
VALUES ('mytempadmin', 'mytempadmin', 'A');
You should now be able to log in using the following details:
- Username: mytempadmin
- Password: mytempadmin
On X-Cart versions 4.4.0 and later, an attempt to log in using the above method may cause an error:
- Email address is invalid! Please correct
This error occurs in stores using the 'Email as login' user authentication mode. If you got this error, replace the username in the above query statement with your valid email address and re-run the query. For example, if your email address is mytempadmin@example.com, use the following (the below example is for GOLD/GOLD PLUS):
DELETE FROM xcart_customers WHERE login = 'mytempadmin@example.com';
INSERT INTO xcart_customers (login, password, usertype)
VALUES ('mytempadmin@example.com', 'mytempadmin', 'P');
After that you should be able to log in using the following credentials:
- Email: mytempadmin@example.com
- Password: mytempadmin
X-Cart versions 4.5.5 and later:
Decide on the login you would like to use for your temporary admin account. We recommend using your email address, as this works well both for stores with the 'Username as login' user authentication mode and stores with the 'Email as login' user authentication mode. Let's say you are going to use 'mytempadmin@example.com' as your admin login. You do not need to worry about creating a good password just now, it is not really important as you will have to change it before you can actually log in; for the sake of example, we'll use 'mytempadmin' as the password.
Open your phpMyAdmin (supplied by your hosting company), click the "SQL" tab and run the following query:
X-Cart GOLD or GOLD PLUS edition
DELETE FROM xcart_customers WHERE login = 'mytempadmin@example.com';
INSERT INTO xcart_customers (login, password, usertype, email)
VALUES ('mytempadmin@example.com', 'mytempadmin', 'P', 'mytempadmin@example.com');
X-Cart PLATINUM edition
DELETE FROM xcart_customers WHERE login = 'mytempadmin@example.com';
INSERT INTO xcart_customers (login, password, usertype, email)
VALUES ('mytempadmin@example.com', 'mytempadmin', 'A', 'mytempadmin@example.com');
In Admin area, go to the Password Recovery page:
- On the Admin area home page (httр://<YOUR_XCART_DOMAIN>/admin/home.php), click the "Forgot password?" link.
OR - Enter the following address in your browser's address bar: httр://<YOUR_XCART_DOMAIN>/admin/help.php?section=Password_Recovery.
Request change of password for the temporary admin account you just created: On the Password Recovery page, enter the email address you used for your temporary admin account and click Submit. An email message with a password reset link is mailed to your admin email address.
Use the password reset link provided in the email message to reset your password. Before saving the new password, be sure to disable the admin profiles' authenticity check for the xcart_customers table by setting the value of the constant CHECK_CUSTOMERS_INTEGRITY in your store's main configuration file config.php to FALSE (Without disabling this check you will not be able to save the new password). After resetting the password, restore the value of CHECK_CUSTOMERS_INTEGRITY in config.php to TRUE.
Now you should be able to log in to your store's Admin area using your new password.
If you find it difficult to do it yourself - feel free to request our support team for assistance via your personal Helpdesk.


