Difference between revisions of "X-Cart:Extra Fields"
(→Editing extra fields) |
m (→Adding Extra Fields) |
||
| (8 intermediate revisions by 2 users not shown) | |||
| Line 1: | Line 1: | ||
== What Extra Fields module does == | == What Extra Fields module does == | ||
| − | + | <u>Extra Fields</u> is a built-in X-Cart module that allows you to add custom fields to X-Cart's '<u>Product details</u>' form. For example, the module can be used to add '<u>Author</u>' or '<u>ISBN</u>' fields to a product that is a book: | |
| − | + | : [[Image:extra_field1.gif|center]] | |
| − | |||
| − | : [[Image:extra_field1.gif| | ||
X-Cart supports product search by extra fields both in the Customer area and in the store's back end, so putting information by which a product is likely to be searched for in extra fields can facilitate finding products. | X-Cart supports product search by extra fields both in the Customer area and in the store's back end, so putting information by which a product is likely to be searched for in extra fields can facilitate finding products. | ||
| Line 12: | Line 10: | ||
If a customer selects such a check box, search will also be conducted | If a customer selects such a check box, search will also be conducted | ||
| + | |||
| + | <u>Extra Fields</u> is available as a built-in module in all X-Cart editions. | ||
== Roles in Extra Fields module management == | == Roles in Extra Fields module management == | ||
| − | If you are an X-Cart GOLD administrator/provider: | + | ''If you are an X-Cart GOLD or GOLD PLUS administrator/provider:'' |
| − | * You can enable/disable <u>Extra Fields</u> module and adjust its configuration settings (See [[#Enabling and Configuring 'Extra Fields']]). | + | * You can enable/disable <u>Extra Fields</u> module and adjust its configuration settings (See [[#Enabling and Configuring 'Extra Fields' | Enabling and Configuring 'Extra Fields']]). |
| − | * You can create extra fields and define their values for any products in the store (See [[#Assigning Values to Extra Fields]]). | + | * You can create extra fields and define their values for any products in the store (See [[#Assigning Values to Extra Fields | Assigning Values to Extra Fields]]). |
| − | * You can edit and delete any extra fields (See [[#Managing Extra Fields]]). | + | * You can edit and delete any extra fields (See [[#Managing Extra Fields | Managing Extra Fields]]). |
| − | * You can define which extra fields need to be included into the product search form (See [[#Enabling Search by Extra Fields]]). | + | * You can define which extra fields need to be included into the product search form (See [[#Enabling Search by Extra Fields | Enabling Search by Extra Fields]]). |
| − | If you are an X-Cart PRO administrator: | + | ''If you are an X-Cart PLATINUM or PRO administrator:'' |
| − | * You can enable/disable <u>Extra Fields</u> module and adjust its configuration settings (See [[#Enabling and Configuring 'Extra Fields']]). | + | * You can enable/disable <u>Extra Fields</u> module and adjust its configuration settings (See [[#Enabling and Configuring 'Extra Fields' | Enabling and Configuring 'Extra Fields']]). |
| − | * You can define which of the extra fields created by the store providers need to be included into the product search form (See [[#Enabling Search by Extra Fields]]). | + | * You can define which of the extra fields created by the store providers need to be included into the product search form (See [[#Enabling Search by Extra Fields | Enabling Search by Extra Fields]]). |
* You can see the extra fields of any product in the store regardless of what provider the product belongs to. | * You can see the extra fields of any product in the store regardless of what provider the product belongs to. | ||
| − | If you are an X-Cart PRO provider: | + | ''If you are an X-Cart PLATINUM or PRO provider:'' |
| + | |||
| + | * You can create extra fields for your products (See [[#Adding Extra Fields | Adding Extra Fields]]). | ||
| + | * You can define values for the extra fields that you created (Study [[#Assigning Values to Extra Fields | Assigning Values to Extra Fields]]). | ||
| + | * You can view, edit and delete the extra fields that you created (See [[#Managing Extra Fields | Managing Extra Fields]]). | ||
| − | + | {{XC_4.4}} | |
| − | |||
| − | |||
==Enabling and Configuring 'Extra Fields'== | ==Enabling and Configuring 'Extra Fields'== | ||
| Line 38: | Line 40: | ||
To begin using the module: | To begin using the module: | ||
| − | # Enable <u>Extra Fields</u> module (<u> | + | # Enable <u>Extra Fields</u> module (<u>Settings->Modules</u>). |
| − | # If you | + | # If you are enabling the module in a PLATINUM- or PRO-based X-Cart store shared by multiple providers, adjust the maximum number of extra fields each provider will be able to define (<u>General settings/Modules->Extra fields</u>): |
| − | : [[Image:extrafields_opts1.gif| | + | : [[Image:extrafields_opts1.gif|center|border]] |
Click the '''Save''' button. | Click the '''Save''' button. | ||
| Line 54: | Line 56: | ||
1. Go to the '<u>Extra fields</u>' section of the store's back end (<u>Catalog->Extra fields</u>). You should see a dialog box titled '<u>Extra fields</u>': | 1. Go to the '<u>Extra fields</u>' section of the store's back end (<u>Catalog->Extra fields</u>). You should see a dialog box titled '<u>Extra fields</u>': | ||
| − | : [[Image:extra_field0.gif| | + | : [[Image:extra_field0.gif|center|border]] |
2. Use the '<u>Add extra field</u>' subsection of the '<u>Extra fields</u>' dialog box to provide the details of the new extra field: | 2. Use the '<u>Add extra field</u>' subsection of the '<u>Extra fields</u>' dialog box to provide the details of the new extra field: | ||
| Line 62: | Line 64: | ||
* '''DEFAULT VALUE''' - Value that will appear in the extra field by default; will not be visible to customers unless saved by administrator or provider as the value of the extra field in the 'Product details' form. Completion of the DEFAULT VALUE field is optional. | * '''DEFAULT VALUE''' - Value that will appear in the extra field by default; will not be visible to customers unless saved by administrator or provider as the value of the extra field in the 'Product details' form. Completion of the DEFAULT VALUE field is optional. | ||
* '''SHOW''' - Check box defining the extra field's availability to customers (Selecting the check box makes the extra field visible in the Customer area. Unselecting the check box hides the extra field from the Customer area, but leaves it available for editing in the store's back end). | * '''SHOW''' - Check box defining the extra field's availability to customers (Selecting the check box makes the extra field visible in the Customer area. Unselecting the check box hides the extra field from the Customer area, but leaves it available for editing in the store's back end). | ||
| − | * '''ORDERBY''' - Numeric value defining the position of the extra field on the '<u>Product details</u>' page (In X-Cart PRO | + | * '''ORDERBY''' - Numeric value defining the position of the extra field on the '<u>Product details</u>' page (In X-Cart PLATINUM and PRO versions, the position is defined relative to the other extra fields of the same provider). |
3. Click the '''Add new''' button. The extra field should be added to the list of extra fields above. You should see an Information box with a confirmation message. | 3. Click the '''Add new''' button. The extra field should be added to the list of extra fields above. You should see an Information box with a confirmation message. | ||
| Line 76: | Line 78: | ||
1. Open the '<u>Extra fields</u>' dialog box containing a list of your extra fields: | 1. Open the '<u>Extra fields</u>' dialog box containing a list of your extra fields: | ||
| − | : [[Image:extra_field2.gif| | + | : [[Image:extra_field2.gif|center|border]] |
2. From the language selector in the top right-hand corner of the '<u>Extra fields</u>' dialog box, select the language in which you would like to add a field name. There will be a page refresh and you should see the language of the store's back end change to the language you selected. | 2. From the language selector in the top right-hand corner of the '<u>Extra fields</u>' dialog box, select the language in which you would like to add a field name. There will be a page refresh and you should see the language of the store's back end change to the language you selected. | ||
| Line 109: | Line 111: | ||
To delete one or more extra fields: | To delete one or more extra fields: | ||
| − | # In the '<u>Extra fields</u>' section of the store's back end (<u> | + | # In the '<u>Extra fields</u>' section of the store's back end (<u>Catalog->Extra fields</u>), find the field(s) you wish to delete. |
# Select the check boxes next to their names. | # Select the check boxes next to their names. | ||
# Click the '''Delete selected''' button. The field(s) should be removed from the list. You should see an Information box with a confirmation message. | # Click the '''Delete selected''' button. The field(s) should be removed from the list. You should see an Information box with a confirmation message. | ||
Latest revision as of 11:52, 15 October 2012
Contents
What Extra Fields module does
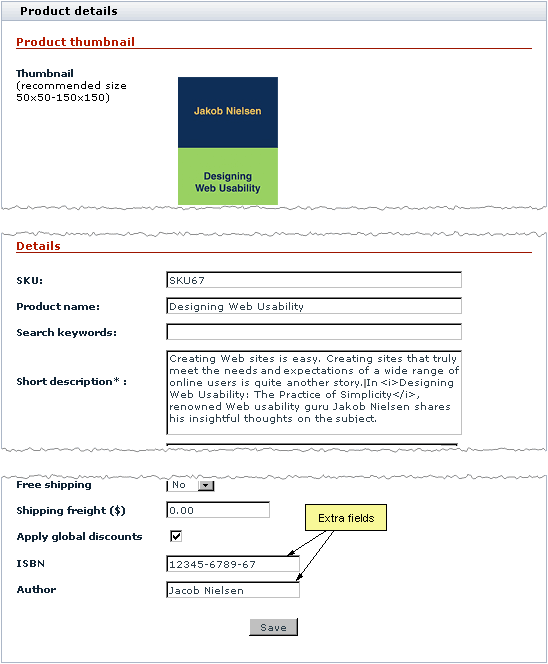
Extra Fields is a built-in X-Cart module that allows you to add custom fields to X-Cart's 'Product details' form. For example, the module can be used to add 'Author' or 'ISBN' fields to a product that is a book:
X-Cart supports product search by extra fields both in the Customer area and in the store's back end, so putting information by which a product is likely to be searched for in extra fields can facilitate finding products.
To enable search by extra fields in the Customer area, go to Settings -> General settings -> Product search options and enable search by the required fields. Check boxes "Search also in: %EXTRA_FIELD_NAME%" appear in the Customer area.
If a customer selects such a check box, search will also be conducted
Extra Fields is available as a built-in module in all X-Cart editions.
Roles in Extra Fields module management
If you are an X-Cart GOLD or GOLD PLUS administrator/provider:
- You can enable/disable Extra Fields module and adjust its configuration settings (See Enabling and Configuring 'Extra Fields').
- You can create extra fields and define their values for any products in the store (See Assigning Values to Extra Fields).
- You can edit and delete any extra fields (See Managing Extra Fields).
- You can define which extra fields need to be included into the product search form (See Enabling Search by Extra Fields).
If you are an X-Cart PLATINUM or PRO administrator:
- You can enable/disable Extra Fields module and adjust its configuration settings (See Enabling and Configuring 'Extra Fields').
- You can define which of the extra fields created by the store providers need to be included into the product search form (See Enabling Search by Extra Fields).
- You can see the extra fields of any product in the store regardless of what provider the product belongs to.
If you are an X-Cart PLATINUM or PRO provider:
- You can create extra fields for your products (See Adding Extra Fields).
- You can define values for the extra fields that you created (Study Assigning Values to Extra Fields).
- You can view, edit and delete the extra fields that you created (See Managing Extra Fields).
Enabling and Configuring 'Extra Fields'
To begin using the module:
- Enable Extra Fields module (Settings->Modules).
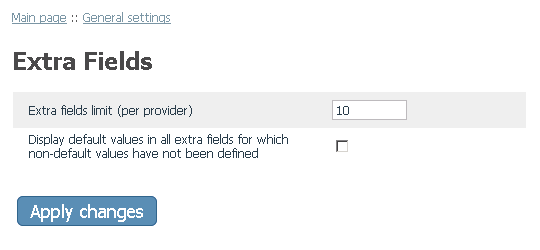
- If you are enabling the module in a PLATINUM- or PRO-based X-Cart store shared by multiple providers, adjust the maximum number of extra fields each provider will be able to define (General settings/Modules->Extra fields):
Click the Save button.
Adding Extra Fields
Creating extra fields
To add an extra field:
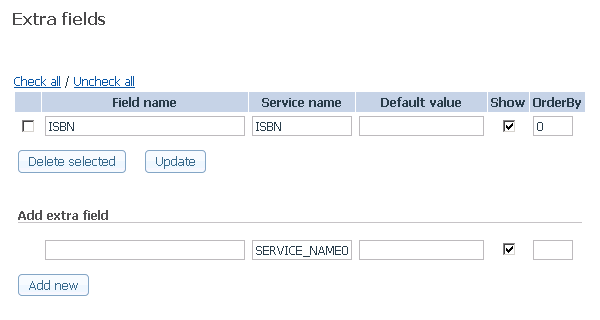
1. Go to the 'Extra fields' section of the store's back end (Catalog->Extra fields). You should see a dialog box titled 'Extra fields':
2. Use the 'Add extra field' subsection of the 'Extra fields' dialog box to provide the details of the new extra field:
- FIELD NAME - Name of the extra field as it will appear in the store interface (both in the store's back end and in the Customer area).
- SERVICE NAME - Unique name by which the application will be able to identify the extra field. This value will not appear anywhere in the store interface and will be the same for all the store languages.
- DEFAULT VALUE - Value that will appear in the extra field by default; will not be visible to customers unless saved by administrator or provider as the value of the extra field in the 'Product details' form. Completion of the DEFAULT VALUE field is optional.
- SHOW - Check box defining the extra field's availability to customers (Selecting the check box makes the extra field visible in the Customer area. Unselecting the check box hides the extra field from the Customer area, but leaves it available for editing in the store's back end).
- ORDERBY - Numeric value defining the position of the extra field on the 'Product details' page (In X-Cart PLATINUM and PRO versions, the position is defined relative to the other extra fields of the same provider).
3. Click the Add new button. The extra field should be added to the list of extra fields above. You should see an Information box with a confirmation message.
Managing multilingual extra field names
If your store supports more than one languages, you need to provide names for your extra fields in all the languages supported by your store.
To add a name for an extra field in a language other than the default store language:
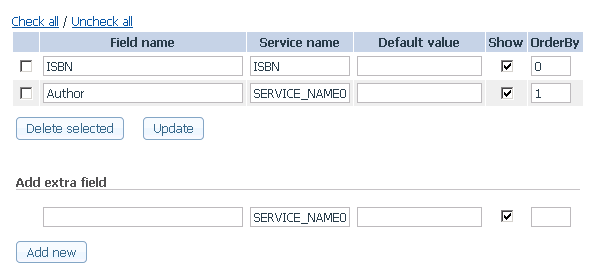
1. Open the 'Extra fields' dialog box containing a list of your extra fields:
2. From the language selector in the top right-hand corner of the 'Extra fields' dialog box, select the language in which you would like to add a field name. There will be a page refresh and you should see the language of the store's back end change to the language you selected.
3. Edit the names of the extra fields in the list replacing the values in the FIELD NAME column by field names in the selected language.
4. Click the Update button to save the changes. The new values should be applied. You should see an Information box with a confirmation message.
Assigning Values to Extra Fields
To assign a value to an extra field:
- Find the product for which you wish to define an extra field value and open the product for modification.
- On the 'Product details' page, find the necessary extra field.
- If the field is empty, simply enter the desired value into it. If the field contains a default value, either make sure the default value can be accepted for the field as is or replace it by the necessary value.
- Click the Save button. The field value will be saved, and you should be able to see it in the Customer area.
Managing Extra Fields
Editing extra fields
To edit a previously created extra field:
- In the 'Extra fields' section of the store's back end (Catalog->Extra fields), find the field that needs to be modified.
- Edit the necessary fields details (field name, service name, default value, availability status or position number).
- Click the Update button. The changes should be applied. You should see an Information box with a confirmation message.
Deleting extra fields
To delete one or more extra fields:
- In the 'Extra fields' section of the store's back end (Catalog->Extra fields), find the field(s) you wish to delete.
- Select the check boxes next to their names.
- Click the Delete selected button. The field(s) should be removed from the list. You should see an Information box with a confirmation message.
Enabling Search by Extra Fields
Users of an X-Cart based store can perform search by extra fields. However, newly created extra fields do not get included into the product search form automatically. To enable search by extra fields, the store administrator needs to enable these fields using the General settings->Product Search options section (see X-Cart:Product Search Options page for details).


