Difference between revisions of "X-Cart:Gift Registry"
m (→Installation) |
m (→Recipients List) |
||
| (3 intermediate revisions by the same user not shown) | |||
| Line 42: | Line 42: | ||
==Installation== | ==Installation== | ||
| − | Starting with X-Cart v4.4.0, X-GiftRegistry is available as a built-in module in all X-Cart editions. It does not require installation and can be enabled in the X-Cart Admin area. | + | Starting with X-Cart v4.4.0, X-GiftRegistry is available as a built-in module in all X-Cart editions. It does not require installation and can be enabled in the X-Cart Admin area. |
| − | For | + | For X-Cart versions 4.0.0-4.3.2 this module can be purchased and installed separately. The instructions below will guide you through the process of installing X-GiftRegistry in your store. |
| − | To install the module | + | To install the module: |
1. Download the module distributive from the <u>File area</u> of your {{QA}}. The file you need is named '''x-giftreg-x.y.z.tgz''', where x, y and z are the numbers of the module version (must be the same as the version of your X-Cart). | 1. Download the module distributive from the <u>File area</u> of your {{QA}}. The file you need is named '''x-giftreg-x.y.z.tgz''', where x, y and z are the numbers of the module version (must be the same as the version of your X-Cart). | ||
| Line 56: | Line 56: | ||
3. Run in the browser the installation script: '''http://www.yourhost.com/xcart_dir/install-xgiftreg.php''' | 3. Run in the browser the installation script: '''http://www.yourhost.com/xcart_dir/install-xgiftreg.php''' | ||
| − | 4. Enter your | + | 4. Enter your [[X-Cart:FAQs#What_is_Auth_code_and_where_can_I_find_it.3F|Auth code]], read the License Agreement and, if you accept the terms and conditions of the License Agreement, click the '''Next''' button. |
| − | |||
| − | |||
5. The installation script will copy the files and make all the necessary changes in the database. | 5. The installation script will copy the files and make all the necessary changes in the database. | ||
| Line 102: | Line 100: | ||
* '''Gift wrapping cost: '''enter the cost of gift wrap to be added to the order total. If any discounts are applied to the order, they do not apply to gift wrapping cost. | * '''Gift wrapping cost: '''enter the cost of gift wrap to be added to the order total. If any discounts are applied to the order, they do not apply to gift wrapping cost. | ||
* '''Apply taxes:''' select which taxes should be applied to gift wrapping cost, if any. This option is not available if no taxes are defined in the store. | * '''Apply taxes:''' select which taxes should be applied to gift wrapping cost, if any. This option is not available if no taxes are defined in the store. | ||
| − | * '''Sum up wrapping cost '''(X-Cart PRO | + | * '''Sum up wrapping cost '''(X-Cart PLATINUM and PRO, if single mode is not enabled): Select the check box to calculate the taxed cost of gift wrapping as a sum of separate taxed wrappings costs of each provider whose products are in the order. The final taxed wrapping cost will be displayed at checkout only, while separate provider-specific wrapping costs will be included into provider invoices. |
E.g., if the order contains products supplied by 4 providers, the final taxed wrapping cost will be calculated as follows: Final taxed wrapping cost = Taxed wrapping cost 1 + Taxed wrapping cost 2 + Taxed wrapping cost 3 + Taxed wrapping cost 4. | E.g., if the order contains products supplied by 4 providers, the final taxed wrapping cost will be calculated as follows: Final taxed wrapping cost = Taxed wrapping cost 1 + Taxed wrapping cost 2 + Taxed wrapping cost 3 + Taxed wrapping cost 4. | ||
Deselect the check box to calculate the taxed cost of gift wrapping as a fixed amount divided equally among all providers whose products are in the order. The single taxed wrapping cost will be displayed at checkout only, while separate provider invoices will contain the taxed wrapping cost divided into the number of providers. | Deselect the check box to calculate the taxed cost of gift wrapping as a fixed amount divided equally among all providers whose products are in the order. The single taxed wrapping cost will be displayed at checkout only, while separate provider invoices will contain the taxed wrapping cost divided into the number of providers. | ||
| Line 153: | Line 151: | ||
Recipients list can be filled in manually or imported through the corresponding interface (the feature can be disabled by administrator). The maximum amount of recipients in the list is limited by administrator. | Recipients list can be filled in manually or imported through the corresponding interface (the feature can be disabled by administrator). The maximum amount of recipients in the list is limited by administrator. | ||
| + | |||
| + | Please read [[X-Cart:Import-Export_Troubleshooting#.22During_CSV_import.2C_data_gets_truncated_after_special_characters_or_is_not_imported_at_all._.2F_Language_file_import_does_not_work_correctly..22|this important note]] on the charset of your import CSV file. | ||
[[Image:gr_img7.gif|533px]] | [[Image:gr_img7.gif|533px]] | ||
Latest revision as of 14:53, 6 August 2013
Contents
Overview
The module is intended for creating Gift Registries for different events (for instance a birthday, a wedding, etc). Gift Registries are a good tool for managing put off products (Wish list) and allow to:
- sort out products by event according to what products you'd like to buy for this or that occasion;
- inform your friends about your plans and wishes;
- keep track of products being bought
- This module supplements the Wish List and can’t be activated without activation of the Wish List. It increases the functionality of the Wish List with a number of new features. Namely, you get the ability to:
- create and manage 'events'. Each event has the following set of characteristics:
- status: public/private/disabled
- date of event
- title
- description shown to the guests in the events list of Search results and in the Wish List of the event
- HTML-card which is customized HTML content created by the author of the event ( for example, detailed info about place and time of an event) which is opened in a pop-up window when a guest visits event wish list
- create 'event wish lists' - sets of products you would like to be bought for a particular occasion (including Gift Certificates and configurations).
- control who may access event information and event wish lists.
- create 'recipients lists' - lists of names and e-mail addresses of event participants to whom notifications of the event and event wish list contents will be sent.
- edit and preview the e-mail notification content
- import/ export recipients list in CSV-format ( the option may be switched off in General settings/Gift Registry options)
- use guest books where visitors can leave messages regarding this or that event ( it may be disabled)
- move products between event wish lists and the main wish list ( any product may be added to the event wish list only through the main wish list)
- track the amount of purchased products in event wish list
Installation
Starting with X-Cart v4.4.0, X-GiftRegistry is available as a built-in module in all X-Cart editions. It does not require installation and can be enabled in the X-Cart Admin area.
For X-Cart versions 4.0.0-4.3.2 this module can be purchased and installed separately. The instructions below will guide you through the process of installing X-GiftRegistry in your store.
To install the module:
1. Download the module distributive from the File area of your X-Cart Account. The file you need is named x-giftreg-x.y.z.tgz, where x, y and z are the numbers of the module version (must be the same as the version of your X-Cart).
2. Uncompress the archive file x-giftreg-x.y.z.tgz and copy the resulting files to the directory where your X-Cart is installed. The file INSTALL.X-GIFTREG provides instructions for installing the module.
3. Run in the browser the installation script: http://www.yourhost.com/xcart_dir/install-xgiftreg.php
4. Enter your Auth code, read the License Agreement and, if you accept the terms and conditions of the License Agreement, click the Next button.
5. The installation script will copy the files and make all the necessary changes in the database.
Click on Next to proceed.
6. After the installation is completed, you will get a message informing you of the completion of the installation process.
Now you need to enable the module and configure it for work with your X-Cart based store.
Uninstalling
To uninstall X-GiftRegistry, do the following:
- Launch the Installation Wizard (Point your browser at the location of your store with the addition of /install-xgiftreg.php)
- At the first step of the Installation Wizard (Step 1: License agreement), select the 'Un-install the module' radio button.
- Click the Next button.
- The Installation Wizard will remove the module files and deactivate the module (Step 2: Uninstalling the module). Click Next to proceed.
- Step 3: Uninstallation complete is the final step of the uninstallation process. It notifies you that the module has been successfully uninstalled.
Enabling and configuring
Log in to the Admin area. Go to the ‘Modules’ section. Enable the module Gift Registry by selecting the checkbox next to it. Click on Update at the bottom of the page.
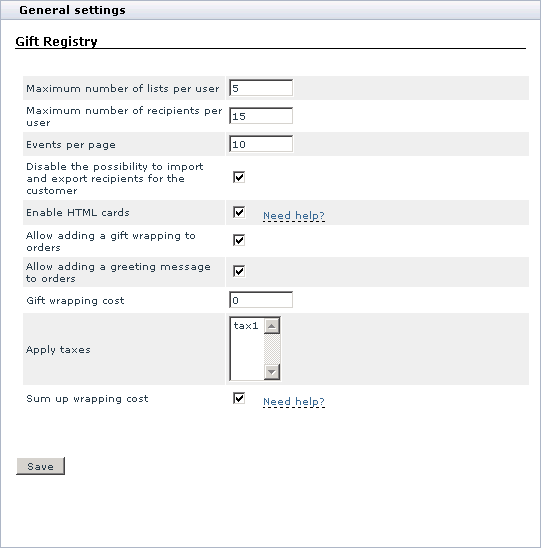
Go to the General settings/Gift registry options section and adjust the module settings:
- Maximum number of lists per user: the maximum amount of events that each user can determine. Default number is 5.
- Maximum number of recipients per user: the maximum amount of recipients for each event. Default number is 15.
- Events per page: an amount of events displayed on one page with results of search.
- Disable the possibility to import and export recipients for the customer: this option is used to forbid import/export of recipients list for users. If admin thinks that the computer skills of his store users are not too good and there are not enough comments on ‘Recipients import/export’ page he can use this option and disable this functionality.
- Enable HTML cards: if you enable this option, event creators will be able to enter their own HTML code to create HTML cards for their events.
To reduce the risk of malicious code being injected into web pages displaying such cards, X-Cart will process the HTML code entered by event creators to strip out all potentially dangerous code (like OBJECT tags and JavaScript), leaving only safe HTML tags.
- Allow adding a gift wrapping to orders: this option enables the possibility to add gift wrapping to orders. Gift wrapping does not affect shipping cost.
- Allow adding a greeting message to orders: this option enables the possibility to add a greeting message to the order.
- Gift wrapping cost: enter the cost of gift wrap to be added to the order total. If any discounts are applied to the order, they do not apply to gift wrapping cost.
- Apply taxes: select which taxes should be applied to gift wrapping cost, if any. This option is not available if no taxes are defined in the store.
- Sum up wrapping cost (X-Cart PLATINUM and PRO, if single mode is not enabled): Select the check box to calculate the taxed cost of gift wrapping as a sum of separate taxed wrappings costs of each provider whose products are in the order. The final taxed wrapping cost will be displayed at checkout only, while separate provider-specific wrapping costs will be included into provider invoices.
E.g., if the order contains products supplied by 4 providers, the final taxed wrapping cost will be calculated as follows: Final taxed wrapping cost = Taxed wrapping cost 1 + Taxed wrapping cost 2 + Taxed wrapping cost 3 + Taxed wrapping cost 4. Deselect the check box to calculate the taxed cost of gift wrapping as a fixed amount divided equally among all providers whose products are in the order. The single taxed wrapping cost will be displayed at checkout only, while separate provider invoices will contain the taxed wrapping cost divided into the number of providers. E.g., if the fixed taxed wrapping cost is $8 and products are supplied by 4 different providers, each provider invoice will contain extra $2 for gift wrapping.
Creating events
Events may be created in one of these ways
- Through the main wish list : Wish List menu >click on New Event link
- Through Gift Registry: Gift Registry Menu> click on New Event link
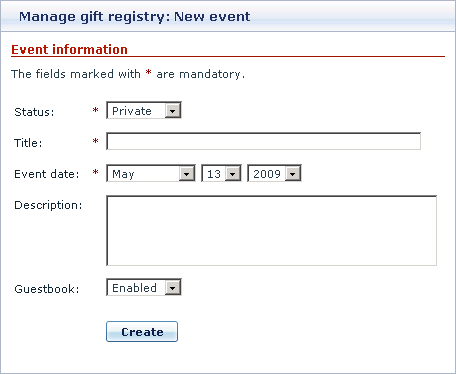
To create an event you are supposed to fill in the following fields:
- Status
- Title
- Event Date
- Description
- HTML-content (if enabled)
- Guestbook
Status field displays the current state of an event and sets the access level for visitors of the site.
- public - all visitors can see and buy products from the event wish list.
- private – only registered users whose e-mail addresses were entered in the recipients list can see and buy products from the event wish list.
- disabled - the event is not accessible to users.
In the Description field you need to enter the description of the event. It will be shown on the event search results page.
In the HTML-content field enter the content of the page, which will be opened in a pop-up window when a user visits this page. The contents of this field will be displayed in the pop-up window without any changes and additions, that’s why you are supposed to have some knowledge and skills of HTML language to create HTML pages. You can also use Microsoft Frontpage for making HTML pages.
Recipients List
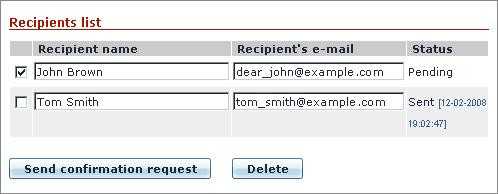
Recipients list contains info about all recipients of an event including:
- e-mail;
- name;
- current status
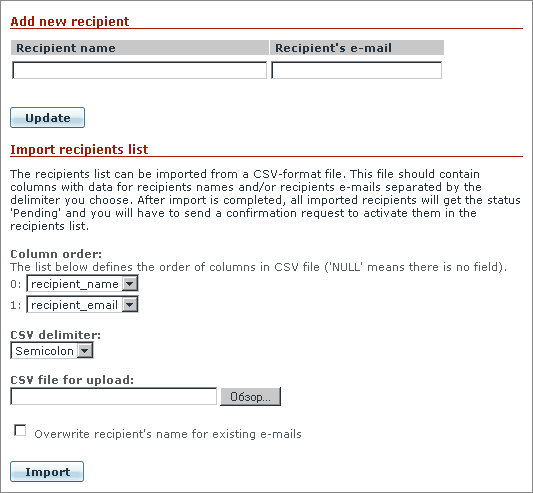
Recipients list can be filled in manually or imported through the corresponding interface (the feature can be disabled by administrator). The maximum amount of recipients in the list is limited by administrator.
Please read this important note on the charset of your import CSV file.
To avoid spam each recipient should confirm their participation in the list of event delivery. You should perform the following actions:
- Mark checkboxes opposite the recipients
- Send a request to confirm the recipients' participation by clicking on ‘Send confirmation request’ link. The current status will be displayed in the field ‘Status’: "Sent" and the date of the last status change.
The notification contains the offer to confirm or cancel your participation in delivery list, for example:
Mr. [Sender name] has sent this invitation for you.

____________________________________________________________________

Dear [Recipient name],

Your e-mail address has been included into the Gift registry's mailing list for this event.

Please confirm or decline your participation by clicking on the links below.

_____________________________________________________________________

Click here to confirm:

http://www.yourhost.com/xcart_dir/customer/giftregs.php?cc=782ab3a60469e12499e13259519e252d

Click here to decline:

http://www.yourhost.com/xcart_dir/customer/giftregs.php?cc=c72ce5192251b1fb9f9ff1eea0c94a96

--

Thank you for using
X-Cart shopping system
X-CART
Phone: 1-800-555-5555
Fax: 1-800-555-5555
URL: WWW.X-CART.COM
After the recipient chooses one of the variants, his participation will either be cancelled or confirmed, and the confirmation date will appear besides the current status (‘Confirmed’ or ‘Declined’) in the field ‘Status’
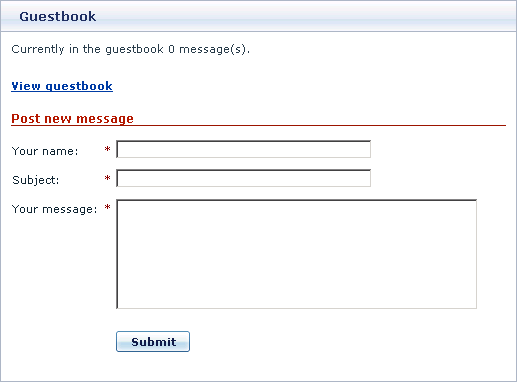
Guestbook
Recipients can leave their messages and comments regarding any event in the Guestbook. To post a message to the Guestbook a recipient is supposed to enter:
- name;
- subject;
- message text.
Filling in all the fields is a must.
The owner of the event can answer and delete messages. His replies are highlighted.
Messages are displayed in the reverse chronological order.
The Guestbook can be disabled by the owner of the event.
Adding Products to Event Wish List
You can add products and Gift Certificates to events wish list, using the "Add to list" button. In the drop-down list you can select the event and click ![]() to add the product directly to an event wish list. Or you can add the product to the general Wish list, and then move it to an event wish list:
to add the product directly to an event wish list. Or you can add the product to the general Wish list, and then move it to an event wish list:
- In the drop-down list click the "Add to wish list" button.
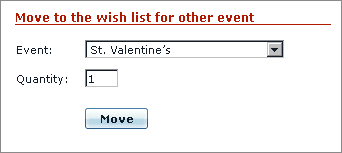
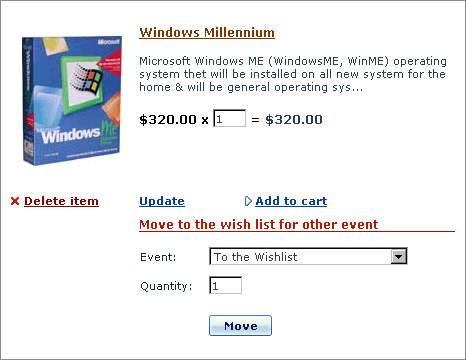
- Then in the Wish list this product may be partially of fully moved to the wish list of a registered event.
By partial moving the following is meant:
There is a product N quantity=5 in Wish list:
- Main wish list: product N (quantity=5)
- You can move some items of the products to event wish list ‘Birthday’
- Main wish list: product N (quantity=3)
- ‘Birthday’ event wish list: product N (quantity=2)
![]() Note:
Note:
The functionality of event wish list is the same as of the main wish list, thus you can:
- add a product to cart
- delete a product from the wish list
- change the amount of product items
- see detailed info about a product
The maximum number of events that a user can define is limited by administrator.
Searching events
All site visitors can search for and look through the events that have ‘public’ status and buy products included in event wish lists.
Only registered users whose e-mails are included in recipients list of this event can look through ‘private’ events.
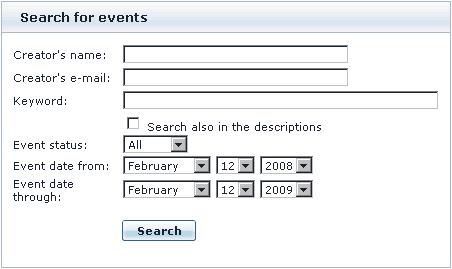
Event search is fulfilled by the following criteria.
- template of the event owner’s name
- event owner’s e-mail
- a key word for search in the header and product description
- event status
- timeframes of an event
If no search criteria were assigned, all events of the database will be delivered.
Event Viewing and Purchase of Products
To enter an event page and see the wish list the following conditions need to be met:
- An event has "public" status
- An event has "private" status if a visitor is a registered user and his/her e-mail is included into Recipients list of this event
To add a product to your cart you should click on ‘Add to cart’ link. The product will be placed in your cart with the options and number of items defined in the wish list. If a customer is not satisfied with these settings they can be changed right in the cart.
When you add to cart a product from an event wish list, a 'Buy this as a present for the event' checkbox appears on checkout. You can select to buy the product for yourself or as a gift.
After checkout is successfully finished, either the number of bought items is displayed below the corresponding products in event wish list or ‘All items already purchased’ if the whole product is bought (such a product cannot be added to cart from event wish list)
Shipping and taxes cost calculations are made depending on the customer’s location and the purchased products are sent to this address.
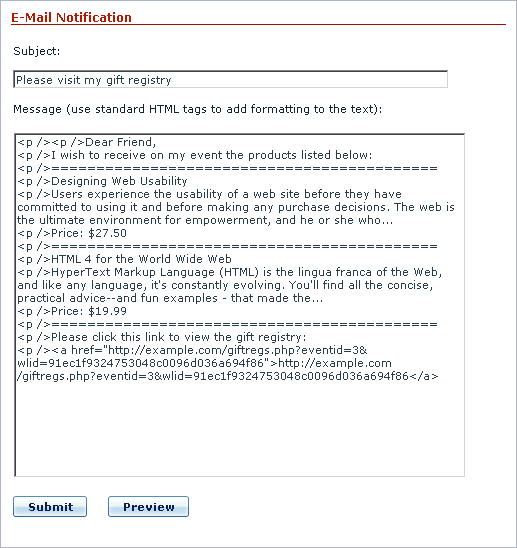
E-mail Notification
To successfully send a notification about this or that event there should be at least one recipient in the recipient list who confirmed his/her participation.
On E-Mail Notification page you can edit the text of the notification, indicate the subject of the e-mail and the way of posting, which can either be HTML page or plain text. It is highly recommended to preview your text message before sending.
