Difference between revisions of "X-Cart:FedEx Cross Border (formerly Bongo International)"
(→Configuring the module) |
(→Bongo Extend) |
||
| Line 108: | Line 108: | ||
== Bongo Extend == | == Bongo Extend == | ||
| − | With such integration checkout is default, however you can see a Bongo banner there.< | + | With such integration checkout is default, however you can see a Bongo banner there.<\br>[[Image:Checkout with bongo extend.png|700px]]<\br>Clicking on this banner will open a Bongo registration window.<\br>[[Image:Bongo banner checkout.png|400px]]<\br>Use this window to register with Bongo and to get a shipping address. Shipping calculation is done directly between a customer and Bongo. |
| − | |||
| − | |||
| − | Clicking on this banner will open a Bongo registration window.< | ||
== Configuring the module == | == Configuring the module == | ||
Revision as of 17:21, 25 April 2014
Contents
Overview
Bongo International is a comprehensive global eCommerce solution provider designed to enable US-based merchants to reach international consumers. Bongo facilitates global expansion while offering fraud protection to businesses interested in converting international shoppers and driving new revenue.
- Bongo Extend is a powerful shopping cart plug-in that enables international shoppers to obtain EU and US shipping addresses and make purchases from your eCommerce store immediately.
Extend’s innovative and portable technology allows businesses to participate in global eCommerce without the complications of developing resources for handling global logistics.
- Bongo Checkout is a modular eCommerce solution promotes safe acceptance of international eCommerce orders with guaranteed fraud protection.
Checkout is an integrated and secure international eCommerce solution that pairs well with most eCommerce infrastructures. Additionally, Checkout is EAR compliant, and screens against the CCL and the required Denied Party Lists, so you don’t have to. Checkout also ensures compliance with all prohibitive licensing agreements, while allowing consumers to purchase approved items from your business.
- Bongo Export (formerly Connect) is a fully integrated eCommerce solution provides a seamless shopping experience for international customers while maintaining merchant brand integrity.
Export uses Bongo's own SOAP API. This fully customizable solution enables you to leverage all of Bongo’s Cross Border technology in a manner that’s sure to meet your needs. Export’s integration creates a seamless customer experience, ensures all orders are compliant with current Export Laws and Regulations and comes with no fees so you keep 100% of your current margin.
X-Cart provides a module that enables Bongo International in your store.
System requirements
To be able to use the Bongo International module, you need the following components installed and configured on your system:
- X-Cart 4.4.5-4.6.x (If you do not remember the version of X-Cart on which your store is based, you can look it up in the Environment info section of the Summary page in X-Cart Admin area);
You will find that the Bongo International module archive contains a script "bongo_international.php". After installing the module, you don't need to set it up. It's optional.
Installation of Bongo International module
This module doesn't require X-Payments module. To install the Bongo International module:
- Obtain a distribution package for the Bongo International module by downloading it from the File Area section of your X-Cart Account. The distribution package you need is contained in the archive file bongo_internztional-x.y.z.tgz or bongo_internztional-x.y.z.zip where x, y and z are the version numbers of the module. Make sure the version of the module is the same as the version of the installed X-Cart.
- Copy the contents of the module archive for your specific X-Cart version to the X-Cart root directory on your server or hosting account.
- If you are using a Windows-based server, or a UNIX-based server without terminal access:
- a) Unpack the module archive to a directory on your system using your favorite compression program (WinZIP, 7-Zip or any other archiver with support for TAR files).
- b) Use an FTP client to upload all the files contained in this directory (retaining the directory structure) to the X-Cart root directory on your server or your hosting account.
- If you are using a UNIX-based server with terminal access:
- a) Use an FTP client to upload the module archive to the X-Cart root directory on your server or your hosting account.
- b) Unpack the archive using the following command:
tar -xzvf bongo_international-x.y.z.tgz
- (Replace x, y and z with the actual version numbers).
- Important: Make sure you keep the directory structure while unpacking and uploading the module archive, otherwise some necessary files may be overwritten!
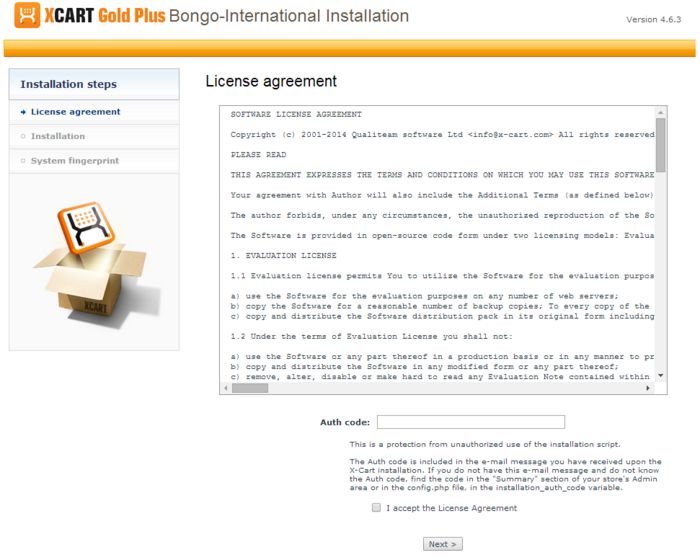
- In a web browser, run the installation script httр://<YOUR_XCART_DOMAIN>/install-bongo_international.php replacing <YOUR_XCART_DOMAIN> with the actual domain name of your X-Cart store. This will start the installation wizard. A screen like the following will be displayed:
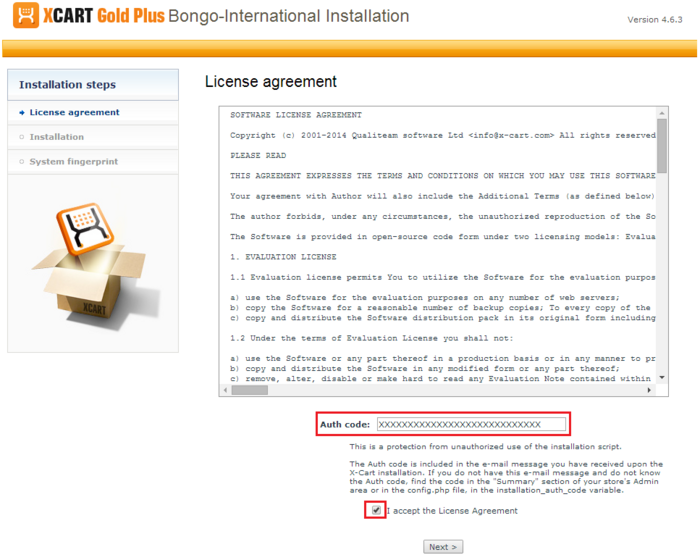
- Carefully read the License agreement, enter the Auth code for your X-Cart installation into the Auth code field and select the "I accept the License Agreement" check box:
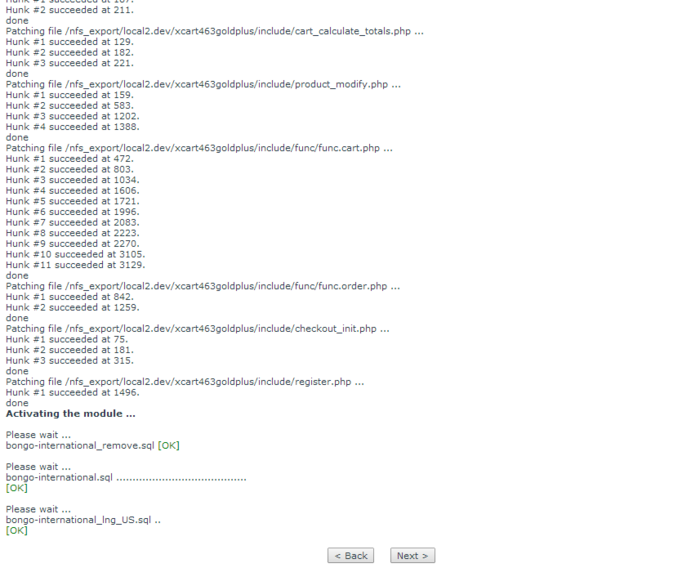
- Click Next to continue. The installation process will start. The installer will make the necessary changes to your X-Cart installation, and the module will be activated:
 Note: If you are using a custom skin, you will need to patch it manually. Otherwise, the module will not work in this skin.
 - Once the process is completed, click Next. This will open the next screen where you will be asked whether you wish a new system fingerprint to be generated:
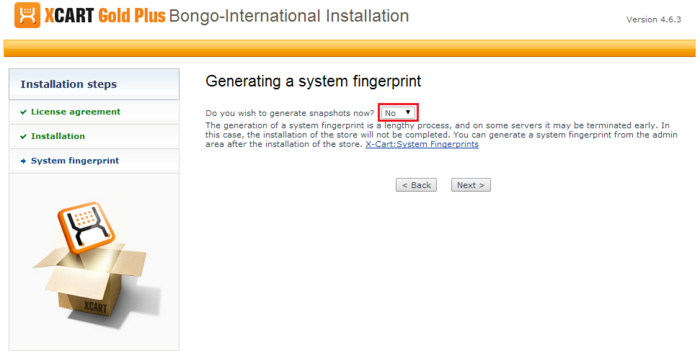
- Make your selection (Yes/No) and click Next. If you have chosen to generate a new system fingerprint, it will be generated. The process of generating a system fingerprint may take up as long as a few minutes. Once the generation process is completed, click Next. If you have chosen to skip the generation of a system fingerprint, you will be taken to the next step.
- After clicking Next you should see the "Installation complete" screen:
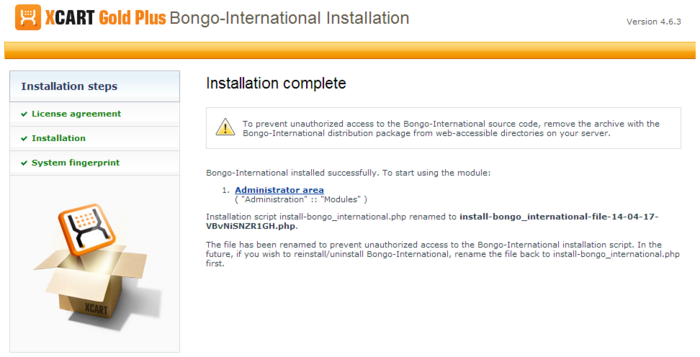
This is the final step. It informs you that the module has been installed successfully. It also reminds you to remove the module archive file in case you put it in a web accessible directory; this is needed to protect the module from unauthorized copying.
Important: At the final step of the installation process, the installation script install-bongo_international.php is automatically renamed as an additional measure to protect the module installation. Please take note of the file name to which the installation script was renamed. If you decide to re-install or uninstall the module later on, you will need to rename the installation script back to install-bongo_international.php before launching the installation process in your web browser.
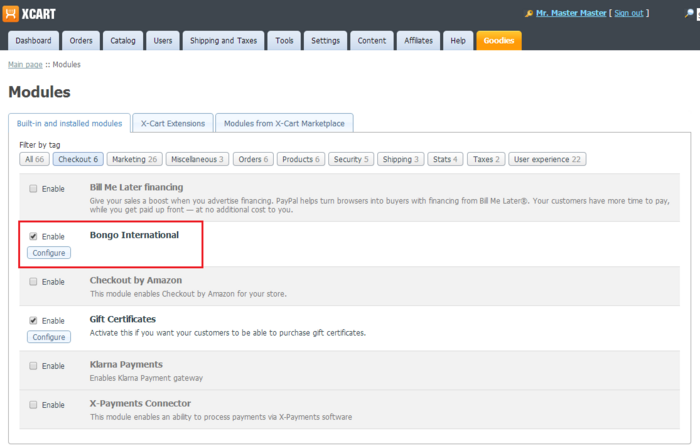
Now if you choose to view the list of your store's installed modules (this can be done using the Administrator area link provided on the "Installation complete" screen), the Bongo International module will be on the list:
Note that after the module has been installed, it is already in the enabled (active) state. You can temporarily disable the module using the module deactivation instructions.
Uninstallation of Bongo International module
Uninstallation completely removes all the data related to the Bongo International module from your store.
To complete the uninstallation, you will need to run the Bongo International module installation script. You might remember that, after the module was installed in your store, the script was saved with a new name to help prevent unauthorised runs of the installer. Now, before you start, you need to rename the script back to its original name - install-bongo_international.php.
To uninstall the module:
- Run the module installation script in your web browser by going to httр://<YOUR_XCART_DOMAIN>/install-bongo_international.php (be sure to replace the <YOUR_XCART_DOMAIN> part with the actual domain name of your X-Cart store). This will start the installation wizard. A screen like the following will be displayed:
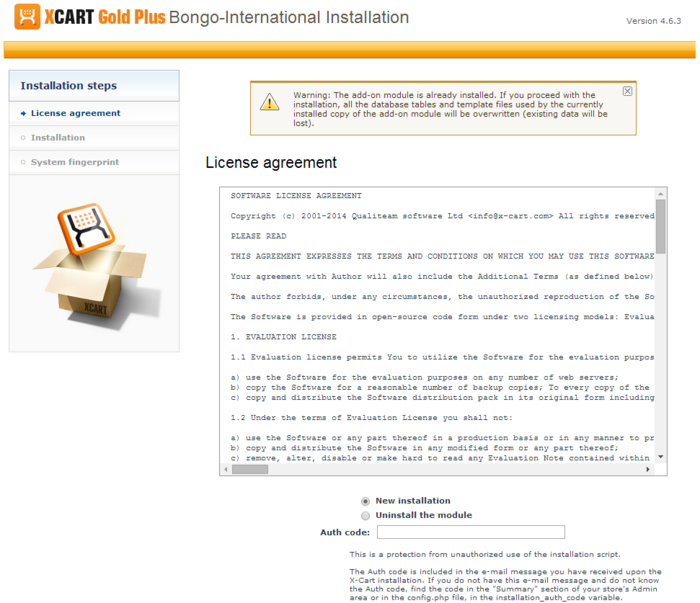
- Select "Uninstall the module", enter the Auth code for your X-Cart installation into the Auth code field and select the "I accept the License Agreement" check box:
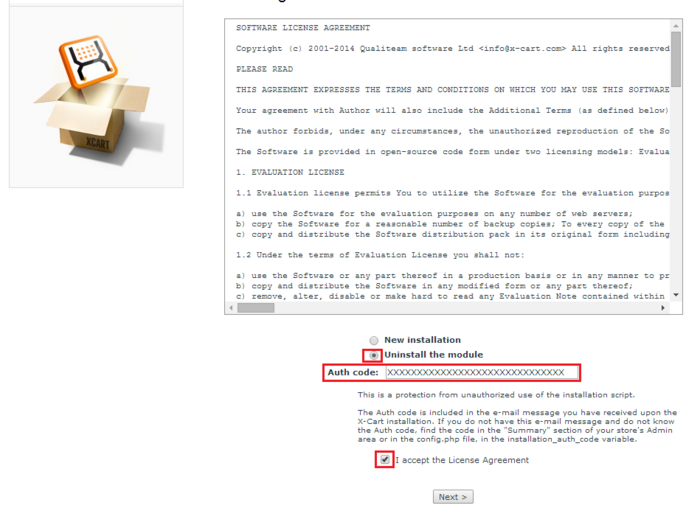
- Click Next to continue. The uninstallation process will start. The installer will make the necessary changes to your X-Cart installation, and the module will be deactivated.
- Once the process is completed, click Next. This will open the next screen where you will be able to generate a new system fingerprint.
- Generate the system fingerprint (or skip it). After clicking Next you should see the "Uninstallation complete" screen.
This is all. The Bongo International module has been uninstalled.
Activating and deactivating the module
It is possible to temporarily disable (deactivate) the installed Bongo International module. Deactivation stops the module from operation, but it does not remove any settings you made to the module configuration nor clear any data that was generated during the period that the module was in operation. If you wish to completely remove all the data related to using the module, you need to uninstall it.
To disable the module:
- Go to the Modules section of your store's Admin area (Settings menu->Modules).
- Locate the entry for the Bongo International module and unselect the respective check box on the left.
- Depending on the version of X-Cart you are using, you may need to apply the change by clicking the Apply changes button. The module will be disabled.
If the Bongo International module is installed, but not active, you can enable (activate) it.
To enable the module:
- Go to the Modules section of your store's Admin area (Settings menu->Modules). This opens the list of your store's installed modules.
- Locate the entry for the Bongo International module and select the respective check box on the left.
- Depending on the version of X-Cart you are using, you may need to apply the change by clicking the Apply changes button. The module will be enabled.
Configuring the module
After the module has been installed and enabled, it needs to be configured.
To configure the module:
- In the Modules section of your store's Admin area (Settings menu->Modules), locate the entry for 'X-Payments Subscriptions and Installments' module and click the Configure link next to it:

The X-Payments Subscriptions and Installments module configuration page opens: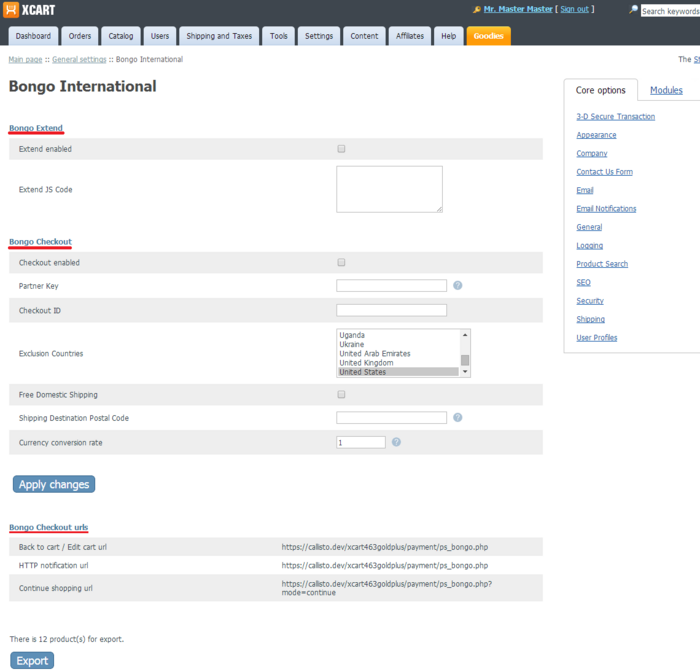
- Adjust the module configuration settings:
- Bongo Extend is a simplified integration. In this case a default checkout is used, however there will appear a special banner in the site. This banner informs on the possibility of international shipping, it provides a special address that should be used as a shipping address.
Extend JS code is provided by Bongo in process of integration. - Bongo checkout is full integration with checkout on Bongo side.
Partner key is provided by Bongo in process of integration.
Checkout ID is provided by Bongo in process of integration.
Exclusion countries is the list of countries that don't require the usage of Bongo Checkout. The country of the store location is always selected in this list. So, Bongo cannot be uses for shipping in the same country.
Free Domestic Shipping is selected in case of absence of free shipping to Bongo's office. If selected, it provides free shipping from a merchant to Bongo International Shipping Destination Postal Code (Zipcode of Bongo International office).
Currency conversion rate is the price of a USD in the currency of the store (1 USD = X in the store currency) - Bongo checkout urls is the data that should be provided to Bongo in process of integration.
- Export is an optional feature. It allows to pass the store products data to Bongo in case cron file is not setup or if the data should be passed to Bongo beyond the cron shedule.
- Bongo Extend is a simplified integration. In this case a default checkout is used, however there will appear a special banner in the site. This banner informs on the possibility of international shipping, it provides a special address that should be used as a shipping address.
- Click Apply changes.
Now your module has been configured.
Adding Bongo shipping to a product
To add Bongo shipping to a product:
- In the products section (Catalog -> Products), find the product for which you wish to create an upselling link. Click on the product name to open the product's details on the 'Product Management' page.
- In the 'Product Management' section menu, click on the Bongo link.
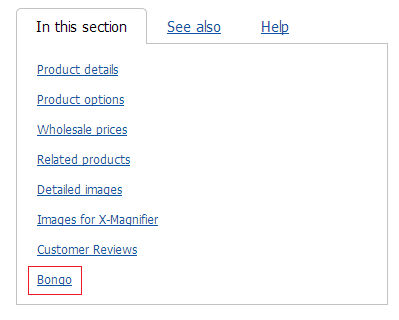
The Bongo shipping settings page opens.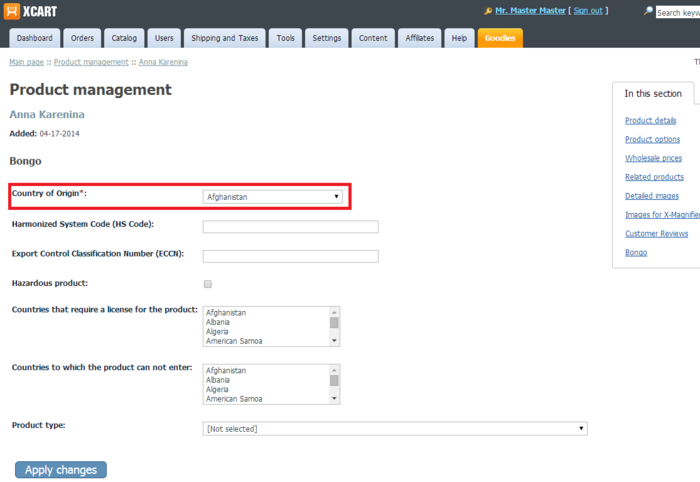
- In the opened page fill in the following fields:
Country of Origin the country of product origin.
Harmonized System Code (HS Code) see http://en.wikipedia.org/wiki/Harmonized_System
Export Control Classification Number (ECCN) see http://en.wikipedia.org/wiki/
Export Control Classification Number
Hazardous product select this checkbox if the product is hazardous (acid, gas, deflagrating mixture)
Countries that require a license for the product
Countries to which the product can not enter t
Product type product type according to Bongo classification.
Note, Country of Origin is a mandatory field, other fields are optional. - Click 'Apply changes'.
Bongo Extend
With such integration checkout is default, however you can see a Bongo banner there.<\br> <\br>Clicking on this banner will open a Bongo registration window.<\br>
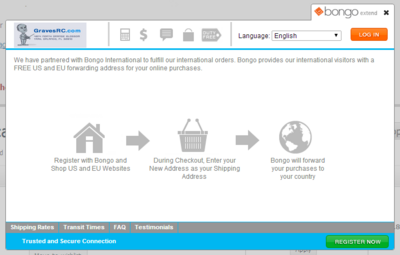 <\br>Use this window to register with Bongo and to get a shipping address. Shipping calculation is done directly between a customer and Bongo.
