Difference between revisions of "X-Cart:Applying Patches"
(→To apply a patch via X-Cart Admin area:) |
|||
| Line 21: | Line 21: | ||
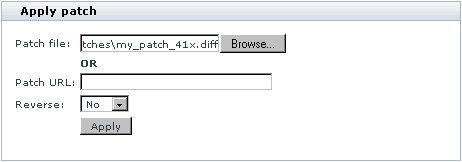
4. log in to the Admin area of your X-Cart and go to the 'Patch/Upgrade' section. You see the '<u>Apply patch</u>' form: | 4. log in to the Admin area of your X-Cart and go to the 'Patch/Upgrade' section. You see the '<u>Apply patch</u>' form: | ||
| − | [[Image:apply_patch.gif|462px|center | + | [[Image:apply_patch.gif|462px|center]] |
5. In the '<u>Apply patch</u>' form select your file by clicking on the '''Browse''' button. Alternatively, you can enter the patch URL into the appropriate field. | 5. In the '<u>Apply patch</u>' form select your file by clicking on the '''Browse''' button. Alternatively, you can enter the patch URL into the appropriate field. | ||
Revision as of 18:56, 26 January 2010
Contents
Overview
X-Cart provides an interface that allows you to apply patches. The two types of patches that you might need to apply in X-Cart are file patches and SQL patches.
Applying File Patches
The 'Patch/Upgrade center' section of X-Cart allows you to apply file patches supplied by X-Cart developers using the Admin area of your store. A patch can be applied from a patch file or from a URL.
Applying the patch can be done in several ways: via X-Cart Admin area, by issuing the command 'patch' or manually.
To apply a patch via X-Cart Admin area:
1. BACK UP YOUR STORE!
2. Set write permissions for the files that will be patched.
3. Save the text of your patch to a file (e.g. patch.diff). If you are planning to use a patch from a certain URL, skip this step.
4. log in to the Admin area of your X-Cart and go to the 'Patch/Upgrade' section. You see the 'Apply patch' form:
5. In the 'Apply patch' form select your file by clicking on the Browse button. Alternatively, you can enter the patch URL into the appropriate field.
If you are going to apply a new patch, 'Reverse' selectbox should be set to 'No'. Selecting 'Yes' will lead to the removal of the specified patch that has already been applied.
To start the application of the patch click the Apply button.
The procedure of patch application includes two basic steps:
1. Testing patch applicability (Step 1 of 2). First X-Cart will check the presence of executable permissions for the patch tool, then patch checksums and permissions for each file the patch must be applied to. Then the results of patch applicability testing will be shown to you in the 'Applying patch' form.
If your Patch/Upgrade center detects any problems (errors - marked in red), you will not be able to proceed with applying your patch until these problems are resolved. You will have to go back, make the necessary corrections and run the patch applicability test once again.
2. Applying the patch (Step 2 of 2). Clicking on the Apply patch button initiates the process of applying the patch. During this process the differences contained in the *.diff files are implemented in the source code of your X-Cart.
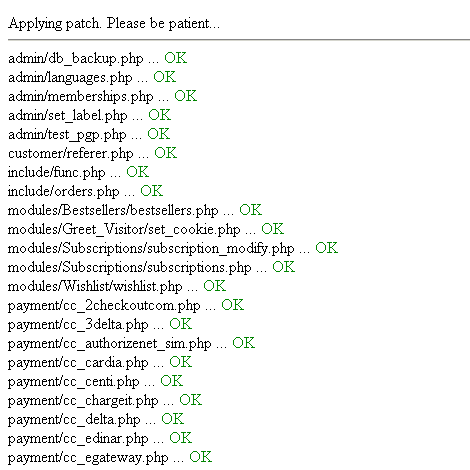
The process of upgrade patch application is shown on the screen:
Patch results show what files the patch was successfully applied to, and what files failed to be patched. You can see patch log for details.
The following problems may arise:
- checksum error - patch contents is corrupted;
- non-writable - writable permission has not been given to the file, please give it writable permission;
- not a file - the target is not a file;
- not exists - the necessary file is missing;
- could not patch - the patch cannot be applied to this file automatically, because it has been significantly modified, the patch should be applied to this file manually
When the patch has been successfully applied, click on Finish to get back to the 'Patch/Upgrade center' page.
To apply a patch by issuing the command 'patch':
- Save the text of your patch to a file (e.g. patch.diff).
- Copy this file (patch.diff) to the directory where X-Cart is installed.
- Issue the command 'patch -C < patch.diff' to check the patch applicability.
- If there are no errors during the check-up, apply the patch by issuing the command 'patch < patch.diff'.
You can read more about 'patch' command in the manual (man patch, info patch).
To apply a patch manually:
If a patch application failed in the first two ways (this may be caused by redundant spaces or conversion problems) you can try to apply the patch manually.
1. Open the file after 'Index:' (admin/category_modify.php) in the text editor;
- Diff files are divided into parts ("hunks"). Each "hunk" starts with a line like this:
@@ -160,7 +160,7 @@
- where:
- 160 - indicates the number of the line of the code where the changes start
- 7 - indicates the number of the lines in the hunk before patch applying
- 7 - indicates the number of the lines in the hunk after patch applying
2. Edit the file (admin/category_modify.php). Find the line, which is marked by "-" in the text of patch and remove it.
3. Insert the line marked by "+" in the text of patch.
If you cannot apply the patch in these ways it means the file that needs to be patched has been modified or this file is from another version of X-Cart and cannot be patched by this patch. Ask technical support to help you.

