Difference between revisions of "X-Cart:Shipping Label Generator"
m |
m |
||
| Line 95: | Line 95: | ||
X-Cart's <u>Shipping Label Generator</u> module functions in such a way that all order shipping labels that once have been generated in your store remain in the store database unchanged regardless of whether or not you change the details of the respective orders - unless you manually regenerate them. In other words, if you generate a shipping label for a certain order and then modify that order by editing the customer's shipping address, next time you click the button '''Shipping label''' on the '<u>Order details</u>' page of that order, you are provided with a download link to the shipping label that was generated before you edited the order details. To get a shipping label with the updated customer address, you need to regenerate the shipping label. Regeneration of shipping labels is easy: on the '<u>Shipping labels</u>' page, you just need to select the shipping labels that need to be regenerated and click the button '''Update shipping labels for selected'''. The updated shipping label files become available for download immediately after the '<u>Shipping labels</u>' page is refreshed. | X-Cart's <u>Shipping Label Generator</u> module functions in such a way that all order shipping labels that once have been generated in your store remain in the store database unchanged regardless of whether or not you change the details of the respective orders - unless you manually regenerate them. In other words, if you generate a shipping label for a certain order and then modify that order by editing the customer's shipping address, next time you click the button '''Shipping label''' on the '<u>Order details</u>' page of that order, you are provided with a download link to the shipping label that was generated before you edited the order details. To get a shipping label with the updated customer address, you need to regenerate the shipping label. Regeneration of shipping labels is easy: on the '<u>Shipping labels</u>' page, you just need to select the shipping labels that need to be regenerated and click the button '''Update shipping labels for selected'''. The updated shipping label files become available for download immediately after the '<u>Shipping labels</u>' page is refreshed. | ||
| + | |||
| + | |||
| + | |||
| + | See also: | ||
| + | :* [[X-Cart:Webgility_Integration_Solutions_for_X-Cart|Webgility Integration Solutions for X-Cart]] | ||
[[Category:X-Cart user manual]] | [[Category:X-Cart user manual]] | ||
[[Category:X-Cart modules]] | [[Category:X-Cart modules]] | ||
Latest revision as of 15:18, 5 June 2014
Contents
Overview
X-Cart's Shipping Label Generator module allows you to create and print shipping labels for orders whose shipping option is defined as UPS, USPS or DHL/Airborne and uses real-time calculated shipping rates.
You probably already know that X-Cart has a standard functionality for generating shipping labels: the button Quick labels for selected in the Orders Management section allows administrators and providers to create shipping labels for selected orders. The process of generating the labels is very quick, as it is performed by X-Cart internally, without exchanging any data with the servers of carrier companies.
The disadvantage of quick labels is that they have the most basic design and do not provide such all-round information about shipments as can be provided by shipping labels generated by specialized software. Shipping Label Generator module is an extension to X-Cart's shipping label printing functionality that provides you the ability to create good-looking and information-rich shipping labels for the most popular shipping methods like UPS, USPS or DHL/Airborne.
To use the module, you need to have accounts with those shipping services for which you want to be able to get shipping labels. The account information is entered into X-Cart and is stored there permanently so the module can use it automatically. When you tell the module to generate a shipping label, the module uses your account information to contact the respective shipping service server or (in the case of UPS) to generate a CSV-formatted data file that can be imported into an external program that will contact the shipping label generating server of the shipping service provider company. The shipping service server processes the information received from X-Cart, generates the required shipping label and sends it back to the application that has submitted the request (X-Cart for USPS and DHL/Airborne; UPS WorldShip for UPS). After that you can freely download the shipping label onto your computer and print it out.
Shipping Label Generator is available as a built-in module for all X-Cart editions. Id does not require installation and can be enabled in the Modules section of X-Cart Admin area.
Roles in Shipping Label Generator module management
If you are an X-Cart GOLD or GOLD PLUS administrator/provider or an X-Cart PLATINUM or PRO administrator:
- You can enable/disable the module Shipping Label Generator and adjust its configuration settings (See #Enabling and Configuring 'Shipping Label Generator').
- You can generate/regenerate shipping labels for any orders in the store (Study #Generating Shipping Labels).
If you are an X-Cart PLATINUM or PRO provider:
- You can generate/regenerate shipping labels for any of your orders (Study #Generating Shipping Labels).
Enabling 'Shipping Label Generator'
To begin using the module:
- Ensure that your X-Cart store can communicate with the servers of the carrier companies whose shipping labels you will need for your orders:
- You need to have a valid account with each shipping service that you are going to use for generating shipping labels.
- The account details need to be specified in your X-Cart:
- USPS: Adjust the fields of the 'U.S.P.S. account details' subsection of the 'General settings/Shipping options' dialog box.
- DHL/Airborne: Adjust the fields of the 'DHL/Airborne account details' subsection of the 'General settings/Shipping options' dialog box. (If you are intending to generate DHL/Airborne shipping labels in test mode, be sure to enable the option 'Use DHL/Airborne test server'. For live (production) mode, disable the option).
- UPS: Enable and configure X-Cart's UPS Online ® Tools module.
- Enable Shipping Label Generator module (Administration menu->Modules). After the module is enabled, a section titled Shipping Label Generator options will be added to General settings/Modules options.
- Adjust the module settings via General settings/Modules options->Shipping Label Generator options.

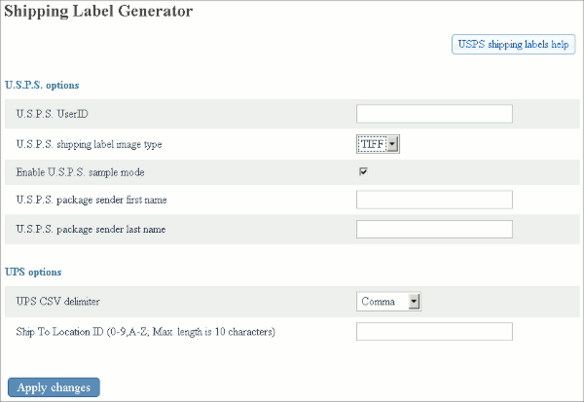
At present, you only need to adjust Shipping Label Generator options if you are going to generate shipping labels for USPS. Provide the following values:- U.S.P.S. UserID: User ID that you received from USPS as a result of completing USPS registration process (For instructions on completing USPS registration, read the help section available through the link 'USPS shipping labels help').
- U.S.P.S. shipping label image type: Image type for your USPS shipping labels. Depending on your selection, the shipping labels generated by USPS Web Tools server will be either in TIF or PDF format.
- U.S.P.S. sample mode: An option that sets the module to work either in test or live mode. If you need to generate sample USPS labels, set the drop-down box to Yes. If you need production quality labels, select No.
- U.S.P.S. package sender first name and U.S.P.S. package sender last name are the boxes for entering your first and last name respectfully.UPS shipping labels are generated as a CSV file, which is to be used with UPS WorldShip software for generating the actual Shipping labels. These settings that affect the CSV file.
- UPS CSV delimiter: delimiter to be used for separating fields in the CSV file.
- Ship_To Location ID: ShipTo_LocationID value to be placed in the CSV file.
- Click the Save button.
Generating Shipping Labels
To generate shipping labels for one or more orders:
- Go to the 'Orders management' section of the store's back end.
- Find the orders for which you need shipping labels and select these orders.
- Click the button Get shipping labels for selected.
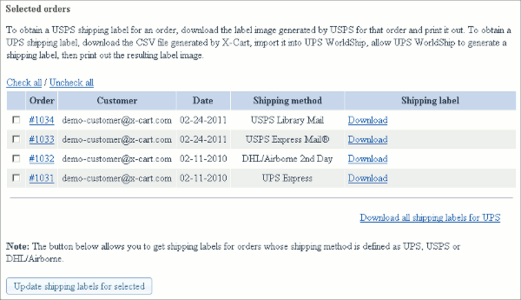
The labels will be generated. On the next page ('Shipping labels' section) the results will be presented in the form of a table.
The table columns will provide the following information about each of the orders that you have selected:
- ORDER - Order ID.
- CUSTOMER - Full name and username of the customer who placed the order.
- DATE - Date when the order was created.
- SHIPPING METHOD - Method of delivery selected for the order by the customer.
- SHIPPING LABEL - Shipping label download link (for UPS, USPS or DHL orders) or "n/a" (for orders with a different shipping option).
Generation of a shipping label for an individual order can also be done from the 'Order details' page of the respective order. To generate a shipping label for an order being viewed, you just need to click the Shipping label button at the top of the 'Order details' dialog box. The label will be generated and the result will be presented in the form of a table in the 'Shipping labels' section the same way as when you generate several labels at once.
On the 'Shipping labels' page, the download links in the SHIPPING LABEL column point to files that are either shipping labels or files that can be processed in an external program to obtain shipping labels. The table below provides information on the possible types of files that are generated for different shipping services and gives instructions on how to print shipping labels from these files.
| Shipping service | Shipping label file | Instructions on using the shipping label file |
|---|---|---|
| USPS | PDF or TIF file (generated by USPS Web Tools server).
The file type (PDF or TIF) depends on the module settings as defined in the 'Shipping Label Generator options' section. |
Download the shipping label image file onto your local computer and print it out. |
| DHL/Airborne | PNG image file (generated by DHL/Airborne server) | Download the shipping label image file onto your local computer and print it out. |
| UPS | CSV file (generated by X-Cart) - is not a shipping label, but can be used by an external program, UPS WorldShip, to generate a shipping label. | Download the CSV file onto your local computer, import it into UPS WorldShip and allow UPS WorldShip to contact the UPS server that will generate a shipping label based on the information provided. Follow UPS WorldShip instructions on how to print the label.
Download a .pdf file containing the instructions on how to import a CSV file into UPS WorldShip here. |
USPS and DHL shipping label download links only make it possible to download individual shipping labels (There is no option that would allow you to download shipping labels for several orders at once). For UPS, shipping label files for different orders can either be downloaded separately or be combined into a single file and be downloaded at once (The latter option is provided by the link 'Download all shipping labels for UPS').
Updating shipping labels
X-Cart's Shipping Label Generator module functions in such a way that all order shipping labels that once have been generated in your store remain in the store database unchanged regardless of whether or not you change the details of the respective orders - unless you manually regenerate them. In other words, if you generate a shipping label for a certain order and then modify that order by editing the customer's shipping address, next time you click the button Shipping label on the 'Order details' page of that order, you are provided with a download link to the shipping label that was generated before you edited the order details. To get a shipping label with the updated customer address, you need to regenerate the shipping label. Regeneration of shipping labels is easy: on the 'Shipping labels' page, you just need to select the shipping labels that need to be regenerated and click the button Update shipping labels for selected. The updated shipping label files become available for download immediately after the 'Shipping labels' page is refreshed.
See also:
