Difference between revisions of "X-Cart:Managing Languages"
(→Setting Default Store Languages) |
(→Exporting Languages) |
||
| Line 64: | Line 64: | ||
==Exporting Languages== | ==Exporting Languages== | ||
| + | |||
| + | To export a language: | ||
| + | |||
| + | # In the Admin area, go to the <u>Edit languages</u> section (<u>Administration menu</u> -> <u>Languages</u>). | ||
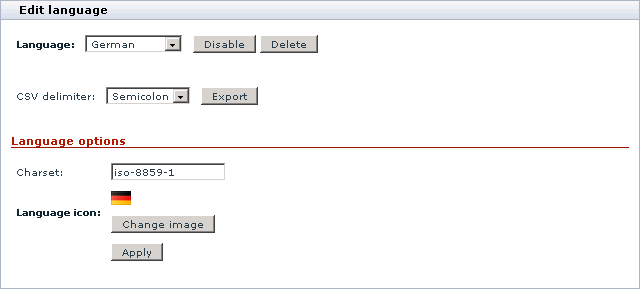
| + | # Select the language you want to export from the '''Language''' drop-down selector in the <u>Edit language</u> box.<br><br>[[Image:managing_languages_06.gif|640px]]<br><br>After you have selected the language, the page will automatically refresh expanding the <u>Edit language</u> box, which now contains several options and controls.<br><br>[[Image:managing_languages_03.gif|640px]]<br><br> | ||
| + | # Select a type of a delimiter for the export file from the '''CSV delimiter''' drop-down box selector. | ||
| + | # Click the '''Export' button. | ||
| + | |||
| + | After you have clicked on Export, a dialog window appears. In the dialog window select to save the CSV file. If prompted, choose a location where the CSV file should be saved to. | ||
==Disabling Languages== | ==Disabling Languages== | ||
Revision as of 19:43, 31 January 2010
Contents
Overview
If your customers come from different countries, or you do business in a multilingual country, having your online store available in several languages will be rather advantageous to your business. X-Cart enables you to build a true multilingual store and translate the store to as many languages as you wish. You can apply several languages to all store interfaces (Customer, Admin, Provider and Partner areas) and different kind of store data, including product and category descriptions, manufacturer pages, static content, etc.
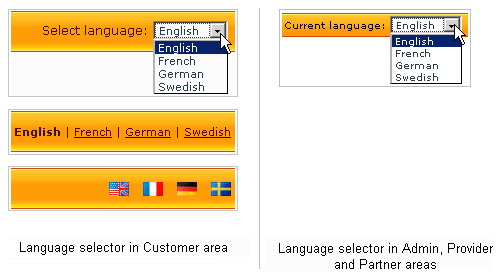
When a store has more than one language, store users can switch between languages using a special selector. For the Customer area the selector can be either a drop-down box, a single-line box with text or a single-line box with language icons (defined by the store administrator in the General settings/Appearance options section); for the Admin, Provider and Partner areas the selector is available as a simple drop-down box only. A selector contains a list of all the languages that are currently installed and activated in the store.
After a user has switched a language, the text of the current interface will automatically change to the selected language until the current user session expires. When the user starts a new session, the language will be switched back to the store's default language, which is set up by the store administrator.
At the moment X-Cart is delivered with the English language pack only. To add a new language you need to either import a tailored language pack or translate all the language variables on your own. As a rule, translation does not cause any technical difficulties, but it may take time and effort. To translate X-Cart into a different language, first you need to create a copy of an existing language and then either translate its variables directly in the Admin area or export the variables in a CSV file and edit the file with any suitable facility, including a spreadsheet editor like Microsoft Office Excel or OpenOffice.org Calc.
A tailored language pack is a CSV file with translated language variables. Language packs are prepared and distributed by independent third-party developers and dedicated X-Cart community members who have already translated their stores to other languages and who are ready to share or trade language packs they have. A place on the Internet where you can find a tailored language pack for your store is the X-Cart Community Forums at http://forum.x-cart.com/.
Adding Languages
Overview
Technically, adding a language to a store means that you create a new language either by cloning an installed language or by importing a tailored language pack, a CSV file with translated language variables.
When you create a new language without importing a tailored pack, the variables for the new language are taken from the default language for the Customer area. If some of the variables are broken or missing, X-Cart takes their values from the default language for the Admin area. If unsuccessful, the variables get the values of the English language pack. When you create a new language by importing a tailored language pack, the variables for the new language consecutively take their values from the default languages for the Customer and Admin areas, and from the English language pack. Finally, the existing variables get replaced with the values from the language pack that you import. This way of importing languages ensures that the new language will not have empty or broken variables if there were any in the language pack that you imported. For example, this may become an issue if you import a language pack for an earlier X-Cart version.
Adding a language
To add a language:
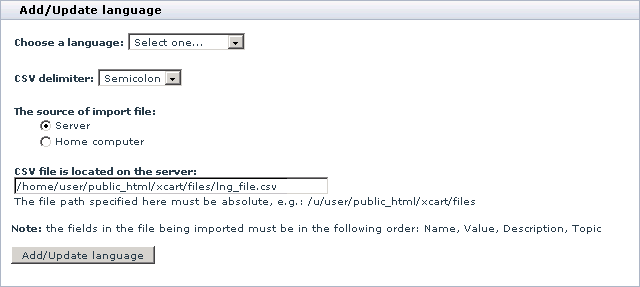
- In the Admin area, go to the Edit languages section (Administration -> Languages) and scroll down to the Add/Update language box.

- In the drop-down box Choose a language, select the name of the language that you want to add.
- If you are importing a tailored language pack, specify the delimiter type and the location of the import file.
- In the drop-down box CSV delimiter, select the type of delimiter you used when preparing the import CSV file;
- Specify the filename and the location of the import file.
- If the file is located somewhere on the server, select Server as the source of the import file and enter in the CSV file is located on the server field an absolute path to the file;
- If the file is located on your local computer, select Home computer as the source of the import file and use the Browse button to locate the file.
- Click the Add/Update language button.
After you have clicked on Add/Update language, the new language will be added to the store. X-Cart will display the Edit language box, which you can use to disable/enable the language, change the language charset and the language icon. If you edit any of the language options, remember to click the Apply button for changes to take effect.
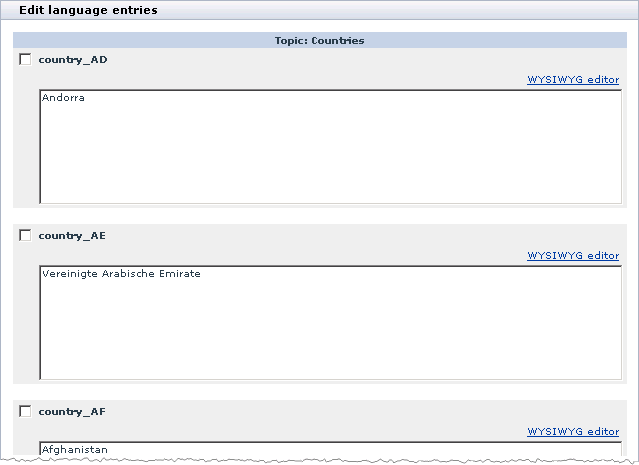
Below the Edit language box X-Cart will display another box Edit language entries, which you can use to edit some of the variables of the selected language.
Setting Default Store Languages
When a store uses several languages, you should specify which languages should be used as default languages for the customer and administrator interfaces. A default language means a language in which a user interface must appear when a user first opens a particular interface (Customer, Admin, Provider or Partner area). Customer interfaces include the Customer area and the Partner area; administrator interfaces include the Admin area and the Provider area.
For registered users, X-Cart can remember what language they selected, and when a registered user logs in to the personal account, X-Cart automatically switches to the user's language, not to the default language. For anonymous users, X-Cart does not keep information about a preferred user language, and anonymous users need to switch to their language each time they visit your store.
To set a default language for the customer and administrator interfaces:
- In the Admin area, go to the Edit languages section (Administration menu -> Languages).
- Select the language you want to use as default from the Default customer language and Default admin language drop-down selectors in the Edit language box.
- Click the Update button to apply the changes.
- Open the International descriptions page
- Select default language
- Click Save. The international descriptions values will be copied to the main fields of products/categories.
Exporting Languages
To export a language:
- In the Admin area, go to the Edit languages section (Administration menu -> Languages).
- Select the language you want to export from the Language drop-down selector in the Edit language box.

After you have selected the language, the page will automatically refresh expanding the Edit language box, which now contains several options and controls.
- Select a type of a delimiter for the export file from the CSV delimiter drop-down box selector.
- Click the Export' button.
After you have clicked on Export, a dialog window appears. In the dialog window select to save the CSV file. If prompted, choose a location where the CSV file should be saved to.


