Difference between revisions of "LiteCommerce:LayoutOrganizer"
m |
|||
| Line 1: | Line 1: | ||
| + | {{LC2_disclaimer}}<br /><br /> | ||
{{LC_2.x}} | {{LC_2.x}} | ||
Latest revision as of 13:05, 31 May 2012
|
LiteCommerce Layout Organizer add-on module introduces advanced customization to the look and feel of LiteCommerce-based online stores. With this module installed and activated your online store catalog presentation becomes fully customizable. It helps you improve your store presentation; make it truly unique and more appealing to customers.
This manual will guide you through the process of Layout Organizer add-on module installation and use.
Contents
Configuring the module
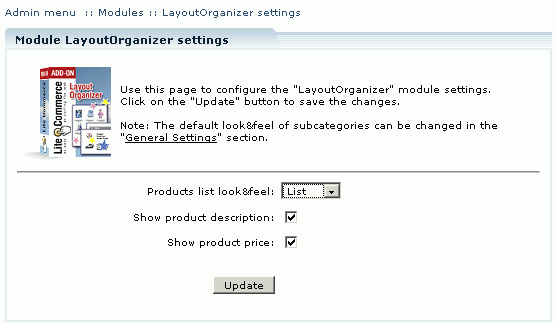
After you have successfully installed the Layout Organizer module, you can configure its settings to change the look of your online catalog according to your preferences. Basic module settings can be modified from the 'Modules' section. Click on the Layout Organizer module link to enter the module's settings page.
These settings are similar to the settings of the Showcase Organizer module. If you previously had the Showcase Organizer module installed, its settings will retain when you switch to the Layout Organizer module. First you need to choose whether you want product lists to be displayed in the form of a 'List', 'Table' or a set of 'Icons'. Once you choose the desired look and feel for product lists, corresponding additional parameters are displayed. These will be the default settings for all product lists in the catalog. When you finish making changes to the settings, click on the 'Update' button to save the changes.
Managing Template Schemes
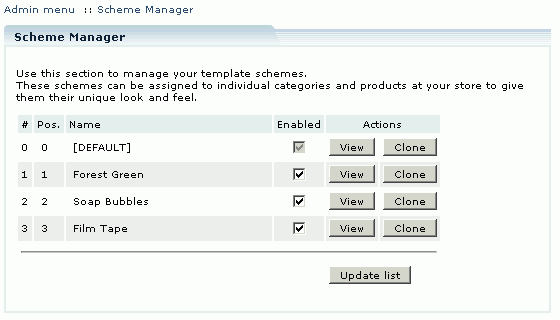
You can manage your template schemes from the Administrator Zone. Choose the 'Scheme Manager' link from the 'Look&Feel' menu to open the Scheme Manager. Scheme Manager allows you to review the list of available schemes and make modifications to them.
You can disable the schemes that you do not want to be listed as available scheme options for category and/or product presentation. To disable a scheme, uncheck the 'Enabled' box field next to the scheme name and click on the 'Update list' button.
Creating a scheme
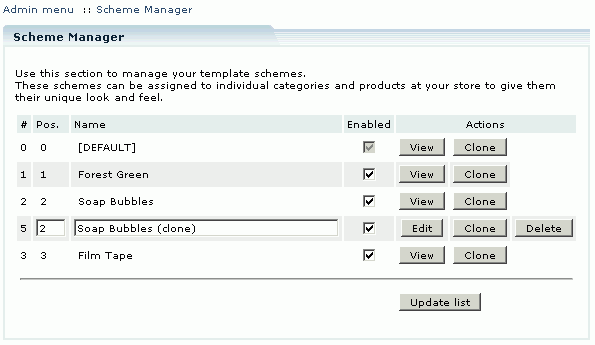
You can create additional schemes by cloning one of the existing schemes. Click on the 'Clone' button next to the scheme name to create a copy of that scheme.
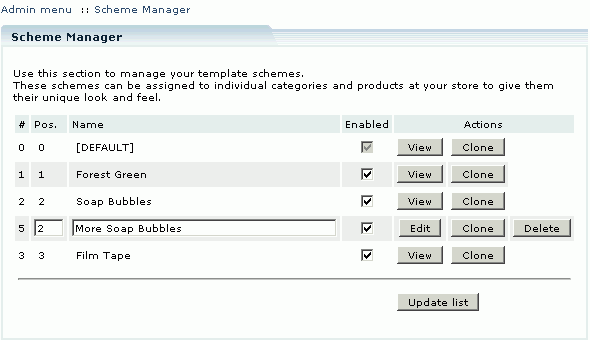
To change the name of a newly created scheme, type the desired name in the 'Name' field and click on the 'Update list' button.
When you create a new scheme, LiteCommerce generates a separate folder to store its templates. The folder is located at:
<re>'skins/default/<lang>/modules/Layout Organizer/schemes/schemeN_<scheme_name>/'
within LiteCommerce installation, where:
- '<lang>' is the language version of LiteCommerce that you are running,
- 'N' is the number assigned to the scheme at the time of its creation (the same number is visible in the '#' field in the list of available schemes) and
- '<scheme_name>' is its name.
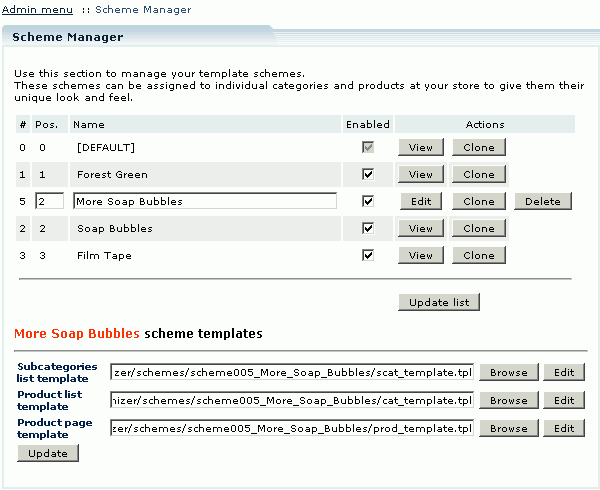
The scheme contains several template files. Clicking the 'View' button located next to the scheme name reveals the templates pertinent to the scheme:
- 'scat_template.tpl' for subcategories template,
- 'cat_template.tpl' for product list template, and
- 'prod_template.tpl' for product page template.
Editing a scheme
Scheme templates can be modified using Template Editor. To modify a scheme follow the instructions below:
- Click on the 'Edit' button next to the scheme name to see a list of templates pertinent to this scheme (Figure 7).
- Choose the template you want to modify and click on the 'Edit' button next to its filename. This will open the Template Editor with the template in it.
- Modify the template.
- Click on the 'Save' button to save changes. You will be redirected back to the Scheme Editor.
You can also change the scheme by assigning a different file to a relevant template (subcategories, product list or product page):
- Click on the 'Browse' button next to the template type that you want to modify.
- File browser will open in a new web-browser window allowing you to choose one of the template files located on the server. Choose a file by clicking on the radio button next to the filename, and then click on the 'Select' button.
- The browsed window will close and the new filename will appear in the Scheme Manager next to the corresponding template type. Click on the 'Update' button to save the changes.
Sorting the scheme list
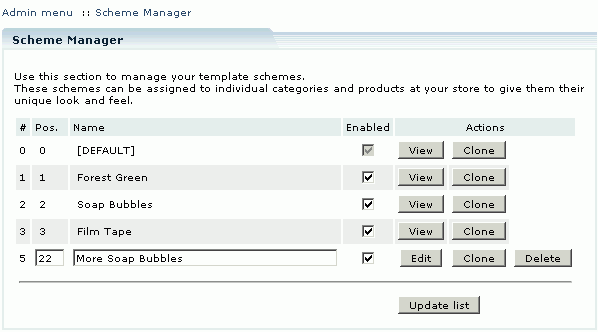
The list of schemes can be sorted for ease of use. To sort the schemes, assign 'Pos.' values to the schemes that would differ from one another. Schemes with lower 'Pos.' numbers will appear at the top of the list. Schemes with equal 'Pos.' values are sorted alphabetically (Figure 8).
Deleting a scheme
To delete a scheme, click on the 'Delete' button next to the scheme's name. Confirm the deletion by clicking on the 'OK' button in the confirmation pop-up window.
Changing the appearance of your store
Layout Organizer add-on module enables you to customize appearance of individual categories, subcategories and individual products in your store catalog.
Changing the category look and feel
Follow the instructions below to modify the style of a category:
1. In the 'Catalog' menu choose the 'Categories' section to open the 'Manage categories' page.
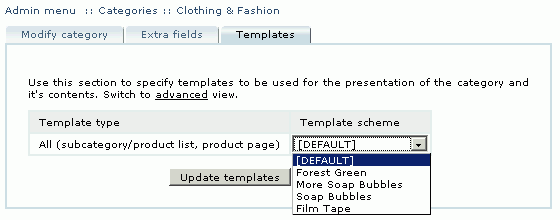
2. Choose the category you want to customize and click on the 'Modify' link next to it, then in the category details page click on the 'Templates' tab (Figure 9).
3. In this page you can specify a template scheme (subcategory list template, product list template and product page template) to be used for the corresponding category. To specify a scheme, choose one of the following drop-down list options:
[DEFAULT] – use this option if you want the category to be presented using default design templates.
Inherit – use this option if you want the category to inherit the appearance of its parent category. This option is not available for top-level categories.
Scheme name(s) – all the schemes listed in the Scheme Manager as 'Enabled' are listed in the drop-down box; you can choose any of them to customize the appearance of the category.
4. If you need a more flexible design, you can assign individual design templates to category components. Click on the 'advanced' link to switch to the advanced mode. In the advanced mode, each component can be assigned its own template available from a drop-down list of the following options:
[DEFAULT] – use this option if you want the corresponding component to be presented using the template which is default for this component type.
Inherit – use this option if you want the component to inherit the appearance of the same component of its parent category. This option is not available for top-level categories.
Scheme name(s) – all the schemes listed in the Scheme Manager as 'Enabled' are listed in the drop-down box; you can choose any of them to customize the appearance of the corresponding category component.
Clicking on the 'simple' link switches you back to the simple mode.
5. Click on the 'Update templates' button to save the changes.
Changing the look and feel of a category automatically applies the new style to those of its subcategories which are set to inherit the style from their parent.
Changing the product look and feel
While the look and feel of a product details page is defined by its category's 'Product page template', it can also be changed for each product. Follow the instructions below to modify the style of an individual product:
1. In the 'Catalog' menu choose the 'Products' section. This will open the 'Search product' page.
2. Find the product you want to customize and click on its title to enter the 'Product info' page, then click on the 'Templates' tab.
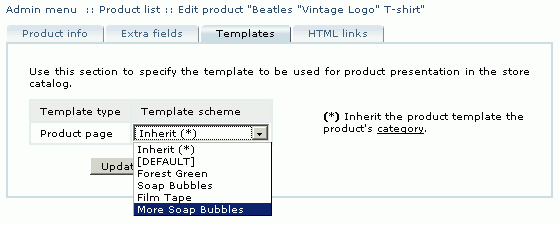
3. In this page you can specify the product page template to be used for displaying your product details page. Choose one of the following drop-down list options:
- Inherit – use this option if you want the product to retain the appearance defined by the 'Product page template' setting of its parent category.
- [DEFAULT] – use this option if you want the product details to be presented using the default product details template.
- Scheme name(s) – all the schemes listed in the Scheme Manager as 'Enabled' are listed in the drop-down box, you can choose any of them to customize the appearance of the product.
4. Click on the 'Update' button to save the changes.
Customer zone
This section demonstrates how Layout Organizer add-on module can improve the look of your online store.
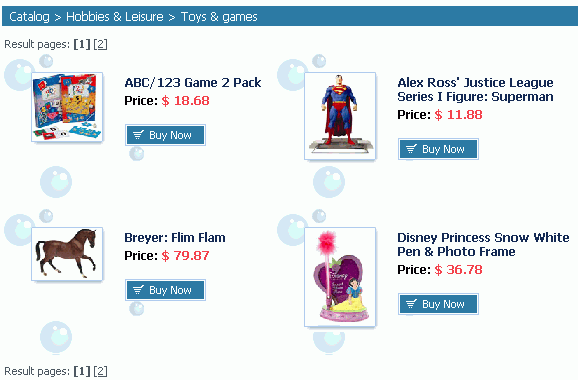
Customized category appearance
In the above example we have specified set the 'Games and toys' category of our sample store to use the 'Soap Bubbles' template.
Subcategories inherit the custom style of a product list from the 'Games and toys' category.
Customized product appearance
Product pages can be set to inherit page templates from the parent category. However, you can assign an individual template to a single product page if you want to make it more product-specific. This makes the product page look different and truly unique.
