X-Cart:Manufacturers
Contents
- 1 What Manufacturers module does
- 2 Roles in Manufacturers module management
- 3 Enabling and Configuring 'Manufacturers'
- 4 Adding Manufacturers
- 5 Managing Manufacturers
- 6 Defining Manufacturer Details
- 7 Defining International Manufacturer Descriptions
- 8 Assigning Products to Manufacturers
- 9 Product Search by Manufacturers
What Manufacturers module does
If your store sells goods for more than one manufacturers, some of your customers may be interested in being able to find products by the name of an individual or company that produced them.
The module Manufacturers helps you meet the needs of such customers, as it allows you to categorize your products by the producer (manufacturing firm, provider, developer, etc).
Examples: A shop specializing in mobile phones could have categories based on brand names: 'Nokia', 'Siemens', 'SonyEriccson', etc.
Using manufacturer categories is optional: if you do not want to use them, you do not have to.
Manufacturer categories can help your customers in one of the two ways:
- Customers can find products by browsing manufacturer categories in a way similar to browsing custom product categories.
- Customers can specify a manufacturer in the Advanced search options when searching for products using X-Cart's Product search functionality.
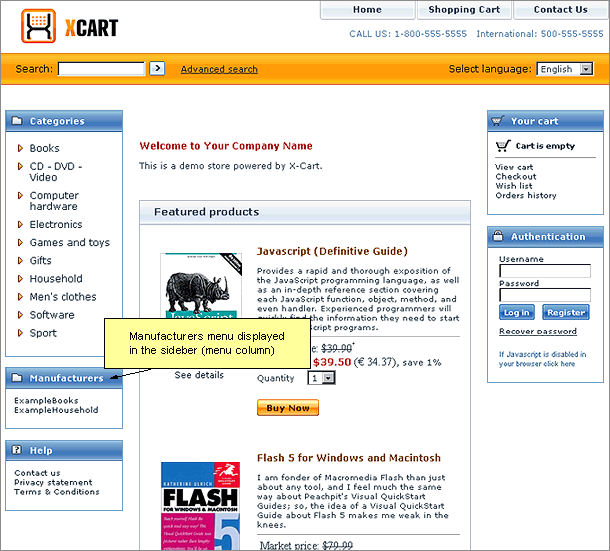
Depending on the module settings, the list of available manufacturer categories can either be displayed in the Manufacturers menu in the Customer area sidebar (menu column):
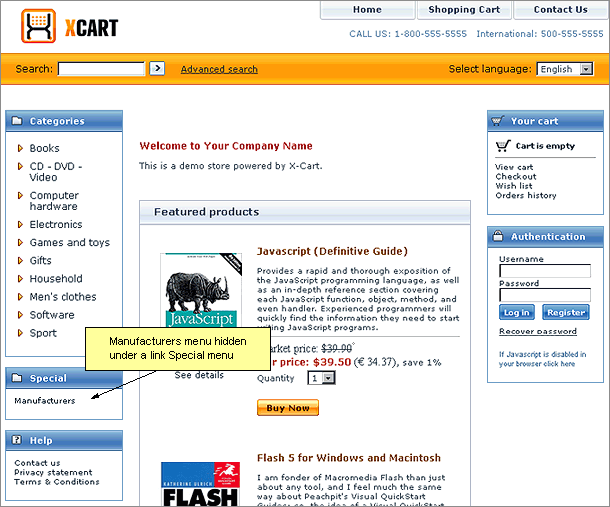
or be hidden under the Manufacturers link of the Special menu:
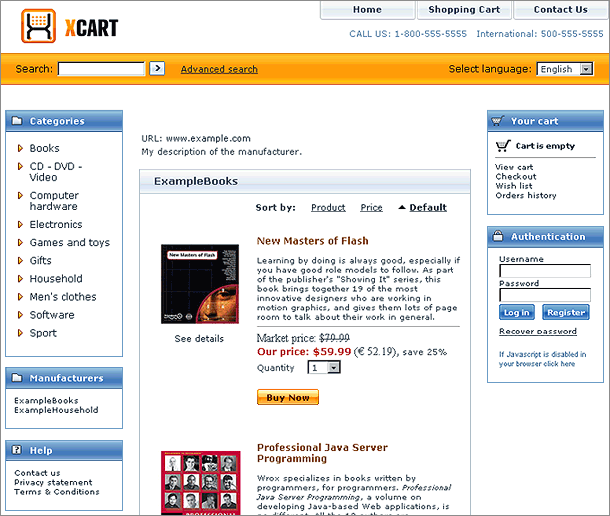
Clicking on a manufacturer category name allows a customer to view all the products in your store which are produced by this manufacturer.
Both administrators and providers have the ability to create manufacturer categories and assign specific products to them.
Roles in Manufacturers module management
If you are an X-Cart GOLD administrator/provider or an X-Cart PRO administrator:
- You can enable/disable and configure the module Manufacturers (See #Enabling and Configuring 'Manufacturers').
- You can create manufacturer categories (Check out the section #Adding Manufacturers).
- You can control all existing manufacturer categories (Study the section #Managing Manufacturers):
- adjust the order in which manufacturer categories appear on the storefront
- enable/disable manufacturer categories
- modify the details of any manufacturer categories
- delete any manufacturer categories
- You can assign products to manufacturer categories (See #Assigning Products to Manufacturers).
- You can enable/disable product search by manufacturers for customers (See #Enabling Product Search by Manufacturers).
If you are an X-Cart PRO provider:
- You can create manufacturer categories (Check out the section #Adding Manufacturers).
- You can control manufacturer categories that you own (For details, see #Managing Manufacturers):
- modify the details of any manufacturer categories you created (except that you cannot rename your own manufacturer categories if they are used by some other providers),
- delete any manufacturer categories you created if none of the other providers in the store are using them.
- You can assign products to manufacturers (See #Assigning Products to Manufacturers).
- You cannot control the order in which manufacturer categories appear on the storefront or enable/disable manufacturer categories.
- You cannot modify or delete manufacturer categories created by other providers.
Enabling and Configuring 'Manufacturers'
To begin using the module:
1. Enable Manufacturers module (Administration menu->Modules).
When the module is enabled, you can see:
- Manufacturers item in the Management menu;
- Manufacturers link in the 'Product Management' section menu (when a product is opened for editing);
- Manufacturers options section in General settings/Modules options.
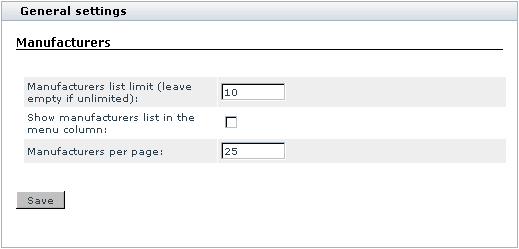
2. Adjust the module settings via General settings/Modules options->Manufacturers options:
- a) Use the 'Manufacturers list limit (leave empty if unlimited)' field to specify the maximum number of manufacturer categories which can appear in the Manufacturers menu (If the number of manufacturer categories in your store is greater than this limit, all the manufacturer categories beyond this limit will be concealed under the Other manufacturers... link.
- b) If you wish your manufacturer categories to be displayed in the Manufacturers menu of the Customer area sidebar, select the 'Show manufacturers list in the menu column' check box.
- c) Use the 'Manufacturers per page (admin)' field to specify the maximum number of manufacturers which can be displayed on one page in the 'Manufacturers list' dialog box in the Admin area.
- d) Click the Save button.
Adding Manufacturers
To add a manufacturer category:
1. Open the 'Manufacturers' section of the store's back end: click on Manufacturers in the Catalog menu.
- In this section, a dialog box titled 'Manufacturers list' is displayed:
2. In the 'Manufacturers list' dialog box, click the Add new... button. This opens a dialog box titled 'Manufacturer details'.
3. In the 'Manufacturer details' dialog box, provide the details of the manufacturer category being created (See #Defining Manufacturer Details).
4. Click the Save button.
When you click Save, the new manufacturer category is created. A message is displayed confirming that the manufacturer category has been created successfully.
To add another manufacture category, click the Add Manufacturer link at the top of the 'Manufacturer details' dialog box.
To return to the list of manufacturers, click the Manufacturers list link at the top of the 'Manufacturer details' dialog box.
Managing Manufacturers
Changing the order in which manufacturer categories appear on the storefront
To change the order in which your manufacturer categories appear on the storefront, do the following:
- Open the 'Manufacturers list' dialog box.
- Change the position number of one or more manufacturer categories.
- Click the Update button.
The order of the manufacturer categories in the Customer area should change.
Enabling/Disabling manufacturer categories
To temporarily disable one or more manufacturer categories, do the following:
- Open the 'Manufacturers list' dialog box.
- Unselect the check boxes in the ACTIVE column for the manufacturer categories which you want to be temporarily disabled.
- Click the Update button. The disabled categories should disappear from the storefront.
To enable one or more manufacturer categories, select the check boxes in the ACTIVE column for these categories and click on Update. The categories should appear on the storefront.
Modifying the details of manufacturer categories
To rename a manufacturer category, to change its icon, description or any other parameter(s), do the following:
- Open the 'Manufacturers list' dialog box.
- Click on the name of the manufacturer category whose details you wish to modify.
- Change the necessary details.
- Click the Save button. The details of the manufacturer category should be updated. You should see an information box with a confirmation message.
Deleting manufacturer categories
To completely remove a manufacturer category, do the following:
- Open the 'Manufacturers list' dialog box.
- Select the check boxes next to the names of the manufacturer categories you wish to delete.
- Click the Delete selected button. The selected manufacturer categories should be removed. You should see an information box with a confirmation message.
Defining Manufacturer Details
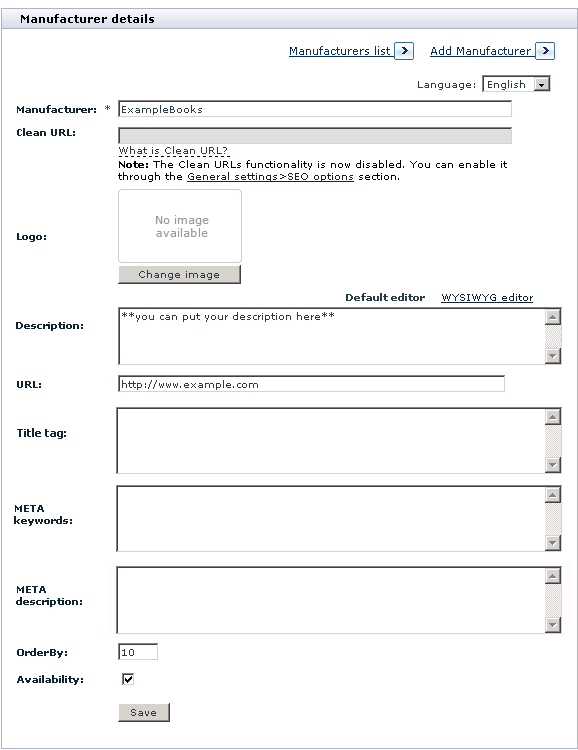
The details of a manufacturer category are defined in the 'Manufacturer details' dialog box:
To define the details of a manufacturer category, complete the following fields:
- Manufacturer: The name by which you and your customers will be able to identify this manufacturer category.
- Clean URL: The clean URL value for this manufacturer category. Instructions for adjusting this field are available in the section X-Cart:Clean URLs#Defining Clean URL Values of this manual.
- Logo: The image that will be displayed as the manufacturer's logo.
- Description: The description of the manufacturer (will be displayed to customers).
- URL: URL of the manufacturer's site.
- Title tag: The title to be used in the title bar of this manufacturer details page.
- META keywords: The keywords to be used in the keywords meta tag on the pages of this manufacturer category.
- META description: The description to be used in the description meta tag on the pages of this manufacturer category.
For more information on using the description and keywords meta tags, see the section X-Cart:Configuring Page Titles and Meta Tags of this manual.
- OrderBy: The position of the manufacturer category relative to the other manufacturer categories in the manufacturers list.
- Availability: This option allows you to specify whether this manufacturer category must be displayed in the Customer area. Select this check box to activate the manufacturer category.
Defining International Manufacturer Descriptions
If your store supports more than one languages, you must provide names and descriptions for your manufacturer categories in all the languages supported by your store. In X-Cart, a combination of the name and description of a manufacturer category in a language other than the default store language is called the manufacturer's international description.
To add an international description for a manufacturer category:
- Open the manufacturer category for which you wish to add an international description for editing.
- In the 'Manufacturer details' dialog box, switch the language selector to the language in which you wish to add an international description. The language of the interface changes to the selected language.
- Edit the name and description of the manufacturer category translating them into the selected language.
- Click the Save button.
When you click on Save, the international description is added. A message is displayed confirming that the international description has been updated successfully.
To edit an international description of a manufacturer category:
- Open the manufacturer category whose international description needs to be changed for editing.
- In the 'Manufacturer details' dialog box, switch the language selector to the language in which you wish to add an international description. The language of the interface changes to the selected language.
- Edit the name and/or description of the manufacturer category.
- Click the Save button.
When you click Save, the international description is updated. A message is displayed confirming that the international description has been updated successfully.
Assigning Products to Manufacturers
Each product in your store can be assigned to one of the defined manufacturer categories.
To assign a product to a manufacturer category:
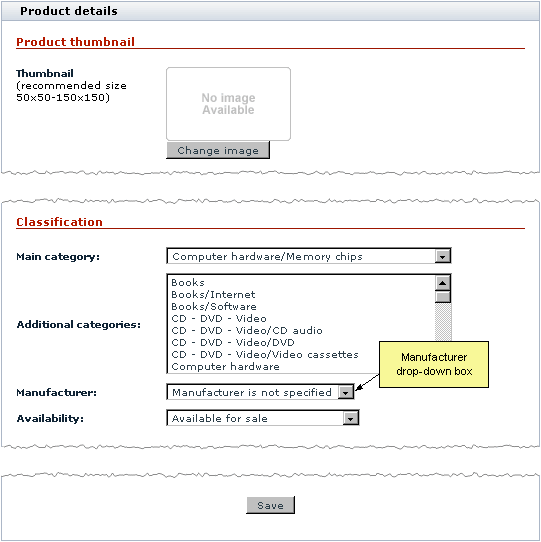
1. Find the product for which you want to define a manufacturer. Open this product for modification in the 'Product Management' section. The product's details should be displayed in the 'Product details' form.
2. Select the product's manufacturer from the 'Manufacturer' drop-down box in the 'Classification' section of the 'Product details' form.
3. Click the Save button.
The product should be assigned to the selected manufacturer category and added to this manufacturer category on the storefront.
Product Search by Manufacturers
When the module Manufacturers is enabled, product search by manufacturers is available: 'Manufacturers' field is added to the product search form for customers. This field can be used by customers to specify products of which manufacturer(s) need to be found.
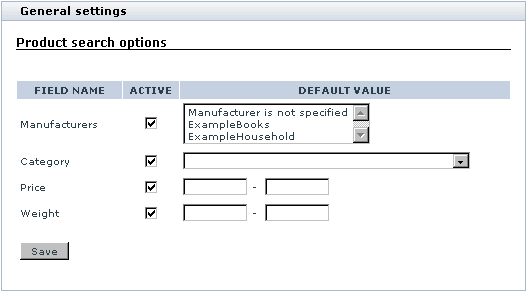
'Manufacturers' field is enabled in 'General settings/Product search options' by default, so you needn't worry about enabling it when you begin using Manufacturers module.
However, if you wish to disable search by manufacturers, you can disable this field at any time. Simply go to the 'General settings/Product search options' section, unselect the ACTIVE check box for 'Manufacturers' field and click on the Save button.
