X-Cart:X-CloudBackup
Contents
Overview
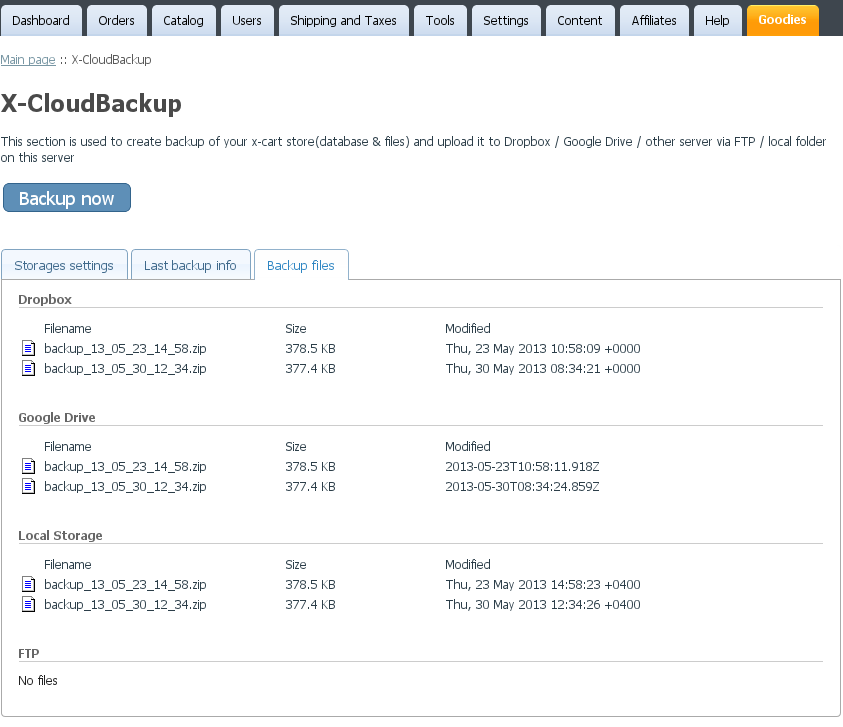
X-CloudBackup is an add-on module for X-Cart that allows you to protect your ecommerce data with backups. With this convenient module you will never again have to worry about losing your store's files or database: all you'll need to do is set up a backup schedule and specify where you want backups to be uploaded - the system will take care of the rest. In addition to running backups automatically on a schedule, X-CloudBackup makes it possible to run backups manually (like before an upgrade or making a change to your site - just in case something goes wrong).
Key features:
- One-click backups. Your entire store can be backed up with a single click of a button; just configure your preferences and rest assured that your precious data will be safe.
- Adjustable backup scope. Decide whether you want to back up your X-Cart store's database, files or both. Exclude specific directories or files from backup as you wish.
- Automatic, regularly scheduled backups. It is possible to specify the time when your next backup must be run or schedule backups to be run periodically (every day, every week). Once you have configured your settings, your store's data will be backed up automatically based on the schedule you defined: no chance of “forgetting” a vital backup and permanently losing irreplaceable data.
- Instant upload to Dropbox, Google Drive or FTP server of your choice. Add an extra layer of protection by housing your backup somewhere other than your primary server, so if something goes wrong with your server, your data will be safe. The module can automatically upload generated backups to Dropbox, Google Drive or any FTP server you specify. It is even possible to use more than one storage location at a time.
Quick Start
To start using X-CloudBackup at your X-Cart store, follow these steps:
- Install the X-CloudBackup add-on module in X-Cart (See X-CloudBackup system requirements and Installing the X-CloudBackup add-on module).
- Enable the module in X-Cart's back end (See Enabling the X-CloudBackup add-on module).
- On the X-CloudBackup module configuration page, specify your preferences in the General settings section (See Configuring the X-CloudBackup add-on module).
- On the same page, specify the storage location(s) to which you would like backups to be saved/uploaded by selecting the respective check box(es):
- Dropbox: Enable the option "Enable upload to Dropbox".
- Local Storage: Enable the option "Save to local storage".
- FTP: Enable the option "Enable upload to ftp server".
- Google Drive: Enable the option "Use Google Drive".
- Configure the selected storage(s) and connect it/them to X-CloudBackup:
- Dropbox: See Configuring Dropbox storage.
- Local Storage: Specify the path to the local directory where you would like store backups to be saved.
- FTP: Specify the details for connecting to your preferred FTP server and the path to the directory on that server where you would like store backups to be saved.
- Google Drive: See Configuring Google Drive storage.
- Configure your favourite scheduling program to periodically run the script cron_backup.php (See Running the script cron_backup.php).
X-CloudBackup system requirements
To be able to successfully install and use the X-CloudBackup add-on module, you need to have an installed working copy of X-Cart 4.1.x or later. Make sure that the version of the module is the same as the version of your installed copy of X-Cart.
X-CloudBackup system requirements are as follows:
- PHP version >= 5.3.1
- cURL PHP extension
- One of the following PHP functions available: exec, system or passthru
- crontab or other scheduling program on your server
- zip and mysqldump programs on your server
Installing the X-CloudBackup add-on module
To install the module:
- Obtain the X-CloudBackup add-on module distribution package by downloading it from the File Area section of your X-Cart Account. The distribution package you need is contained in the archive file X-CloudBackup-x.y.z.tgz where x, y and z stand for X-Cart version (These need to match the version of X-Cart on which your store is based).
- Copy the distribution package to the X-Cart root directory on your server or hosting account.
- If you use a Windows-based server, or a UNIX-based server without terminal access:
- a) Decompress the archive with the X-CloudBackup distribution package to a directory on your system using your favorite compression program (WinZIP or any other archiver with support for TAR files).
- b) Use an FTP client to upload all the files contained in the archive (retaining the directory structure) to the X-Cart root directory on your server or your hosting account.
- If you use a UNIX-based server with terminal access:
- a) Use an FTP client to upload the archive with the distribution package to the X-Cart root directory on your server or your hosting account.
- b) Decompress the package using the following command:
tar -xzvf X-CloudBackup-x.y.z.tgz
- Important: Make sure you keep the directory structure while unpacking and uploading the distribution package, otherwise some necessary files can be overwritten!
- In a web browser, run the installation script httр://<YOUR_XCART_DOMAIN>/install-xbackup.php replacing the variable <YOUR_XCART_DOMAIN> with the actual domain name of your X-Cart based store.
- Enter the Auth code, accept the License Agreement and click the Next button.
- The installation script patches the files and activates the module. Click Next to continue the installation.Note: if you are using a custom skin, you will need to manually apply the patches to it. Otherwise, the module will not work in this skin. For more info, see How to patch a 3rd party skin after the installation of the X-CloudBackup module.
- The installation script generates a new system fingerprint. Click Next to complete the installation.
- Use the ADMINISTRATOR AREA link to log in to the Admin area.
Enabling the X-CloudBackup add-on module
After the X-CloudBackup add-on module installation has been completed, the module you have installed needs to be enabled in your store:
- In Admin area, go to the Modules section (Settings menu->Modules).
- Choose the X-CloudBackup module by selecting the respective check box on the left.
- Click the Apply changes button. This activates the module.
Configuring the X-CloudBackup add-on module
After the X-CloudBackup add-on module has been enabled in your store, you should check and adjust its configuration:
- In the Modules section (Settings menu->Modules), click the Configure link opposite the module name ('X-CloudBackup').
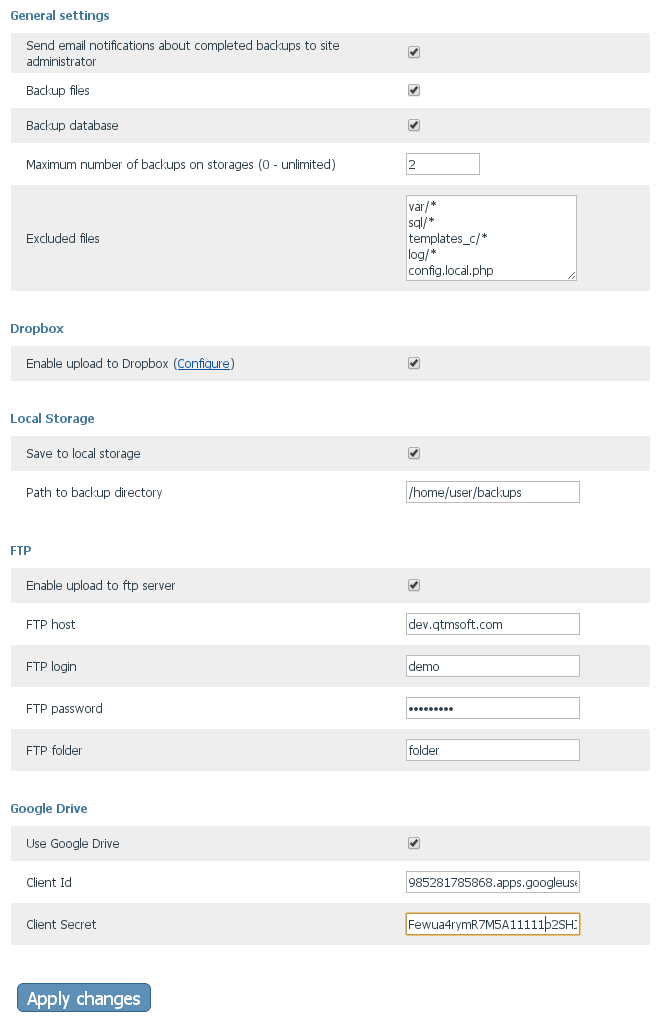
The module configuration page (titled by the name of the module) opens: - Adjust the settings on the module configuration page. Detailed information regarding the X-CloudBackup module configuration settings is available below.
- Click the Apply changes button to save the changes.
X-CloudBackup module configuration settings
General settings
- Send email notifications about completed backups to site administrator: Enable this option if you want information about each completed backup (as seen on the Last backup info tab of the X-CloudBackup page) to be sent to the store administrator's email address.
- Backup files: Enable this option if you want your X-Cart store's files to be backed up.
- Backup database: Enable this option if you want your X-Cart store's database to be backed up.
- Maximum number of backups on storages (0 - unlimited):
- Excluded files: If certain files or directories under your X-Cart installation directory do not need to be backed up, specify them here - they will not be included.
Format:
- folder_name/* - This excludes the folder "folder_name" and all the files in this folder from the backup archive.
- folder_name/file_name.txt - This excludes the file "folder_name/file_name.txt" from the backup archive.
Dropbox
- Enable upload to Dropbox: Enable this option if you want backups to be uploaded to your Dropbox account. After doing so, be sure to connect X-CloudBackup with your Dropbox account (See Configuring Dropbox storage).
Local Storage
- Save to local storage: Enable this option if you want backups to be saved locally on the server where your X-Cart store is installed.
- Path to backup directory: Enter the path to the directory in which backups are to be saved.
FTP
- Enable upload to ftp server: Enable this option if you want backups to be uploaded to an FTP server.
- FTP host: Enter the host name of the FTP server on which backups are to be stored.
- FTP login and FTP password: Enter your FTP account username and password.
- FTP folder: Enter the name of the folder to which backups are to be saved.
Google Drive
- Use Google Drive: Enable this option if you want backups to be uploaded to Google Drive.
- Client Id and Client Secret: Enter the Client Id and Client Secret obtained from Google (See Configuring Google Drive storage).
Preparing to use X-CloudBackup
Configuring Dropbox storage
To enable the X-CloudBackup module to upload backups to Dropbox, you must connect your Dropbox account with X-CloudBackup. Follow these steps:
- In X-Cart's Admin area, go to the X-CloudBackup page (Click Tools menu->X-CloudBackup or use the Configure link shown next to the Enable upload to Dropbox option on the X-CloudBackup module configuration page.
- On the Storages settings tab, locate the section titled Dropbox settings. Before you have connected your Dropbox account with X-CloudBackup, this section contains a message saying "You should connect your Dropbox account with X-CloudBackup. Please use this link."
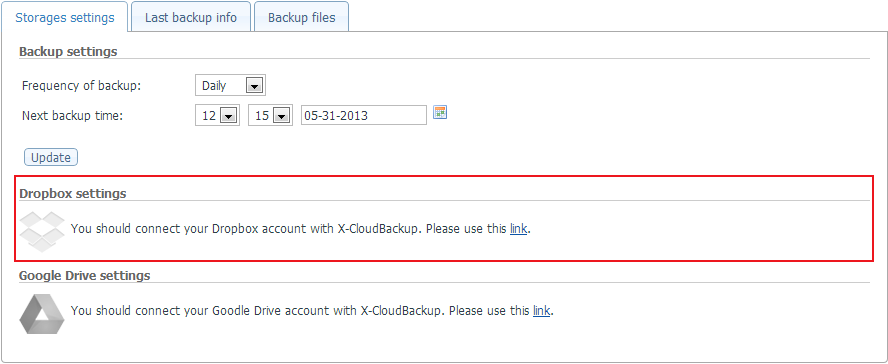
- Follow the link. You will be redirected to Dropbox.
- Sign in to your existing Dropbox account or create a new one.
- After signing in to Dropbox, you will be asked to provide permission for the X-Backup application to create a folder "x_backup" in your Dropbox account. Allow the creation of the "x_backup" folder (This is where your store's backups will be stored). The folder will be created automatically, after which you will be redirected back to the X-CloudBackup page in your X-Cart store.
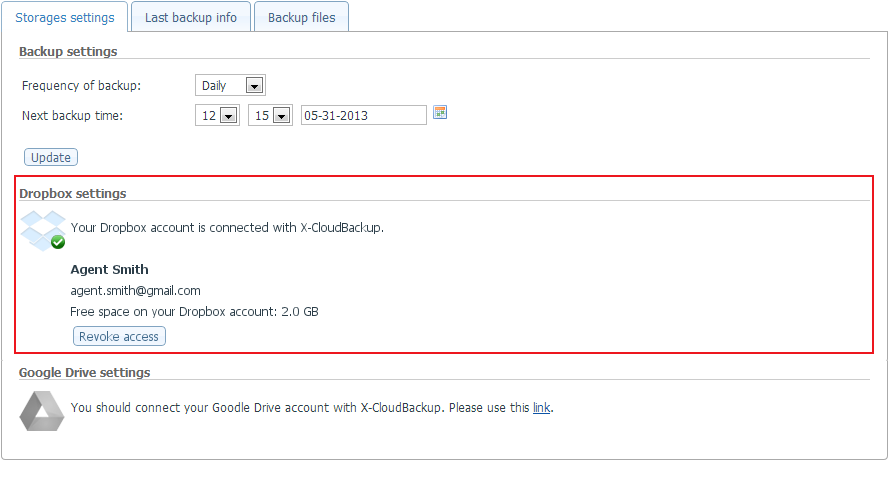
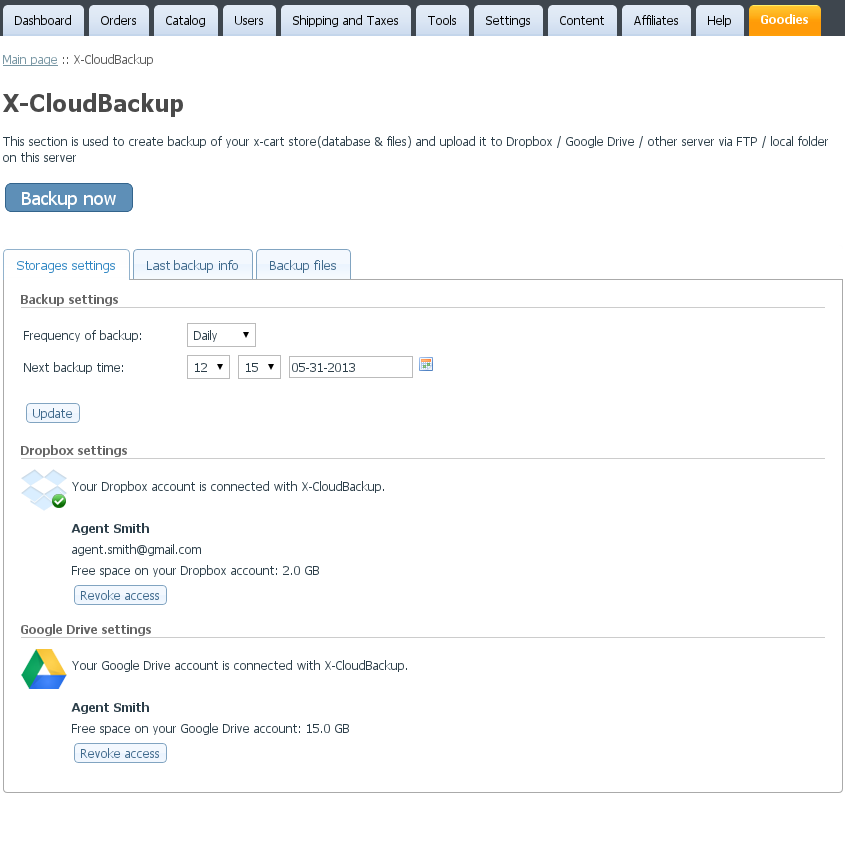
That is all - your Dropbox account is now connected to X-CloudBackup. The Dropbox settings section now shows your Dropbox account info:
Configuring Google Drive storage
- Create an API project in the Google APIs Console
- Select the Services tab in your API project, and enable the Drive API.
- Select the API Access tab in your API project, and click Create an OAuth 2.0 client ID.
- In the Branding Information section, provide a name for your application (e.g. "Backup for my store"), and click Next. Providing a product logo is optional.
- In the Client ID Settings section, do the following:
- Select Installed application for the Application type.
- Select Other for the Installed application type.
- Click Create Client ID.
- In the API Access page, locate the section Client ID for installed applications and note or copy the two pieces of information: Client ID and Client Secret.
- In your X-Cart store's Admin area, go to the X-CloudBackup module configuration page and enter the Client ID and Client Secret values in the Google Drive section. Be sure to save the changes.
Running the script cron_backup.php
X-CloudBackup provides a script cron_backup.php, which must be executed from the command line. You can use this script to launch execution of periodic backup tasks, necessary for correct operation of the module. It is recommended to launch this script using your favorite scheduling program (for example | cron daemon in Unix/Linux systems) once per 5-10 minutes.
Recommended setup for running cron_backup.php script via crontab:
*/5 * * * * cd /path/to/your/xcart; /path/to/php -d safe_mode=Off cron_backup.php --key=c901d65fc15ff15d0ac0af967437d051
- */5 * * * * - to run script every 5 minutes
- cd /path/to/your/xcart - to change dir to x-cart folder on your server
- /path/to/php - path to PHP 5.3.1 CLI binary on your server
- -d safe_mode=Off - to execute cron_backup.php script
- --key=c901d65fc15ff15d0ac0af967437d051 - secure key defined in x-cart General Settings: Secure key for launching the cron.php script
Managing the X-CloudBackup add-on module
- In Admin area, go to the X-CloudBackup page section (Tools->X-CloudBackup page). On this page you should connect X-CloudBackup with your Dropbox or Google Drive accounts and setup frequency and time of backuping.
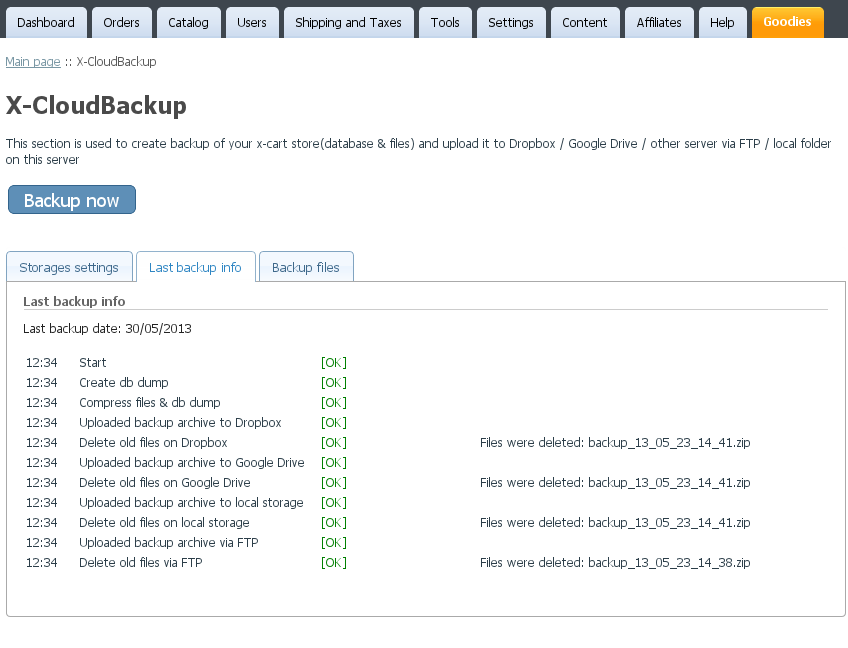
- On the tab "Last backup info" you can find information about the last backuping.
- The list of the backup archive files is showing on the tab "Backup files".
