X-Cart:Customizing Text Labels
Overview
The text in the interface of your X-Cart based store (all kinds of text notes, labels and error messages), as well as the text sent in the e-mail notifications to your users, is easily editable. Perhaps, the best thing about it is that user does not need to possess any programming skills to be able to edit the text: the wording of any text piece of the store can be easily changed from the Admin area.
What makes text editing easy is the use of language variables. A language variable is a named storage location that can contain textual data. X-Cart's template code and program code operate with language variable names instead of using text pieces directly. Thus, the text pieces contained in the variables can be edited without changing the template or program code.
In fact, editing texts in X-Cart boils down to editing language variable values. X-Cart allows you to edit language variable values using the 'Languages' section of the store's admin area (see #Managing Language Variables) or using the Webmaster mode (see #Using Webmaster Mode).
X-Cart's 'Languages' section allows you to edit the values of the existing language variables, add new language variables and delete the language variables that you do not need in your store.
Managing Language Variables
Selecting a language for editing
Before you can edit, add or delete language variables, you need to select the language you are going to alter.
To select the language to be edited:
1. On the 'Content' menu, select 'Languages' in your store's admin area.
2. In the 'Edit language' section, pull the drop-down menu and then select the language to be edited.
This refreshes the page and displays all the tools necessary for editing the variables of the selected language.
Finding and viewing language variables
Please remember that every language is associated with a certain charset. To ensure that the variables of the language you have opened for editing are displayed properly, make sure to view them in the language they were created. In other words, if the language selected for editing is French, the current language of the Admin area needs to be switched to French, too:
The number of language variables in X-Cart is extremely great, so, in order to view specific language variables, you will first need to find them. X-Cart's language variable filter facilitates finding language variables:
Here's how you can use the filter:
For your convenience, all the language variables in X-Cart are divided into several groups:
- Countries - country names in the language you are currently editing
- E-mail - text pieces used in email notification messages
- Errors - error messages
- Labels - relatively small text pieces (section titles, field names, etc)
- Languages - language names in the language you are currently editing
- Modules - module names and descriptions for the 'Modules' section of the store's admin area
- Options - subsection titles for the 'General settings' section of the store's back end, names of specific options and settings, help notes for specific options and settings
- Text - longer text pieces (notes, comments, instructions, etc.)
The filter allows you to narrow down your search by specifying a group of variables to be searched and entering a sequence of characters to be looked for.
To find one or more language variables:
1. On the 'Select topic' drop-down box of the language variable filter, select the variable group to be searched (or select All to search all the groups).
This refreshes the page and displays all the variables of the selected group in the 'Edit language entries' area below the filter.
2. In the 'Apply filter' field, enter a phrase, word or partial word to be looked for (Please note that X-Cart searches both variable names and variable values).
3. Click the Go button.
This refreshes the page again displaying only those variables that belong to the specified variable group and match the search string.
Editing language variables
To edit the value of a language variable:
- Select the language to be edited.
- Make sure the options of the language being edited are adjusted properly:
- If you have not yet done so, set the charset to be used for displaying the language by entering the respective charset code in the 'Charset' field of the 'Language options' section of the 'Edit language' page. By default, the value of the 'Charset' field is iso-8859-1, which is appropriate for English and some other European languages. If you need a different charset, replace the content of the 'Charset' field with the required code. The following resources provide information on charsets:
- Click the Apply button
- Make sure the current interface language matches the language being edited (This is critical because when editing variable values in a certain language, you want to enter the characters in the charset of that language).
- Find the language variable to be edited.
- Edit the value of the language variable.
- Click the Update all button.
Adding language variables
To add a new variable:
- Select the language to be edited.
- Make sure the options of the language being edited are properly set.
- Make sure the current interface language matches the language being edited (This is critical because when editing variable values in a certain language, you want to enter the characters in the charset of that language).
- Scroll down to the 'Add new entry' section of the 'Edit language entries' area.
- Enter details for the new variable:
- 'Select topic' - Name of the variable group the new variable belongs to.
- 'Variable' - Name of the new variable (in English).
- 'Value' - Text piece to be stored in the variable (in the language being edited).
- Click the Add button.
Deleting language variables
To delete one or more language variables:
- Select the language to be edited and find the language variables to be removed.
- Select the check boxes next to their names in the 'Edit language entries' area.
- Click the Delete selected button.
Using Webmaster Mode
The Webmaster mode is an operating mode that facilitates the WYSIWYG editing of language variable values directly on the pages where they are displayed. In this mode, clicking on any text element in your store opens an editor, where you can edit the text of the selected element. Once the changes made to the element are saved, the result of the editing becomes available to all users viewing the respective page of your store.
The following browsers support the Webmaster mode:
- IE 6.0.3790
- IE 7.0.6000.16386
- Firefox 2.0.0.5
- Opera 9.22
- Mozilla 1.7.13
- Safari 2.0.4
- Safari 3.0.4
- Netscape Navigator 9.0.05 (Limited support: hyperlinks cannot be edited by pressing the "e" button)
- Konquerror 3.5.7
- Ephiphany 2.18.3
Other browsers may support the Webmaster mode, but we cannot guarantee it, as no thorough testing has been carried out.
Starting Webmaster mode
To start the Webmaster mode:
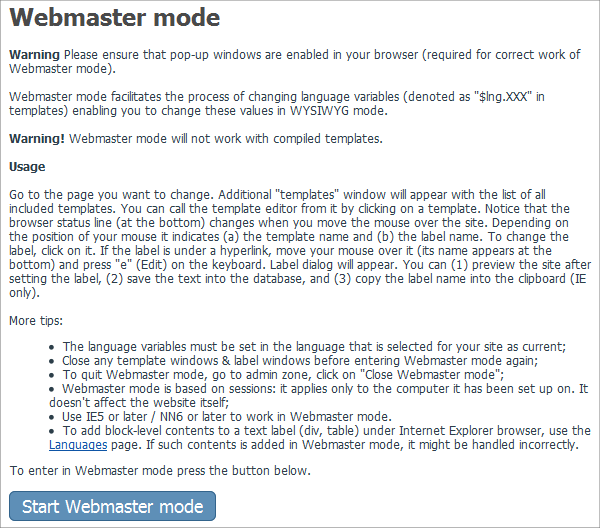
1. Go to the 'Webmaster mode' section of your store's Admin area by selecting the 'Webmaster mode' item on the 'Tools' menu. This opens a page with instructions on using the Webmaster mode. At the bottom of that page, there is a button labeled Start Webmaster mode.
2. Click the Start Webmaster mode button to enable the Webmaster mode. You will know it is enabled when all the textual elements of the user interface in your current user session become green: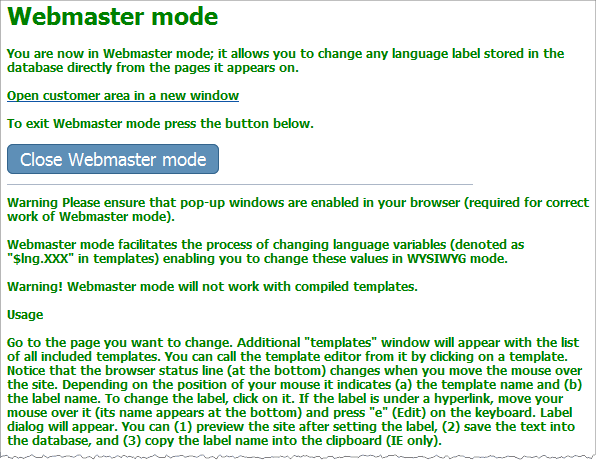
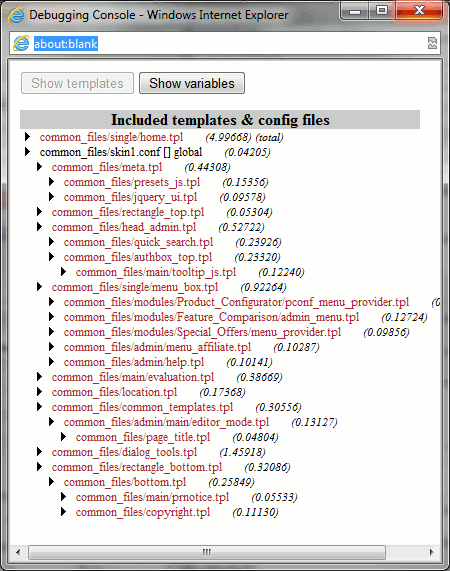
Webmaster mode also opens a pop-up window with the tree of templates used on the current page.
The window is X-Cart's Debugging console, which you can use to quickly edit any templates used on the current page. (For detailed information on using the Debugging console, read X-Cart:Editing Skin Files#Using Debugging Console).
Editing text in Webmaster mode
To edit text in the Webmaster mode:
- Once the Webmaster mode is enabled, go to the page with the text to be edited.
- If the desired page is in the Admin area, simply browse to that page (the way you would do that in the normal mode).
- If the desired page is in the Customer area, click on the 'Open customer area in a new window' link at the top of the page with the instructions on using the Webmaster mode (this opens the Customer area in a new browser window or tab in the same session), then browse to the desired page. Please note that you will need to log in using your customer account to edit the pages that are accessible to authorized customers only (like wish list, order history, etc).
- (In X-Cart PLATINUM or PRO): If the desired page is in the Provider area, open the Admin area in a new browser window or tab in the same session, then switch to that new window or tab, edit the URL in the browser address bar so that it points to the Provider area and press the Enter key. When the Provider area authentication page appears, log in as provider and browse to the desired page.
- Make sure that the page to be edited is displayed in the language you are going to edit. For example, if the page is currently displayed in English, and you wish to leave all the English text on the page "as is" and just edit the Russian version of the page, switch the Language selector at the bottom right-hand corner of the page to Russian before you proceed.
- Place the mouse pointer over the text element to be edited.Tip: As you place the mouse pointer over a non-clickable text element, the browser status bar (in browsers that have it) may display the name of the language variable that stores the respective text piece and the name of the template file that references this language variable; similarly, when you place the mouse pointer over a hyperlink, the browser status bar may display the destination of the hyperlink. However, this feature is now disabled by default in the majority of web browsers. See http://kb.mozillazine.org/JavaScript#JavaScript_settings_in_Firefox_23_and_above for more info.
- Do one of the following:
- (If the text element is a non-clickable piece of text) Click the text element.
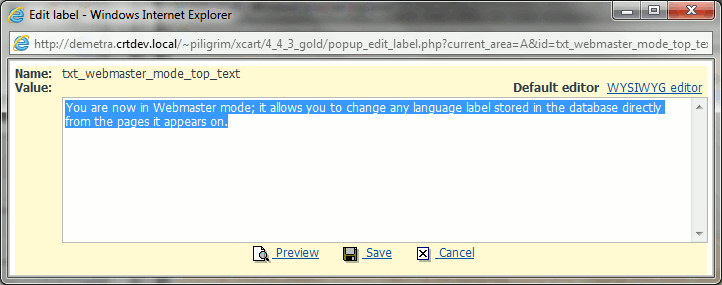
- (If the text element is a hyperlink): Press the "e" key on your keyboard.Important: Make sure the keyboard layout on your computer is set to English when you are pressing the e key; otherwise it will simply not work.This opens a small pop-up window titled 'Edit label', where you can edit the value of the language variable:
Edit the value of the language variable displayed in the 'Edit label' pop-up window and save the changes. For information on the 'Edit label' pop-up window, see the following chapter.
The 'Edit label' pop-up
The 'Edit label' pop-up window appears after you select a text element to be edited in the Webmaster mode. It displays the name of the language variable that stores the selected text element and provides a text area, where you can edit the value of that variable.
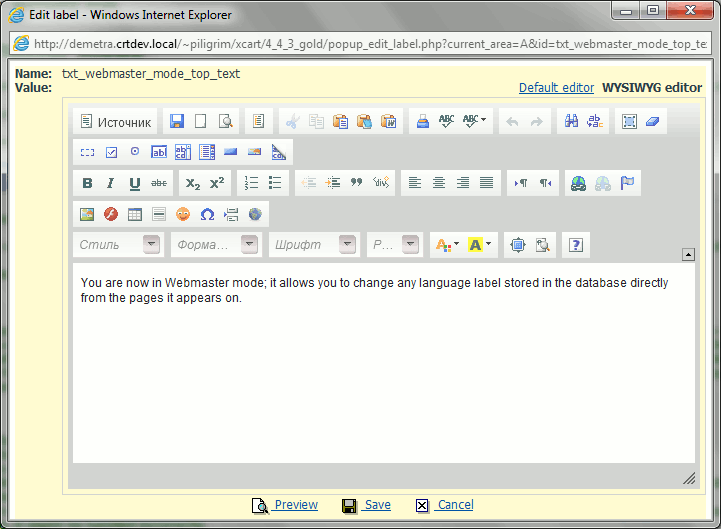
Note that with the HTML Editor module enabled in your store you can use a WYSIWYG editor for editing language variable values that are longer than 40 characters or contain an EOL (end of line) symbol. The two links: 'Default editor' and 'WYSIWYG editor' above the text area with the variable value indicate that the WYSIWYG editor is available:
By clicking on the 'WYSIWYG editor' link, you can switch to editing the variable value in the WYSIWYG editor. If you do not like the WYSIWYG editor, you can switch back to the Default editor at any moment by clicking on the 'Default editor' link.
For short and simple language variable values (shorter than 40 characters or not containing EOL symbols) only the Default editor is provided (In this case, you do not see any links above the text area).
Below the text area with the language variable value, there are three buttons: Preview, Save and Cancel.
The Preview button allows you to preview the page after making changes to the language variable value before you actually save the changes.
The Save button saves the changes you make to the language variable value.
The Cancel button allows you to discard any changes made to the language variable value before they are saved.
Exiting Webmaster mode
To quit the Webmaster mode:
- Go to the 'Webmaster mode' section of your store's Admin area by selecting the 'Webmaster mode' item on the 'Tools' menu.
- Click the Close Webmaster mode button. The Webmaster mode will be disabled. All the textual elements in the store should return to their normal colors.

