X-Cart:Braintree Integration
Contents
Overview
BrainTree payment integration module allows to use BrainTree payment gateway in your store. Braintree helps online and mobile businesses process credit card payments by providing a merchant account, payment gateway and credit card storage. The company is disrupting the payments industry by providing elegant tools for developers coupled with white-glove support. Braintree works with some of the world’s most discerning online merchants, including LivingSocial, 37signals, OpenTable, GitHub, and ranked 47th in the 2011 Inc. 500.
Integration key features:
- Authorize the transaction (action "by default")
- Capture or request for settlement of the authorized transaction
- Void the authorized transaction
- Refund the captured/settled transaction
- Check for status of the transaction and update the order status accordingly
- Checkout on X-Cart side
- Cheaper than its analogues offered by 3rd party vendors
The Braintree payment integration module can be purchased and installed on all X-Cart editions.
System requirements
- PHP 5.3 or above with gd lib support
To be able to successfully install and use the Braintree payment integration module, you need a working copy of X-Cart 4.4.0 or higher installed on your server. Make sure that the version of the Braintree payment integration module matches the version of your copy of X-Cart.
Installation and removal
To install the Braintree payment integration module:
1. Obtain a distribution package for the Braintree payment integration module by downloading it from the File Area section of your X-Cart Accountaccount. Make sure the version of the module matches the version of your copy of X-Cart.
2. Copy the distribution package to the X-Cart root directory on your server or hosting account.
- If you use a Windows-based server or a UNIX-based server without terminal access:
- a) Extract the contents of the archive with the Braintree payment integration module files to a directory on your system using your favorite compression program (WinZIP or any other archiver that supports TAR files).
- b) Use an FTP client to upload all the files extracted from the archive (retaining the directory structure) to the X-Cart root directory on your server or hosting account.
- If you use a UNIX-based server with terminal access:
- a) Use an FTP client to upload the archive with the Braintree payment integration module distribution package to the X-Cart root directory on your server or hosting account.
- b) Decompress the package by typing the following command:
tar -xzvf braintree.4.x.x.tgz
Enabling Braintree payment in X-Cart
Once you have installed the Braintree payments module, enable it in the X-Cart Admin area. It should be done though the Settings -> Payment methods page: http://help.x-cart.com/index.php?title=X-Cart:Configuring_Payment_Methods_in_X-Cart_4.5.0-4.5.2
Configuring Braintree payment gateway in X-Cart
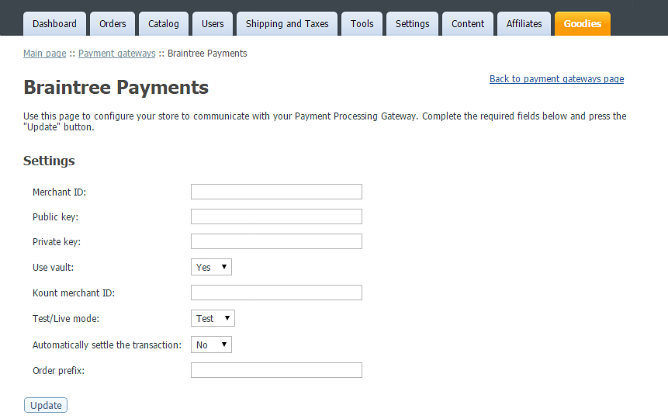
To configure Braintree payment gateway in X-Cart, adjust the following settings:
- Merchant ID, Public key and Private key: Specify your credentials for access to the Braintree API.
- Use vault:
- Kount merchant ID: (This setting should be adjusted only if you use Kount) Your Kount merchant ID.
- Automatically settle the transaction: Specify the mode in which transactions should be conducted via Braintree payments. "Off" = authorization to capture the funds should be obtained (The funds will need to be captured manually at a later time). "On" = the funds should be authorized and captured at once.
- Test/Live mode: Specify your store's payment mode. For testing purposes, set this value to "Test". For production, set to "Live". Note that the set of API access credentials for Test and Live modes should be different, so be sure to adjust the values in the "Merchant ID", "Public key" and "Private key" fields according to the mode selected.
- Order prefix: Set a prefix that will allow Braintree to identify orders as originating from this store. For example, this may be useful if your Braintree account is used for more than one stores.
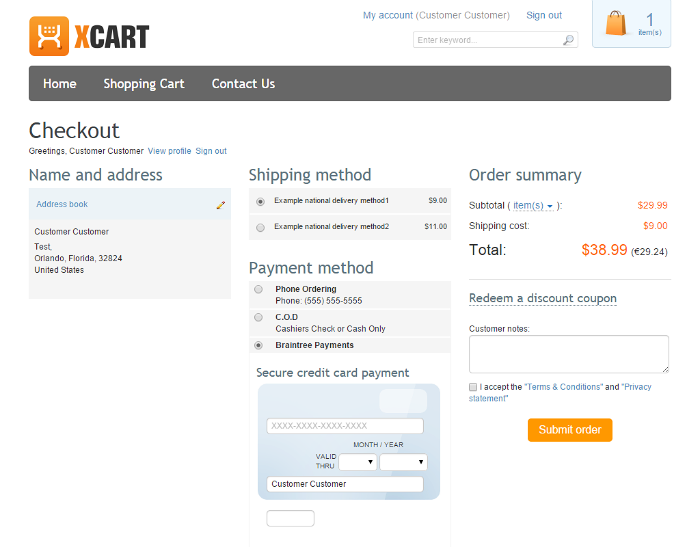
Checkout page
Once the configuration is complete, the form to enter credit card details will be displayed right on the checkout page of your store:

