X-Cart:Amazon Simple Pay
Amazon Payments has retired the payments processing features of Amazon Simple Pay (ASP). This service is no longer available since June 1, 2015.
We are providing a module that allows you to use another payment processing solution by Amazon: Pay with Amazon.
For more information see:
- Flexible Payments Service (FPS) and Amazon Simple Pay (ASP) End of Life FAQ
- Migration Guide for Amazon Simple Pay (ASP)
- Pay with Amazon module page
- Pay with Amazon module manual
Amazon Simple Pay Standard enables digital goods and services providers to offer Amazon Payments as a payment option for collecting one-time payments on their website.
Obtaining an Amazon Payments Account
If you have not registered an account with Amazon yet, you should do it before you start setting up Amazon Simple Pay in X-Cart. Amazon Payments uses your Amazon.com account to identify you. You may sign in using your existing Amazon account or you can create a new account. To open an account, go to Amazon Payments website and follow the instructions on the screen. After you have registered an account, you can set up Amazon Simple Pay in the X-Cart Admin area.
To sign up you will need to have:
- Your business name, contact information, and credit card
- US billing address
Setting up Amazon Simple Pay
To use Amazon Simple Pay as one of the payment options in the store:
- Log in to the X-Cart Admin area.
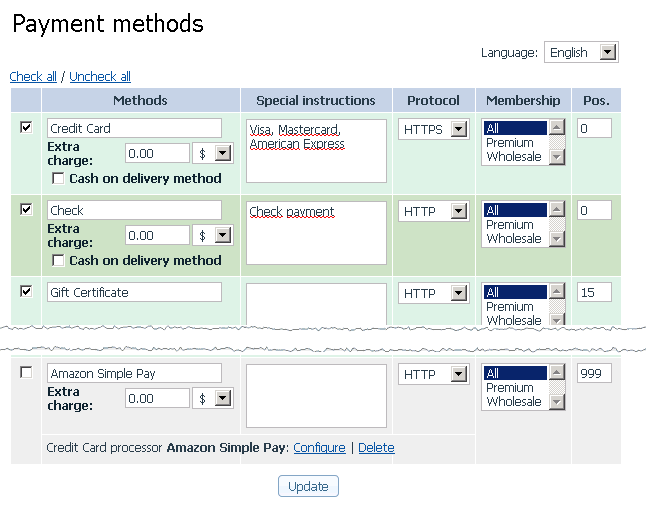
- Go to the Payment methods section (Settings menu -> Payment methods) and scroll down to the Payment gateways form.
- Select Amazon Simple Pay from the drop-down list and click the Add button.
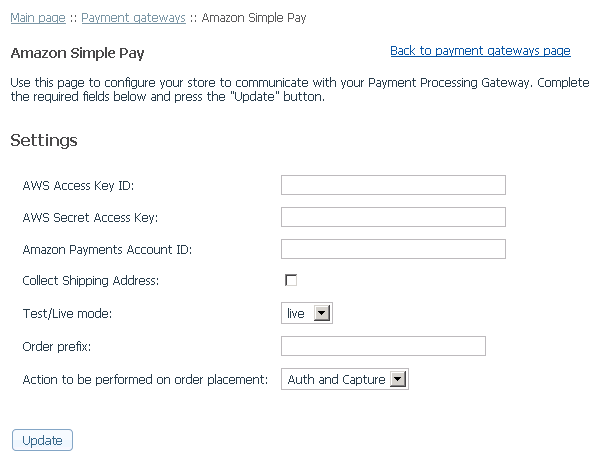
After you have clicked Add, Amazon Simple Pay will be added to the list of the available payment methods. - Click on the Configure link. This opens the configuration page for Amazon Simple Pay.
- Adjust the configuration settings for Amazon Simple Pay:
- AWS Access Key ID: Enter your AWS Access Key ID (a string distributed by Amazon that uniquely identifies a merchant).
- AWS Secret Access Key: Enter your AWS Secret Access Key (this key plays the role of password).
- Amazon Payments Account ID: Enter your Merchant ID (your unique identifier for all your transactions). You can find your Merchant ID in Seller Central by clicking the Settings tab and then clicking Checkout Pipeline Settings: your Merchant ID appears on the page as a 14-character string similar to this: "AEIOU1234AEIOU".
- Collect Shipping Address: Select this check box if you want Amazon to send the customer's shipping address to X-Cart. If the customer already has a default shipping address set up on Amazon.com or any of the international Amazon retail sites, then the customer is not prompted for the shipping/mailing address. The customer can, however, have the option of changing the shipping/mailing address on the payment authorization confirmation page. If the customer does not have a default shipping address set up, he or she is prompted to choose one from the shipping addresses already on file with Amazon, or enter a new one. If the option 'Collect Shipping Address' is disabled, then no shipping/ mailing address will be returned to X-Cart and the customer will not be prompted for one either.
- Test/Live mode: Select whether you wish to use your Sandbox account (test mode) or actual Amazon Simple Pay account (live mode).
- Order prefix: Enter a prefix that will be automatically added to the IDs of orders placed in your store and paid through Amazon Simple Pay. Using a prefix ensures uniqueness of order IDs in case you have more than one online store that uses Amazon Simple Pay as a payment option.
- Action to be performed on order placement: Choose whether Amazon must capture money automatically (Auth and Capture) or only freeze the funds until you capture the authorized amount manually through the X-Cart Admin area (Auth only).
- Click the Update button to apply the changes.
- Return to the list of payment methods and activate Amazon Simple Pay by selecting the check box next to the gateway's name.
- Click the Update button.


