X-Cart:Editing Skin Files
Contents
- 1 Introduction
- 2 Managing Skin Files
- 3 Overview of Templates
- 4 Overview of CSS Files
- 5 Location of skin specific template and CSS files
- 6 Using X-Cart's Debugging Console
- 7 Using Webmaster Mode
- 8 Using X-Cart's Template Editor
- 9 Replacing X-Cart's Logo
- 10 Customizing the breadcrumb trail
- 11 Adding a 3rd Column to Ideal Responsive
- 12 Adding the Short Description to Product List
- 13 See also
Introduction
An X-Cart skin typically includes PHP Smarty templates, CSS files, JavaScript files and, in some cases, HTML files.
The PHP Smarty templates of your store's skin are files out of which your store's pages are built. Each template file defines how a specific element of the site appears. Template files are made up of HTML/CSS and Smarty; all of them have the .tpl file extension.
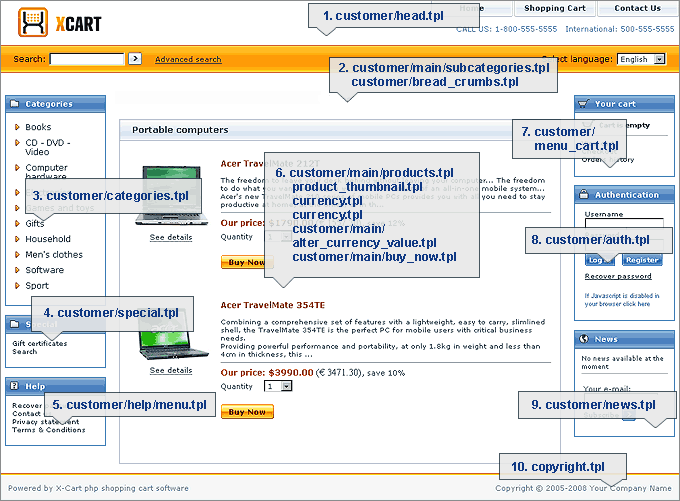
The screenshot of the customer area below provides an example of how a page is created using templates:
The CSS files of your store's skin are style sheets that define the presentation of your store's pages. They use the extension .css.
The JavaScript files of your store's skin are files that contain JavaScript code which can be called on your store's pages. They use the extension .js.
If you wish to change the look of a specific element of your store site, you need to edit the skin files that control this element. Most typically, you will need to edit X-Cart's template and CSS files. To be able to edit X-Cart's template and CSS files, you must possess substantial knowledge of HTML, CSS and Smarty. Here is a list of online resources that might be helpful:
HTML:
- W3C HTML start page: http://www.w3c.org/MarkUp/
- HTML Validation Service: http://validator.w3.org/
CSS:
- W3C Cascading Style Sheets homepage: http://www.w3.org/Style/CSS/
- Validation service: http://jigsaw.w3.org/css-validator/
Smarty:
- Smarty resources: http://www.smarty.net/
- Smarty online documentation: http://www.smarty.net/docs.php
All the files of your X-Cart skin are stored in the directory skin within the X-Cart installation directory. Your store's Admin area provides a section that allows you to view and manage the contents of this directory (see the section Managing Skin Files).
The number of skin files in X-Cart is really large, so finding out which file controls what elements may require a great deal of effort. We recommend you begin by studying the chapters Overview of Templates and Overview of CSS Files. When you begin working on the skin files more closely, we also recommend you use the Debugging Console, a tool that will help you to find out the skin files for each page of the your X-Cart based store (See the section Using X-Cart's Debugging Console).
X-Cart's skin files can be edited in X-Cart's built-in template editor (see the section Using X-Cart's Template Editor), or in any decent external text editor.
Managing Skin Files
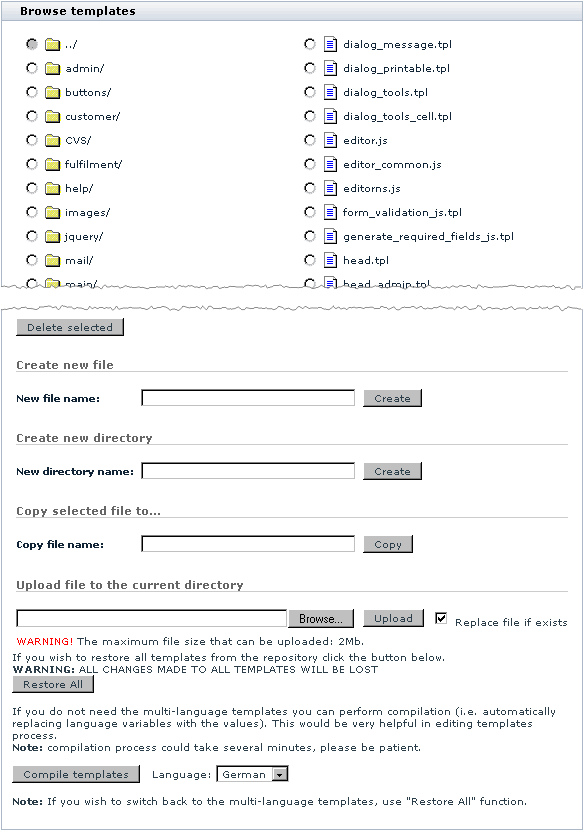
You can manage the contents of X-Cart's skin directory using the 'Browse templates' section of your store's Admin area (Administration menu->Edit templates). This section works similarly to the 'Browse files' section (Management menu->Files): it provides a file browser that you can use to view the contents of the directory skin, to upload your own files, to copy and delete existing files, to create and delete sub-directories.
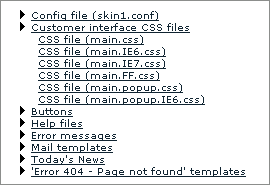
The Quick access menu above the 'Browse templates' dialog box allows you to quickly access specific files/groups of files in skin:
Overview of Templates
Templates files which are common for all X-Cart skins are stored in the directory skin/common_files.
However, each specific skin, for example Ideal Comfort, can have its own template files which are stored in the skin specific directory, for example skin/ideal_comfort. The skin specific template files override the corresponding common template files stored in the directory skin/common_files.
Templates stored in the directory skin/common_files
The templates, stored in the directory skin/common_files, except for product_thumbnail.tpl and currency.tpl, are used only for the store's admin area. Here is a list of the major templates stored in this directory:
- rectangle_top.tpl - controls the overall width and height of the store's layout (affects only the store's back end).
- dialog.tpl - provides the main 'wrapper' of all content in the main window of X-Cart (affects only the store's back end).
- menu.tpl - provides the 'wrapper' for the side menu boxes.
- head_admin.tpl - controls the 'header' row for the Admin and Provider areas. It contains the logo and the language selector.
- bottom.tpl - controls the 'footer' of the Admin and Provider areas.
- rectangle_bottom.tpl - counterpart to rectangle_top.tpl (affects only the store's back end).
- dialog_message.tpl - controls the top message box that pops up at the top of the main window in the store's back end.
- auth.tpl - controls the side menu login box (affects only the store's back end).
- authbox.tpl - controls the side menu login box for logged in users (affects only the store's back end).
- help.tpl - controls the side menu help box containing links to the help pages. This template also contains the code that automatically adds a link when you add a new embedded static page.
- location.tpl - contains the code for the breadcrumb navigation (at the top of the main content area).
- news.tpl - controls the side menu newsletter sign-up box.
- today_news.tpl - controls the side menu that shows the current news.
The templates product_thumbnail.tpl and currency.tpl are used for both the admin area and the customer area:
- product_thumbnail.tpl - controls the thumbnail of a product.
- currency.tpl - controls the format of the currency.
Templates stored in the sub-directories of skin/common_files
The template files contained in the sub-directories of skin/common_files are the following:
- skin/common_files/admin and skin/common_files/provider - templates for the store's admin area.
- skin/common_files/single - templates for the store's admin area, X-Cart GOLD or GOLD PLUS.
- skin/common_files/customer - templates for the store's Customer area.
- skin/common_files/partner - templates for the store's Partner area (X-Affiliate add-on module).
- skin/common_files/fulfilment - templates for the pages intended for fulfillment staff users.
- skin/common_files/main - miscellaneous templates for the main content area.
- skin/common_files/mail - mail templates.
- skin/common_files/buttons - mutton templates for all areas.
- skin/common_files/help - templates for help pages (like FAQ, Contact us, Terms and conditions, etc).
- skin/common_files/pages - templates for embedded static pages.
- skin/common_files/payments - templates for payment processors' pages.
- skin/common_files/images - images.
- skin/common_files/modules - templates for X-Cart's modules and add-ons.
Some of the template files contained in the sub-directory skin/common_files/customer are the following:
- customer/home.tpl - 1st master template for the customer area of the store.
- customer/content.tpl - 2nd master template for the customer area of the store.
- customer/head.tpl - controls the 'header' row for the customer area. By default, it contains the logo, the speed bar tabs, the search box (customer/search.tpl) and the language selector.
- customer/bottom.tpl - controls the 'footer' of the site. It contains the 'Powered by' (skin/common_files/main/prnotice.tpl) and 'Copyright' text (skin/common_files/copyright.tpl).
- customer/auth.tpl - controls the side menu login box for the Customer area.
- customer/authbox.tpl - controls the side menu login box for logged in customers.
- customer/categories.tpl - side menu category template.
- customer/dialog.tpl - provides the main 'wrapper' of all content in the main window of X-Cart in the Customer area.
- customer/home_main.tpl - controls what is displayed in the main content area.
- customer/menu_cart.tpl - controls the side menu cart.
- customer/search.tpl - search box template.
- customer/special.tpl - side menu Special template.
Some of the template files contained in the sub-directory skin/common_files/customer/main are the following:
- customer/main/cart.tpl - controls the main shopping cart structure page.
- customer/main/checkout.tpl - controls the checkout process structure.
- customer/main/subcategories.tpl - controls the sub-category display, and also is the 'wrapper' for the products display.
- customer/main/products.tpl - includes either products_list.tpl or products_t.tpl depending on how the setting 'Display products list in multiple columns (1-3) (leave empty to use standard format)' is adjusted in the section General Settings/Appearance options.
- customer/main/products_list.tpl - controls the products display under a category for a single column layout.
- customer/main/products_t.tpl - controls the products display under a category for a multi-column layout.
- customer/main/product.tpl - controls the product details page.
- customer/main/order_message.tpl - controls the order confirmation screen for checkout (where you would place tracking conversion codes like Google AdWords, Yahoo, etc.)
Some of the template files contained in the sub-directory skin/common_files/mail are the following:
- mail/html/order_invoice.tpl - controls the invoice on the order confirmation screen and order emails.
- mail/html/order_data.tpl - controls product data on the invoice.
- mail/html/html_message_template.tpl - controls CSS styles applied to HTML-based emails.
The template files contained in the sub-directory skin/common_files/modules/Fast_Lane_Checkout are used to control the look of cart and checkout pages if the Fast Lane Checkout module is enabled. Some of the templates are the following:
- Fast_Lane_Checkout/home.tpl - controls the structure of cart and checkout pages.
- Fast_Lane_Checkout/home_main.tpl - controls what is displayed in the main content area - the cart itself and checkout steps (authorization/registration, shipping method selection, payment method selection, preview).
- Fast_Lane_Checkout/head.tpl - controls the 'header' row for cart and checkout pages.
The template files contained in the sub-directory skin/common_files/modules/One_Page_Checkout are used to control the look of cart and checkout pages if the One Page Checkout module is enabled.
Overview of CSS Files
All common CSS files are stored in the directory skin/common_files/css.
CSS files for the Customer area are the following:
- main.css - Main CSS file for the Customer area.
- main.FF.css - Browser-specific CSS for Mozilla FireFox, Customer area.
- main.IE6.css - Browser-specific CSS for Microsoft Internet Explorer 6, Customer area.
- main.IE7.css - Browser-specific CSS for Microsoft Internet Explorer 7, Customer area.
- main.popup.css - CSS for layer-based popups, Customer area.
- main.popup.IE6.css - Browser-specific CSS for layer-based popups in Microsoft Internet Explorer 6, Customer area.
CSS files for the store's back end (Admin and Provider areas) are the following:
- skin1_admin.css - Main CSS file for the Admin area.
- skin1_printable.css - CSS file for the printable version of the Admin area.
CSS files for modules are the following:
- skin/common_files/modules/One_Page_Checkout/main.css - Main CSS file for the Customer area, One Page Checkout module.
- skin/common_files/modules/Fast_Lane_Checkout/main.css - Main CSS file for the Customer area, Fast Lane Checkout module.
- skin/common_files/modules/Gift_Certificates/template_sample_1.css - CSS file for template_sample_1.tpl, Gift certificates module.
- skin/common_files/modules/Gift_Certificates/template_sample_2.css - CSS file for template_sample_2.tpl, Gift certificates module.
- skin/common_files/modules/HTML_Editor/scripts/style/editor.css - CSS file for the WYSIWYG editor, Admin area, HTML Editor module (editing not recommended).
- skin/common_files/modules/Subscriptions/calendar.css - CSS file for the calendar in the Admin area, Subscriptions module.
- skin/common_files/modules/XAffiliate/main.css - Main CSS file for the Customer area, X-Affiliate add-on.
- skin/common_files/modules/Product_Configurator/main.css - Main CSS file for the Customer area, X-Configurator add-on.
- skin/common_files/modules/Fancy_Categories/main.css - Main CSS file for the Customer area, X-FancyCategories add-on.
- skin/common_files/modules/Feature_Comparison/main.css - Main CSS file for the Customer area, X-FeatureComparison add-on.
- skin/common_files/modules/Feature_Comparison/main.IE6.css - Browser-specific CSS for Microsoft Internet Explorer 6, Customer area, X-FeatureComparison add-on.
- skin/common_files/modules/Gift_Registry/main.css - Main CSS file for the Customer area, X-GiftRegistry add-on.
- skin/common_files/modules/Magnifier/main.css - Main CSS file for the Customer area, X-Magnifier add-on.
- skin/common_files/modules/RMA/main.css - Main CSS file for the Customer area, X-RMA add-on.
- skin/common_files/modules/Special_Offers/main.css - Main CSS file for the Customer area, X-SpecialOffers add-on.
- skin/common_files/modules/Survey/main.css - Main CSS file for the Customer area, X-Survey add-on.
Location of skin specific template and CSS files
There are directories which are used to store specific template and CSS files for the built-in X-Cart's skins:
- skin/2-columns
- skin/3-columns
- skin/artistictunes_business/
- skin/artistictunes_car_tires/
- skin/artistictunes_fragrances_and_makeup/
- skin/artistictunes_water_colour/
- skin/books_and_magazines/
- skin/fashion_mosaic_blue/
- skin/fashion_mosaic_green/
- skin/fashion_mosaic_grey/
- skin/fashion_mosaic_pink/
- skin/ideal_comfort/
- skin/vivid_dreams_aquamarine/
- skin/vivid_dreams_chromo/
- skin/vivid_dreams_lotus/
- skin/vivid_dreams_violet/
Using X-Cart's Debugging Console
When working on X-Cart's templates, you may want to use X-Cart's Debugging console. It is a tool that enables you to view the template structure of the page you are currently viewing.
X-Cart's Debugging console can be launched by enabling the option 'Enable debugging console' in General settings->General options. It is also enabled automatically when you start Webmaster mode.
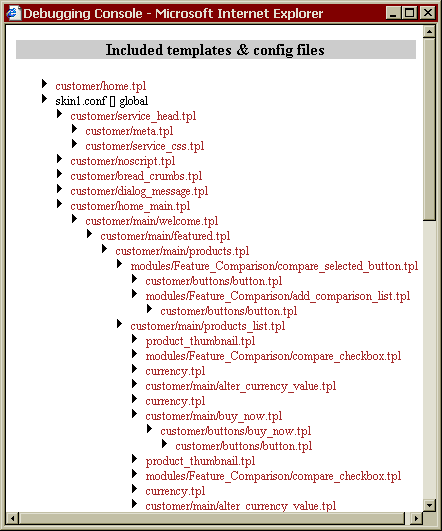
When enabled, the Debugging console is displayed in a separate browser window. This window contains a list of templates and config files used for the current page. Note that this list is organized hierarchically, so you can see which template includes what. For example, if you use the Debugging console to explore the template structure of the Customer area front page, the result may be something like this:
As you move about the store, the contents of the Debugging console window gets updated for each page.
In Webmaster mode, X-Cart's Debugging console allows you not only to view the template structure of a page, but also to quickly access any of the templates involved in this structure: clicking on the name of a template opens the respective file in X-Cart's template editor (See Using X-Cart's Template Editor).
Besides, if you move your mouse over any template name in the Debugging console window - it will outline the area of the page which the selected template is used for.
Using Webmaster Mode
Webmaster mode allows you to edit templates within the admin interface. You may edit language variables (denoted as "$lng.XXX" in templates) by changing those values in WYSIWYG mode.
1) Before entering the webmaster mode, close any template windows & label windows. Enter your admin zone, go to the 'Administration' menu, 'Webmaster mode' page. Click on 'Start webmaster mode' button.
2) The additional "templates" window will appear. It displays the list of templates composing a current page. You can call the template editor from this window by clicking a template.
3) Go to the page you want to change. To define the right template, look at the browser status line (at the page bottom). When the mouse is pointing at some text, this status line indicates the corresponding template and label.
4) To change a label, click on it. If the label is under a hyperlink, move the mouse over it and press "e" (Edit) on the keyboard. The label dialog will appear.
5) After you set a new label content you can
- (a) preview the site with the changed label,
- (b) save the text in the database, and
- (c) copy the label name into the clipboard (IE only).
6) The webmaster mode is based on sessions: it applies only to the computer it has been set up on. I.e., when the 'Webmaster mode' is launched, it isn't displayed at the customer's end and doesn't affect the store performance. The changes will show up only after the admin clicks on 'save' button.
7) To quit the webmaster mode, go to admin zone, to the 'Administration' menu, 'Webmaster mode' page. Click on "Quit webmaster mode" button.
For additional information about Webmaster mode please refer to this article.
Using X-Cart's Template Editor
X-Cart provides a built-in template editor. This editor allows you to view and edit your store's skin files.
To open a skin file in X-Cart's template editor, use one of the following methods:
- With X-Cart's Debugging console enabled, locate the file you wish to edit and click on its name in the Debugging console window.
- or
- Go to the section 'Browse templates' (Administration menu->Edit templates), use the file browser to locate the file you wish to edit and click on its name.
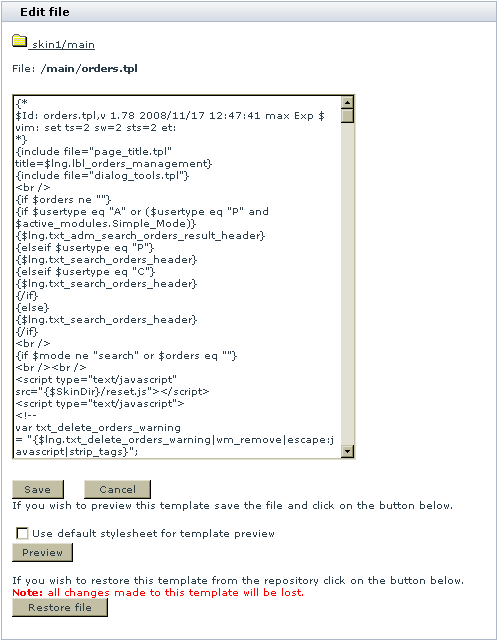
As a result, the contents of the selected file opens in X-Cart's template editor as follows:
Now you can edit this file as necessary.
To save the changes after the editing has been completed, click the Save button. To quit editing without saving your changes, click on Cancel. To restore the original file, click on Restore.
If the file opened in the template editor is a template, you can preview the element whose appearance is defined by this template the way it will appear in your store. To do so, use the Preview button. If you click on Preview with the check box 'Use default stylesheet for template preview' selected, the presentation of the element corresponding to the template will be defined by the main CSS file for the respective X-Cart area.
Typically, any changes you make to X-Cart's templates become visible in your store immediately after you click on Save. However, in some cases, some of the changes may not appear in the store because an older version of the template was cached. If you know you edited a specific template, but the changes do not appear in your store after the file has been saved, you must clear your store's templates cache (the contents of the directory /templates_c). You can either remove the entire contents of the directory /templates_c manually, or use X-Cart's 'Clear templates cache' tool (See X-Cart:Advanced Tools).
Replacing X-Cart's Logo
One of the most popular and necessary tasks about skins is replacing the default company logo on the Customer page with a real logo of your company/store. Before you start replacing the logo, ensure that the required skin is properly installed, and you have the required image file for your company logo. The recommendations for the image files are listed in the table below.
The name of the image file with your company logo can either coincide with the filename of the default logo or have a different name. If both the default logo and your company logo have the same filename, you only need to replace the default image file with your image file. If these files have different names, you need to edit the template which controls the storefront header. The exact filename of the default company logo depends on the skin that you use.
The default company logo files for X-Cart 4.0.x-4.3.x skins are as follows:
| Skin Name | Default Logo Path and Filename* | File Format | Logo Size |
|---|---|---|---|
| Light & Lucid | /xlogo.gif | GIF | 244 x 67 px |
| Artistic Tunes | /custom/company_logo.gif | GIF | 190 x 27 px |
| Fashion Mosaic | /fashion_mosaic/company_logo.gif | GIF | 228 x 50 px |
| Neon Lights | /neon_lights/xlogo.gif | GIF | 205 x 26 px |
| Vivid Dreams | /vivid_dreams/logo.gif | GIF | 275 х 61 px |
* - path from X-Cart's skin directory <xcart_dir>/skin1/images.
To replace the logo:
If the filename of your company logo is the same as the filename of the default logo.
- Log in to the Admin area and go to the Edit templates section (Administration menu -> Edit templates).
- Use the Browse templates form to locate the folder with the default logo file (see the table).
For example, if you are replacing the logo of the Artistic Tunes skin, in the Browse templates form first move to the folder images/ and then move to the folder custom/. In the same manner, for the Fashion Mosaic skin first move to folder images/ and then move to folder fashion_mosaic/, etc. - Find section Upload file to the current directory at the bottom of the form and click the Browse button to open a file upload dialog window.
- Locate the image file with your company logo and choose it for the upload.
- Make sure the Replace file if exists check box is selected.
- Click the Upload button to upload the file to the current directory.
Now the logo on the Customer area is replaced with your company logo.
If the filename of your company logo is different to the filename of the default logo.
- Log in to the Admin area and go to the Edit templates section (Administration menu -> Edit templates).
- Use the Browse templates form to locate the folder where you want to keep the file with logo. It can be either the directory with the default logo file (see the table) or any other location inside the images/ directory.
- After you choose where to keep your company logo, find section Upload file to the current directory at the bottom of the form and click the Browse button to open a file upload dialog window.
- Locate the image file with your company logo and choose it for the upload.
- Click the Upload button to upload the file to the current directory.
- Click on the Edit templates breadcrumbs link at the top of the page to go back to the root skin directory skin/.
- In the Browse templates form go to the folder customer and click on the head.tpl link to open the respective file for editing.
- In the Edit file form, find the following code:
<div class="logo">
<a href="{$catalogs.customer}/home.php">
<img src="{$ImagesDir}LOGO_PATH_AND_FILENAME" alt="" />
</a>
</div>
- and replace the LOGO_PATH_AND_FILENAME part with the the relative path to the directory where your company logo is located and the logo filename. For example, if the image file with the logo is located in the directory <xcart_dir>/skin/images/custom and its name is custom_logo.gif, the LOGO_PATH_AND_FILENAME part must be replaced with /custom/custom_logo.gif.
- Click the Save button for the changes to take effect.
Now the logo on the Customer area is replaced with your company logo.
The default company logo files for X-Cart 4.5.x-4.6.x skins are as follows:
| Skin Name | Default Logo Path and Filename* | File Format | Logo Size |
|---|---|---|---|
| Books & Magazines | /books_and_magazines/images/custom/logo.gif | GIF | 455 x 125 px |
| Ideal Comfort | /ideal_comfort/images/custom/logo.png | PNG | 297 х 42 px |
| Fashion Mosaic (Blue) | /fashion_mosaic_blue/images/fashion_mosaic/company_logo.gif | GIF | 228 x 50 px |
| Fashion Mosaic (Green) | /fashion_mosaic_green/images/fashion_mosaic/company_logo.gif | GIF | 228 x 50 px |
| Fashion Mosaic (Grey) | /fashion_mosaic_grey/images/fashion_mosaic/company_logo.gif | GIF | 228 x 50 px |
| Fashion Mosaic (Pink) | /fashion_mosaic_pink/images/fashion_mosaic/company_logo.gif | GIF | 228 x 50 px |
| Vivid Dreams (Aquamarine) | vivid_dreams_aquamarine/images/vivid_dreams/logo.gif | GIF | 345 х 54 px |
| Vivid Dreams (Chromo) | vivid_dreams_chromo/images/vivid_dreams/logo.png | PNG | 288 х 59 px |
| Vivid Dreams (Lotus) | vivid_dreams_lotus/images/vivid_dreams/logo.gif | GIF | 275 х 61 px |
| Vivid Dreams (Violet) | vivid_dreams_violet/images/vivid_dreams/logo.gif | GIF | 230 х 133 px |
* - path from the directory <xcart_dir>/skin
In Books & Magazines, Ideal Comfort and Vivid Dreams skins, the company logo image is implemented on the site via <xcart_dir>/skin/<skin_name>/customer/head.tpl. For example, in head.tpl for Ideal Comfort skin it looks as follows:
<div class="line1">
<div class="logo">
<a href="{$catalogs.customer}/home.php"><img src="{$AltImagesDir}/custom/logo.png" alt="" /></a>
</div>
In Fashion Mosaic skins, the company logo is defined in the corresponding skin's CSS file. For example, for Fashion Mosaic (Grey) skin it is the file skin/fashion_mosaic_grey/css/altskin.css. The company logo is implemented as follows:
#header .line1 .logo a:active
{
display: block;
width: 228px;
height: 50px;
background: transparent url(../images/fashion_mosaic/company_logo.gif) no-repeat left top;
}
To replace the default company logo image on your site, prepare an image with your own company logo, save it with the same name as the default company logo image (see the 'Logo Size' column in the table above) and upload it to the location of the default company logo (see the 'Default Logo Path and Filename' column in the table above). You can use a different filename, but in this case you will need to adjust the image filename in the code that defines what file must be used as the company logo.
For instructions on changing the logo in Ideal Responsive skin see Replacing X-Cart's Logo in the Ideal Responsive Skin.
Customizing the breadcrumb trail
X-Cart generates a breadcrumb navigation trail automatically, using category titles for the crumbs. Until version 4.4.2, the first item of a breadcrumb trail used to be Home. Now you can customize it too.
Customizing the first breadcrumb item
The first breadcrumb item is defined by the lbl_site_path variable. If the lbl_site_path variable is set – for instance, to 'Home page' the breadcrumb appears something like this:
Home page :: Books :: Internet :: Designing Web Usability
If the lbl_site_path variable is not set, the same trail now looks a bit different:
Books :: Internet :: Designing Web Usability
Customizing the breadcrumb separator
To customize the breadcrumb separator, select General settings -> Appearance on the administrator menu and then edit the "Separator string for breadcrumbs" option in the "Miscellaneous" section.
In the earlier version of the software, the first breadcrumb item is defined by the lbl_site_path variable. If the lbl_site_path variable is set – for instance, to 'Home page' the breadcrumb appears something like this:
Home page :: Books :: Internet :: Designing Web Usability
If the lbl_site_path variable is not set, the same trail now looks different:
My Company Name :: Books :: Internet :: Designing Web Usability
To customize the 'My Company Name' value, select General settings -> Company options on the administrator menu and then edit the "Company name" option in the "Company details" section.
In the older versions, the first breadcrumb item is always defined by the "Company name" option.
Adding a 3rd Column to Ideal Responsive
In this X-Cart Tutorial from http://babymonkeystudios.com we add a 3rd column to the ideal_responsive skin, step by step.
Mike comments on this video: "I think this is one of my best tutorials to date. I show you how to accomplish the goal assuming that you know nothing about it. I even left in my mistakes and thought process so you could learn how I would approach the problem from beginning to end. Anyone new to responsive design or working with this skin is going to find this reference invaluable."
Adding the Short Description to Product List
In this brief tutorial we add the products short description to the products list in a category page of X-Cart 4 Classic. Webmaster mode, and product arrays are explained.
See also
- X-Cart:Customizing_storefront
- http://www.w3schools.com/css/css_intro.asp - profound information to learn about CSS
