LiteCommerce:General Settings
Contents
Overview
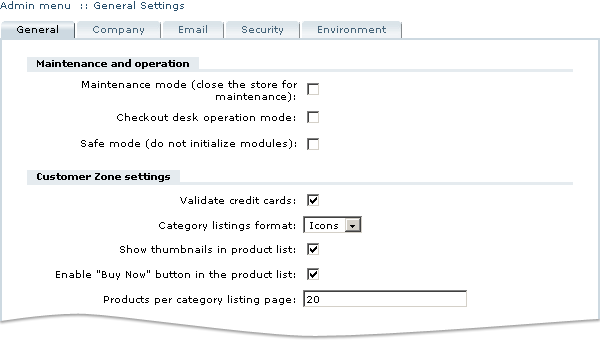
'General settings' section of the 'Settings' menu (Figure 3-3) contains the major settings of your store including the parameters of your store's operation mode, identity and contact information, customer and administrator interface settings, and security settings. It is comprised of several tabs, namely 'General', 'Company', 'E-mail', 'Security' and 'Environment'. The following sections provide detailed description of settings and options contained in those tabs.
General Options
Four groups of settings are listed under the 'General' tab of the 'General settings' section:
- Maintenance and operation options,
- Customer Zone settings,
- Administrator Zone settings and
- Units of measurement settings.
The maintenance and operation settings (Figure 3-4) are used to set the modes of operation of your store and include the following options:
- Maintenance mode - activating this mode makes the store inaccessible to visitors. Use this mode when you perform store maintenance tasks, make significant changes to the store design and configuration, or update the store catalog and do not want the visitors to observe your work in progress. Do not forget to switch the maintenance mode off (by removing the checkmark in the corresponding field) after you finish those tasks.
- Checkout desk mode – activating this mode switches the store from autonomous operation to checkout desk operation which allows flawless integration of LiteCommerce into existing online store. The purpose and capabilities of this mode are described in full detail in the section LiteCommerce:Integrating LiteCommerce into Existing Online Store Using Checkout Desk Mode of this manual.
- Checkout desk operation mode main page - select 'Shopping cart' to use the dynamically generated shopping cart page as a main page. Select 'Static HTML page' for the customer to see a specially created static main page.
- Safe mode – having this mode activated disables the initialization and operation of add-on modules installed at your store. This can be useful when diagnosing unexplainable run-time or configuration errors. Alternatively, the 'safe_mode=on' parameter can be appended to a page URL in the location field of your browser when accessing the Customer Zone in order to disable the modules.
The Customer Zone settings (Figure 3-5) adjust various aspects of the catalog and shopping cart presentation and operation. The following options are defined here:
- Validate credit cards - checkmark this option to enable automatic verification of accuracy and validity of credit card numbers by using the checksum algorithm.
- Display check number for eCheck payment method: - checkmark this option to show a 'Check number' field during checkout when offline eCheck payment method is used.
- Category listings format - use this drop-down menu to define how to present category listings in the Customer Zone.
- Show thumbnails in product list - when this option is switched on, thumbnail images of products are displayed next to product names in category listings.
- Enable "Buy now" button in the product list - this option makes it possible to add products to the shopping cart right from category listings. When this option is switched off, a store visitor needs to access individual product page in order to add that product to his shopping cart.
- Products per category listing page - LiteCommerce software automatically splits long product listings into separate pages. This option defines how many products can be displayed simultaneously in one page.
- Allow direct URL access to products from disabled categories - select this option to allow products from disabled categories to be displayed in the "Featured products" and "Related products" lists, and allow direct access (for example, when a customer enters the URL directly into the browser address line). When this check box is empty, products from disabled categories will not be displayed anywhere in the customer area and will not be accessible by direct URL.
- Show shipping rates & taxes to unregistered customers - when reviewing shopping cart contents, shoppers are shown calculated product taxes and shipping costs based on their location. Since the location of unregistered customers is unknown, they typically see the 'N/A' values in these fields. By enabling this option we assume that an unregistered customer comes from the default country and has the default zip/postal code, and calculate and display product taxes and shipping costs based on this assumption (see below for 'Default country in the registration form' and 'Default zip/postal code in the registration form' option details).
- Enable anonymous checkout - enabling this option makes it possible for shoppers to purchase products at your store without registering customer accounts.
- Minimum allowed order total, maximum allowed order total - lower and upper limits of acceptable order totals. Checkout is not allowed if the shopping cart total is out of the specified range.
- Redirect customer to cart when adding a product - if this option is enabled, the customers is redirected to the shopping cart every time a product is being added to the cart, otherwise the customer stays in the last visited product list.
- Default country in the registration form, default zip/postal code in the registration form - these options define the default values of country and zip/postal code settings in the customer registration form.
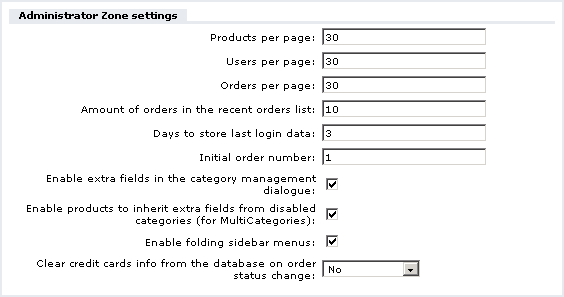
The Administrator Zone settings (Figure 3-6) adjust various aspects of the Administrator Zone interface and operation. The following options are defined here:
- Products per page, users per page, orders per page - LiteCommerce software automatically splits long search results into separate pages. These options define how many product, user and order search matches can be displayed simultaneously in one page.
- Amount of orders in the recent orders list - this option defines how many orders are to be shown in the automatically-generated 'Recent orders' list in the 'Orders' section.
- Days to store last login data - this option specifies how many days the administrator login cookie must be stored in the administrator's browser. If the cookie is present in the browser, administrative e-mail address is substituted automatically in the Administrator Zone login screen. To disable this feature, set the option to '0' (zero).
- Initial order number - this setting defines the minimal possible order number and can be adjusted for your convenience.
- Enable extra fields in the category management dialogue - this option adds 'Extra fields' tab to 'Modify category' pages making it possible to review category-specific global extra fields.
- Enable products to inherit extra fields from disabled categories - this option makes it possible for products listed in several categories (feature introduced by MultiCategories add-on module) to retain global extra options inherited from disabled categories.
- Enable folding sidebar menus - this option makes it possible to fold unneeded sidebar menus in the Administrator Zone for ease of navigation (see Figure 3-1 as a sample).
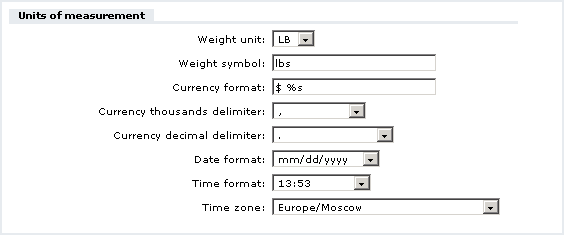
The Units of measurement section (Figure 3-7) contains the following settings:
- Weight unit – select the weight measurement unit.
- Weight symbol – specify how product weight should be denoted in product pages.
- Currency format – specify how product price should be displayed in product pages. '%s' code stands for product price amount.
- Currency thousands delimiter, currency decimal delimiter - select the symbols to be used as thousands delimiter (separating thousands from hundreds) and decimal delimiter (separating fractional portion of the price from the whole number; in case of US currency, cents from dollars).
- Date format – select one of the predefined time formats to be used.
- Time format – select 12-hour or 24-hour format.
- Time zone – select your time zone from the drop-down list. (This option works only for PHP v 5.2.0. or later).
After you have modified the options in the 'General' tab, click on the 'Submit' button to save your changes.
Company Options
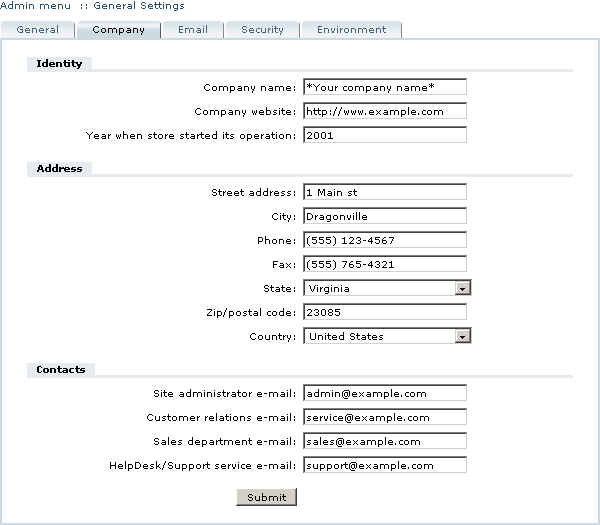
The 'Company' tab contains settings pertaining to your company (store) identity and contact data (Figure 3-8). These settings affect your store operation and presentation in a number of ways:
- The settings provided under the 'Identity' subtitle are used in invoices and automatic e-mail messages sent out by your store. The 'Company name' and 'Year when store started its operation' settings are also reflected in the copyright notice at the Customer and Administrator Zones.
- The 'Address' group of parameters defines the store location, and telephone and fax numbers, which are also printed on the invoice. The store location data is used to define available shipping methods (if the customer and the store are located in the same country, national shipping methods are displayed; otherwise international methods are displayed) and calculate shipping charges for online payment methods.
- The 'Contacts' group of parameters defines e-mail addresses of various departments of your store to be used in communication with the customers and utilized internally for various purposes. For example, the 'HelpDesk/Support service e-mail' field is used in the 'Contact us' form at the Customer Zone.
The names of the parameters are self-explanatory. To modify them, type the relevant data in the corresponding fields and click on the 'Submit' button to save your changes.
Email Options
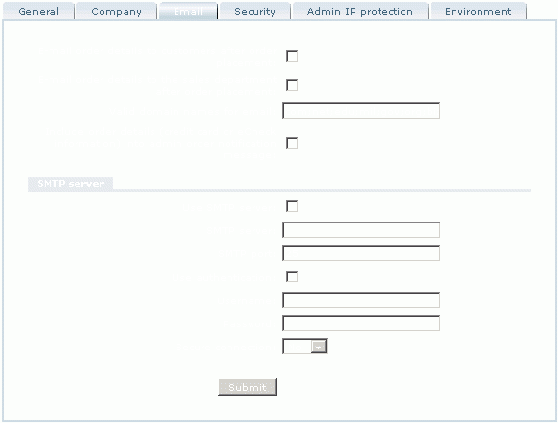
The 'Email' tab (Figure 3-9) contains two options which define the store behavior after a customer places an order:
- E-mail order details to customers after order placement and
- E-mail order details to the sales department after order placement.
To enable any of the options, place a checkmark against it; to disable an option, remove the checkmark.
Enter the domain names from which you wish to allow email into the 'Valid domain names for email:' field. Use semicolon as a delimiter. For example, 'au;de'. By default email from the following domain names is allowed: com, net, edu, mil, gov, org, biz.
Click on the 'Submit' button to save your changes.
Security Options
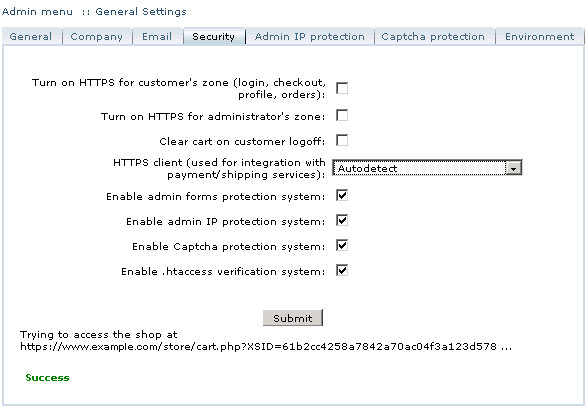
The options in the 'Security' tab affect the overall security of your store. When you open the tab, LiteCommerce checks your store configuration to make sure that HTTPS protocol is enabled at your store (Figure 3-10). Based on the value of the 'HTTPS client to use' parameter it either attempts to establish HTTPS connection using 'CURL PHP extension', 'Curl external application' or 'OpenSSl external application', or tries to automatically detect the presence of one of these HTTPS clients.
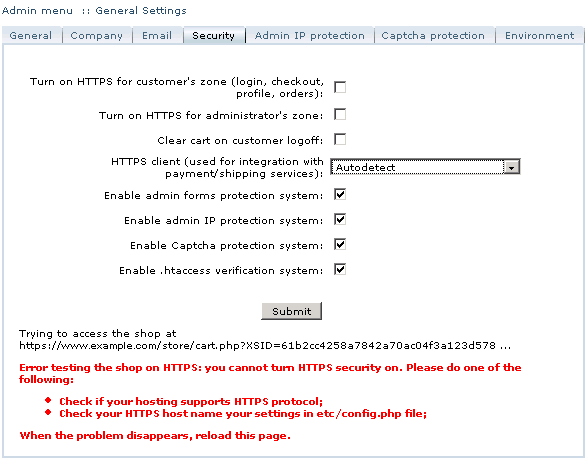
If HTTPS checkup fails, the following screen is displayed, providing the instructions for fixing the secure connection problem:
Lack of HTTPS protocol support does not influence the basic functionality of your online store, and the store can operate successfully without it. However, the use of online payment gateways and real-time shipping methods is impossible without secure connection capability.
Higher level of security can be achieved by activating secure protocol (HTTPS) in the Administrator and Customer Zones of your store. Using HTTPS in the Customer Zone protects confidential information being transmitted during the login, profile editing, shopping and checkout procedures. Using encrypted HTTPS connections to access the Administrator Zone is especially recommended if the administrator manages the store over the Internet (as opposed to the local network), since sensitive business information is transmitted when store operation, configuration and maintenance tasks are performed.
cd secure_html/ ln -s ../public_html/store store
(where 'public_html/store' is LiteCommerce installation directory).Another security feature of LiteCommerce is the 'Clear cart on customer logoff' option. Enabling this option makes it impossible for anybody to see the customer's shopping cart contents after he logs off even if he doesn't exit his browser session (exiting the browser clears the shopping cart regardless of this option).
The following protection systems can be enabled:
Enable admin forms protection system: select this option to include a special numeric identifier into each form generated by LiteCommerce. This prevents the store administrator from opening forms which do not have a valid identifier. Links to such forms can be used by a malicious person as a means of making the application inoperable or gaining access to the application back-end (this technique is known as "phishing").
By default this option is enabled and we strongly recommend you do not disable it. However you can disable it for testing purposes, for example, if some custom module does not work properly.
Enable admin IP protection system: select this option to be able to limit access to admin zone by IP address. 'Admin IP protection' tab will be added in the 'General settings' section.
Enable .htaccess verification system: select this option to check if the versions of .htaccess files stored in the database and on the server, are the same. 'Security files' section will be added at the bottom of the 'Environment' tab in the 'General settings' section.
Enable Captcha protection system: select this option to add Captchas to 'Contact us' and 'Registration' pages. 'Captcha protection' tab will be added in the 'General settings' section.
To enable any of the above-mentioned options, place checkmarks in the corresponding fields and click on the 'Submit' button to save your new settings.
For further information on improving the security of your store, see LiteCommerce:Security page.
Admin IP Protection
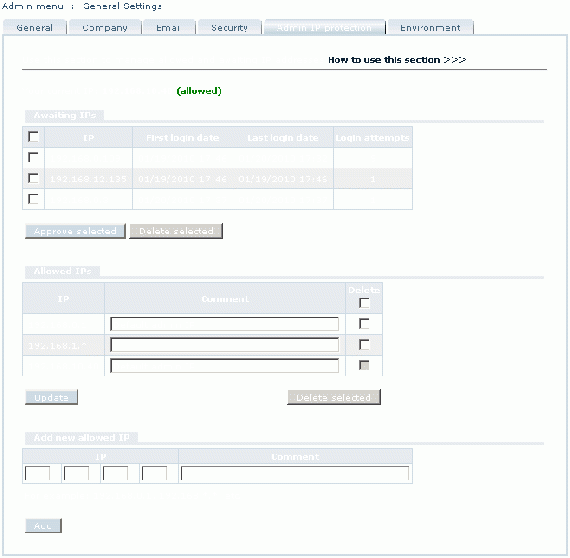
When Admin IP protection system is enabled, an additional tab appears in the 'General settings' section. Use the controls on this tab to limit access to admin zone by IP addresses.
When you enable the admin IP protection system, your IP is automatically added to the allowed IP list with a comment 'Default admin IP'. From that time on, you can manage the allowed IP list: add and delete IP addresses, edit comments, etc.
Awaiting IPs list
When someone tries to login in the admin zone, his IP appears in the awaiting IPs list, after which you can either add it to the allowed IP list or delete.
The following information is displayed for each awaiting IP address:
- IP address
- first login date
- last login date
- the number of login attempts
Adding IPs to the allowed IPs list
There are two ways to add an IP address to the allowed IP list:
- In the awaiting IPs list place a check mark in the check box next to the required IP address and click Approve selected.
- Use the 'Add new allowed IP' section: enter the IP address, add a comment (optional) and click Add.
Deleting IPs from the allowed IPs list
To delete an IP address from the allowed IP list, place a check mark in the check box to the right of the required IP and click Delete selected. To delete all IPs, place a check mark in the check box under the column heading and click Delete selected.
Captcha Protection
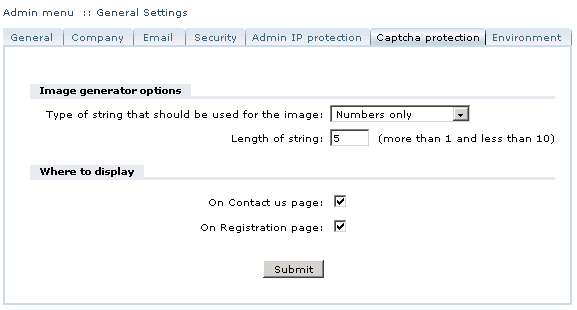
When Captcha protection system is enabled, an additional tab appears in the 'General settings' section. Use the controls on this tab to add Captchas to 'Contact us' and 'Registration' pages.
The following settings can be adjusted:
Type of string that should be used for the image: select which symbols you want to include in Captchas: Numbers only, Letters only, Numbers and letters.
Length of string: enter the number of Captcha symbols: must be more than 1 and less than 10.
Where to display: select the pages, on which you want to display Captchas: On Contact us page and On Registration page.
After all the settings have been adjusted, click Submit.
Server Environment Information
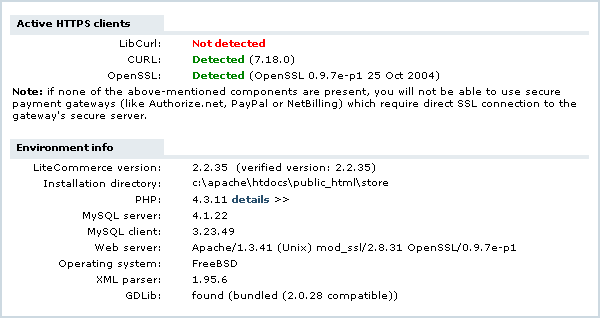
The 'Environment' tab in the 'General settings' section (Figure 3-12) provides:
- the list of HTTPS clients installed on your web server,
- detailed information on versions and configurations of the software running on your web server (to see the PHP engine configuration details click on the 'details >>' link located next to the version of PHP; PHPInfo page will open in a separate window),
- LiteCommerce software version.
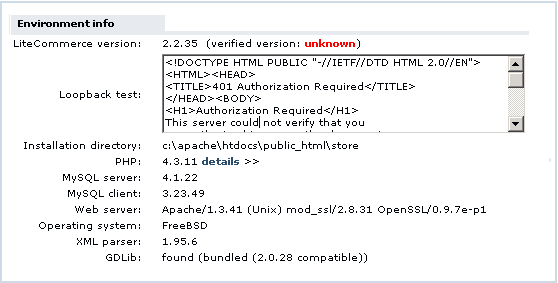
- From time to time LiteCommerce checks if the store is available and answers HTTP requests at the licensed URL.
- A test in the Environment info section simulates such a check. If this test fails and the version designated in the store's database does not coincide with the verified version (received as a result of the above test), this might mean that the server configuration settings need to be adjusted. In this case a message received as a result of such test, will be displayed in the 'Loopback test' field.
- It would be a good idea to consult our support team and request further investigation.
- LiteCommerce installation directory.
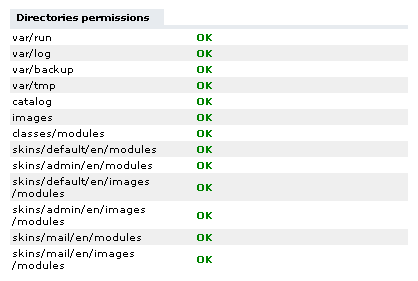
- LiteCommerce checks whether all the directories have permissions, which are required for correct operation of the store. You can view this information in the 'Directories permissions' section of the 'Environment' tab.
- If you see 'OK' next to the directory names, it means the permissions for this directory and all its subdirectories are correct. If subdirectory permissions are not correct, you will see a 'subdirectories problems' message. Click the 'details>>' link to the right of the message to view the list of subdirectories, the permissions for which must be corrected.
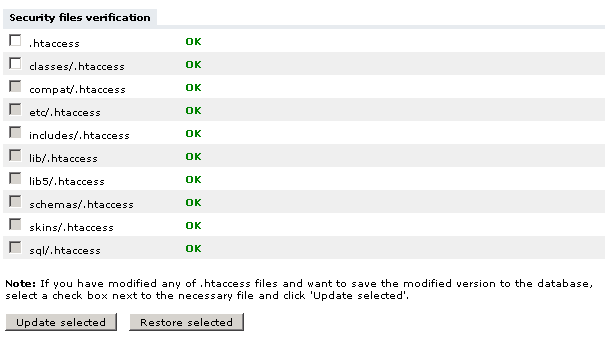
- When the 'Enable .htaccess verification system' option is enabled on the 'Security' tab, an additional section 'Security files verification' appears at the bottom of the 'Environment' tab.
- Copies of your .htaccess files are stored in the database. This section allows to compare actual .htaccess files on the server with the ones stored in the database. If a file on the server has been modified (by you or by a malicious person trying to get access to the store), the verification will fail and a corresponding message will be displayed.
- If it was you who modified the file, in order to save the newly modified file to the database, place a check mark in the check box next to the required file and click Update selected.
- If you want to perform the opposite action - to copy the previous version of the file from the database to the server, you should place a check mark in the check box next to the required file and click Restore selected.
