X-Cart:Tax Settings
Contents
Tax settings in X-Cart
X-Cart provides you with a flexible tool for defining taxes to be used in your store. Simple settings allow you to define virtually any tax and tax rate. For each tax you can define how it needs to be calculated, to what products it needs to be applied, how information about it needs to be displayed to customers, etc. You can make taxes dependent on the customer's location (billing or shipping address) and on the customer's membership. Customers coming from a certain location and having a certain membership will see just the tax rates for their destination zone and membership level, while the other tax rates will be hidden. X-Cart also allows you to have non-taxable products at your store.
Roles in tax settings management
If you are an X-Cart GOLD administrator/provider:
- You can define taxes (See the chapter #Taxes).
- You can define taxes options (See the chapter #Taxes Options).
- You can define tax rates (See the chapter #Tax Rates).
- You can apply taxes to products (See the chapter #Applying Taxes to Products).
If you are an X-Cart PRO administrator:
- You can define taxes (See the chapter #Taxes).
- You can define taxes options (See the chapter #Taxes Options).
- You can apply taxes to products (See the chapter #Applying Taxes to Products).
If you are an X-Cart PRO provider:
- You can define tax rates for your products (See the chapter #Tax Rates).
- You can apply taxes to your products (See the chapter #Applying Taxes to Products).
Taxes
Adding taxes
To add a tax:
1. Go to the 'Taxes' section of your store's Admin area (Settings menu->Taxes). A dialog box titled 'Taxes' opens:
Before you have created any taxes, the dialog box is empty.
2. In the 'Taxes' dialog box, click the Add new... button. A dialog box 'Tax details' opens.
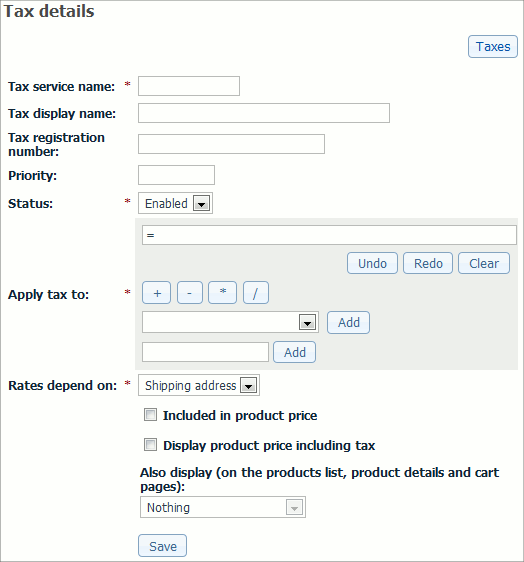
3. Define the details of the desired tax by completing the fields of the 'Tax details' dialog box (The fields marked by a red asterisk sign are mandatory):
- Tax service name: Unique name by which X-Cart application will identify this tax. A tax service name may include letters (A-Z, a-z) and digits (0-9), may not exceed 10 characters in length and must begin with a letter. This value will not appear anywhere in your store's Customer area.
- Tax display name: Name of the tax as it will appear to customers. If necessary, you can define a different tax display name for each of the languages used in your store. To add a tax display name in another language, select the necessary language from the Current language selector at the top of the page, enter the tax display name in this language into the appropriate field and click the Save button.
- Tax registration number: Tax registration number (required for certain types of taxes; appears on the invoice)
- Tax priority: Number defining the order in which the tax needs to be applied (relative to the other taxes).
- Status: Tax status (Enabled or Disabled).
- Apply tax to: Tax base. Use the #Tax Formula Editor to create the formula according to which this tax needs be applied.
- Rates depend on: Select if the tax rate should be calculated for Shipping Address or Billing Address.
- Included into the product price: This option defines whether the prices of products to which this tax applies are stored in the database with this tax included or excluded. If you want the product prices to be inclusive of this tax, select this check box. If you leave this check box unselected, the prices will be tax-exclusive.
- Display product price including tax: This option defines whether the prices of products to which this tax applies are displayed to customers with this tax included or excluded. If you want the product prices to be displayed as inclusive of this tax, select this check box. If you leave this check box unselected, the prices will appear tax-exclusive.
- Also display (on the products list, product details and cart pages): This option is used in conjunction with the option 'Display product price including tax' and defines what needs to be displayed on the named pages of your store besides the price with the included tax (Nothing, Rate value, Calculated tax cost, Rate value and tax cost).
4. Click the Save button. The tax will be created and added to the list of your store's taxes. To view the list of your store's taxes, you can click the Taxes list link at the top right-hand corner of the 'Tax details' dialog box.
Now that the tax has been created, it is possible to add tax rates for it. See the chapter #Tax Rates.
After the necessary taxes have been defined, be sure to set the options affecting how all taxes in your store are applied and displayed. See the chapter #Taxes Options.
Also, please be aware that, before the taxes you have created become functional, they will need to be applied to products. See the chapter #Applying Taxes to Products.
Managing Taxes
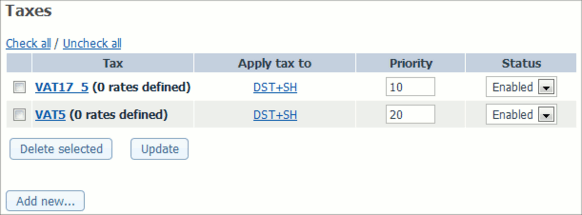
The 'Taxes' dialog box in the 'Taxes' section of your store's Admin area shows all the taxes defined in your store. When you have some taxes defined, it looks similar to this:
The table columns provide the following information about each tax:
- TAX - Service tax name.
- APPLY TAX TO - Tax base as defined in the 'Apply tax to' field of the 'Tax details'.
- PRIORITY - Order in which the tax needs to be applied (relative to the other taxes).
- STATUS - Enabled or disabled.
To edit the details of a tax:
- Click on the name link of the tax that needs to be edited. The 'Tax details' dialog box displaying the details of the selected tax opens.
- Edit the tax details.
- Click the Save button at the bottom of the 'Tax details' dialog box to save the changes.
To change the order in which your taxes should be applied:
- Change the order numbers in the PRIORITY column (The tax with the highest priority needs to have the smallest order number, the tax with the lowest priority - the greatest order number).
- Click the Update button.
To temporarily disable a tax or to re-enable a disabled tax:
- Select the appropriate status from the STATUS drop-down box opposite the name of the tax.
- Click the Update button.
To delete a tax:
- Select the check box next to the name of the tax that needs to be deleted. (You can use the Check all / Uncheck all links to select or unselect all the taxes on the page.
- Click the Delete selected button.
Tax Rates
Adding tax rates
After the necessary taxes have been defined, you need to define tax rates for each tax.
To define a tax rate:
If you are an X-Cart GOLD administrator/provider:
1. Go to the 'Taxes' section of your store's Admin area (Settings menu->Taxes).
2. In the dialog box titled 'Taxes', find the tax for which you would like to add rates and click on its name. The 'Tax details' section of your store opens. Scroll down through the 'Tax details' dialog box. You should see a dialog box titled '<Tax name>: Tax rates' (where '<Tax name>' is the name of the tax whose details are being displayed).
If you are an X-Cart PRO provider:
1. Go to the 'Tax rates' section ( Settings menu->Tax rates). You should see a dialog box 'Taxes' displaying the names of all taxes defined for your store by the store administrator (The expression 'N rates defined' displayed in brackets next to each of the tax names shows the number of tax rates defined by you for these taxes. Before you have defined any rates, this number is 0 (zero)).
2. In the 'Taxes' dialog box, find the tax for which you would like to add rates and click on its name. The 'Tax details' section of your store opens. On the page, you should see a box titled 'Tax details' displaying the details of the selected tax as defined by the store administrator:
Below the 'Tax details' box, you should see a dialog box titled '<Tax name>: Tax rates' (where '<Tax name>' is the name of the tax whose details are being displayed).
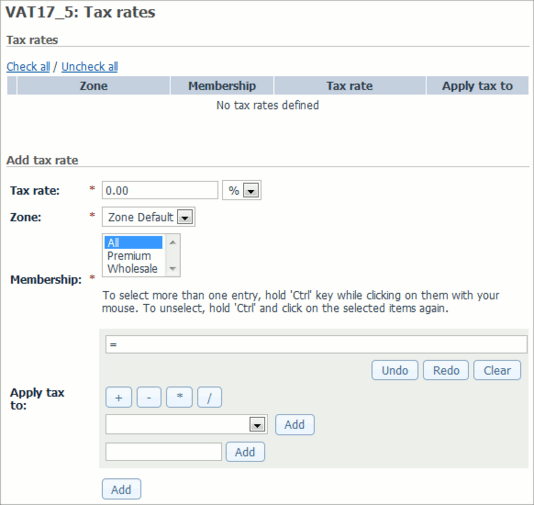
3. Turn to the '<Tax name>: Tax rates' dialog box:
4. Define the details of the tax rate by completing the fields of the 'Add tax rate' subsection of the '<Tax name>: Tax rates' dialog box:
- Rate value: Tax rate value (Use the drop-down box next to the 'Rate value' field to define whether the tax rate should be an absolute or percentage value).
- Zone: Destination zone to which the rate needs to be applied.
- Membership: Membership level to which the rate needs to be applied.
- Apply tax to: Tax base. This field needs to be completed in the '<Tax name>: Tax rates' dialog box only if the tax base for the different destination zones and membership levels to which the tax will be applied needs to be different from the value defined by the store administrator in the 'Apply tax to' field of the 'Tax details' dialog box.
To complete the field, use the #Tax Formula Editor.
5. Click the Add button to save the changes. The new rate will be created and added to the list of tax rates for the tax.
After you have added the necessary tax rates for a tax, be sure to apply the tax to all the products to which it needs to be applied.
Managing tax rates
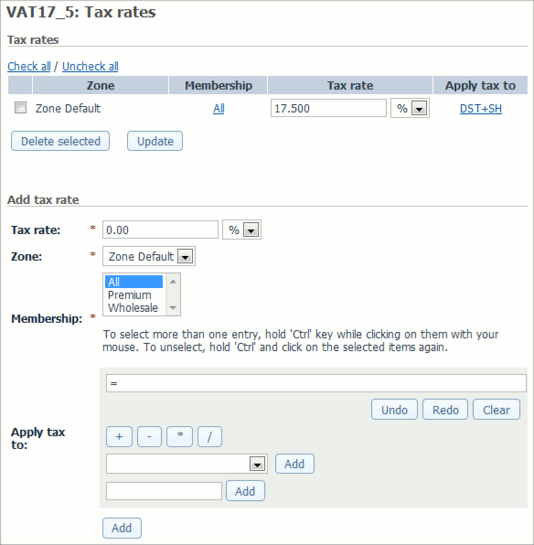
Tax rates can be managed from the '<Tax name>: Tax rates' dialog box. X-Cart allows you to view, edit and delete tax rates.
To change the value of a tax rate:
- In the 'Taxes' dialog box, find the tax rate that you would like to change and click on its name. The 'Tax details' section opens.
- In the '<Tax name>: Tax rates' dialog box, find the rate that you wish to change.
- Change the value of the 'Rate value' field specifying whether the value is absolute or percentage.
- Click the Update button.
To edit the details of a tax rate:
- In the 'Taxes' dialog box, find the tax rate that you would like to change and click on its name. The 'Tax details' section opens.
- In the '<Tax name>: Tax rates' dialog box, find the rate whose details you wish to edit.
- Click either on the membership link (MEMBERSHIP column) or on the tax formula link (APPLY TAX TO column) corresponding to this rate. The rate details appear in the 'Edit tax rate' subsection of the '<Tax name>: Tax rates' dialog box.
- Change the necessary tax rate details (rate value, destination zone, membership level, tax base formula).
- Click the Update button.
To delete a tax rate:
- In the 'Taxes' dialog box, click on the name of the tax whose rate you wish to delete. The 'Tax details' section opens.
- In the '<Tax name>: Tax rates' dialog box, find the rate you wish to delete.
- Select the check box next to this rate. You can use the Check all / Uncheck all links to select or unselect all the rates displayed on the page.
- Click the Delete selected button.


