X-Cart:Egoods
Contents
What Egoods module does
The Egoods module enables you to sell digital products like software, audio and video files, graphics, etc. that are delivered to customers by download.
When the module is enabled, every Product details page in the Admin and Provider areas contains a special field ESD distribution that enables you to assign a file to a product. After you have specified a file for the product and saved the product details, X-Cart handles this product as a downloadable one: the system does not calculate shipping charges and disables inventory tracking for the product.
Customers can add digital products to their carts and go to checkout in the same manner as if it were ordinary products. After an order, containing such a product, has been processed, X-Cart sends an email notification with a download link to a customer who placed the order. The customer can then follow the link and download the product. Each download link is valid for a limited time, defined by the store administrator. When needed, the store administrator can manually extend the download period.
Roles in Egoods module management
If you are an X-Cart GOLD administrator/provider or an X-Cart PRO administrator, you can:
- Enable/disable Egoods module and adjust its configuration (see section #Enabling and Configuring 'Egoods').
- Upload files for downloadable products to any location in the X-Cart file repository.
- Limit available payment options for orders containing downloadable products.
- Assign files to downloadable products.
- Extend expired download links.
If you are an X-Cart PRO provider, you can:
- Upload files for downloadable products to a personal location within the X-Cart file repository.
- Assign files to downloadable products.
Enabling Egoods module
Before you can start creating downloadable products you must enable the Egoods module in the X-Cart Admin area.
To enable the module:
- Log in to the Admin area.
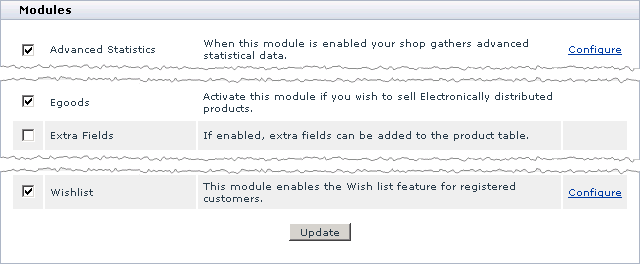
- Go to the Modules section (Administration menu -> Modules).
- Select the check box for the entry Egoods.
- Click the Update button at the bottom of the page.
Configuring Egoods module
To configure the module:
1. Log in to the Admin area.
2. Go to the General settings section (Settings menu -> General settings).
3. Click on the Egoods link (General settings/Modules options). You will be redirected to the Egoods configuration page.
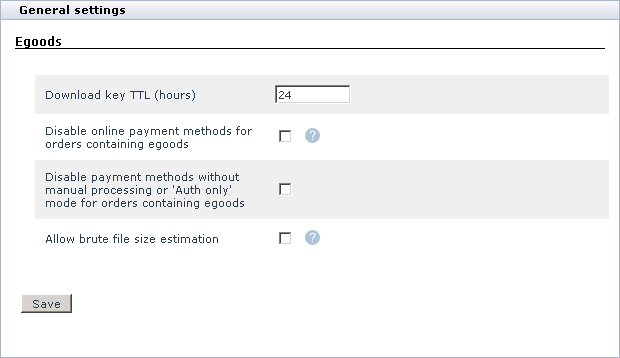
4. Use the Egoods form to adjust module settings.
- Download key TTL (hours): The number of hours after a download key was sent to a customer, during which the key is valid and the customer can download the product.
- Disable online payment methods for orders containing egoods: Use this option to disable all online payment methods in your store if an order contains a downloadable product.
If you select this check box, online payment methods will be disabled, and customers who buy downloadable products in your store will be able to pay through offline payment methods only. (Remember to activate at least one offline method).
If you leave this check box unselected, customers who buy downloadable products in your store will be able to pay, using any active payment method.
- Disable payment methods without manual processing or 'Auth only' mode for orders containing egoods: Use this option to disable all payment methods in your store except those that require manual processing or support the "auth only" mode, if an order contains a downloadable product.
If you select this check box, customers who buy downloadable products in your store will be able to pay through those payment methods that require manual processing or support the "auth only" mode.
If you leave this check box unselected, customers who buy downloadable products in your store will be able to pay, using any active payment method.
- Allow brute file size estimation: Select the checkbox to allow size estimation of remote files by reading the whole file if alternative ways of estimating file size cannot be used.
5. Click the Save button.
Managing Product Files
Arranging file location
Files for downloadable products can be physically located either on the same server as your copy of X-Cart, or on a different server. The recommended option is to store files on the same server. This way of arranging the file repository has the following advantages:
- The store does not depend on other servers, which may be temporary down, and individual URLs, which may be broken;
- Incoming and outcoming traffic is spent more efficiently;
- Customers can download files faster;
- Files can be assigned to products by simple browsing;
- Files can be uploaded to the file repository directly from the X-Cart Admin and Provider areas.
However, for some reason or another, you may have to keep some files on a different server. In such a situation, make sure that the files on the other server(s) can be freely accessed through the internet, e.g. a firewall will not reject the connection, etc.
When storing files on the same server, a default location for the file repository is the directory /files in the X-Cart root directory. Depending on the number of store providers, the directory may contain one or more folders. Each of these folders keeps files uploaded by the respective provider only. Other providers cannot use these, while store administrators can access all the files and folders within the /files directory. You can upload files to the directory (or its subdirectories) through the X-Cart Admin and Provider areas, or you can upload them in bulk via FTP, SCP or other suitable facility. For instructions on how to upload files through the X-Cart interfaces, refer to the X-Cart:Files section of this manual.
If necessary, you can assign the file repository to a different directory within the X-Cart root. You can do it by editing the main X-Cart configuration file config.php.
To change the default file repository location:
1. In the X-Cart root directory, locate the file config.php and open it for editing with your favorite plain text editor.
2. Change the values of variables $files_dir and $files_webdir.
3. Find the following lines.
$files_dir = "/files";
$files_webdir = "/files";
4. Replace the directory name, which is enclosed in quotation marks, with the name of the new directory.
For example, if you want to store files in the directory called "download", edit the values as follows.
$files_dir = "/download";
$files_webdir = "/download";
5. Save the changes.
Protecting files
It is important to protect files for downloadable products from unauthorized access. The directory /files, a default X-Cart location for the file repository, already has correct permissions and is set up to protect its contents. If you keep files in a different directory (regardless of its actual location), make sure the directory is well protected. On an Apache-based server use an .htaccess file. On an IIS server use the Access permissions dialog box.
For more information on how to protect files and directories, refer to the documentation for the server you use.

