LiteCommerce:Egoods
LiteCommerce Egoods add-on module introduces functionality for selling electronic content also known as egoods. When using this add-on your customers will be able to experience the advantage of immediate electronic delivery of the products they order. You can sell both egoods and material products in one online store.
This add-on is indispensable for selling software, e-books, downloadable music, copyrighted content, calling cards and shareware registration codes, and can have many other applications when electronic content distribution is required. Egoods can be delivered via email or can be downloaded via personalized key-protected links from your web site. For extra protection personalized links expire after a certain set period of time or a certain number of downloads.
For more flexibility, PIN codes for serialized products like phone cards, registration keys, information access codes, etc. can be stored in the database or generated by an external application.
When combined with the WholesaleTrading add-on module, Egoods add-on is also suitable for providing paid periodic access to electronic resources (E.g.: content subscription).
This article will guide you through Egoods add-on module installation, setup and maintenance procedures.
Contents
Configuring the module
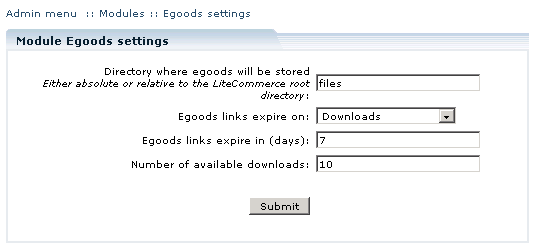
After you have successfully installed the Egoods module, click on the 'Egoods' module link to proceed to the module's settings page (Figure 3).
In the settings page, set the following parameters:
- 'Directory where egoods will be stored' – type here either an absolute path to the directory, or the path relative to LiteCommerce installation root directory. The directory must exist on the server and the user, under which PHP is running, must have write permissions for it.
To manage your product files (upload, delete, etc.), assign 0777 permissions to the files storing directory. After you finish managing product files, change the directory permissions back to 0755.
- 'Egoods links expire on' – this parameter defines the default egoods link expiration condition and can be set to 'Date', 'Downloads' or 'Date and downloads'. If you select the 'Date and downloads' option, the egoods product expires as soon as the first of the two expiration conditions is met.
- 'Egoods links expire in (days)' – if egoods links are set to expire on 'Date' or 'Date and downloads', this parameter defines the default amount of days the link remains valid before it expires.
- 'Number of available downloads' – default amount of product downloads available through a single automatically-generated product link.
Review your changes and click on the 'Submit' button to save new settings.
After you have completed the form on the module configuration page make sure you protect your files storing directory from unauthorized access. You can do this with the help of .htaccess file.
Create a file with the following contents:
Options -Indexes

Deny from all
Save this file with the name ".htaccess" and place it in your files storing directory.
Read more about it at http://httpd.apache.org/docs/2.2/howto/htaccess.html.
Managing Egoods
Egoods are listed in the store catalog just like other products. Egoods product is comprised of one or several downloadable files. These files are transferred to the server using the Administrator Zone interface. Every product is treated by LiteCommerce shopping system as a regular product, unless at least one downloadable file is associated with it.
To review product information, in the 'Products' section of the 'Catalog' menu locate the product you want to edit and click on its title to switch to product details pages. Egoods add-on module creates two additional tabs in the product details of every product, namely the 'Egoods' tab and the 'PIN codes' tab which contain additional product details, pertinent to electronic distribution. Click on the 'Egoods' tab to manage the files and links, associated with an egoods product and designate memberships to be given charge-free product access.
Adding a product file
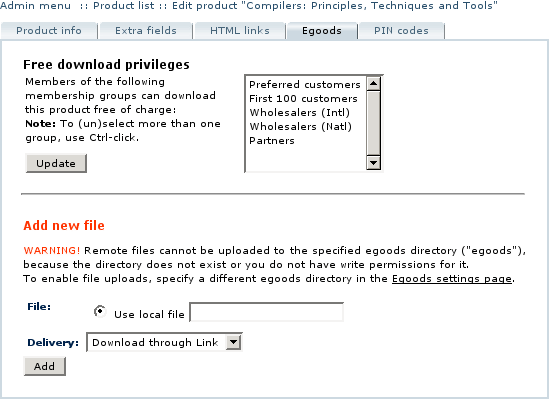
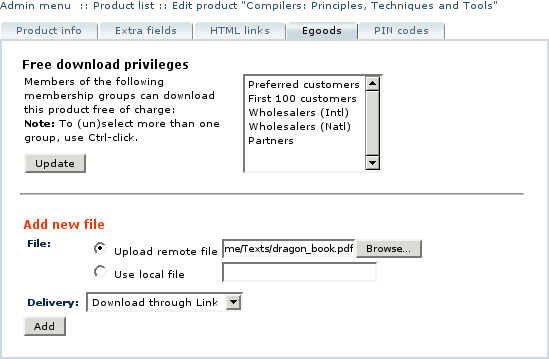
In order to add a product file, under the 'Add new file' subtitle in the 'Egoods' tab specify the file location and the way it is to be delivered to the customers (Figure 5):
- If you are going to upload a file from your computer, enable the 'Upload remote file' option and click on the 'Browse' button to locate the file. If you are going to use a file stored on the server, enable the 'Use local file' option and type in the directory location of that file.
- In the 'Delivery' field, specify whether the egoods product is to be available for download form the website ('download through link' option) or is to be sent to a customer by e-mail ('send via e-mail').
- Click on the 'Add' button to save the product file settings in the shopping system.
You can then add more files or make changes to the settings of the file you have just added.
Managing product files
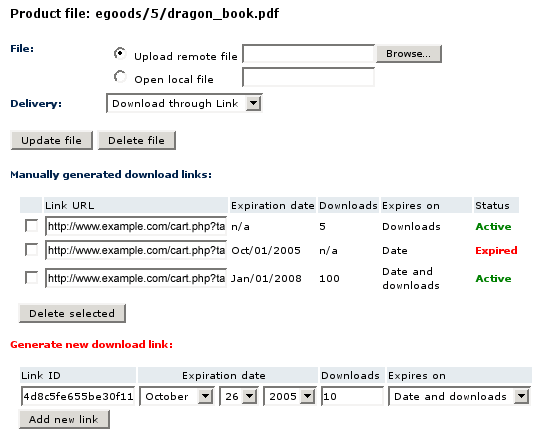
After you have added a file to the egoods product details, additional capabilities become available (Figure 6) in the 'Egoods' tab.
Start by locating the product file you want to review (Figure 6). You can update the file by specifying a different product file in the 'File' field. You can also change the delivery method by choosing a different option in the 'Delivery' field. Click on the 'Update file' button located underneath the product file details for your changes to take effect.
If a product file is configured to be delivered to your customers via e-mail, and some customer has difficulties receiving the e-mail attachment, you can manually generate a link for that customer to download the file from. This can also be useful if you wish to let a certain customer download a file for free without granting him particular membership rights. Under the 'Generate new download link' subtitle review the parameters of the download link to be created and click on the 'Add new link' button. The newly generated link will appear in the list of manually generated download links.
When no longer needed, the link can be deleted. Place a checkmark against the link(s) you want to delete and click on the 'Delete selected' button.
Deleting a product file
To remove a product file, click on the 'Delete file' button underneath the product file details.
Managing free downloads
Using Egoods add-on module, you can create a subscription mechanism which would allow your customers to download products for free. This can be done by specifying membership groups eligible for free downloads and then offering membership subscriptions to your customers.
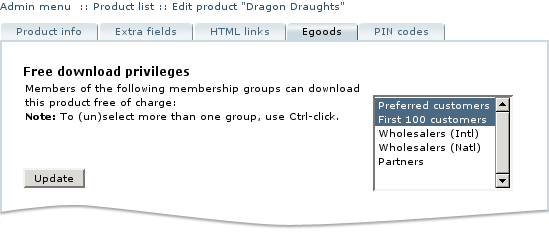
To specify membership groups which have the right to download a product for free, click on the 'Egoods' tab in the product details section and locate the list of available memberships under the 'Free download privileges' subtitle (Figure 7). Select membership groups to be granted the free download privilege (use <CTRL>-click to select more than one membership) and click on the 'Update' button to save the changes.
PIN Codes
Use the 'PIN codes' tab to manage PIN codes to be distributed through egoods product purchase. These can be calling card numbers, software keys or other product identification codes.
Specifying data source of PIN codes
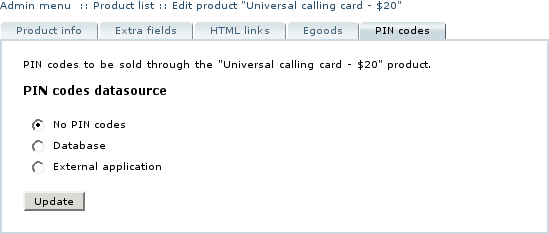
By default, no PIN codes are distributed with product purchases (Figure 8). To provide PIN codes with product purchases, you must first select the data source for PIN codes. It can be either the 'Database' or an 'External application'. Make your choice by enabling the corresponding option and click on the 'Update' button to apply your changes.
Storing PIN codes in the database
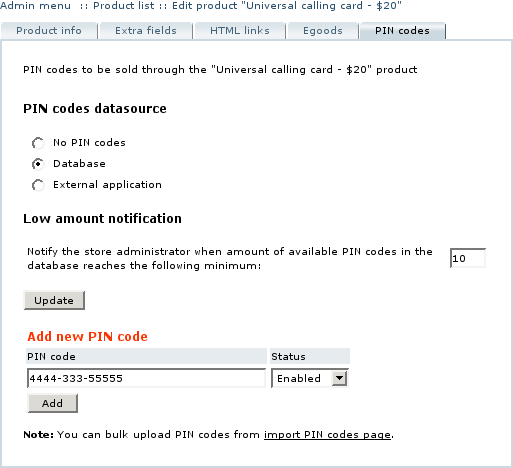
f you select the 'Database' (Figure 9) option, PIN codes are stored in the database and retrieved from there when the status of a relevant order is converted into 'Processed' or 'Completed' and an e-mail message with the PIN code is sent to a customer. In order to be utilized, the PIN code must be 'Enabled' and 'Available for sale'. Once the PIN code is used, its utilization status is changed to 'Sold'.
To keep track of the amount of available PIN codes in the database, specify the critical amount of PIN codes in the 'Notify the store administrator when amount of available PIN codes in the database reaches the following minimum' field and click on the 'Update' button to save this parameter. Whenever the amount of available PIN codes drops below the critical amount, an e-mail notification is sent to the store administrator.
You can input PIN codes either by typing them in manually or using the 'Import PIN codes' functionality (see the 'Importing PIN codes' section of this manual for more details on the second option). To create a new PIN code, under the 'Add new PIN code' subtitle type in the PIN code, specify its status and click on the 'Add' button to save the new PIN code to the database.
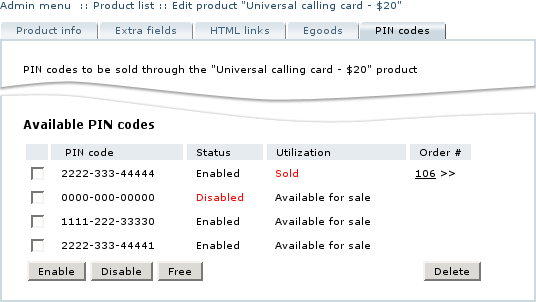
You can review the list of PIN codes in the database in the 'Available PIN codes' sub-section (Figure 10). The list shows the PIN codes, their statuses and assisting information. You have full control over the statuses of the PIN codes. Place checkmarks against the PIN codes you want to modify and then click on:
- the 'Enable' button to set the status of the selected PIN codes to 'Enabled',
- the 'Disable' button to set the status of the selected PIN codes to 'Disabled',
- the 'Free' button to mark the selected PIN codes as 'Available for sale' and make them available for re-use, or
- the 'Delete' button to remove the selected PIN codes from the database.
Using an external application to generate PIN codes
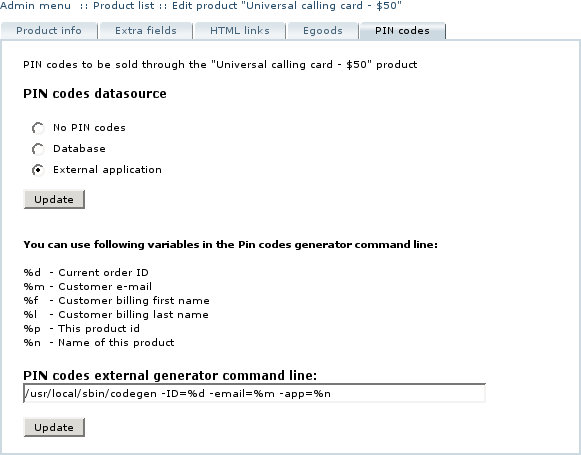
If you choose the 'External application' as a source of PIN codes, PIN codes will be automatically generated by an external PIN code generator when requested. The PIN code generator program must be located at the server and must be executable by the web server owner user. To specify the application to be used, locate the 'PIN codes external generator command line' field and type in the location of the application there (Figure 11). You can provide the following optional parameters to the application:
%d Current order ID
%m Customer e-mail
%f Customer billing first name
%l Customer billing last name
%p This product id
%n Name of this product
Importing PIN codes
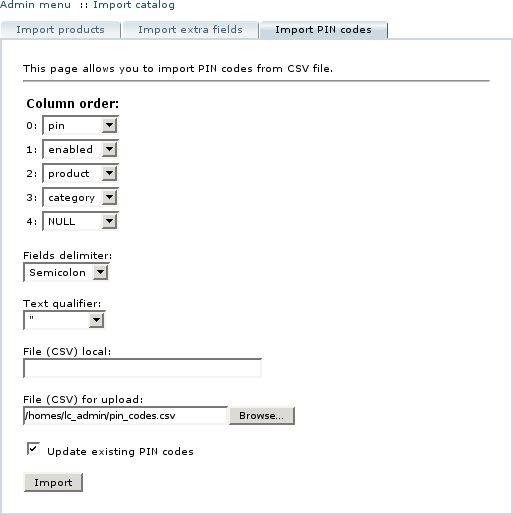
To import PIN codes from a CSV file follow the steps below:
- Select the 'Import catalog' section from the 'Catalog' menu in the Administrator Zone.
- Select the 'Import PIN codes' tab.
- Specify the order of PIN code data fields as they appear in the CSV file. The following fields are available for export: 'pin' (the PIN code itself), 'enabled' (PIN code status), 'product' (the name of the product with which the PIN code is associated), 'category' (the category of the product). The remaining fields must be set to 'NULL'.
- Select the field delimiter and the text qualifier used in the CSV file.
- Choose the CSV file to import. If the file is located on the server, provide its location in the 'File (CSV) local' field. If the CSV file is located on your local computer, click on the 'Browse…' button next to the 'File (CSV) for upload' field to locate the file.
- Specify how to handle situation when identical PIN codes appear in the database and the CSV file. Place a checkmark to update existing PIN codes with the details provided in the CSV file, or remove the checkmark to skip duplicate PIN code lines.
- Click on the 'Import' button to import PIN codes from the CSV file.
Exporting PIN codes
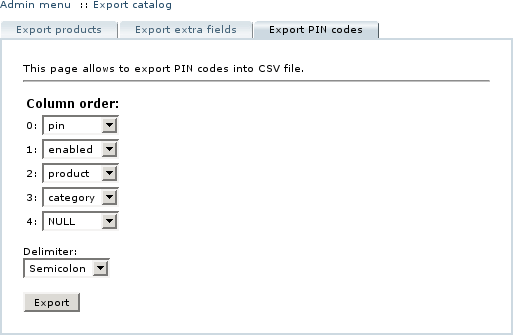
To export PIN codes follow the steps below:
- Select the 'Export catalog' section from the 'Catalog' menu in the Administrator Zone.
- Indicate the desired layout of the CSV file by specifying the order of the fields. The following fields are available for export: 'pin', 'utilization', 'product', 'category'. The remaining fields must be set to 'NULL'.
- Choose the field delimiter from the drop-down menu.
- Click on the 'Export' button to generate a CSV file named 'pin_codes.csv'. You can either open it with the software of your preference, or save it on your computer for future use.
Processing Egoods orders
Orders containing egoods products are handled similarly to regular orders. Once an order is placed, its status is set to either' Queued' or 'Processed' depending on the payment method used. If an order is 'Queued', the electronic content is not delivered until you receive the payment and manually change the status of the product from 'Queued' to either 'Processed' or 'Complete'.
When an order status is set to 'Processed' or 'Complete', your shopping system instantly generates relevant e-mail messages and sends them to the customer:
- If a product ordered is to be downloaded through a link, Egoods module automatically generates a unique URL link (or several links if a product includes more than one file) and sends the URL(s) to the customer. A customer does not need to log into your store in order to download the file, all he needs to do is follow the link provided.
- If a product ordered is to be delivered via e-mail, an e-mail message is sent to the customer with the files attached to it.
- If a product purchased is equipped with a PIN code, the first available product's PIN code is e-mailed. The utilization status of the code is then set to 'Sold'.
- When a all the PIN codes, assigned to a product, are sold, the product is no longer visible in the Customer Zone.
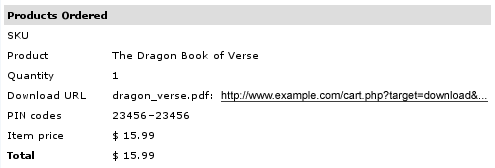
Corresponding 'Download URL' and/or 'PIN code' are reflected in the order details page. Locate the order details and review egoods-specific details under the 'Products Ordered' sub-title (Figure 14).
Egoods statistics
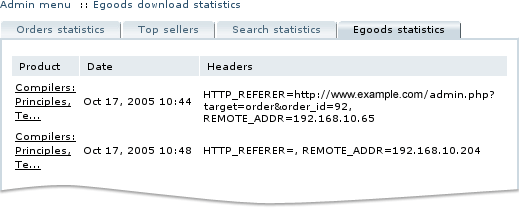
Downloads of egoods products are being recorded in the database. To see the statistics of egoods downloads, select the' Statistics' section from the 'Management' menu and click in the 'Egoods statistics' tab. Statistics displayed includes product names, download dates and HTTP request parameters (see Figure 15).
Customer zone
This section describes how the LiteCommerce Egoods add-on module affects the Customer Zone and includes information about:
Free Product Downloads
If a product is available for free download to a certain membership group, a member of such a group must visit the product page at the store catalog in order to download the product. If a customer qualifies the membership condition, LiteCommerce system displays links to download the product files under the 'Download this product for free' sub-title (Figure 16). When a customer clicks on a link, the standard download window comes up in his browser. A customer doesn't have to add a product into his shopping cart or go through checkout process.
Customers, who are not qualified for a free download, do not see the 'Download this product for free' sub-title and the links. Yet, if such a customer attempts to download such a file, he will get an 'Access denied' message (Figure 17).
Purchasing an Egoods Product
Purchase procedure is basically the same as the regular procedure: a customer logs in, places a product in his shopping cart and goes through the checkout procedure. A notable difference is that Egoods with files associated to them cannot be purchased in multiple quantities. Even if you try to modify product quantity in the shopping cart, it will be reverted to one item.
When a customer places an order on an egoods product and pays the order, he receives several e-mails: one being a regular order receipt and other e-mails containing the content ordered:
- If a product ordered is configured to be downloaded through a link, an e-mail message contains a link (or several links, if a product includes more than one file) to the product and download instructions. A customer does not need to log into your store in order to download the file, all he needs to do is follow the link provided.
- If a product ordered is to be delivered via e-mail, an e-mail message has the product file(s) attached to it.
- If a product purchased is equipped with a PIN code, additional e-mail is sent to the customer with the product's PIN code in it.
Depending on the settings of the Egoods module, automatically generated product download links expire either after a certain amount of downloads or a certain period of time, or both. If an attempt is made to download a product using an expired link, a corresponding 'Access denied' message comes up in the user's browser.
