X-Cart:MultiCurrency
Contents
Overview
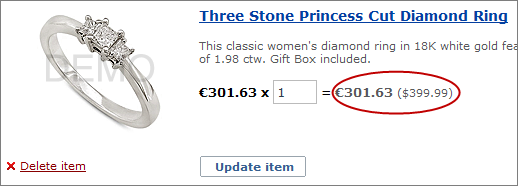
MultiCurrency is an add-on that allows using multiple currencies at customer's front end.
The module features:
- Changing your online store's default currency.
- Defining any number of additional currencies.
- Automatically displaying prices in your customers' local currencies.
and much more.
System requirements
To be able to successfully install and use the MultiCurrency module, you must have a working copy of X-Cart Gold or X-Cart Pro already installed on your server. Make sure that the version of the MultiCurrency module matches the version of your copy of X-Cart.
Installation and removal
These instructions on both installing and removing the MultiCurrency module are the same for both X-Cart Gold and X-Cart Pro.
To install the MultiCurrency module to your X-Cart based store:
1. Obtain a distribution package for the MultiCurrency module by downloading it from the File Area section of your X-Cart Account account. The distribution package is archived in the file x-multicurrency-x.y.z.tgz, where x, y and z indicate the version of the module. Make sure the version of the module matches the version of your copy of X-Cart.
2. Copy the distribution package to the X-Cart root directory on your server or hosting account.
- If you use a Windows-based server or a UNIX-based server without terminal access:
- a) Extract the contents of the archive with the MultiCurrency files to a directory on your system using your favorite compression program (WinZIP or any other archiver that supports TAR files).
- b) Use an FTP client to upload all the files extracted from the archive (retaining the directory structure) to the X-Cart root directory on your server or hosting account.
- If you use a UNIX-based server with terminal access:
- a) Use an FTP client to upload the archive with the MultiCurrency distribution package to the X-Cart root directory on your server or hosting account.
- b) Decompress the package by typing the following command:
tar -xzvf x-multicurrency-x.y.z.tgz
3. In a web browser, run the installation script at httр://www.example.com/install-xmulticurrency.php, replacing the variable www.example.com with the real domain name, where your X-Cart is installed.
4. Enter the Auth code, accept the License Agreement and click the Next button.
5. The installation script copies the files and activates the module. Click the Next button to continue.
6. The installation script generates a new system fingerprint. Click the Next button to complete the installation.
7. Use the ADMINISTRATOR AREA link to log in to the Admin area.
To uninstall the MultiCurrency module:
1. In a web browser, run the installation script at http://www.example.com/install-xmulticurrency.php, replacing the "www.example.com" with the real domain name, where your X-Cart is installed.
2. Choose the Uninstall the module option, enter the Auth code, accept the License Agreement and click the Next button.
3. Once the installation script has removed the MultiCurrency files and deactivated the module, click the Next button to complete the uninstallation.
4. On the Uninstallation complete screen, click Next to leave the Wizard.
Enabling MultiCurrency module in X-Cart
Once you have installed the MultiCurrency module, enable it in the X-Cart Admin area.
To enable the MultiCurrency module:
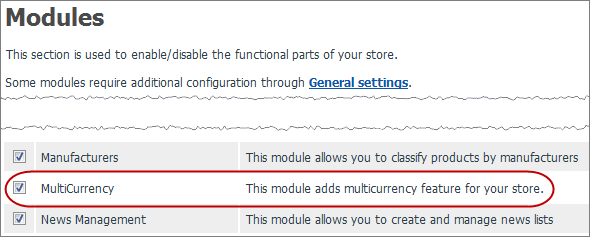
1. Log in to the X-Cart Admin area and go to the Modules section (select Settings -> Modules on the administration menu).
2. On the list of modules, find the "MultiCurrency" item and select the check box by the item's name.
3. Scroll down to the bottom of the page and click the Apply changes button to save changes.
Using MultiCurrency
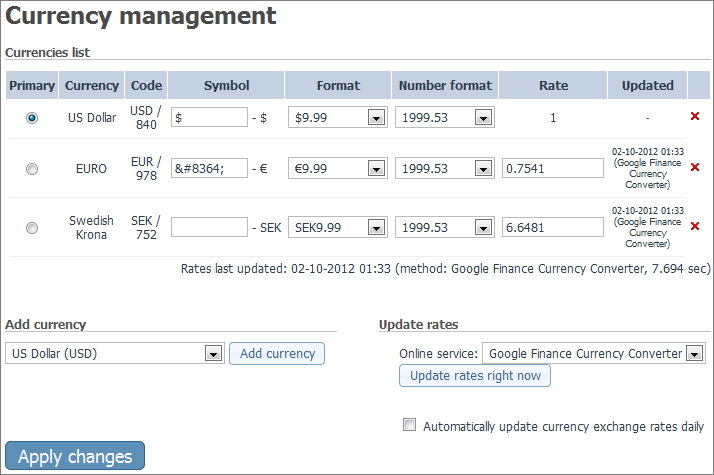
To get started with MultiCurrency, go to the Currency management page and set up the currencies to be used in your store.
To open the Currency management page:
1. Log in to the X-Cart Admin area.
2. Select the Currencies item on the Settings menu.
To add new currency:
1. On the Currency management page, find the Add currency section.
2. Select the currency to be added on the Add currency select box.
3. Click the Add currency button.
The new currency now appears on the Currencies list.
To delete currency:
1. On the Currency management page, find the Currencies list section.
2. On the Currencies list, click the red ![]() icon by the currency to be deleted.
icon by the currency to be deleted.
The deleted currency no longer appears on the Currencies list.
Managing currencies
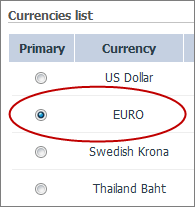
Defining primary currency
To define primary currency:
1. On the Currencies list, click on the Primary radio button by the currency to be set as primary.
2. Click the Apply changes button to save the selection.
Editing currency
To edit currency:
On the Currencies list, simply modify the editable fields as necessary and click the Apply changes button to save changes.
Here are the fields you can edit:
- Symbol - a graphic symbol used as a shorthand for a currency's name. For more information, please refer to the Currency sign article in Wikipedia.
- Format - order of character sequence in price expression: currency symbol followed by a numeric value or vice versa.
- Number format - order of digits and signs (comma, period, space) in the numeric value.
- Rate - currency exchange rate; can be entered manually or retrieved automatically from an online currency conversion service.
Currency exchange rate
Exchange rate shows the rate at which the selected currency will be exchanged for one unit of the primary currency.
To enter exchange rate manually:
1. On the Currencies list, modify the Rate field as necessary for the selected currency.
2. Click the Apply changes button to save changes.
To get current exchange rate from online service:
1. On the Currency management page, find the Update rates section.
2. On the Online service select box, select the online currency conversion service to retrieve data from.
3. Click the Update rates right now button to get current exchange rate for currencies on your list.
To get current exchange rate automatically:
1. On the Currency management page, find the Update rates section.
2. On the Online service select box, select the online currency conversion service to retrieve data from.
3. Select the Automatically update currency exchange rates daily check box.
4. Click the Apply changes button to save changes.
Advanced options
The MultiCurrency module adds a popup selector, which allows customers to select language (when several languages defined), currency (when more than one currency specified) and country. First time visitors' country is detected automatically by their IP address. Language and currency are preselected according to the detected country and remembered in cookies. You can disable changing country on the popup selector.
To allow/disallow customers to select country:
1. On the Currency management page, find the Update selector options section.
2. Select the Allow customers to select country check box.
3. Click the Apply changes button to save changes.
You can also limit the list of available countries by those that use currencies defined on the Currencies list.
To limit the list of available countries:
1. On the Currency management page, find the Update selector options section.
2. Select the List only countries with currencies set on the currency list check box.
3. Click the Apply changes button to save changes.


