Draft:Claud Search
Contents
Overview
данный модуль позволяет реализовать возможность мнгновенного отображения резульатов поиска невосредственно в момент ввода поисковой фразы. Результаты поиска сортируются в релевантном порядке. Анализируюя результаты поиска клиент может варьировать поисковые запросы для получения лучшего результата. кроче нужно чтото скомпилироваьт из http://www.websitecm.com/x-cart-mods/advanced-instant-product-search.html и http://www.firetanksoftware.com/x-cart/Instant-Product-Search-basic-pid-125.html Since X-Cart version 4.5.3, the CloudSearch widget is included into X-Cart code. On earlier X-Cart versions (4.4.0-4.5.2), the widget can be enabled by installing the ClaudSearch integration module. Apache Solr (http://lucene.apache.org/solr/) Internet Explorer 7 or later, Chrome, Safari (including iOS), Firefox.
Key benefits of using CloudSearch in X-Cart:
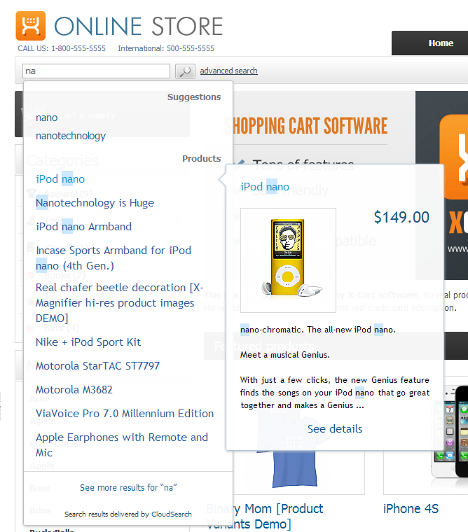
- Search as you type: Search results are presented instantly, before the user is even done typing.
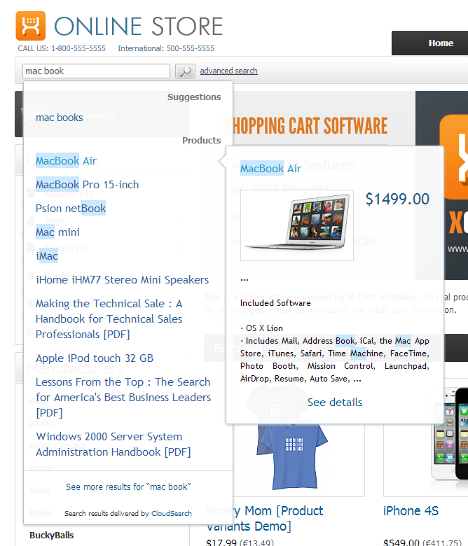
- Search hit highlighting: Search results show the exact portions of text where the word or phrase matching the search query occurs, with the words matching the query emphasized by background highlighting.
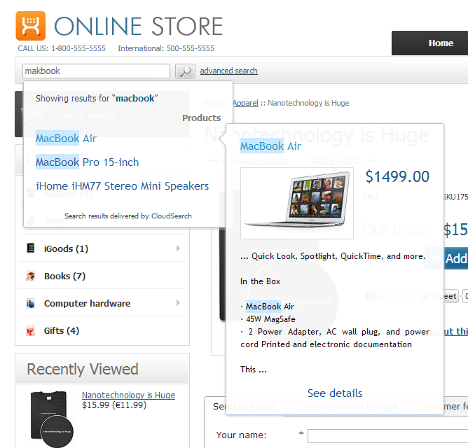
- Automatic spelling suggestions: Even if a word has been misspelled, the customer can still find the product by using a closely related option from the presented list.
- Relevant search results: Based on Apache Solr, the industry leading open source enterprise search platform, CloudSearch recognizes word forms and provides other advanced full-text search capabilities.
- Amazingly fast: The CloudSearch widget in your store interacts directly with our cloud without increasing load on your server.
- SaaS architecture: High performance and feature updates are available automatically without the need to upgrade your client software.
- Slick Ajax GUI widget.
- CSS-based layout that can be tweaked to fit any design.
- 30 day free trial period.
- Subscription-based plans.
ClaudSearch integration module system requirements
To be able to successfully install and use the CloudSearch integration module, you must have a working copy of X-Cart Gold or X-Cart Pro already installed on your server.
Installation and removal
The CloudSearch integration module installation process is the same for both X-Cart Gold and X-Cart Pro.
To install the ClaudSearch integration module:
- Obtain a distribution package for the module by downloading it from the File Area section of your X-Cart Account account. The distribution package you need is archived in the file isearch-x.y.z.tgz, where x, y and z indicate the version of the module. Make sure the version of the module matches the version of your copy of X-Cart.
- Copy the distribution package to the X-Cart root directory on your server or hosting account.
- If you use a Windows-based server or a UNIX-based server without terminal access:
- a) Extract the contents of the archive with the CloudSearch integration module files to a directory on your system using your favorite compression program (WinZIP or any other archiver that supports TAR files).
- b) Use an FTP client to upload all the files extracted from the archive (retaining the directory structure) to the X-Cart root directory on your server or hosting account.
- If you use a UNIX-based server with terminal access:
- a) Use an FTP client to upload the archive with the CloudSearch integration module distribution package to the X-Cart root directory on your server or hosting account.
- b) Decompress the package using the following command:
tar -xzvf isearch-x.y.z.tgz
- Important: Make sure that you maintain the directory structure while unpacking and uploading the distribution package; otherwise, some critical files can be overwritten!
- In a web browser, run the installation script at httр://www.example.com/install-isearch.php, replacing www.example.com with the actual domain name of your X-Cart based store.
- Enter the Auth code, accept the License Agreement and click the Next button.
- Note: The Auth code is a random code that was generated after you installed your copy of X-Cart. If you do not remember the Auth code, find it on the Summary page in X-Cart Admin area before the License info subsection. Another way to find out the code is to retrieve the value of the variable $installation_auth_code from the file<xcart_dir>include/install.php .
- The installation script copies the files and activates the module. Click the Next button to continue.
- The installation script generates a new system fingerprint. Click the Next button to complete the installation.
- Use the ADMINISTRATOR AREA link to log in to the Admin area.
To uninstall the CloudSearch integration module:
- In a web browser, run the installation script at httр://www.example.com/install-isearch.php, replacing www.example.com with the actual domain name of your X-Cart based store.
- Choose the Uninstall the module option, enter the Auth code, accept the License Agreement and click the Next button.
- Once the installation script has removed the CloudSearch integration module files and deactivated the module, click the Next button to complete the uninstallation.
- On the Uninstallation complete screen, click Next to leave the Wizard.Important: After you have uninstalled the CloudSearch integration module, be sure to remove the CloudSearch integration module distribution package from your web directory as well.
Enabling the CloudSearch integration module in X-Cart
After the CloudSearch integration module installation has been completed, the module needs to be enabled in your store.
To enable the CloudSearch integration module:
- In the X-Cart Admin area, go to the Modules section (Settings -> Modules).
- In the list of modules, choose the "CloudSearch integration" item by selecting the respective check box on the left.
- Scroll down to the bottom of the page and click the Apply changes button. This activates the module.
The module does not require any additional configuration and will work out of the box.


