Difference between revisions of "Draft:KOUNT Antifraud screening"
m |
m |
||
| Line 9: | Line 9: | ||
# In the AWC, adjust credit card validation rules for your online store. | # In the AWC, adjust credit card validation rules for your online store. | ||
# Log in to X-Payments and locate the payment configuration for which you want to use Kount fraud screening. | # Log in to X-Payments and locate the payment configuration for which you want to use Kount fraud screening. | ||
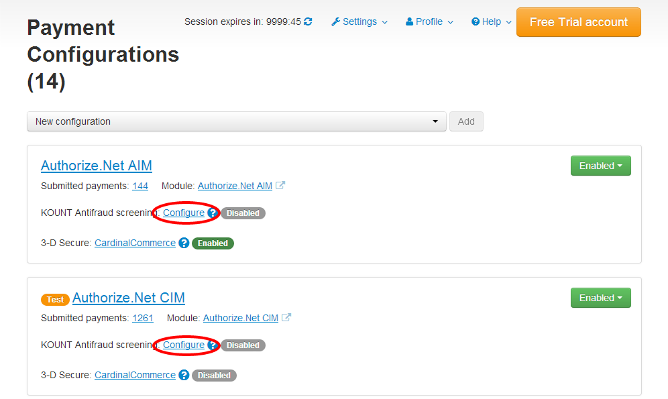
| − | # Go to the 'KOUNT Antifraud screening settings' page for this payment configuration by clicking the <u>Configure</u> link | + | # Go to the 'KOUNT Antifraud screening settings' page for this payment configuration by clicking the "KOUNT Antifraud screening: <u>Configure</u>" link:<br /> |
| − | #* On the 'Payment configurations' page (Settings -> Payment configurations) you can find | + | #* On the 'Payment configurations' page (Settings -> Payment configurations) you can find this link here:<br />[[File:Kount_configure1.png|border]] |
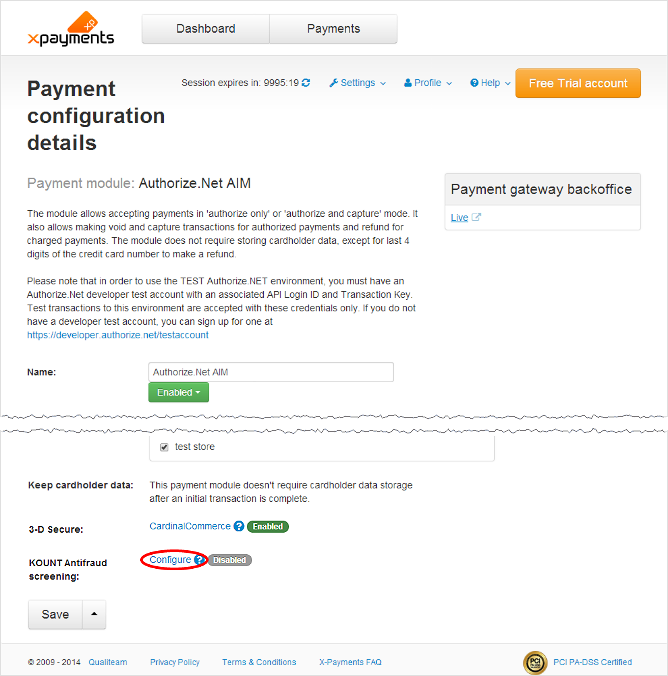
#* On the 'Payment configuration details' page it is here:<br />[[File:Kount_configure2.png]] | #* On the 'Payment configuration details' page it is here:<br />[[File:Kount_configure2.png]] | ||
# Use the 'KOUNT Antifraud screening settings' page for the selected payment configuration to configure your Kount integration module:<br />[[File:Kount_settings.png|border]] | # Use the 'KOUNT Antifraud screening settings' page for the selected payment configuration to configure your Kount integration module:<br />[[File:Kount_settings.png|border]] | ||
| Line 23: | Line 23: | ||
## When you are done adjusting all the fields, click '''Save''' to save the changes. | ## When you are done adjusting all the fields, click '''Save''' to save the changes. | ||
# Enable Kount fraud screening for the selected payment configuration: On the 'KOUNT Antifraud screening settings' page for your selected payment configuration, click the '''Disabled''' button located near the top of the page close to the title "Payment configuration: <Payment configuration name> KOUNT Antifraud screening", and select the action ''Enable'' from the button menu:<br />[[File:Kount_enable.png|border]]<br />Once the button switches to '''Enabled''', Kount screening for the selected payment configuration will be enabled. | # Enable Kount fraud screening for the selected payment configuration: On the 'KOUNT Antifraud screening settings' page for your selected payment configuration, click the '''Disabled''' button located near the top of the page close to the title "Payment configuration: <Payment configuration name> KOUNT Antifraud screening", and select the action ''Enable'' from the button menu:<br />[[File:Kount_enable.png|border]]<br />Once the button switches to '''Enabled''', Kount screening for the selected payment configuration will be enabled. | ||
| + | <br /> | ||
| + | Once Kount antifraud screening has been configured and enabled for a specific payment configuraton, any new payment transactions for this payment configuration will be screened by Kount, and you will be able to view the screening results on the Payment details page: | ||
| + | ::[[File:Kount_results.png|border]] | ||
Revision as of 15:11, 27 June 2014
To help you protect your business against fraud, X-Payments 2.1 provides integration with a powerful fraud detection and prevention solution by Kount. Kount delivers an all-in-one, SaaS model fraud and risk management platform for merchants operating in card-not-present (CNP) environments and looking to root out fraudsters and increase revenue. For each transaction, Kount’s real-time "decisioning" engine analyzes hundreds of relevant variables and activity across the globe. Kount applies a multitude of proven and patented technologies including Multi-layered Device Fingerprinting®, Proxy Piercer® geolocation tools, statistical scoring, rules-based fraud detection, cross-merchant linking, and Persona behavioral modeling. Kount's proprietary technology has reviewed hundreds of millions of transactions and provides maximum protection for some of the world's best-known brands.
For more information on Kount and how it can help you increase sales and manage the fraud/risk process more efficiently, you can request a personal demo; a Kount representative with contact you shortly to schedule an appointment.
To start using Kount for online payment fraud screening in X-Payments, complete the following steps:
- Sign up for a Merchant account with Kount at http://www.kount.com. You will be provided with some credentials that you will need to configure Kount fraud screening in X-Payments: your Merchant ID and your Site ID. Take note of this information.
- Go to the desired Kount Agent Web Console (AWC), test or production, and request your Pulic certificate and Private key. You will need to convert the files to .PEM format and set your private key passphrase. For detailed instructions on certificate exportation and conversion, see Media:Kount_Certificate_Export_and_Conversion5.2.4.pdf.
- Upload the public certificate and private key files to the directory <xp-dir>/var/certs/kount/ within your X-Payments installation.
- In the AWC, adjust credit card validation rules for your online store.
- Log in to X-Payments and locate the payment configuration for which you want to use Kount fraud screening.
- Go to the 'KOUNT Antifraud screening settings' page for this payment configuration by clicking the "KOUNT Antifraud screening: Configure" link:
- On the 'Payment configurations' page (Settings -> Payment configurations) you can find this link here:
- On the 'Payment configuration details' page it is here:
- On the 'Payment configurations' page (Settings -> Payment configurations) you can find this link here:
- Use the 'KOUNT Antifraud screening settings' page for the selected payment configuration to configure your Kount integration module:
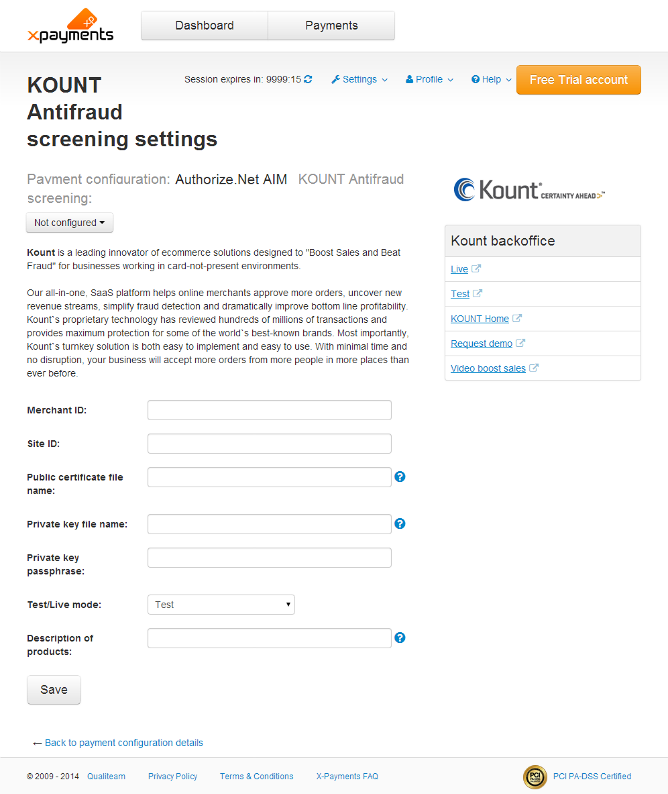
- Adjust the following settings:
- Merchant ID: Specify your Merchant ID as was provided to you by Kount.
- Site ID: Specify your Site ID.
- Public certificate file name: Specify your public certificate file name.
- Private key file name: Specify your private key file name.
- Private key passphrase: Specify your private key passphrase.
- Test/Live mode: Use this to set the operation mode for Kount fraud screening service - Test or Live. For access to the Kount AWC in Live mode use the address https://awc.kount.net, in Test mode - the address https://awc.test.kount.net.
- Description of products: Common name of the products sold by your store.
- When you are done adjusting all the fields, click Save to save the changes.
- Adjust the following settings:
- Enable Kount fraud screening for the selected payment configuration: On the 'KOUNT Antifraud screening settings' page for your selected payment configuration, click the Disabled button located near the top of the page close to the title "Payment configuration: <Payment configuration name> KOUNT Antifraud screening", and select the action Enable from the button menu:
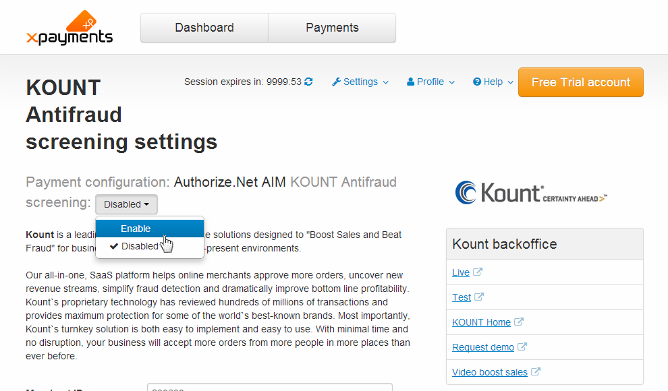
Once the button switches to Enabled, Kount screening for the selected payment configuration will be enabled.


Once Kount antifraud screening has been configured and enabled for a specific payment configuraton, any new payment transactions for this payment configuration will be screened by Kount, and you will be able to view the screening results on the Payment details page:
