Difference between revisions of "Draft:X-Cart:Pay with Amazon"
m (→Customer experience) |
m (→Customer experience) |
||
| Line 71: | Line 71: | ||
==Customer experience== | ==Customer experience== | ||
| + | In the Customer area of your X-Cart store, in all the locations from which buyers can initiate the checkout process using the standard X-Cart's '''Checkout''' button, the Pay with Amazon module adds another button: '''Pay with Amazon'''. | ||
| − | [[File:PwA_cart.png|border]]<br /> | + | Here's what it looks like on "Your cart" page:<br /> |
| − | [[File:PwA_minicart.png|border]]<br /> | + | ::[[File:PwA_cart.png|border]]<br /><br /> |
| − | [[File:PwA_add_to_cart.png|border]]<br /> | + | in the "Minicart" widget:<br /> |
| + | ::[[File:PwA_minicart.png|border]]<br /><br /> | ||
| + | and in the "Add to cart" popup:<br /> | ||
| + | ::[[File:PwA_add_to_cart.png|border]]<br /><br /> | ||
| − | [[File:PwA_signin.png|border]]<br /> | + | ::[[File:PwA_signin.png|border]]<br /> |
| − | [[File:PwA_checkout.png|border]]<br /> | + | ::[[File:PwA_checkout.png|border]]<br /> |
==Admin experience== | ==Admin experience== | ||
Capture payments for your orders; this is required to collect payment from the buyer | Capture payments for your orders; this is required to collect payment from the buyer | ||
Revision as of 17:08, 27 January 2014
Contents
Overview
Pay with Amazon
System requirements and installation
See Pay with Amazon module installation.
Getting started
- Register for Amazon Payments Advanced service.
Amazon Payments Advanced is an Amazon service that is separate from Checkout by Amazon (CBA) solution. That means you’ll need to go through a registration process, even if you have an existing CBA account.
You can register for Amazon Payments Advanced using this link: Get started now > - Log in to Amazon's Seller Central at https://sellercentral.amazon.com to complete a few extra steps. If you’ve registered for multiple Amazon services, you’ll see a dropdown at the top of the page that lets you move between the different services.

- Create a test account to use in Sandbox mode.
Select "Amazon Payments Advanced (Sandbox View)" from the drop-down box at the top of the screen. Under "Integration" -> "Test Accounts", you can create test accounts for use in Sandbox mode. Sandbox mode can be used to make test purchases without processing an actual payment.
- Set up your account
Select "Amazon Payments Advanced (Production View)" from the drop-down box at the top of the screen. You’ll need to complete a tax interview and set up your bank account, even if you’ve already done so for an existing account. You’ll see a message and links to complete these steps on your home page when you switch to the Production View.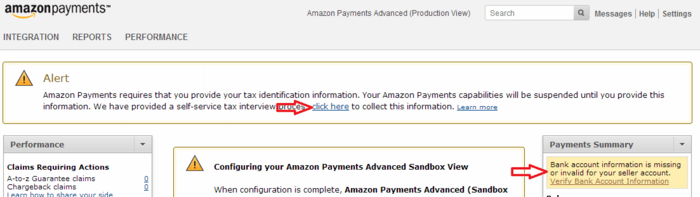
- Get your account keys (These will need to be entered in X-Cart):
- Under "Settings" -> "Integration Settings":
- Your Merchant ID
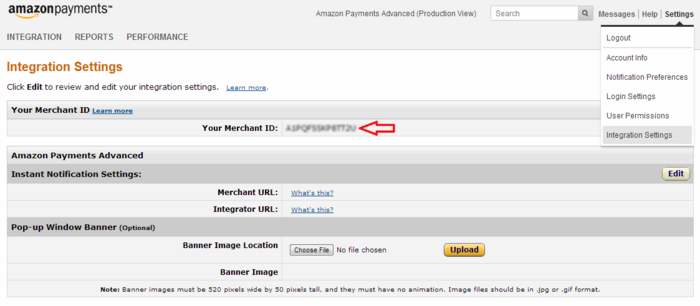
- Your Merchant ID
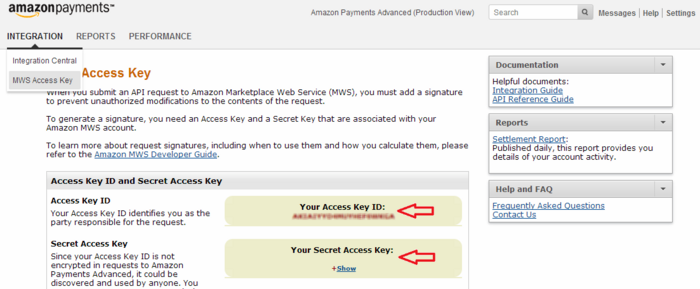
- Under "Integration" -> "MWS Access Key":
- Your Access Key ID
- Your Secret Access Key
- Note: If you do not see your keys, you'll need to create new ones, which you do by clicking the link under "Create MWS Account":
- Log in using your Seller Central account.
- Select the "I want to access my own Amazon seller account with MWS" option.
- Accept the license agreement.
- Your keys will be set up in your account, you can ignore the IDs you see on the final page.
- Go back to Seller Central (http://sellercentral.amazon.com) to the "MWS Access Key" page to see the keys you'll need to enter in X-Cart.
- Under "Settings" -> "Integration Settings":
- In a new browser tab or window, log in to the Admin interface of your X-Cart store. Copy the account keys from Seller Central and paste them into X-Cart on the Pay with Amazon module configuration page. Specify the rest of the settings (Operation mode, Currency, Capture mode) as required and save the configuration. We recommend setting the Operation mode to "Test" first, so you can create some orders in Sandbox mode and see how it works. For more info on the module configuration settings, see:
- In Seller Central, configure your instant notification settings (IPN):
Under "Settings" -> "Integration Settings", enter your Merchant URL. The Sandbox and Production accounts each have separate values for this setting, so you must switch the view using the drop-down box at the top of the screen to set both. The URL you'll need to enter is httрs://<YOUR_XCART_STORE>/payment/amazon_pa_ipn_recv.php (HTTPS is required when you configure your IPN URL for the production account. HTTP is only allowed for testing since no private customer data is passed in test mode).Note: Recent web servers use a protocol called Server Name Indication (SNI) to support hosting of multiple sites on a single domain. Unfortunately, Amazon Payments does not support the use of SNI for IPN destinations, so you may need to configure a default certificate to be used on your web server and use this certificate’s registered domain name in your configured IPN URL. For example, if your site is configured with two secure virtual hosts, httрs://www.site.com and httрs://store.site.com, you should configure one of these certificates as the default to be returned if SNI is not supported. The IPN URL must then be configured to match your default certificate.
Please refer to your web server’s documentation for how to configure default certificates. On Apache web servers, this is commonly configured in a file included in your installation under /etc/httpd/conf.d/ called ssl.conf. - If you wish to use your own graphics (store logo) in the pop-up window where buyers will sign in to Amazon Payments, upload the image in Seller Central (This is called "Pop-up Window Banner" under "Settings" -> "Integration Settings").
- If you disabled the Pay with Amazon module in X-Cart after installation, enable (activate) it:
- Test your setup in Sandbox mode. You can use the test account you set up earlier. We recommend trying out both your customer-facing checkout flow as well as order management to get a feel for how orders are processed.
- Once you’re ready to go live with your Pay with Amazon module, configure the module to production mode by setting its Operation mode to "Live" and you should be ready to go.
- Order Management
You manage orders entirely within X-Cart’s order management interface, as you would with a standard credit card payment gateway. There's no need to process the orders via Amazon's Seller Central website as with Checkout by Amazon.


Activating and deactivating the module
If the module Pay with Amazon is installed, but not active, you can enable (activate) it.
To enable the module:
- Go to the Modules section of your store's Admin area (Settings menu->Modules). This opens the list of your store's installed modules.
- Locate the entry for the Pay with Amazon module and select the respective check box on the left.
- Click Apply changes. The module will be enabled.
It is possible to temporarily disable (deactivate) the installed Pay with Amazon module. Deactivation stops the module from operation, but it does not remove any settings you made to the module configuration nor clear any data that was generated during the period that the module was in operation. If you wish to completely remove all the data related to using the module, you need to uninstall it. See Uninstallation for more info.
To disable the module:
- Go to the Modules section of your store's Admin area (Settings menu->Modules).
- Locate the entry for the Pay with Amazon module and unselect the respective check box on the left.
- Click Apply changes. The module will be disabled.
Configuring the module
After the module has been installed and enabled, it needs to be configured.
To configure the module:
- Open to the module configuration section. Use one of the following methods:
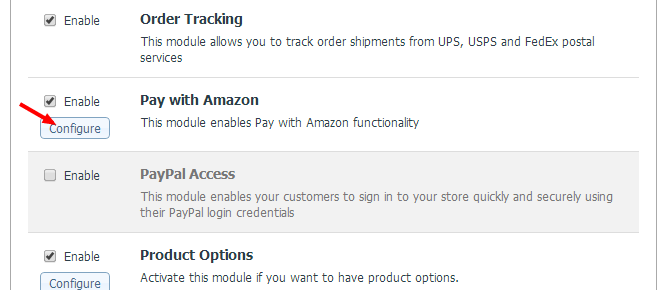
- In the Modules section of your store's Admin area (Settings menu->Modules), locate the entry for 'Pay with Amazon' module and click the Configure link next to it:
OR: - In the Payment methods section of your store's Admin area (Settings menu->Payment methods), click the 'Pay with Amazon' tab:
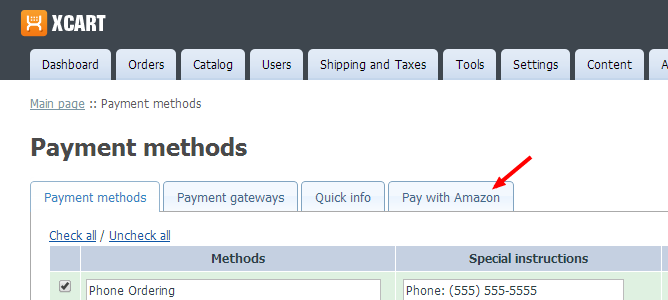
The Pay with Amazon module configuration section looks like the following: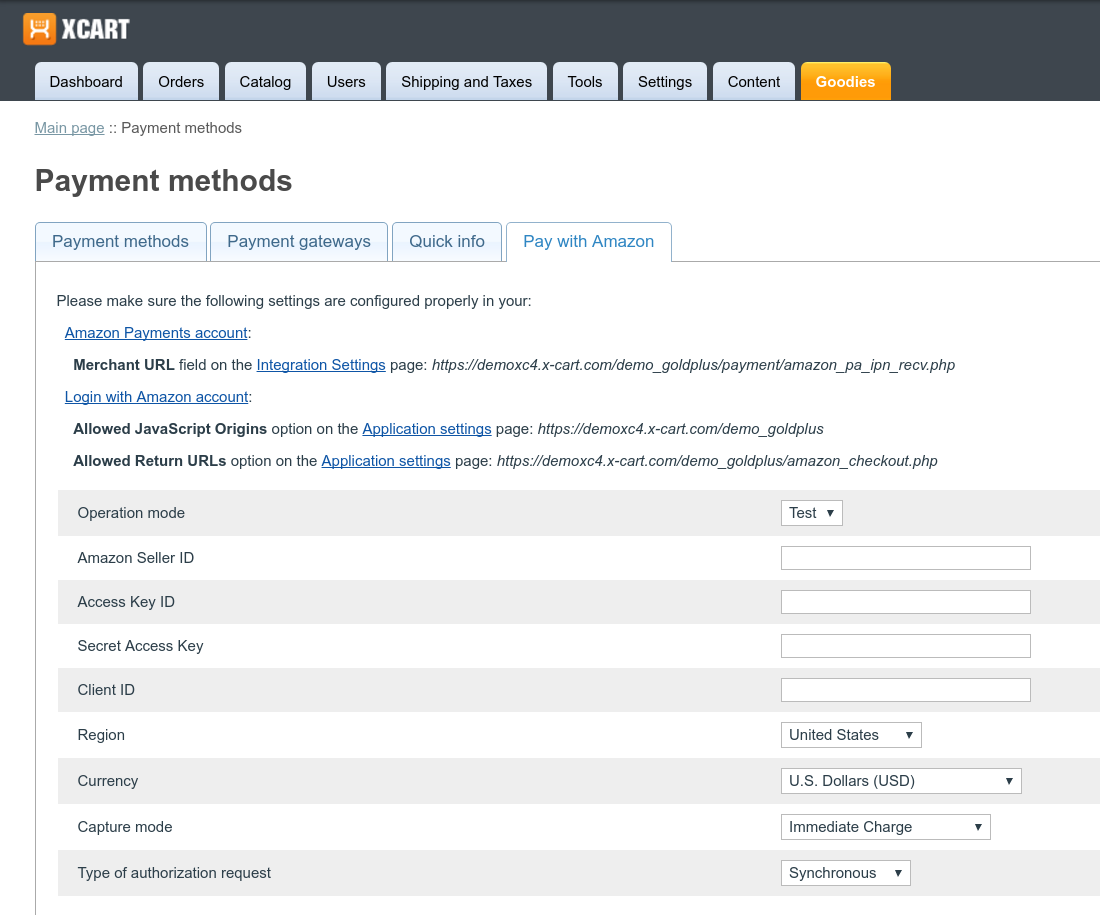
- In the Modules section of your store's Admin area (Settings menu->Modules), locate the entry for 'Pay with Amazon' module and click the Configure link next to it:
- Adjust the module configuration settings:
- Operation mode: Use this to switch between the Sandbox and Production modes for the Amazon Payments Advanced integration.
- Amazon Seller ID: Enter your Merchant ID from your Seller Central account.
- Access Key ID: Enter your Access Key ID from your Seller Central account.
- Secret Access Key: Enter your Secret Access Key from your Seller Central account.
- Currency: Select your currency.
- Capture mode: Specify the desired capture mode ("Authorization then capture" or "Immediate Charge"). The "Authorization then capture" mode means that, when your buyer submits their order on checkout, you only get an Authorization on the payment method they selected, but not charge the buyer until you fulfill the order. To actually charge the funds you have authorized, you need to manually capture the payment amount by clicking the Capture button on the details page of the respective order in your X-Cart store. "Immediate Charge" means that, when buyer submits their order on checkout, the payment is both Authorized and Captured at the same moment.Note: The Amazon Payments policy states that you charge your buyer when you fulfill their order. For physical goods, the order is considered fulfilled when the goods are shipped. For digital goods and services, the order is considered fulfilled when the goods or services are delivered to the buyer. If you want to charge your buyer before you ship, you must contact the Amazon Payments team for approval.
- Click Apply changes.
This is it. Now your module has been configured.


Customer experience
In the Customer area of your X-Cart store, in all the locations from which buyers can initiate the checkout process using the standard X-Cart's Checkout button, the Pay with Amazon module adds another button: Pay with Amazon.
Here's what it looks like on "Your cart" page:

in the "Minicart" widget:

and in the "Add to cart" popup:


Admin experience
Capture payments for your orders; this is required to collect payment from the buyer