Difference between revisions of "LiteCommerce:AdvancedSecurity"
(→Configuring the Module) |
m |
||
| (4 intermediate revisions by 2 users not shown) | |||
| Line 1: | Line 1: | ||
| + | {{LC2_disclaimer}}<br /><br /> | ||
| + | {{LC 2.x}} | ||
| + | |||
==Introduction== | ==Introduction== | ||
| Line 164: | Line 167: | ||
==Secure order management== | ==Secure order management== | ||
| + | |||
| + | The '''Advanced Security add-on module''' allows to encrypt credit card details | ||
| + | |||
| + | If the module is installed but not configured correctly (for example, the keys are not uploaded or the master password has been entered incorrectly), then: | ||
| + | |||
| + | # The 'Credit Card' payment method is not available on checkout in the Customer Zone. | ||
| + | # A warning message is displayed on the order details page in the Administrator Zone. | ||
| + | # The payment processor declines this order and displays a corresponding error message. | ||
===Encrypting order details=== | ===Encrypting order details=== | ||
| + | |||
| + | To encrypt credit card details of all the orders stored in your database use the 'Secure order management' section on the '''Advanced Security''' module settings page. | ||
| + | |||
| + | : [[Image:lc-asc-07.gif|560px|LC-ASc-07]] | ||
| + | |||
| + | Enter the master password used during GnuPG key generation process and click ''''Encrypt''''. From now on the credit card info is encrypted. Check this by going to the 'Orders' section of the 'Management' menu and selecting one of the orders with 'Credit Card' payment method. Here is how the encrypted data is displayed: | ||
| + | |||
| + | : [[Image:lc-asc-08.gif|470px|LC-ASc-08|border]] | ||
===Decrypting order details=== | ===Decrypting order details=== | ||
| + | |||
| + | To view the encrypted data use the 'Master password' on the order details page. Enter master password and click ''''Submit''''. | ||
| + | |||
| + | : [[Image:lc-asc-09.gif|560px|LC-ASc-09]] | ||
| + | |||
| + | |||
| + | In order not to compromise your master password use the ''''Clear master password'''' button when you do not need to view the credit card details. | ||
| + | |||
| + | : [[Image:lc-asc-10.gif|560px|LC-ASc-10]] | ||
| + | |||
| + | |||
| + | To decrypt all the orders go to the 'Secure order management' section on the Advanced Security module options page, enter the master password and click ''''Decrypt''''. | ||
==Setting up email client software== | ==Setting up email client software== | ||
| + | |||
| + | To enable your email client software to read encrypted email notifications from your LiteCommerce-based online store you need to take several configuration steps. | ||
| + | |||
| + | For most email clients you will need to install a separate GnuPG plug-in to be able to read encrypted email. Here is a list of GnuPG plug-ins for the most popular email clients: http://openpgp.vie-privee.org/courrier_en.html. | ||
| + | |||
| + | If you have generated your keypair directly on the server or your hosting provider has done it for you, you can download the secret key from the corresponding section of the '''Advanced Security''' module configuration page. Enter the master password and click ''''Download secret key''''. The key will be saved as an .asc file. If you have installed GnuPG software on your local machine and used it to generate your private and public keys, there is no need to download the key. | ||
| + | |||
| + | Further in this chapter we will give some basic guidelines on how to configure some of the most popular email clients: MS Outlook, Outlook express and The Bat!. Other email client software is configured similar to the described programs. | ||
===Outlook Express=== | ===Outlook Express=== | ||
| + | |||
| + | A plug-in for Outlook Express is included into WinPT package. To get it working go to [http://www.x-cart.com/xcart_manual/online/http://winpt.sourceforge.net/en/download.php http://winpt.sourceforge.net/en/download.php] and take the following steps: | ||
| + | |||
| + | 1. Download WinPT Outlook Express Plugin. | ||
| + | |||
| + | 2. Unzip the file to your computer and read the Readme file. | ||
| + | |||
| + | 3. Make sure that you have the GPGOE.dll and GPGOEInit.exe files in the same directory which will be the case if you have simply unpacked all the files to the same directory. | ||
| + | |||
| + | 4. Then simply click on the GPGOEInit.exe to run the application and a pad lock icon should appear in the right hand side of the panel. | ||
| + | |||
| + | 5. Right click on this icon and make sure that "Use default key" is selected. | ||
| + | |||
| + | When you get an encrypted email, the message will be flagged with an icon of a blue padlock. | ||
| + | |||
| + | * To read the message, just double-click it like any regular email. By default you will get a message telling you this is an encrypted message. | ||
| + | * Click ''''Continue'''' to open the message. If you don’t want to see this helpful message every time you open an encrypted email, you can check a box to turn the feature off. | ||
===The Bat!=== | ===The Bat!=== | ||
| + | |||
| + | To use GnuPG with [http://www.ritlabs.com/en/products/thebat/ The Bat!] no plug-ins are necessary. Just install GnuPG completely, and make sure that the directory in which the GnuPG executables have been installed is in your system's PATH Environment variable. | ||
| + | |||
| + | Whenever you receive a GnuPG encrypted message, you can decrypt it if you have an appropriate private key in your key database. | ||
| + | |||
| + | To decrypt an encrypted e-mail message from The Bat!, use the 'Check OpenPGP signature' command from the 'Tools -> Privacy' menu. If the message is signed, OpenPGP automatically checks the validity of the signature. Note that the decrypted message is NOT stored so you will need to decrypt it this way each time you need to read the message. | ||
| + | |||
| + | Another way is to decrypt the message into your message base using "Decrypt OpenPGP..." command of the Tools menu. Note that in this case your privacy might be compromised because the message is stored in your message base in clear text so that anybody else with access to your system can read it. | ||
| + | |||
| + | You tell The Bat! which version of GPG/PGP you'll be using via the "Tools -> OpenPGP -> Choose OpenPGP Version" Menu. Select the GPG option. | ||
| + | |||
| + | To decrypt encrypted emails click on the Signature Icon located in the right portion of the Message Header Box in the Preview Pane. A pop-up window will prompt you to enter the passphrase for the key the message was encrypted to. | ||
| + | |||
| + | You can find more detailed instructions on how to configure The Bat! for using GnuPG here: http://www.kcoates.com/thebat_pgpguide.htm. | ||
===MS Outlook=== | ===MS Outlook=== | ||
| + | |||
| + | To be able to read encrypted email in MS Outlook you need a separate plug-in, for example, GPGol, which is a part of the [http://www.gpg4win.org/ Gpg4win] installer package. Visit their site to download the plug-in and find detailed instructions on how to install and use it here: [http://www.gpg4win.org/handbuecher/novices_14.html http://www.gpg4win.org/handbuecher/novices_14.html]. | ||
==Customer Zone== | ==Customer Zone== | ||
| + | |||
| + | If the module is installed but not configured correctly (for example, the keys are not uploaded or the master password has been entered incorrectly), then: | ||
| + | |||
| + | # The 'Credit Card' payment method is not available on checkout in the Customer Zone. | ||
| + | # The payment processor declines this order and displays a corresponding error message. | ||
[[Category:LiteCommerce user manual]] | [[Category:LiteCommerce user manual]] | ||
[[Category:LiteCommerce modules]] | [[Category:LiteCommerce modules]] | ||
Latest revision as of 12:55, 31 May 2012
|
Contents
Introduction
LiteCommerce Advanced Security add-on module is highly recommended for the shop owners who are going to store credit card numbers in the database or include them in email notifications. The module supports strong encryption of credit card numbers and email messages with Gnu Privacy Guard (GnuPG) technology.
GnuPG encrypts information using asymmetric keypairs individually generated by GnuPG users. Each pair consists of a private key and a public key. Information encrypted using the private key can be decrypted by using the public key and vice versa. For more information go to GnuPG home page: http://www.gnupg.org.
Once the add-on is installed, properly configured and encryption is enabled neither unauthorized database access nor intercepted email messages with sensitive data would cause any security problems. To access the encrypted data from the admin menu a private key password is required.
Gnu Privacy Guard is freeware encryption software not included in Advanced Security package. GnuPG v1.2.3 or newer needs to be installed on your system in order for the add-on to work. Please visit GnuPG download page to choose a package for your platform.
To make working with GnuPG easier, many special applications can be used. One of the most comprehensive is Gpg4win. Gpg4win is an installer package for Windows (95/98/ME/2000/XP/2003) with computer programs and handbooks for email and file encryption. Gpg4win and the software included with Gpg4win are Free Software. The package may consist of several applications, including:
- GnuPG: The core; this is the actual encryption tool
- WinPT: A key manager and helper for various encryption matters. The documentation can be found here: http://encoderx.eu/security/winpt.php
- GPA: Another key manager
- GPGol: A plugin for Microsoft Outlook 2003 (email encryption)
- GPGee: A plugin for Microsoft Explorer (file encryption)
- Sylpheed-Claws: A complete email program including the plugin for GnuPG
GnuPG software for Mac OS X can be found at http://macgpg.sourceforge.net.
Installing the Module
To successfully install Advanced Security add-on module your shopping system requires LiteCommerce shopping cart software version 2.x to be installed at your online store.
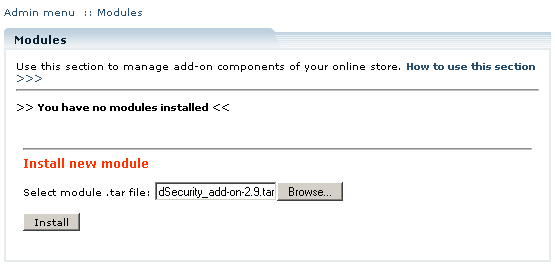
Select the 'Modules' section in the 'Settings' menu of the Administrator Zone. The list of currently installed modules will appear. To install a module (Advanced Security in our case) click on the 'Browse…' button, select the module's '.tar' file and click on the 'Install' button to add the module to your store setup.
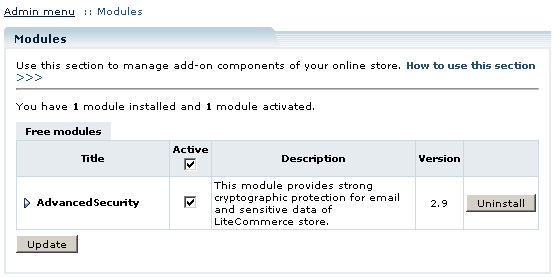
'Advanced Security' module will appear in the list of the installed modules; it will be activated automatically.
To deactivate the module, unselect the 'Active' check box against the module title and click on the 'Update' button. To completely uninstall the module, click on the 'Uninstall' button.
Generating keys
First, you need to create your keys. There is a number of desktop applications, which make the process simple and easy. For example, software for Windows called WinPT. For information about WinPT, installation, use and key generation visit http://winpt.sourceforge.net/en/.
Here is what the process of generating keys might look like if you are using a command-line version of GnuPG. In our example we are using a fake name and email address - John Smith <john_smith@example.com>:
1. Start key generation:
gpg --gen-key
2. Select the key types you want - The default is good.
Please select what kind of key you want:
(1) DSA and ElGamal (default)
(2) DSA (sign only)
(4) ElGamal (sign and encrypt)

Your selection? 1
3. Select your key size:
DSA keypair will have 1024 bits.

ELG-E keys may be between 1024 and 2048 bits long.

What keysize do you want? (2048)

Requested keysize is 2048 bits
4. Set the lifetime of this key:
Please specify how long the key should be valid.

0 = key does not expire
<n>  = key expires in n days
<n>w = key expires in n weeks
<n>m = key expires in n months
<n>y = key expires in n years

Key is valid for? (0) 1m
Key expires at Fri Jun 10 14:39:04 2005 MSD

Is this correct (y/n)? y
5. Enter your name and email address(es)...
Real name: John Smith <return>
Email address: john_smith@example.com<return>
Comment:
You selected this USER-ID:
"John Smith <john_smith@example.com>"

Change (N)ame, (C)omment, (E)mail or (O)kay/(Q)uit?  O
6. Choose a passphrase. It should be long and very difficult to guess. It should be something you won't forget. If you forget your passphrase, you cannot recover your key.
After you have generated your public and secret keys, go to Advanced Security configuration page.
Configuring the Module
To ensure security of mail traveling over the Internet from the store to the orders department, LiteCommerce allows you to use GnuPG encryption for order details stored in the database and admin order email notifications. GNU Privacy Guard software version 1.2.3 or better has to be installed on your hosting. Detailed information on GnuPG is available here:
GnuPG settings
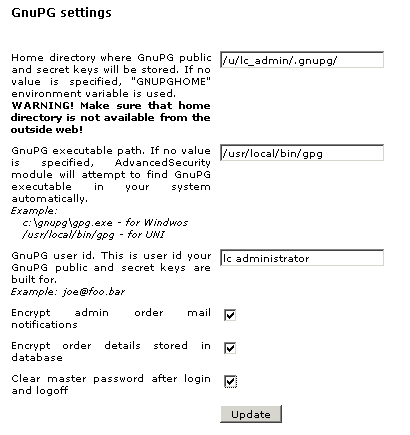
These are the general settings for correct GnuPG operation adjusted on the Advanced Security module configuration page:
Home directory where GnuPG public and secret keys will be stored: If no value is specified, "GNUPGHOME" environment variable is used.
GnuPG executable path: If no value is specified, Advanced Security module will attempt to find GnuPG executable in your system automatically. Your hosting provider might need to remove the open_basedir restriction for this directory path. Example:
- c:\gnupg\gpg.exe - for Windows
- /usr/local/bin/gpg - for UNIX
GnuPG user id: This is the user id your GnuPG public and secret keys were generated for. Example: john smith <john_smith@example.com>
Clear master password after login and logoff: select this check box to make sure that no one can use your master password. It will be deleted after you login and logoff. Leave the check box empty to remember master password.
If the option is disabled, the master password lifetime is determined by the session duration. If you are the only store admin and you are working with the orders logging in and off frequently, it might be a good idea to disable the option so you will not have to enter the master password after every login.
If you work with a partner or have other staff members to whom you would like to restrict access to customers credit card information, enable the option so only the person who knows the password can view decrypted data.
After you have entered all the settings, click 'Update' to be able to move to the 'GnuPG keyring settings' step.
GnuPG keyring settings
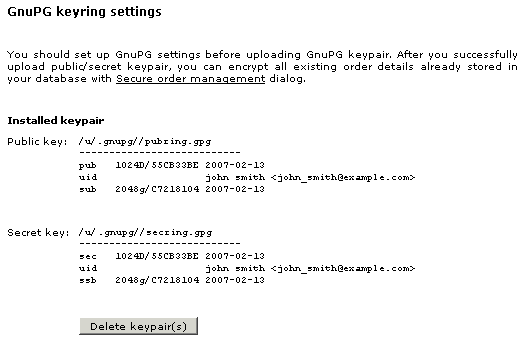
If you have ssh access to the web server and have used it to generate the keys, there is no need to upload them. Configure GnuPG settings and the module will automatically find and use the public and private keys. If you have generated the keys elsewhere, you can use the 'Install keypair' section.
Before uploading the keys please set 0777 permissions for the directory containing the two key files pubring.gpg and secring.gpg (by default the files get put in your home directory in a directory called .gnupg.) and 0666 the files inside it. After the keys have been uploaded (if necessary) to the server and you have made sure that the module is configured and operates correctly, change the permissions to 0755 and 0644 accordingly.
Use the 'Install keypair' section: click 'Browse', locate the necessary files and click 'Upload'.
After you have uploaded your keypair, it is displayed on the module configuration page:
To remove the keys click 'Delete keypair(s)'. Remember that all the encrypted data will be unavailable after you delete the keypair used to encrypt it. Make sure you decrypt the data before deleting the keys.
Testing configuration
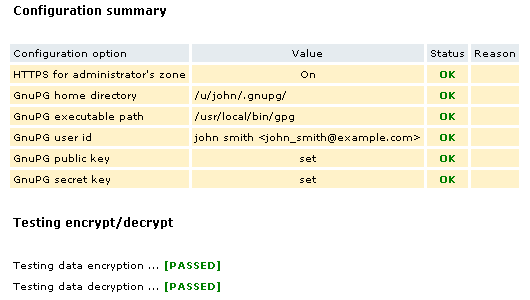
In the 'Test Advanced Security configuration' section enter the master password and click 'Test configuration' to see if everything is set up and works correctly. The results of the test are displayed as a table. When everything is fine, all the settings are marked OK.
If something is wrong, a corresponding warning sign appears in the Status column and a more detailed explanation is displayed in the Reason column.
Secure order management
The Advanced Security add-on module allows to encrypt credit card details
If the module is installed but not configured correctly (for example, the keys are not uploaded or the master password has been entered incorrectly), then:
- The 'Credit Card' payment method is not available on checkout in the Customer Zone.
- A warning message is displayed on the order details page in the Administrator Zone.
- The payment processor declines this order and displays a corresponding error message.
Encrypting order details
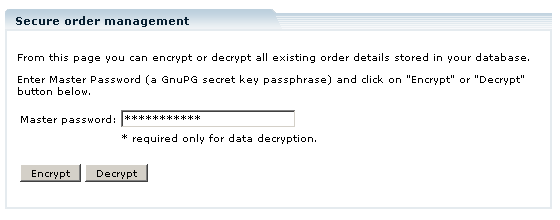
To encrypt credit card details of all the orders stored in your database use the 'Secure order management' section on the Advanced Security module settings page.
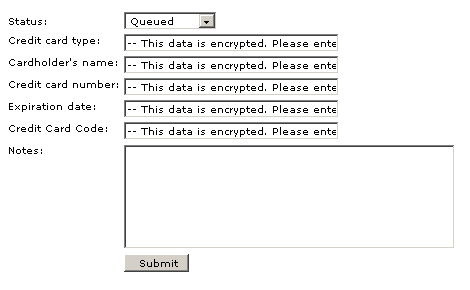
Enter the master password used during GnuPG key generation process and click 'Encrypt'. From now on the credit card info is encrypted. Check this by going to the 'Orders' section of the 'Management' menu and selecting one of the orders with 'Credit Card' payment method. Here is how the encrypted data is displayed:
Decrypting order details
To view the encrypted data use the 'Master password' on the order details page. Enter master password and click 'Submit'.
In order not to compromise your master password use the 'Clear master password' button when you do not need to view the credit card details.
To decrypt all the orders go to the 'Secure order management' section on the Advanced Security module options page, enter the master password and click 'Decrypt'.
Setting up email client software
To enable your email client software to read encrypted email notifications from your LiteCommerce-based online store you need to take several configuration steps.
For most email clients you will need to install a separate GnuPG plug-in to be able to read encrypted email. Here is a list of GnuPG plug-ins for the most popular email clients: http://openpgp.vie-privee.org/courrier_en.html.
If you have generated your keypair directly on the server or your hosting provider has done it for you, you can download the secret key from the corresponding section of the Advanced Security module configuration page. Enter the master password and click 'Download secret key'. The key will be saved as an .asc file. If you have installed GnuPG software on your local machine and used it to generate your private and public keys, there is no need to download the key.
Further in this chapter we will give some basic guidelines on how to configure some of the most popular email clients: MS Outlook, Outlook express and The Bat!. Other email client software is configured similar to the described programs.
Outlook Express
A plug-in for Outlook Express is included into WinPT package. To get it working go to http://winpt.sourceforge.net/en/download.php and take the following steps:
1. Download WinPT Outlook Express Plugin.
2. Unzip the file to your computer and read the Readme file.
3. Make sure that you have the GPGOE.dll and GPGOEInit.exe files in the same directory which will be the case if you have simply unpacked all the files to the same directory.
4. Then simply click on the GPGOEInit.exe to run the application and a pad lock icon should appear in the right hand side of the panel.
5. Right click on this icon and make sure that "Use default key" is selected.
When you get an encrypted email, the message will be flagged with an icon of a blue padlock.
- To read the message, just double-click it like any regular email. By default you will get a message telling you this is an encrypted message.
- Click 'Continue' to open the message. If you don’t want to see this helpful message every time you open an encrypted email, you can check a box to turn the feature off.
The Bat!
To use GnuPG with The Bat! no plug-ins are necessary. Just install GnuPG completely, and make sure that the directory in which the GnuPG executables have been installed is in your system's PATH Environment variable.
Whenever you receive a GnuPG encrypted message, you can decrypt it if you have an appropriate private key in your key database.
To decrypt an encrypted e-mail message from The Bat!, use the 'Check OpenPGP signature' command from the 'Tools -> Privacy' menu. If the message is signed, OpenPGP automatically checks the validity of the signature. Note that the decrypted message is NOT stored so you will need to decrypt it this way each time you need to read the message.
Another way is to decrypt the message into your message base using "Decrypt OpenPGP..." command of the Tools menu. Note that in this case your privacy might be compromised because the message is stored in your message base in clear text so that anybody else with access to your system can read it.
You tell The Bat! which version of GPG/PGP you'll be using via the "Tools -> OpenPGP -> Choose OpenPGP Version" Menu. Select the GPG option.
To decrypt encrypted emails click on the Signature Icon located in the right portion of the Message Header Box in the Preview Pane. A pop-up window will prompt you to enter the passphrase for the key the message was encrypted to.
You can find more detailed instructions on how to configure The Bat! for using GnuPG here: http://www.kcoates.com/thebat_pgpguide.htm.
MS Outlook
To be able to read encrypted email in MS Outlook you need a separate plug-in, for example, GPGol, which is a part of the Gpg4win installer package. Visit their site to download the plug-in and find detailed instructions on how to install and use it here: http://www.gpg4win.org/handbuecher/novices_14.html.
Customer Zone
If the module is installed but not configured correctly (for example, the keys are not uploaded or the master password has been entered incorrectly), then:
- The 'Credit Card' payment method is not available on checkout in the Customer Zone.
- The payment processor declines this order and displays a corresponding error message.
