Difference between revisions of "LiteCommerce:Modifying a Category"
(Created page with 'To make changes to the category details, locate the category in the catalog tree and click on the corresponding ''''Modify'''' button. The complete list of parameters will appear…') |
m |
||
| Line 1: | Line 1: | ||
| + | {{LC2_disclaimer}}<br /><br /> | ||
To make changes to the category details, locate the category in the catalog tree and click on the corresponding ''''Modify'''' button. The complete list of parameters will appear (Figure 5-10) with mandatory fields marked with a red asterisk. | To make changes to the category details, locate the category in the catalog tree and click on the corresponding ''''Modify'''' button. The complete list of parameters will appear (Figure 5-10) with mandatory fields marked with a red asterisk. | ||
Latest revision as of 12:38, 31 May 2012
|
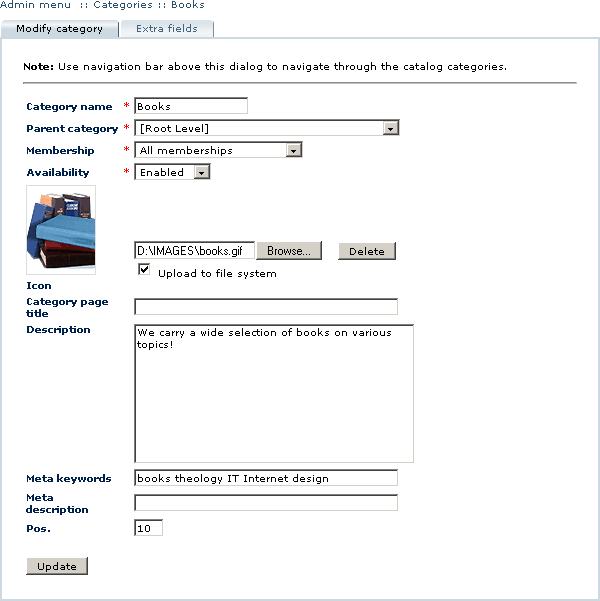
To make changes to the category details, locate the category in the catalog tree and click on the corresponding 'Modify' button. The complete list of parameters will appear (Figure 5-10) with mandatory fields marked with a red asterisk.
The following category details can be edited:
- Category name - the name by which the category is identified in the catalog.
- Parent category - the name of the category to which this category belongs. Change the value of this field if you want to move the category to another location within the category tree. The list of existing categories is provided in a drop-down menu. To move the category to the root level, choose '[ Root level ]' in this field.
- Membership - this option makes it possible to select a membership group to which the category will be visible. You can select any available membership level using the drop-down menu. Selecting 'All memberships' makes the category visible to all visitors.
- Availability - this option makes it possible to temporarily hide the category from the store catalog by switching it to the 'Disabled' state. In comes handy when you need to perform multiple product updates in the category and you do not want your customers to see the intermediary data. Once you are done updating the category, switch it back to 'Enabled'.
- Icon - a graphics file displayed in store catalog along with the name of the category. To remove the file currently being used as an icon for the category, click on the 'Delete' button to the right from the 'Icon' field. To replace it with another graphics file, click on the 'Browse...' button and locate the new file on your computer. The graphics file must be in GIF, PNG or JPG (JPEG) format. By default image files are stored in the database of your online store. To upload the image file to the 'images/' folder instead of placing it into the database, checkmark the 'Upload to file system' option.
Note: To ensure that your catalog pages look nice, it is recommended that category icon files are formatted to have identical sizes in pixels. Since these files are displayed in the catalog along with several other pictures, it is also recommended that icons have reasonably small file sizes.
- Category page title - the title displayed in the header of the customer's browser when he accesses the category page.:f left empty, the 'Category name' field is used instead. When your store visitors bookmark your catalog pages, category page titles are saved in their bookmarks as bookmark titles.
- Description - the detailed description of the category, which appears in the category page of the store catalog.
- Meta keywords - keywords which describe the contents of the category. These keywords are used by search engines to index your store.
- Meta description - a phrase describing the category. Along with the 'Meta keywords', this field affects the indexing of your online store by various search engines.
- Pos. - the position value of the category.
When you finish making changes to the category details, click on the 'Update' button to save your changes. The updated information becomes instantly available at the Customer Zone.
The 'Extra fields' tab in the category editing page contains the list of global extra fields, pertaining to the category (see the section "Managing Global Extra Fields" for detailed instructions on managing category-specific global extra fields).
