X-Cart:Import 3x-4x
This module allows a store based on X-Cart 4.1.x to import data exported from a 3.x.x or 4.0.x store (ensures compatibility of data formats).
To begin using the module:
Enable Import 3x-4x module (Administration menu->Modules).
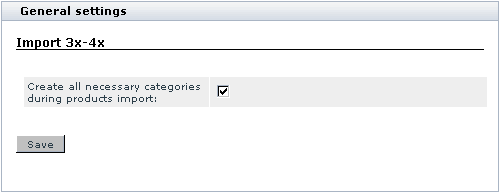
When the module is enabled, a section titled Import 3x-4x is added to General settings/Modules options.
Adjust the module settings via General settings/Modules options->Import 3x-4x:
Adjust the check box 'Create all necessary categories during products import'. If this check box is selected, during import X-Cart creates all the categories specified in the product details of the products being imported that have not existed in the store by the time of data import. If unselected, X-Cart refuses to import products that, according to their details, belong to a product category that does not already exist in the store (An error is generated for each unknown category).
Click the Save button to save the changes.
Importing a list of products
1. First of all, click on 'Import products' item in the Products menu. The 'Import products' form will appear on the screen.
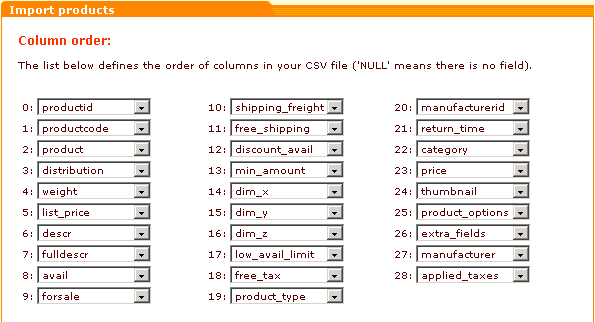
2. Set the columns order. It must be the same as the order used in the CSV file you are going to import.
You do not have to supply values for all the fields (to do this, just place a double delimiter (;;) instead of entering the value between two delimiters (;value;)). However, filling out price, product, descr and avail fields is mandatory as they are required for the application to work correctly. If you are planning to use the "UPDATE INVENTORY" function for further quantity or price updating it's necessary to define product_code as updates are done only by the field product_code.
- productid - Product id
- 'productcode' (recommended) - Product code or SKU.
- 'product' (required) - Product name.
- distribution - Product distribution (for EGoods)
- weight - Product weight
- list_price - List price
- 'descr' (required) - Description
- fulldescr - Detailed description
- 'avail' (required) - Quantity in stock (items)
- forsale - Available for sale (Y or N)
- 'shipping_freight - Shipping freight
- free_shipping - Free shipping (Y or N)
- 'discount_avail' - Apply global discounts (Y or N)
- 'min_amount - Min order amount
- dim_x - x dimension of the product package (for shipping)
- dim_y - y dimension of the product package (for shipping)
- dim_z - z dimension of the product package (for shipping)
- low_avail_limit - Low limit in stock
- free_tax - Non-taxable (Y or N)
- 'product_type - Product type
- manufacturerid - Manufacturer id
- return_time - Time during which the product can be returned to the store
- category - Product category
- 'price' (required) - Price of the product
- thumbnail - Thumbnail image file name and (if necessary) file location
- product_options - Product options
- extra_fields - Extra fields
- manufacturer - Product manufacturer
- applied_taxes - Taxes applied to the product
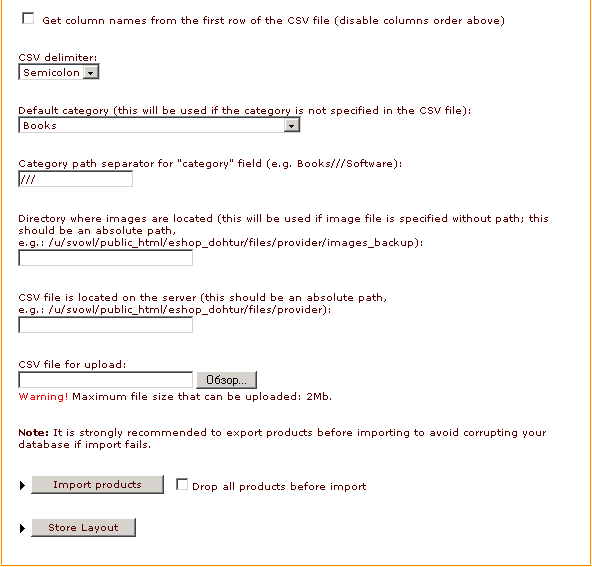
3. Select the delimiter used in the CSV file you are going to import (comma, tab or semicolon).
4. Select the default category from the drop-down list. If the value of the category field is not specified in the CSV file, the default category will be applied.
5. Enter the category path separator for "category" field (e.g. Books///Software).
6. If you have thumbnails for your products, you should put them all into one directory and specify the absolute path to this directory in the field "Directory".
7. Do one of the following:
- Enter the location of the CSV file if you have uploaded it before, or
- Click on 'Browse' and select the necessary CSV file.
8. Click on 'Import products'.
If you want to drop all existing products in your store before you import new products, select the 'Drop all products' before import check box. Be careful, this operation cannot be undone and all existing data in the product catalogue will be lost.


