X-Cart:Refine Filters
Contents
Overview
What Refine Filters does
X-Cart's Refine Filters add-on module enables your customers to use parametric search to easily find what they need. With this add-on module enabled at your store, your customers will no longer feel like they are looking for a needle in a haystack. Working from your existing product options, variants, feature comparison classes and more, Refine Filters generates radio buttons and numeric sliders and even allows for multiple selections to help your customers narrow a products list down to what fits their needs.
Why Refine Filters?
Imagine navigating hundreds or even thousands of similar-looking medicines or auto parts to find the one you need. With Refine Filters, your customers can leave the nightmare behind and find what they are looking for in just a few clicks — increasing sales conversions, generating add-on sales and lowering your customer service workload.
System requirements
To be able to successfully install and use the Refine Filters add-on module, you must have a working copy of X-Cart GOLD or GOLD PLUS version 4.5.0 or later installed on your server. Make sure that the version of the module is the same as the version of the installed copy of X-Cart.
Installation
To install the module:
- Obtain a distribution package for the Refine Filters add-on module by downloading it from the File Area section of your X-Cart Account. The distribution package you need is contained in the archive file x-refine-filters-x.y.z.tgz where x, y and z are the version numbers of the module. Make sure the version of the module is the same as the version of the installed X-Cart.
- Copy the distribution package to the X-Cart root directory on your server or hosting account.
- If you are using a Windows-based server, or a UNIX-based server without terminal access:
- a) Decompress the archive with the Refine Filters distribution package to a directory on your system using your favorite compression program (WinZIP or any other archiver with support for TAR files).
- b) Use an FTP client to upload all the files contained in the archive (retaining the directory structure) to the X-Cart root directory on your server or your hosting account.
- If you are using a UNIX-based server with terminal access:
- a) Use an FTP client to upload the archive with the distribution package to the X-Cart root directory on your server or your hosting account.
- b) Decompress the package using the following command:
tar -xzvf x-refine-filters-x.y.z.tgz
- Important: Make sure you keep the directory structure while unpacking and uploading the distribution package, otherwise some necessary files can be overwritten!
- In a web browser, run the installation script httр://<YOUR_XCART_DOMAIN>/install-x-refine-filters.php replacing the variable <YOUR_XCART_DOMAIN> with the actual domain name of your X-Cart store.
- Enter the Auth code, accept the License Agreement and click Next.
- The installation script patches the files and activates the module. Click Next to continue the installation.Note: If you are using a custom skin, you will need to manually apply the patches to it. Otherwise, the module will not work in this skin.
- The installation script generates a new system fingerprint. Click Next to complete the installation.
- Use the ADMINISTRATOR AREA link to log in to the Admin area.
Enabling the Refine Filters add-on module
After the Refine Filters add-on module installation has been completed, the module is enabled and working.
You can disable/enable the module as follows:
- In Admin area, go to the Modules section (Settings menu->Modules).
- Choose the Refine Filters module by selecting/unselecting the respective check box on the left.
- Click the Apply changes button. This activates/deactivates the module.
Configuring the Refine Filters add-on module
After the Refine Filters add-on module has been enabled in your store, you should check and adjust its configuration:
- In the Modules section of your store's Admin area (Settings menu->Modules), click the Configure link opposite the module name ('Refine Filters'). The module configuration page (titled by the name of the module) opens.
- Adjust the settings on the module configuration page as needed. Detailed information regarding the Refine Filters add-on module configuration settings is available below.
- Click Apply changes to save the changes.
Refine Filters add-on module configuration settings
Here are a few notes on how to adjust the Refine Filters module configuration settings:
General section
- Enable dynamic filtering (this may slow down your server): Enable/disable dynamic filtering. With dynamic filtering enabled, filters will be dynamically adjusted to your customers' needs based on the selections of filter attributes your customers make: as soon as a customer selects a certain filter attribute, the attributes that would render zero search results if combined with the selected one will appear grayed out.
The snapshot below shows how the options 21.5-inch, None and 27-inch in the Display section of the filter appear grayed out after we have selected the Notebook option in the Type section (which is explained as being due to the fact that we do not have notebooks with 21.5- and 27-inch displays - nor notebooks without a display - in our demo store):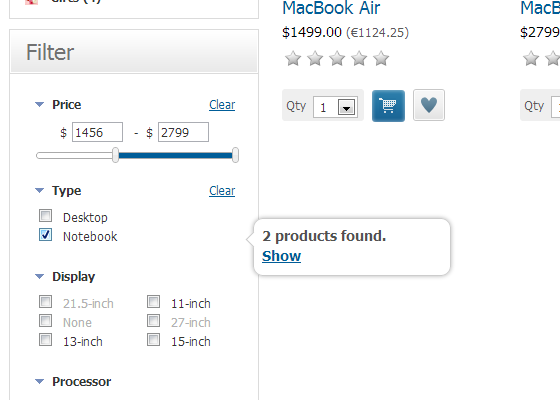
- Max number of categories in search results (0 - unlimited): Specify the maximum number of category names that can be displayed in the Filter box on search results and manufacturer pages. If a greater number of categories is found, a link to the full list of found categories will be provided.
For example, if the 'Max number of categories in search results (0 - unlimited)' option were set to "5", and a customer's search returned products from eight categories, the Filter box would look as follows: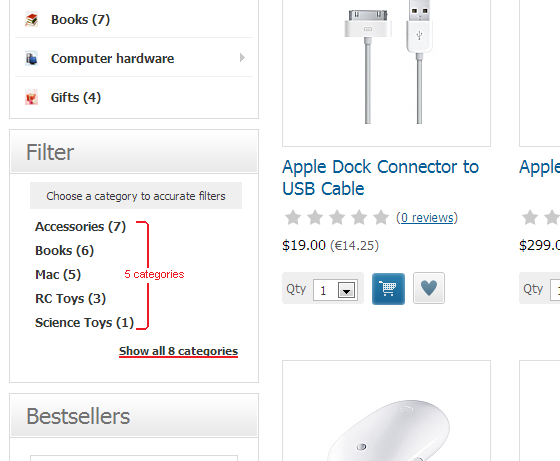
- New filters are enabled by default: Enable this option if you want all new filters generated by the module to be enabled (available to customers) by default in all your store's categories.
- New filters are expanded by default: Enable this option if you want all new filters generated by the module to be expanded by default in all your store's categories.
- Price filter view: There are 2 price filter views - numeric slider and price ranges. You can select which view of price filter you want to use in your store:
- Enable dynamic filtering (this may slow down your server): Enable/disable dynamic filtering. With dynamic filtering enabled, filters will be dynamically adjusted to your customers' needs based on the selections of filter attributes your customers make: as soon as a customer selects a certain filter attribute, the attributes that would render zero search results if combined with the selected one will appear grayed out.


- Price ranges (comma separated): Here you can define ranges for price ranges filter only. For example, "1,5,10" means the following ranges: $1-$5, $5-$10, $10 and above.
Data Sources section
- This section allows you to enable/disable the data sources on which filters are generated. For example, you may disable all but extra fields so your filters are generated based on extra fields only (Other data sources, such as product options and Feature Comparison classes, will not be used). There are also options for special filters like "Free shipping". You can hide this filter by deselecting the respective check box.
- Note that this section controls filters globally for all categories. If you need to show a filter for a certain category, but hide it for other categories, you should adjust its availability for each category specifically via the Refine Filters page (see the section Managing Refine Filters below).
Appearance section
- In this section you choose the types of pages on which refine filters are to be displayed in your store:
- Display filters on category page: Enable this option to display filters on category pages.
- Display filters on search results: Enable this option to display filters on search results pages.
- Display filters on manufacturers page: Enable this option to display filters on manufacturer pages.
- You can also adjust other settings affecting what your customers will see:
- Show filters classes info at product details: This option displays defined filter classes on the product details page in the Customer front-end.
- Show dynamic range for sliders: This option applies only when dynamic filtering is enabled. By default, there is a blue bar on the numeric sliders which shows the actual numeric range for the filtered products. By turning this option off you can hide such blue bar and thus simplify the sliders a bit.
- Disable checkboxes for unavailable attributes in dynamic filtering: This option applies only when dynamic filtering is enabled. Filter attributes which are not available for filtered products will be gray-out, but the corresponding check boxes will not be disabled (thus allowing to result in "0 products found" if selected). If you want to disable checkboxes for unavailable attributes, turn this option on.
- Truncate too long attributes up to XX characters max (0 - do not truncate): Some products may have quite long attributes and thus they can be warped into several rows when shown to customer. To avoid such situation you can truncate too long attributes with this option to fit attribute text into single row.
Managing Refine Filters
Filters can be configured on the ‘Refine Filters’ page in your store's administration back end. This page can be accessed by clicking the Refine Filters link in the Catalog menu.
Once you open this page you will see the category selector:

This selector allows you to choose a category for which you want to view or manage filters.
After choosing a category from the dropdown, you will see the 'Filters' table displaying the list of filters automatically generated by the module for this category and their respective settings:

The following information is available about each filter:
- Source: Filter source. By default all filters are enabled, but you can globally turn some filters off using the Data sources section on the Refine Filters add-on module configuration settings page.
- Service name: Service name of the filter. This is a unique identifier of a particular data source (e.g. service name of an extra field, class name of a product option &etc.)
- Title: Display name of the filter. This value is displayed to customers as the title of the filter.
- Enabled: Whether he filter is enabled or disabled.
- Filter view: Visual representation of the filter for customers (Multiple selector, Yes-No selector or Numeric range (slider)).
- Unit: Measurement unit for the numeric value (like "cm", "in", "g", etc). Applicable for "Numeric range" filters only.
- Expanded: Whether your customers see the filter as expanded on first page load. If the "Expanded" property is turned off for the filter, on first page load the filter attributes will not be shown to customers, so the customers will need to expand the filter first. This may help you save some screen space.
The snapshot below demonstrates the look of expanded filters vs. collapsed: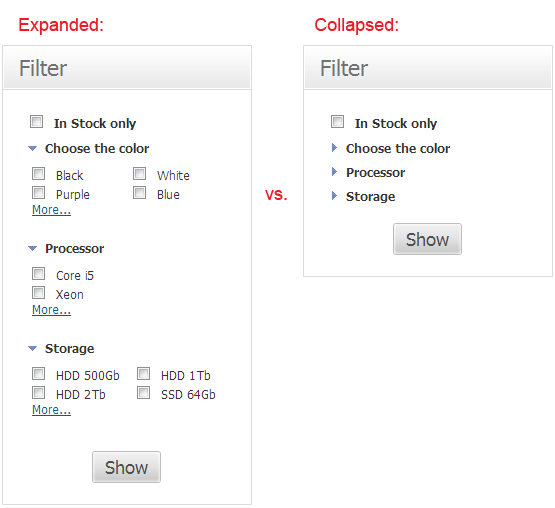
- Max attrs: The maximum number of filter attributes displayed in the 'Filter' box before the "More..." link. Applicable for "Multiple selector" filters only.
The snapshot below demonstrates the look of the Color filter with the maximum number of attributes defined as "4":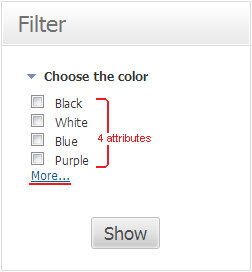
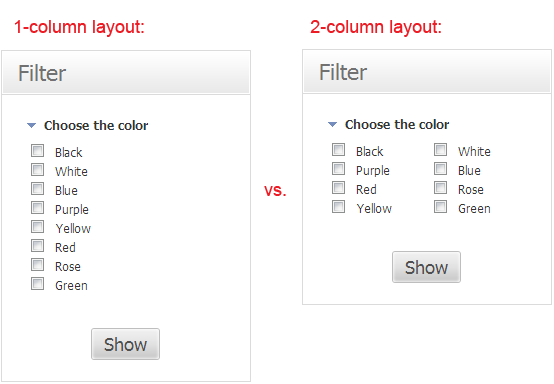
- Columns: The type of layout used to display the attributes of this filter in the 'Filter' box (1-column, 2-column or Auto). Applicable for "Multiple selector" filters only. The Auto option means that with a number of attributes smaller than the value of the Max attrs field multiplied by two, the attributes are displayed in a single column, whereas a greater number of filter attributes is displayed in two columns.
- Pos: Position of the filter in the filters list in the Customer area.


You can adjust the settings for any filter(s) in the category by editing the respective fields in the 'Filters' table. After you're done editing the filter settings, be sure to click the Apply changes button save the changes.
It is possible to spread the filter settings of the selected category to all its subcategories: select the Including subcategories checkbox and click Apply changes.
Managing filter classes for filters
Filter classes overview
As has been mentioned above, the Refine Filters add-on module can use the Feature Comparision module Product classes as a data source for generating filters. We are sure the owners of X-Cart based stores using the Feature Comparision module will find it a great feature. Unfortunately, not everyone has Feature Comparision, so we decided to re-create the Product classes functionality within the Refine Filters add-on module. This functionality was given the name "Filter classes". Filter classes work similarly to Products classes in the Feature Comparision module and can be used to define additional properties (attributes) for products.
Adding, updating and deleting filter classes
Filter classes can be defined on the 'Filter classes' page in the Admin area. This page can be accessed by clicking the Filter classes link in the Catalog menu.
To create a new product class:
- Click the 'Add product class' link in the section menu. The 'Add product class' form will appear.
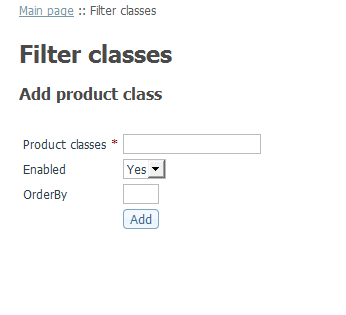
- Enter a title for the product class into the 'Product class' field.
- Specify whether the class is enabled by selecting Yes or No from the ‘Enabled’selectbox.
- Specify the position number of the product class in the list of product classes (‘OrderBy’ field).
- Click on ‘Add’. As soon as the product class is created, you will be informed about it by a message in the ‘Information’ box.

After the creation of the new product class, you can see another form appearing in the place of the 'Add product class form. This new form is titled 'Modify product class'.
This form allows you to modify the details of the product class you have just created (if necessary) and to define product class options (features) for it. You can turn to modifying the product class details (image, title, availability, or OrderBy position number) and defining product class options (features) at once, or put it off till later (The ‘Modify product class’ form can be accessed at any time by clicking on the title of the product class which you want to modify in the ‘Product classes’ form). To find out how to modify a product class, please refer to the ‘Modifying product classes’ section of this User guide.
To add more filter classes, use the ‘Add product class’ button on the filters classes page.
You can change the availability status of your product classes and the order in which they are displayed right in the ‘Product classes’ form. To do so, select Yes or No from the ENABLED selectbox, change the product class position number in the OrderBy field opposite the title of the appropriate product class and click on Update. The changes will be saved.
To delete a filter class, select the check box next to the title of the product class you would like to delete and click on ‘Delete selected’. The filter class will be removed from the list. (You can use the Check all / Uncheck all links to select or unselect all the check boxes).
Modifying filter class details
To modify the details of a product class:
- Open the 'Modify product class' form.
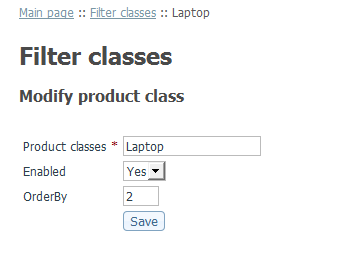
- If necessary, change the filter class title, availability status and OrderBy position number.
- Click Save.

Modifying filter class options
To define product class options:
- Open the 'Modify product class' form. Scroll down to the 'Product class options' section of the form.
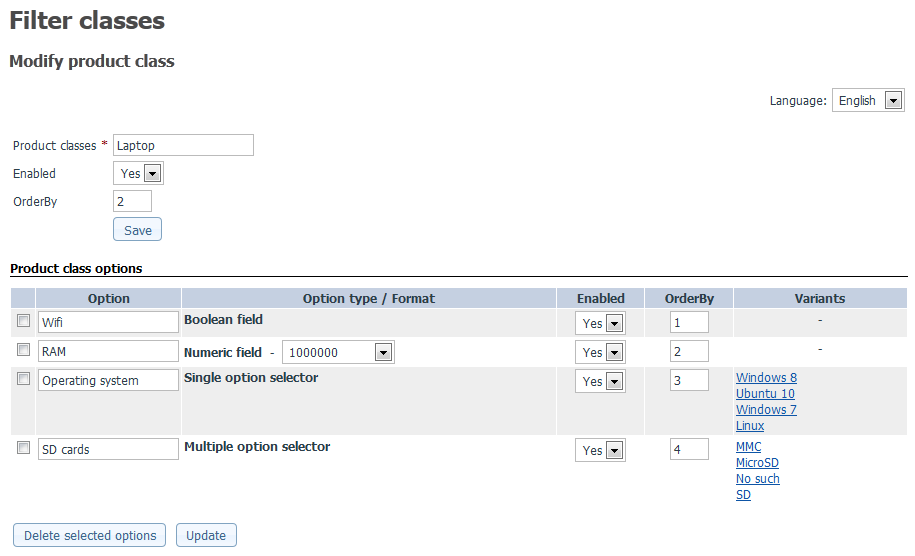
- Use the 'Add new option' subsection to add product class options:
- Enter a name for the new option (Option column).
- Use the selectbox in the Option type/Format column to select the option type see “Notes on option types” section for option types notes
- Select Yes or No from the selectbox in the Enabled column to specify whether the feature should be displayed to customers or not.
- Enter a position number of the option in the list of product class options (OrderBy column).
- If applicable, specify available variants for the option being created: enter the variant names in a column, each variant starting from a new line (Variants column).
- Click Add. The option will be created and added to the list of options in the 'Product class options' section of the form.
- If applicable, specify the format in which concrete values of the option should be displayed (Option type/Format column, below the option type selectbox). Click on ‘Update’.
- Repeat these steps to add more product class options.

To delete product class options (features):
- In the 'Product class options' section, select the check boxes next to the names of the product class options you want to delete.
- Click Delete selected options.
To modify product class options (features):
- In the 'Product class options' section of the 'Modify product class' form, change the necessary product class options’ settings.
- Click Update.
To modify the variants of a product class option:
- In the 'Product class options' section of the 'Modify product class' form, click on the option variants you want to modify. The 'Variants setup' box appears:
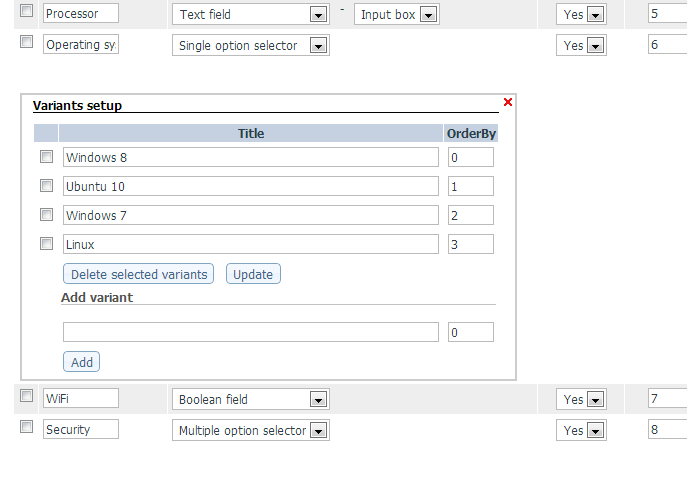
- Use the 'Variants setup' box to modify the contents of the variants section:
- To rename one or more of the existing variants, change the names of the variants you want to rename and click Update.
- To delete one or more of the existing variants, select the check boxes next to the names of the variants you want to delete and click Delete selected variants.
- To add a new variant to the list, enter a name for the new variant in the 'Add variant' subsection and click Add.
- Click on the X ('Close' sign) in the top right corner of the 'Variants setup' box. The box will be closed.

Notes on option types
Below is the list of option types supported by filter classes. These types determine the way in which providers and customers can input data into the fields corresponding to product class options.
- Text field: This is a simple text field into which custom text can be entered. Any characters entered into a field of this type are regarded as text. This option type requires the option field format to be specified (Input box or Text area, depending on the amount of text that needs to be entered).
- Single option selector: This is a field displaying a predefined set of values from which only one can be selected. This option type requires variants to be provided.
- Multiple option selector: This is a field displaying a predefined set of values from which several values can be selected. This option type requires variants to be provided.
- Numeric field: This is a field that allows users to enter numeric values so they are treated as numbers (which allows customers to search for products using number ranges). This option type requires the option field format to be specified.
- Boolean field: This is a field from which only one of the two values can be chosen: Yes or No (signifies presence or absence of some feature).
- Date field: This is a field that allows users to enter dates. This option type requires the option field format to be specified.
Assigning filter classes to products
After the necessary product classes have been defined, they need to be assigned to the products for which you want to allow comparison.
To assign a product class to some product:
- Find the product and open it for modification.
- Click the Filter class link in the section menu.
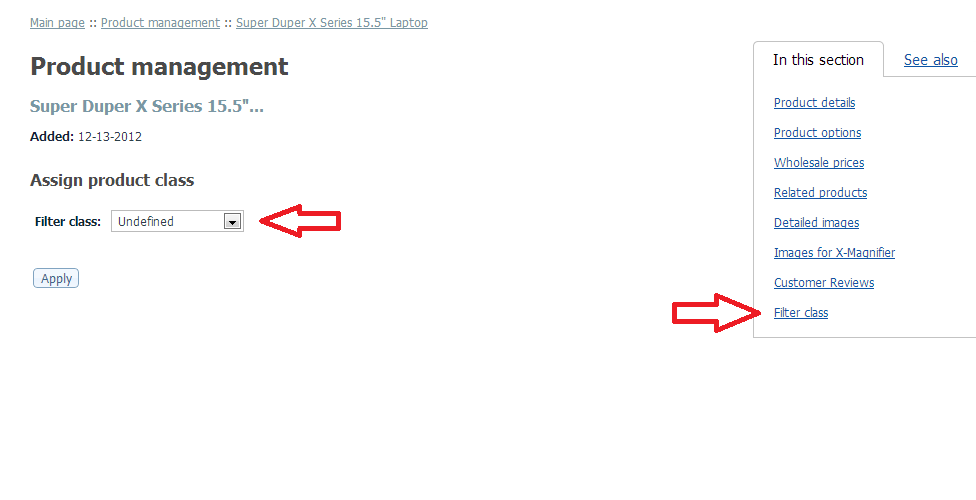
The 'Assign filter class' form will appear. As the product has not been assigned to any product class yet, Undefined appears in the 'Product class' selectbox. - Use the selectbox to select the product class to which you want the product being modified to be assigned.
- Click Apply. The product class will be assigned. The 'Product class options' form will appear below the ‘Assign product class’ form (The set of fields in the 'Product class options' form corresponds to the product class selected for the product).
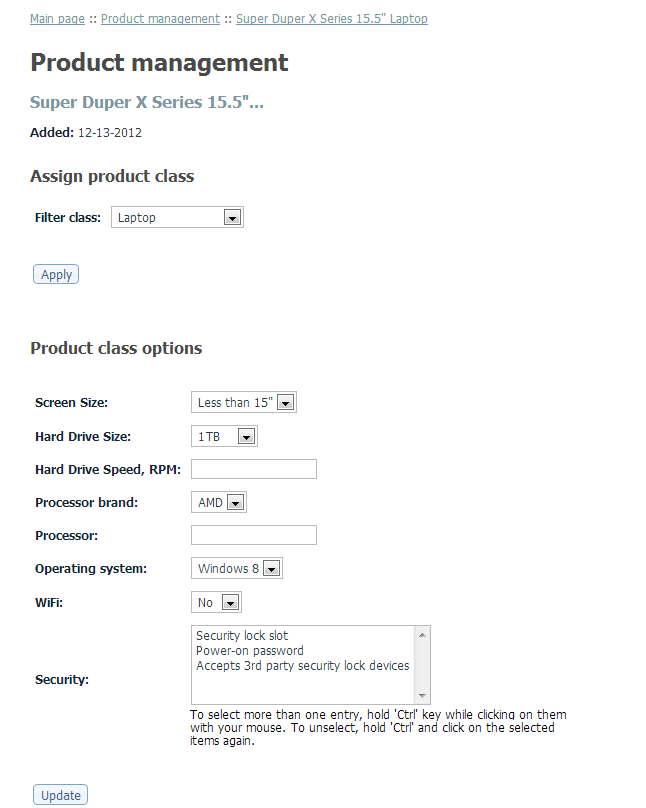
- Use the option fields in the 'Product class options' form to assign the necessary option values to the product being modified.
- Click Update. The changes will be applied.

