Difference between revisions of "X-Cart:Social Login (former Janrain Engage) module"
m (→Administrator sign-in over identity providers) |
(→Creating a Janrain Social Login account: https://dashboard.janrain.com/) |
||
| (31 intermediate revisions by 3 users not shown) | |||
| Line 1: | Line 1: | ||
==Overview== | ==Overview== | ||
| − | < | + | <youtube>OccegndNi_I</youtube> |
| − | + | <br /> | |
The [http://www.x-cart.com/janrain-engage.html Social Login module] is an add-on for integrating your X-Cart with Janrain’s services. The services allow your visitors with existing accounts with social networks – including Facebook, Twitter, Google, Yahoo! and LinkedIn and over a dozen of others – to quickly sign in to your online store via their existing social network accounts. The solution lets users bypass your traditional registration process and sign in with one click, resulting in an accelerated sign-up process for new users and a simple login experience for returning visitors. | The [http://www.x-cart.com/janrain-engage.html Social Login module] is an add-on for integrating your X-Cart with Janrain’s services. The services allow your visitors with existing accounts with social networks – including Facebook, Twitter, Google, Yahoo! and LinkedIn and over a dozen of others – to quickly sign in to your online store via their existing social network accounts. The solution lets users bypass your traditional registration process and sign in with one click, resulting in an accelerated sign-up process for new users and a simple login experience for returning visitors. | ||
| Line 42: | Line 42: | ||
* Social Sharing – lets your users share comments, purchases or other activities from your site to their friends on multiple social networks. | * Social Sharing – lets your users share comments, purchases or other activities from your site to their friends on multiple social networks. | ||
| − | On top of that, Janrain | + | On top of that, Janrain Social Login allows your visitors to '''share''' their comments, purchases, reviews or other activities directly from your online store to their friends on multiple social networks, all without leaving your store. Social sharing with Janrain Social Login lets you trigger sharing based on any number of user's actions, including purchases, posting comments, user-generated content or clicking a share button, enabling the word of mouth marketing for your business and transforming your users into brand advocates. |
| − | For more information on Janrain | + | For more information on Janrain Social Login, please visit [http://janrain.com/product/social-login/?campaign=xcart&utm_source=xcart&utm_medium=partner&utm_campaign=xcartreferral Janrain Social Login page]. |
: [[Image:XC_JR-01.png]] | : [[Image:XC_JR-01.png]] | ||
| Line 51: | Line 51: | ||
Social Login is available as a built-in module in X-Cart GOLD PLUS and PLATINUM editions v4.5.3 and later. In the said editions, it does not require installation and can be enabled in the <u>Modules</u> section of X-Cart Admin area. | Social Login is available as a built-in module in X-Cart GOLD PLUS and PLATINUM editions v4.5.3 and later. In the said editions, it does not require installation and can be enabled in the <u>Modules</u> section of X-Cart Admin area. | ||
| − | For X-Cart GOLD and PRO editions v4.1.12 | + | For X-Cart GOLD and PRO editions v4.1.12 and later, this module can be purchased and installed separately. The following instructions will guide you through the process of installing the Social Login module in your store. |
=== System requirements === | === System requirements === | ||
| − | To be able to successfully install and use the Social Login module, you need a working copy of X-Cart GOLD or PRO v4.1.12 | + | To be able to successfully install and use the Social Login module, you need a working copy of X-Cart GOLD or PRO v4.1.12 or later installed on your server. Make sure that the version of the Social Login integration module matches the version of your copy of X-Cart. |
{{Note1|Note: If you do not remember the version of your copy of X-Cart, you can find it in the <u>Environment info</u> section of the [[X-Cart:Summary_Page |Summary]] page in X-Cart Admin area.}} | {{Note1|Note: If you do not remember the version of your copy of X-Cart, you can find it in the <u>Environment info</u> section of the [[X-Cart:Summary_Page |Summary]] page in X-Cart Admin area.}} | ||
| Line 61: | Line 61: | ||
=== Installation and removal === | === Installation and removal === | ||
| − | + | To install the Social Login module: | |
| − | |||
| − | |||
| − | |||
| − | |||
| − | |||
| − | |||
| − | |||
| − | |||
| − | |||
| − | |||
| − | |||
| − | |||
| − | |||
| − | |||
| − | |||
| − | |||
| − | |||
| − | |||
| − | {{Note1|Important: Make sure that you maintain the directory structure while unpacking and uploading the distribution package; otherwise, some critical files can be overwritten! }} | + | # Obtain a distribution package for the Social Login integration module by downloading it from the File Area section of your {{QA}} account. The distribution package is archived in the file <u>xauth-x.y.z.tgz</u>, where <u>x</u>, <u>y</u> and <u>z</u> indicate the version of the module. Make sure the version of the module matches the version of your copy of X-Cart. |
| + | # Copy the distribution package to the X-Cart root directory on your server or hosting account. | ||
| + | #* If you use a Windows-based server or a UNIX-based server without terminal access: | ||
| + | #: a) Extract the contents of the archive with the Social Login module files to a directory on your system using your favorite compression program (WinZIP or any other archiver that supports TAR files). | ||
| + | #: b) Use an FTP client to upload all the files extracted from the archive (retaining the directory structure) to the X-Cart root directory on your server or hosting account. | ||
| + | #* If you use a UNIX-based server with terminal access: | ||
| + | #: a) Use an FTP client to upload the archive with the Social Login module distribution package to the X-Cart root directory on your server or hosting account. | ||
| + | #: b) Decompress the package by typing the following command:<br /><pre>tar -xzvf xauth-x.y.z.tgz</pre> | ||
| + | #: {{Note1|Important: Make sure that you maintain the directory structure while unpacking and uploading the distribution package; otherwise, some critical files can be overwritten! }} | ||
| + | # In a web browser, run the installation script at httр://www.example.com/install-xauth.php, replacing the variable www.example.com with the real domain name, where your X-Cart is installed. | ||
| + | # Enter the [[X-Cart:FAQs#What_is_Auth_code_and_where_can_I_find_it.3F|Auth code]], accept the License Agreement and click the '''Next''' button. | ||
| + | # The installation script copies the files and activates the module. Click the '''Next '''button to continue. | ||
| + | # The installation script generates a new system fingerprint. Click the '''Next''' button to complete the installation. | ||
| + | # Use the <u>ADMINISTRATOR AREA</u> link to log in to the Admin area. | ||
| − | |||
| − | + | To uninstall the Social Login module: | |
| − | + | # In a web browser, run the installation script at http://www.example.com/install-xauth.php, replacing the "www.example.com" with the real domain name, where your X-Cart is installed. | |
| − | + | # Choose the <u>Uninstall the module</u> option, enter the [[X-Cart:FAQs#What_is_Auth_code_and_where_can_I_find_it.3F|Auth code]], accept the License Agreement and click the '''Next''' button. | |
| − | + | # Once the installation script has removed the Social Login module files and deactivated the module, click the '''Next''' button to complete the uninstallation. | |
| − | + | # On the ''Uninstallation complete'' screen, click '''Next''' to leave the Wizard.<br />{{Note1|Important: After you have uninstalled the Social Login module, make sure to remove the module's distribution package from your web directory as well.}} | |
| − | |||
| − | |||
| − | |||
| − | |||
| − | |||
| − | |||
| − | |||
| − | |||
| − | |||
| − | |||
| − | |||
| − | |||
| − | |||
| − | |||
| − | {{Note1|Important: After you have uninstalled the Social Login module, make sure to remove the module's distribution package from your web directory as well.}} | ||
==Enabling the Social Login Module in X-Cart== | ==Enabling the Social Login Module in X-Cart== | ||
| − | + | To start using Social Login, make sure the module is enabled in your store's Admin area: | |
| − | |||
| − | |||
| − | |||
# Log in to the X-Cart Admin area and go to the <u>Modules</u> section (<u>Settings menu</u>-><u>Modules</u>). | # Log in to the X-Cart Admin area and go to the <u>Modules</u> section (<u>Settings menu</u>-><u>Modules</u>). | ||
| − | # In the list of modules, find the ''Social Login'' item | + | # In the list of modules, find the ''Social Login'' item.<br />[[File:xc4_sl_module_enable.png|border]] |
| − | + | # Select the check box next to it. In older versions of X-Cart you may also need to click the '''Apply changes''' button to apply the changes.<br />The module will be enabled.<br />[[File:xc4_sl_module_enabled.png|border]]<br /> | |
| − | + | Once the module has been enabled, you can leave alone your X-Cart for a few moments and switch to Janrain. | |
| − | |||
| − | |||
| − | |||
==Setting up Janrain== | ==Setting up Janrain== | ||
| − | To be able to use the Social Login module, you | + | To be able to use the Social Login module, start by completing the following steps: |
| − | + | * If you haven't yet done so, get an account with Janrain. See [[#Creating a Janrain Social Login account | Creating a Janrain Social Login account]] | |
| − | + | * Create a Janrain Social Login application for your store. See [[#Creating a Social Login application | Creating a Social Login application]] | |
| − | + | * Configure the application you have created. See [[#Next step: Configuring your Janrain Social Login application | Next step: Configuring your Janrain Social Login application]] | |
| − | + | Once you're done with the above steps, proceed to [[#SocialLoginSettingsXCart |configuring Social Login in your X-Cart store's Admin back end]].<br /> | |
| − | |||
| − | |||
| − | + | ===Creating a Janrain Social Login account=== | |
| − | + | The Social Login solution by Janrain is available on subscription basis. There are several subscription plans with different pricing levels, including a free basic plan. You can choose a plan that best suits your needs depending on the expected number of users per year. For example, you could choose the free basic plan to get you started and then, as your business grows, upgrade to a more advanced plan. | |
| − | |||
| − | |||
| − | |||
| − | |||
| − | |||
| − | + | To sign up for Janrain Social Login: | |
| − | + | # Visit the [http://janrain.com/product/social-login/plans/ Janrain] website and choose the subscription plan you require. Click on the Sign Up link for that plan. | |
| + | # On the page that opens, sign in to Janrain using social login via Google, Facebook, Twitter, etc:<br />[[File:xc4_sl_social_auth.png|border|800px]]<br /><br />or choose to create a new account from scratch:<br />[[File:xc4_sl_janrain_auth.png|border|800px]]<br /><br /> | ||
| + | # On the following screen, complete the registration form with your information (your first name, last name, e-mail address, phone, company, job title, etc.) and click '''Create Account'''.<br />[[File:xc4_sl_create_janrain_account.png|border|800px]]<br /><br />At this point an email verification message should be sent to the email address you provided. Click on the email verification link in that message and sign in to Janrain:<br />[[File:xc4_sl_welcome_2_janrain.png|border|800px]]<br /><br />Once you're signed in, you should be ready to set up your first Janrain application.<br />[[File:xc4_sl_looks_like_youre_new.png|border|800px]]<br /><br /> | ||
| − | + | ===Creating a Social Login application=== | |
| + | To create an application: | ||
| + | # Visit the dashboard.janrain.com site and log in. | ||
| + | # Choose to create a new property:<br />[[File:xc4_sl_create_property.png|border|800px]]<br /><br /> | ||
| + | # Click '''Create an App''' opposite the '''Engage''' item:<br />[[File:xc4_sl_create_property1.png|border|800px]]<br /><br />A popup window for creating an application opens.<br />[[File:xc4_sl_create_application.png|border|800px]]<br /><br /> | ||
| + | # Enter the desired application name and click the '''Create Application''' button.<br />[[File:xc4_sl_create_application1.png|border|800px]]<br />(Be sure to use a recognizable name for the appication so your customers will associate it with your store; this name will be displayed on the identity providers’ sign-in or permission screen when your customers will be signing in to your website). <br />{{Note1|'''Important''': DO NOT enter your website URL into the Application Name field!) }}<br />The Janrain servers generate the application you’ve created.<br />That is all; you now have an application that will allow you to use Social Login at your store.<br />:[[File:xc4_sl_thanks_signing_up.png|border|800px]]<br /><br />Now you can click the 'Get started' button to continue. The next step will be to configure your application. | ||
| + | <br /><br /> | ||
| − | To configure an | + | ===Next step: Configuring your Janrain Social Login application=== |
| + | <div id="ConfigureJanrainSocialLoginApp"></div> | ||
| + | The first step to deploy Social Login on your website is to configure your Social Login providers (i.e. select which identity providers will be offered to the user on your site and specify the types of user data that each provider should be able to access).<br /> | ||
| + | To configure your Social Login providers, do the following: | ||
| + | # Sign in to your Janrain Social Login application. | ||
| + | # Click the '''Manage Engage App''' button for your application to access the application settings on the Janrain Dashboard.<br />[[File:xc4_sl_manage_engage_app.png|border|800px]]<br /><br /> | ||
| + | # On the Dashboard, click '''Sign-Ins''' under the '''Widgets and SDKs''' menu:<br />[[File:xc4_sl_signins.png|border|800px]]<br /><br /> | ||
| + | # On the ''Configure Widget'' screen, select the '''Providers''' tab:<br />[[File:xc4_sl_providers_tab.png|border|800px]]<br /><br /> | ||
| + | # Add to your widget the identity providers with which your website users should be able to sign in. For every provider, complete the following steps: | ||
| + | ## Click the gear icon next to the provider name:<br />[[File:xc4_sl_provider_gear_icon.png|border|800px]]<br /><br />This launches the provider configuration wizard. For example, in the screenshot below you can see the first step of the configuration wizard for Facebook setup:<br />[[File:facebook_instr1.png|border|800px]]<br /><br /> | ||
| + | ## <div id="WizardStep"></div>Follow the wizard instructions to complete the configuration. A detailed guide for how to complete Facebook setup is available in the [[#Facebook setup | Facebook setup]] section below. | ||
| + | ## Once the configuration has been completed, close the wizard window and add the provider you have configured to your widget by dragging it to the central area of the screen into one of the empty slots:<br />[[File:xc4_sl_drag_facebook.png|border|800px]]<br /><br /> | ||
| + | ## Save the changes by clicking the '''Save''' button at the bottom.<br />[[File:Xc4_sl_provider_save.png|border|800px]]<br /><br /> | ||
| + | # Configure appropriate permissions for each of the providers you have added: | ||
| + | ## On the Dashboard, locate the provider for which you need to configure permissions in the '''Providers''' menu. Hover your mouse pointer over the provider name to reveal the '''Manage permissions for <provider name>''' button. Click this button.<br />[[File:xc4_sl_manage_permissions_facebook.png|800px]]<br /><br /> | ||
| + | ## Enable the types of data the provider should be able to access.<br /><div id="Enable_the_types_of_data_the_provider_should_be_able_to_access"></div>For example, let's configure permissions for Facebook: Click on the "Off" switch next to "Email":<br />[[File:xc4_sl_facebook_email.png|800px]]<br /><br />The grey "Off" switch now turns to a green "Ask" label. Note that enabling the permission "Email" automatically enables "Verified Email" as well.<br />[[File:xc4_sl_facebook_email_ask.png|800px]]<br /><br /> | ||
| + | # To add social sharing capabilities for the users of your website, configure social sharing: | ||
| + | ## On the Dashboard, click '''Sharing''' under the '''Widgets and SDKs''' menu:<br />[[File:xc4_sl_sharing.png|border|800px]]<br /><br /> | ||
| + | ## What you do at this step depends on the version of the Social Sharing API you will use. Currently, there are two Social Sharing API versions supported by X-Cart: Social Sharing V2 and Social Sharing V3. Note the drop-down selector at the top left of the page.<br />[[File:xc4_sl_social_sharing_api_selector.png|border|800px]]<br /><br />This is the selector to switch between the API versions. If you are configuring a ''new'' Social Login application (not an existing one), you will not be able to choose Social Share v2 in this selector, since all new Social Login applications are now supposed to use the Social Sharing v3 API. However, if you are editing a Social Login application created and configured some time ago, at this stage you may be able to select either Social Share v2 or Social Share v3. Be sure to note which API version you have selected here and specify the same version in the Social Login module settings in your X-Cart store (See the setting "Social Sharing API version").<br /><br />If you are ''using Social Share v3'':<br />Review the list of providers and select the check boxes next to the names of providers you are going to use for social sharing.<br />[[File:xc4_sl_sharing_providers_select.png|border|800px]]<br /><br />Note that providers with a gear icon next to their name are configurable; they need to be configured before they can be selected (To start configuring, click the gear icon). The rest of the providers are "native" and do not require configuration.<br />'''Important''': Note that selecting a check box for any specific provider here is not enough to add social sharing via this provider to your store's website; all it does is change the embeddable code that you can see lower on the same page. To enable social sharing, there's yet another thing you will have to do: enable the same providers in the Social Login module settings in X-Cart.<br /><br />If you are ''using Social Share v2'':<br />Review the list of providers on the left and select the providers you are going to use for social sharing by clicking or dragging them to the empty provider slots on the right. <br />[[File:xc4_sl_social_share_v2.png|border|800px]]<br /><br /> | ||
| + | ## Make sure each social sharing provider you enabled has appropriate permissions. For example, if you are configuring Gmail, you must request the Contacts and Email Sharing scopes from your Google+ provider configuration page. | ||
| − | # | + | That is all; now you can proceed to [[#SocialLoginSettingsXCart | configuring Social Login in your X-Cart store's Admin back end]].<br /><br /> |
| − | |||
| − | |||
| − | + | ===Facebook setup=== | |
| + | The following procedure provides detailed instructions for setting up a Facebook application for use with Janrain Social Login. When configuring Social Login via Facebook, please follow these instructions at [[#WizardStep | Step 5.2]] of the [[#ConfigureJanrainSocialLoginApp | Configuring your Janrain Social Login application]] procedure.<br /> | ||
| + | # Sign in to your Facebook account and go to [https://developers.facebook.com/apps developers.facebook.com/apps]. Allow "Developer" access to your account if prompted. | ||
| + | # Create your Facebook application and save it: | ||
| + | ## Click '''Add a New App''':<br />[[File:facebook_add_new_app.png|border|800px]]<br /><br /> | ||
| + | ## Select the platform "Website":<br />:[[File:facebook_add_new_app_website.png|border|800px]]<br /><br /> | ||
| + | ## On the next screen, choose '''Skip and Create App ID''':<br />[[File:facebook_skip.png|border|800px]]<br /><br /> | ||
| + | ## On the ''Create a New App ID'' screen, enter a name for your Facebook app and set the Category setting to "Apps for Pages":<br />[[File:facebook_create_app_id.png|border|800px]]<br /><br /> | ||
| + | ## Click '''Create App ID'''. Once you do so, Facebook usually provides some kind of test as a security check for protection against automated app id registrations; so do that test as well. If successful, Facebook generates your App ID, and now you should be looking at the Facebok Dashboard with the details of your app:<br />[[File:facebook_dashboard.png|border|800px]]<br /><br /> | ||
| + | # Configure the Facebook application you have created: | ||
| + | ## Click '''Settings''' in the left navigation. | ||
| + | ## Insert into the appropriate fields the values that the Facebook setup wizard on the Janrain site tells you to copy and paste to Facebook. In our case, the wizard tells us to copy and paste the Site URL https://my-x-cart-store.rpxnow.com (the App Domain for our Janrain application):<br />[[File:facebook_instr3.png|border|800px]]<br /><br />So, that's exactly what we'll do. Let's click '''+ Add Platform''':<br />[[File:facebook_settings_add_platform.png|border|800px]]<br /><br />select the platform "Website":<br />[[File:facebook_platform_website.png|border|800px]]<br /><br />and paste our Janrain app domain value to the Site URL field:<br />[[File:facebook_site_url.png|border|800px]]<br /><br />Done. | ||
| + | ## Save your changes by clicking '''Save Changes''' at the bottom of the Facebook form. | ||
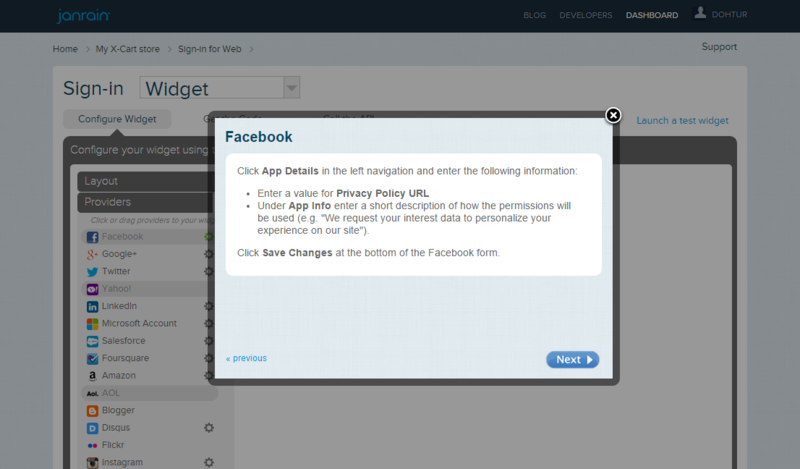
| + | ## Click '''App Details''' in the left navigation.<br />[[File:facebook_app_details.png|border|800px]]<br /><br /> | ||
| + | ## Configure your Facebook application details as suggested by the Facebook setup wizard on the Janrain site.<br />[[File:facebook_instr4.png|border|800px]]<br /><br /> | ||
| + | ## Enter this URL:<br />https://my-x-cart-store.rpxnow.com/facebook/callback<br />into the <span id="ValidOAuthRedirectURIs">'Valid OAuth Redirect URIs'</span> field in the section 'Facebook Login'->'Settings'<br /> [[Image:facebook_valid_uris.png|border|800px| ]] | ||
| + | ## Save your changes by clicking '''Save Changes''' at the bottom of the Facebook form.<br /><br /> | ||
| + | # Connect your Facebook application to your Janrain Social Login application: | ||
| + | ## Click '''Settings''' in the left navigation. | ||
| + | ## Locate your Facebook App ID and App Secret values (You will need to click the '''Show''' button to reveal the App Secret value):<br />[[File:facebook_appid_appsecret.png|border|800px]]<br /><br /> | ||
| + | ## Copy and paste these values one by one into the fields on the Janrain site:<br />[[File:facebook_instr5.png|border|800px]]<br /><br /> | ||
| + | ## Click '''Save''':<br />[[File:facebook_instr6.png|border|800px]]<br /><br />This enables Facebook:<br />[[File:facebook_instr7.png|border|800px]]<br /><br /> | ||
| + | You can now click the '''Close''' button to quit the Facebook configuration wizard and continue setting up your Janrain application starting from [[#WizardStep|Step 5.3]].<br /><br /> | ||
| − | ==Configuring | + | ==Configuring Social Login in your X-Cart store's Admin back end== |
| − | + | <div id="SocialLoginSettingsXCart"></div> | |
| − | Now, tell your X-Cart what it should do with all the stuff you have just set up -- configure the Social Login module that you | + | Now, tell your X-Cart what it should do with all the stuff you have just set up -- configure the Social Login module that you enabled in your store a few steps earlier. |
| − | |||
| − | |||
| + | To configure the Social Login module: | ||
# Log in to the X-Cart Admin area. | # Log in to the X-Cart Admin area. | ||
# Select <u>Settings</u> -> <u>Modules</u> on the menu. | # Select <u>Settings</u> -> <u>Modules</u> on the menu. | ||
| − | # Scroll down until you see the Social Login module item and | + | # Scroll down until you see the Social Login module item and click on the <u>Configure</u> link opposite it. The Social Login module configuration page opens.<br />[[File:xc4_sl_social_login_settings.png|border|800px]] |
| − | # | + | # Adjust the Social Login module configuration settings and click the '''Apply changes''' button. |
| + | ===Social Login module configuration settings=== | ||
| + | Here are a few notes on the Social Login module configuration settings: | ||
| + | :* '''API key (Secret)''', '''Application ID''' and '''Application Domain''': These values can be obtained from your application settings in the Janrain Dashboard. To access these values, select '''App Info''' in the '''Settings''' menu on the Dashboard for your Janrain application:<br />[[File:xc4_sl_janrain_app_info.png|800px]]<br /><br />The information you require will be provided on the ''Application Settings'' page:<br />[[File:xc4_sl_janrain_app_settings.png|800px]]<br /><br /> | ||
| + | :* '''Display mode''': This setting defines the layout of the user login block.<br />The ''Horizontal'' option produces the following result:<br />[[File:h.png]]<br />The ''Vertical'' option gives the following result:<br />[[File:v.png]] | ||
==Administrator sign-in over identity providers== | ==Administrator sign-in over identity providers== | ||
| Line 173: | Line 189: | ||
==Adding Social Sharing to your online store== | ==Adding Social Sharing to your online store== | ||
| − | + | To add the Social Sharing widget to your online store: | |
| − | |||
# On the Janrain Dashboard page, select <u>Deployment</u> -> <u>Social Sharing for Web</u> on the menu. | # On the Janrain Dashboard page, select <u>Deployment</u> -> <u>Social Sharing for Web</u> on the menu. | ||
# Follow the instructions provided on the Social Widget Setup page for adding the social widget to your online store. | # Follow the instructions provided on the Social Widget Setup page for adding the social widget to your online store. | ||
| Line 190: | Line 205: | ||
You should specify "yourappname-domain" as an 'Application name' in X-Cart. | You should specify "yourappname-domain" as an 'Application name' in X-Cart. | ||
| + | |||
| + | ===Misaligned form in Fast Lane Checkout=== | ||
| + | If you are using Fast Lane Checkout in your X-Cart store, you may experience issues with the aligning of elements in the checkout area:<br /> | ||
| + | :[[File:xc4_sl_misaligned_form.png|border]] | ||
| + | To resolve the issue, make sure you are using the single-column widget:<br /> | ||
| + | :[[File:xc4_sl_1column_widget.png|border]] | ||
| + | |||
| + | ===Facebook: URL Blocked: This redirect failed because the redirect URI is not whitelisted in the app’s Client OAuth Settings. Make sure Client and Web OAuth Login are on and add all your app domains as Valid OAuth Redirect URIs.=== | ||
| + | |||
| + | |||
| + | [[#ValidOAuthRedirectURIs|Configure the 'Valid OAuth redirect URIs' field]] | ||
| + | |||
| + | https://www.janrain.com/blog/social-login-facebook-app-requires-strict-uri-matching | ||
| + | |||
[[Category:X-Cart video tutorials]] | [[Category:X-Cart video tutorials]] | ||
[[Category:X-Cart user manual]] | [[Category:X-Cart user manual]] | ||
[[Category:X-Cart modules]] | [[Category:X-Cart modules]] | ||
Revision as of 12:38, 21 November 2019
Contents
- 1 Overview
- 2 System requirements and installation
- 3 Enabling the Social Login Module in X-Cart
- 4 Setting up Janrain
- 5 Configuring Social Login in your X-Cart store's Admin back end
- 6 Administrator sign-in over identity providers
- 7 Adding Social Sharing to your online store
- 8 Troubleshooting
- 8.1 Error: Whoops, you've been directed here by mistake
- 8.2 Misaligned form in Fast Lane Checkout
- 8.3 Facebook: URL Blocked: This redirect failed because the redirect URI is not whitelisted in the app’s Client OAuth Settings. Make sure Client and Web OAuth Login are on and add all your app domains as Valid OAuth Redirect URIs.
Overview
The Social Login module is an add-on for integrating your X-Cart with Janrain’s services. The services allow your visitors with existing accounts with social networks – including Facebook, Twitter, Google, Yahoo! and LinkedIn and over a dozen of others – to quickly sign in to your online store via their existing social network accounts. The solution lets users bypass your traditional registration process and sign in with one click, resulting in an accelerated sign-up process for new users and a simple login experience for returning visitors.
Why Social Login
According to Consumer research study conducted by Blue Research in October 2011
Resistance to Traditional Registration Processes
- Four in five (86%) people are bothered by the need to create new accounts when registering on a website and will change their behavior as a result; this represents an increase of more than 10% over the 2010 findings
- 54% may leave the site or not return
- 26% go to a different site, if possible
- 6% leave/avoid the site
- 14% say they will complete the registration
- 88% admit to having given incorrect information or left forms incomplete when creating a new account at a website, up from 76% in 2010.
- 9 in 10 people (90% versus 45% in 2010) admit they have left a website if they forgot their password or log-in info, instead of answering security questions or re-setting their password.
Irrelevant Targeting by Brands
- 100% of respondents reported receiving information or promotions from companies that are not relevant to them
- Almost 3 in 4 (74%) have received conflicting messages across different marketing channels
- Two-thirds (66%) have received an offer that clearly shows a company does not know who they are
- Over half have received offers targeted to the wrong name, gender or age
Increased Brand Affinity in Fans of Social Login
- 77% believe social login is a good solution that should be offered, an increase of over 10% from the year prior (66% in 2010). Among that population…
- 78% of social login fans have posted a comment or message to their social networks about a product or service they liked or thought others should know about or purchase
- 4 in 5 people (83%) say they are influenced to consider buying new products or services based on positive comments or messages from people in their social network
- 69% say positive reviews may increase their likelihood to purchase a product or service
- 82% seek out or avoid companies based on reviews from friends in their social graph
Key benefits of using the Social Login module in X-Cart
- Converts anonymous visitors into your registered customers.
- Fast customer sign-in.
- Fast personnel sign-in (admin/provider/affiliates).
- Linking multiple external profiles with a single profile at your store.
- Social Sharing – lets your users share comments, purchases or other activities from your site to their friends on multiple social networks.
On top of that, Janrain Social Login allows your visitors to share their comments, purchases, reviews or other activities directly from your online store to their friends on multiple social networks, all without leaving your store. Social sharing with Janrain Social Login lets you trigger sharing based on any number of user's actions, including purchases, posting comments, user-generated content or clicking a share button, enabling the word of mouth marketing for your business and transforming your users into brand advocates.
For more information on Janrain Social Login, please visit Janrain Social Login page.

System requirements and installation
Social Login is available as a built-in module in X-Cart GOLD PLUS and PLATINUM editions v4.5.3 and later. In the said editions, it does not require installation and can be enabled in the Modules section of X-Cart Admin area.
For X-Cart GOLD and PRO editions v4.1.12 and later, this module can be purchased and installed separately. The following instructions will guide you through the process of installing the Social Login module in your store.
System requirements
To be able to successfully install and use the Social Login module, you need a working copy of X-Cart GOLD or PRO v4.1.12 or later installed on your server. Make sure that the version of the Social Login integration module matches the version of your copy of X-Cart.
Installation and removal
To install the Social Login module:
- Obtain a distribution package for the Social Login integration module by downloading it from the File Area section of your X-Cart Account account. The distribution package is archived in the file xauth-x.y.z.tgz, where x, y and z indicate the version of the module. Make sure the version of the module matches the version of your copy of X-Cart.
- Copy the distribution package to the X-Cart root directory on your server or hosting account.
- If you use a Windows-based server or a UNIX-based server without terminal access:
- a) Extract the contents of the archive with the Social Login module files to a directory on your system using your favorite compression program (WinZIP or any other archiver that supports TAR files).
- b) Use an FTP client to upload all the files extracted from the archive (retaining the directory structure) to the X-Cart root directory on your server or hosting account.
- If you use a UNIX-based server with terminal access:
- a) Use an FTP client to upload the archive with the Social Login module distribution package to the X-Cart root directory on your server or hosting account.
- b) Decompress the package by typing the following command:
tar -xzvf xauth-x.y.z.tgz
- Important: Make sure that you maintain the directory structure while unpacking and uploading the distribution package; otherwise, some critical files can be overwritten!
- In a web browser, run the installation script at httр://www.example.com/install-xauth.php, replacing the variable www.example.com with the real domain name, where your X-Cart is installed.
- Enter the Auth code, accept the License Agreement and click the Next button.
- The installation script copies the files and activates the module. Click the Next button to continue.
- The installation script generates a new system fingerprint. Click the Next button to complete the installation.
- Use the ADMINISTRATOR AREA link to log in to the Admin area.
To uninstall the Social Login module:
- In a web browser, run the installation script at http://www.example.com/install-xauth.php, replacing the "www.example.com" with the real domain name, where your X-Cart is installed.
- Choose the Uninstall the module option, enter the Auth code, accept the License Agreement and click the Next button.
- Once the installation script has removed the Social Login module files and deactivated the module, click the Next button to complete the uninstallation.
- On the Uninstallation complete screen, click Next to leave the Wizard.Important: After you have uninstalled the Social Login module, make sure to remove the module's distribution package from your web directory as well.
Enabling the Social Login Module in X-Cart
To start using Social Login, make sure the module is enabled in your store's Admin area:
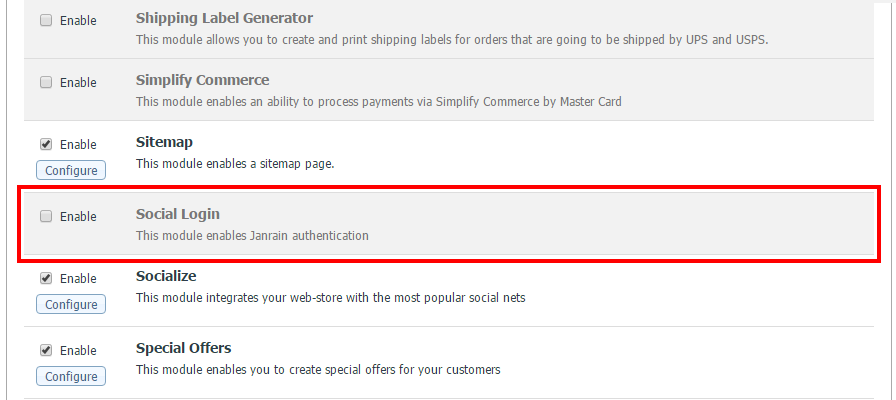
- Log in to the X-Cart Admin area and go to the Modules section (Settings menu->Modules).
- In the list of modules, find the Social Login item.
- Select the check box next to it. In older versions of X-Cart you may also need to click the Apply changes button to apply the changes.
The module will be enabled.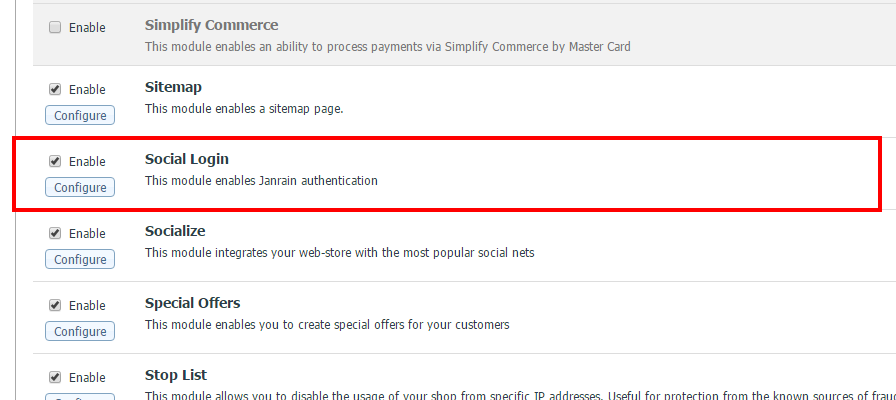


Once the module has been enabled, you can leave alone your X-Cart for a few moments and switch to Janrain.
Setting up Janrain
To be able to use the Social Login module, start by completing the following steps:
- If you haven't yet done so, get an account with Janrain. See Creating a Janrain Social Login account
- Create a Janrain Social Login application for your store. See Creating a Social Login application
- Configure the application you have created. See Next step: Configuring your Janrain Social Login application
Once you're done with the above steps, proceed to configuring Social Login in your X-Cart store's Admin back end.
Creating a Janrain Social Login account
The Social Login solution by Janrain is available on subscription basis. There are several subscription plans with different pricing levels, including a free basic plan. You can choose a plan that best suits your needs depending on the expected number of users per year. For example, you could choose the free basic plan to get you started and then, as your business grows, upgrade to a more advanced plan.
To sign up for Janrain Social Login:
- Visit the Janrain website and choose the subscription plan you require. Click on the Sign Up link for that plan.
- On the page that opens, sign in to Janrain using social login via Google, Facebook, Twitter, etc:
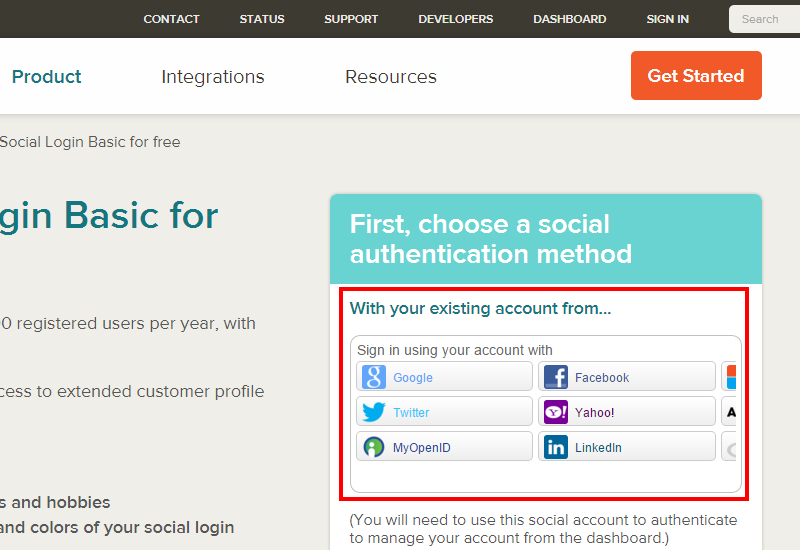
or choose to create a new account from scratch: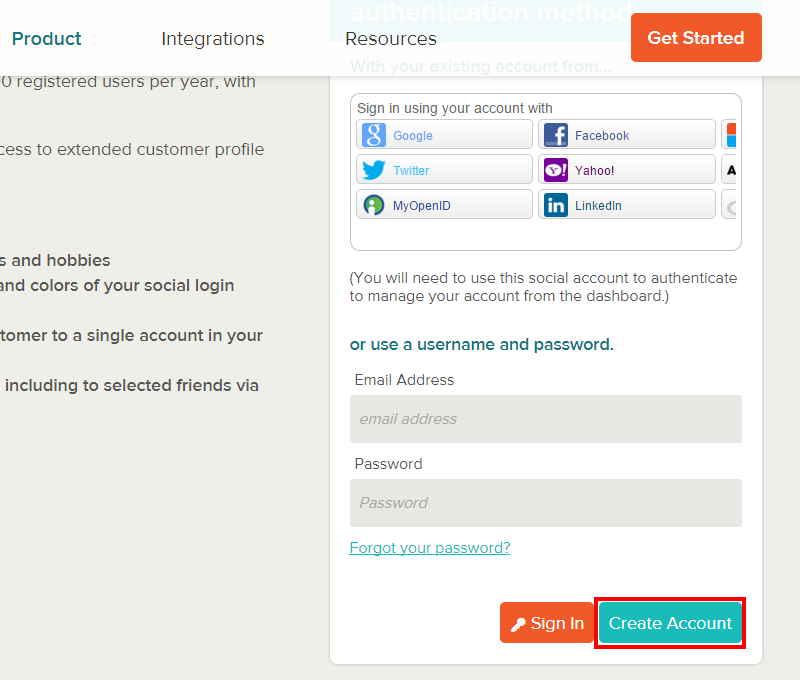
- On the following screen, complete the registration form with your information (your first name, last name, e-mail address, phone, company, job title, etc.) and click Create Account.
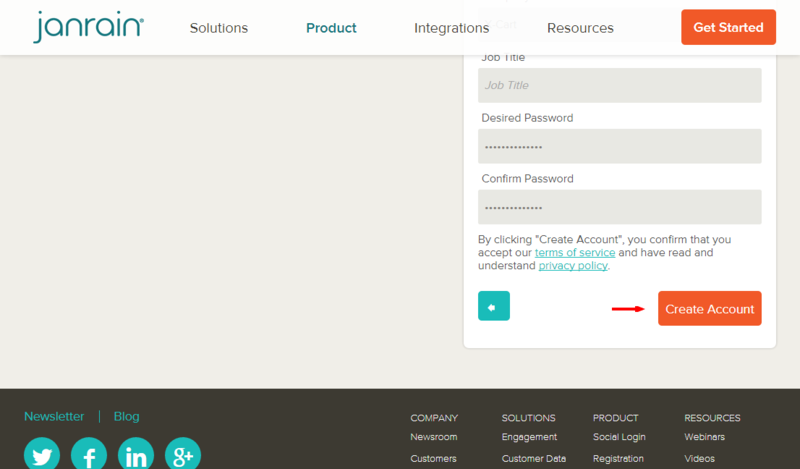
At this point an email verification message should be sent to the email address you provided. Click on the email verification link in that message and sign in to Janrain: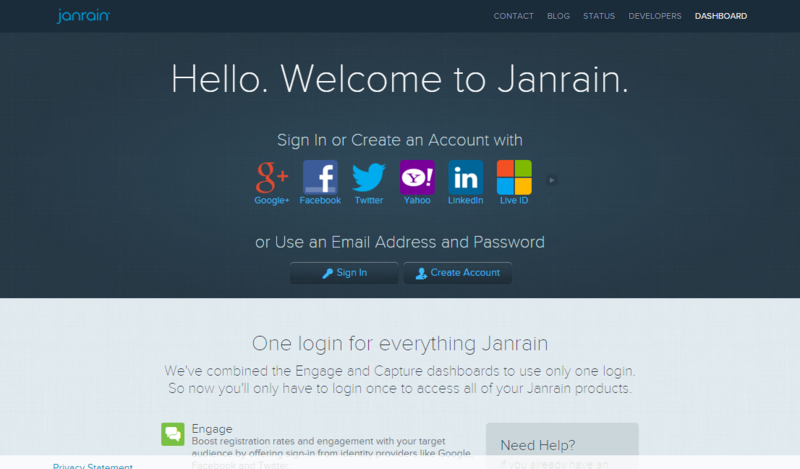
Once you're signed in, you should be ready to set up your first Janrain application.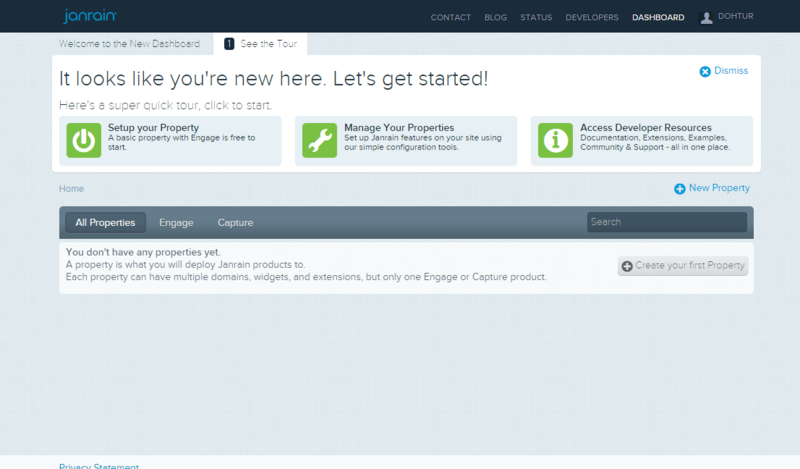


Creating a Social Login application
To create an application:
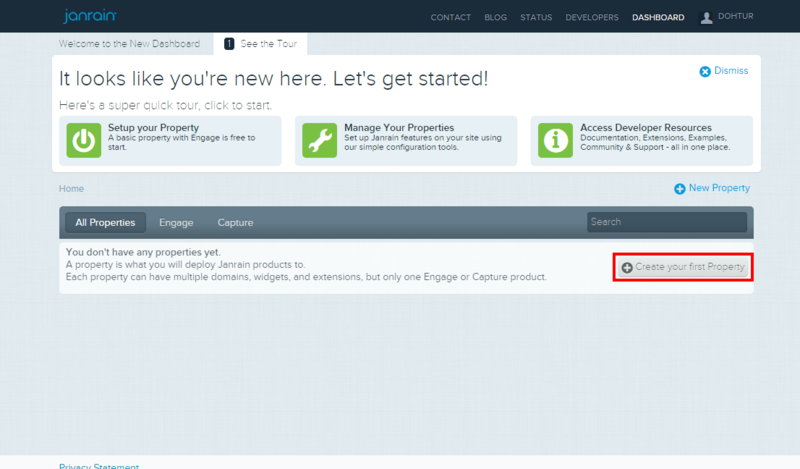
- Visit the dashboard.janrain.com site and log in.
- Choose to create a new property:
- Click Create an App opposite the Engage item:
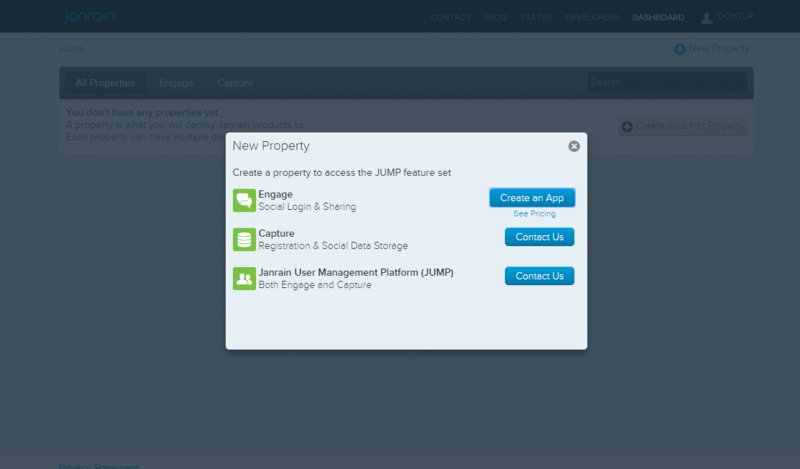
A popup window for creating an application opens.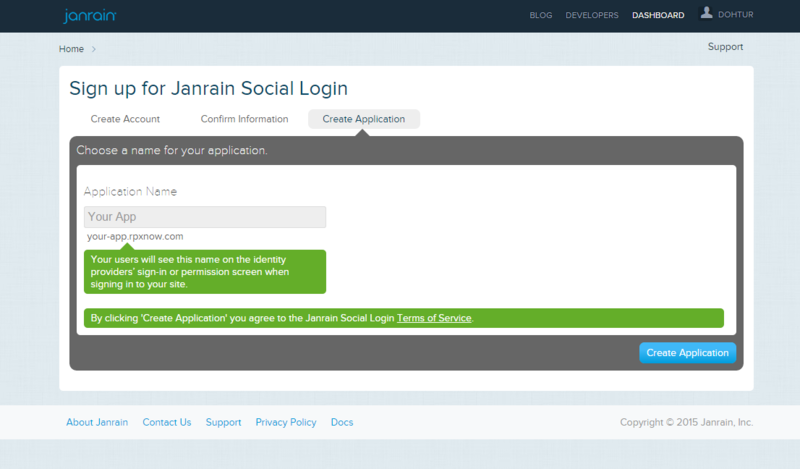
- Enter the desired application name and click the Create Application button.
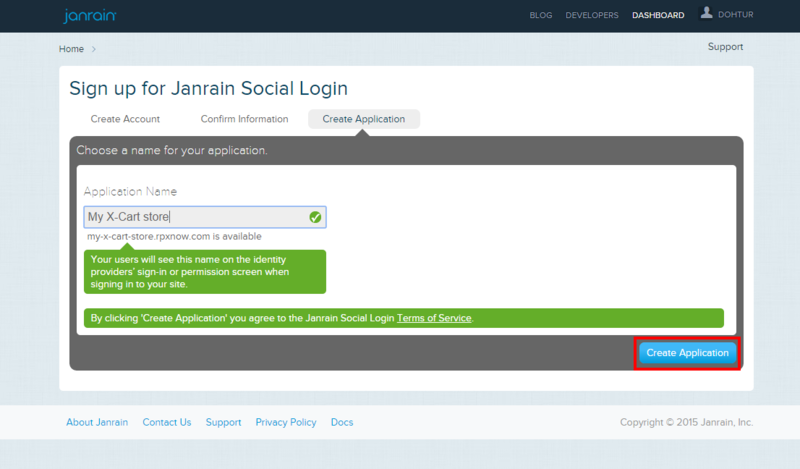
(Be sure to use a recognizable name for the appication so your customers will associate it with your store; this name will be displayed on the identity providers’ sign-in or permission screen when your customers will be signing in to your website).Important: DO NOT enter your website URL into the Application Name field!)
The Janrain servers generate the application you’ve created.
That is all; you now have an application that will allow you to use Social Login at your store.
: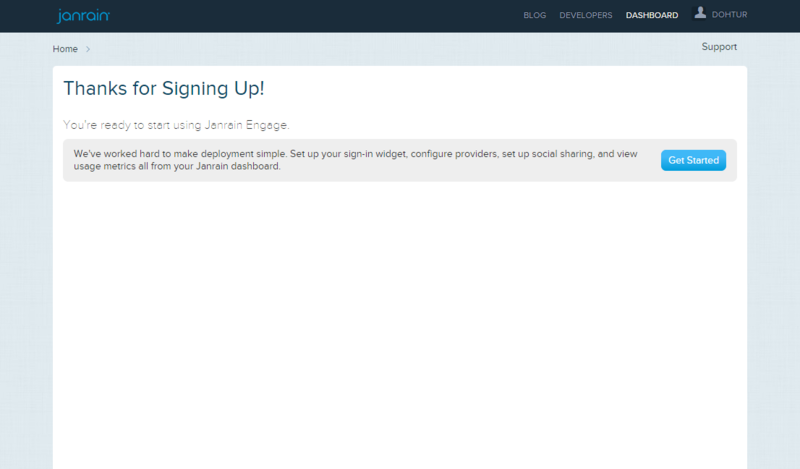
Now you can click the 'Get started' button to continue. The next step will be to configure your application.


Next step: Configuring your Janrain Social Login application
The first step to deploy Social Login on your website is to configure your Social Login providers (i.e. select which identity providers will be offered to the user on your site and specify the types of user data that each provider should be able to access).
To configure your Social Login providers, do the following:
- Sign in to your Janrain Social Login application.
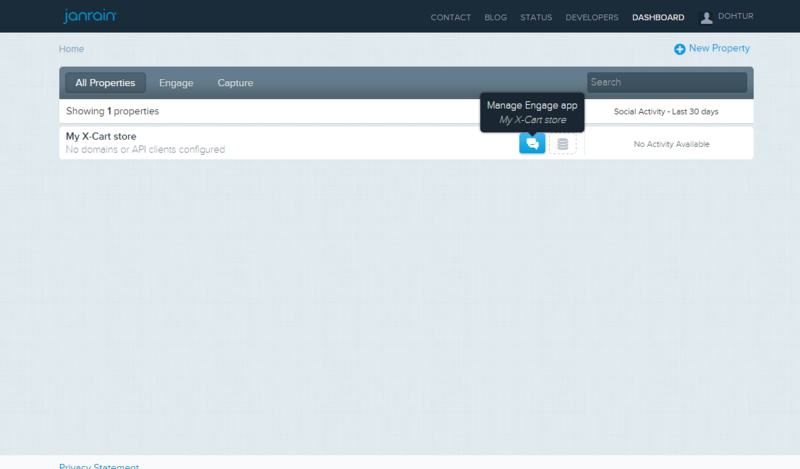
- Click the Manage Engage App button for your application to access the application settings on the Janrain Dashboard.
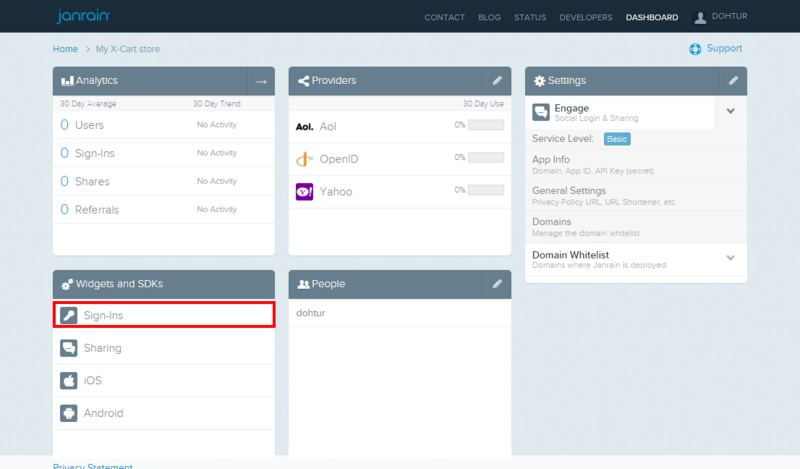
- On the Dashboard, click Sign-Ins under the Widgets and SDKs menu:
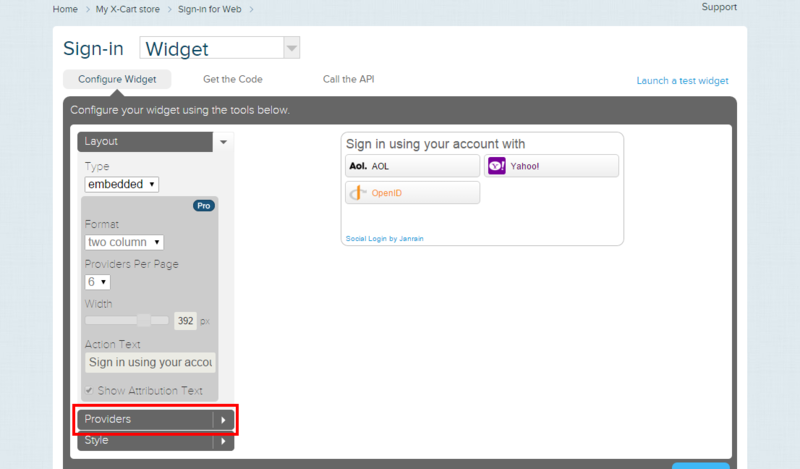
- On the Configure Widget screen, select the Providers tab:
- Add to your widget the identity providers with which your website users should be able to sign in. For every provider, complete the following steps:
- Click the gear icon next to the provider name:
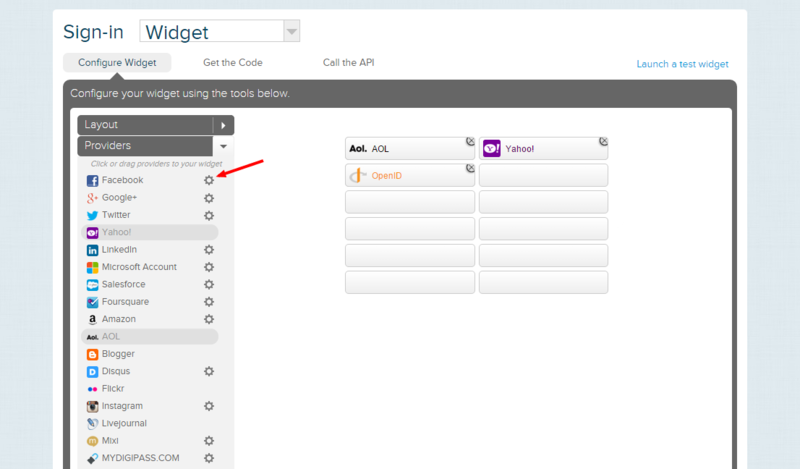
This launches the provider configuration wizard. For example, in the screenshot below you can see the first step of the configuration wizard for Facebook setup: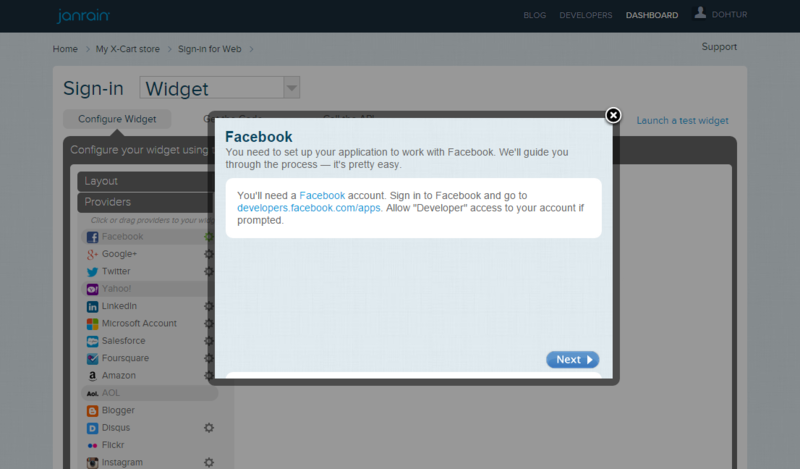
- Follow the wizard instructions to complete the configuration. A detailed guide for how to complete Facebook setup is available in the Facebook setup section below.
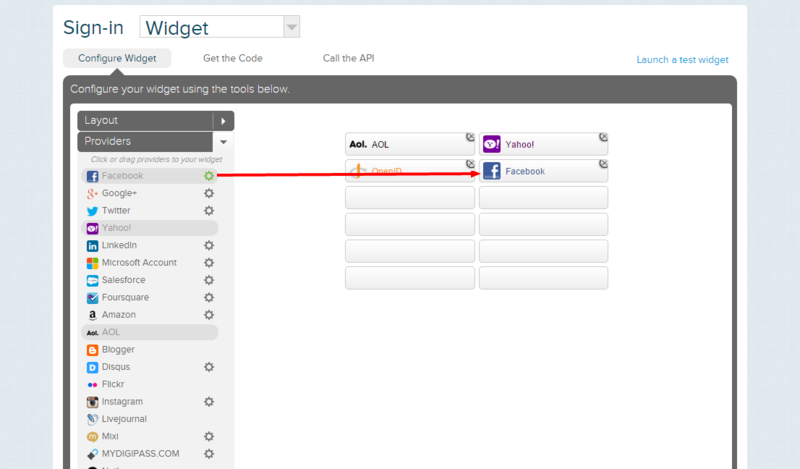
- Once the configuration has been completed, close the wizard window and add the provider you have configured to your widget by dragging it to the central area of the screen into one of the empty slots:
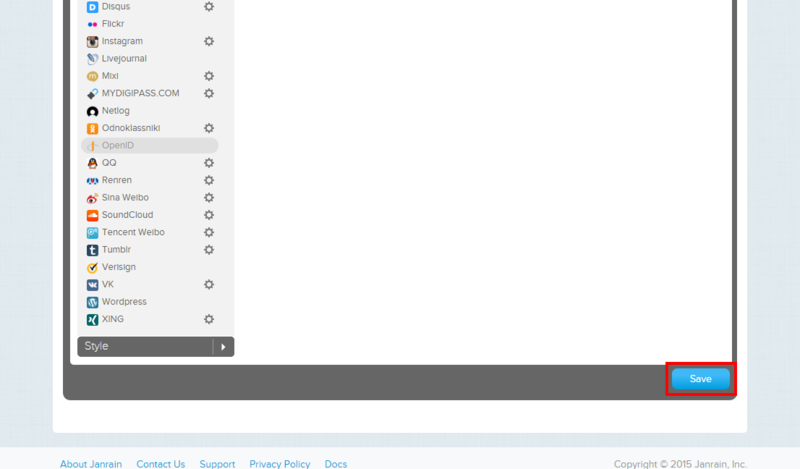
- Save the changes by clicking the Save button at the bottom.
- Click the gear icon next to the provider name:
- Configure appropriate permissions for each of the providers you have added:
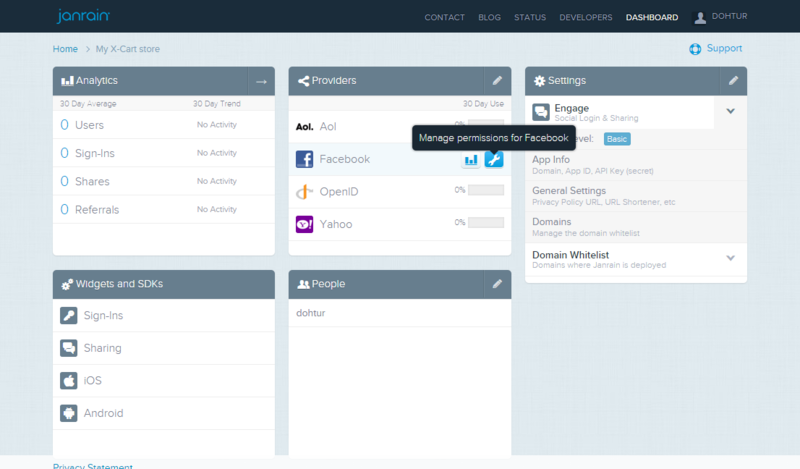
- On the Dashboard, locate the provider for which you need to configure permissions in the Providers menu. Hover your mouse pointer over the provider name to reveal the Manage permissions for <provider name> button. Click this button.
- Enable the types of data the provider should be able to access.
For example, let's configure permissions for Facebook: Click on the "Off" switch next to "Email":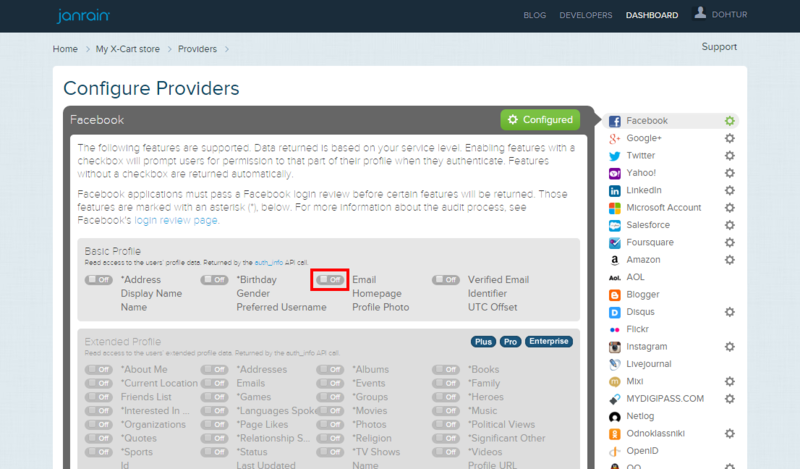
The grey "Off" switch now turns to a green "Ask" label. Note that enabling the permission "Email" automatically enables "Verified Email" as well.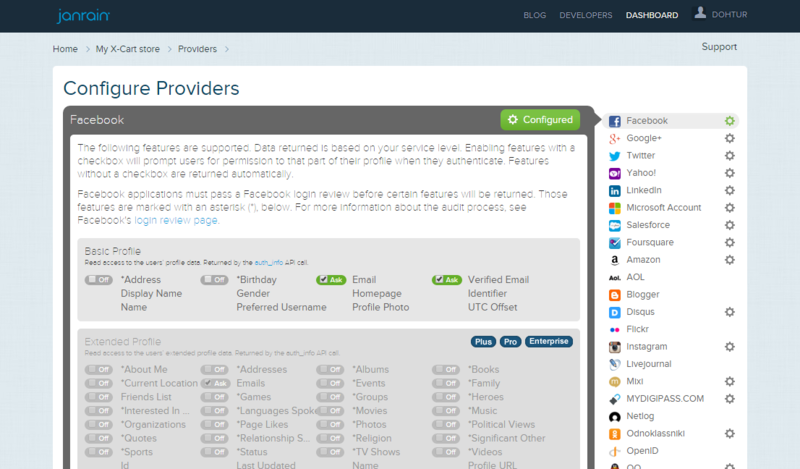
- On the Dashboard, locate the provider for which you need to configure permissions in the Providers menu. Hover your mouse pointer over the provider name to reveal the Manage permissions for <provider name> button. Click this button.
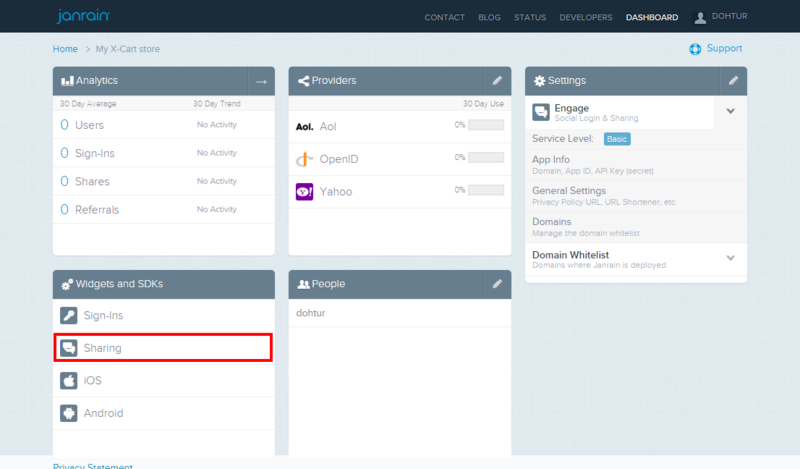
- To add social sharing capabilities for the users of your website, configure social sharing:
- On the Dashboard, click Sharing under the Widgets and SDKs menu:
- What you do at this step depends on the version of the Social Sharing API you will use. Currently, there are two Social Sharing API versions supported by X-Cart: Social Sharing V2 and Social Sharing V3. Note the drop-down selector at the top left of the page.

This is the selector to switch between the API versions. If you are configuring a new Social Login application (not an existing one), you will not be able to choose Social Share v2 in this selector, since all new Social Login applications are now supposed to use the Social Sharing v3 API. However, if you are editing a Social Login application created and configured some time ago, at this stage you may be able to select either Social Share v2 or Social Share v3. Be sure to note which API version you have selected here and specify the same version in the Social Login module settings in your X-Cart store (See the setting "Social Sharing API version").
If you are using Social Share v3:
Review the list of providers and select the check boxes next to the names of providers you are going to use for social sharing.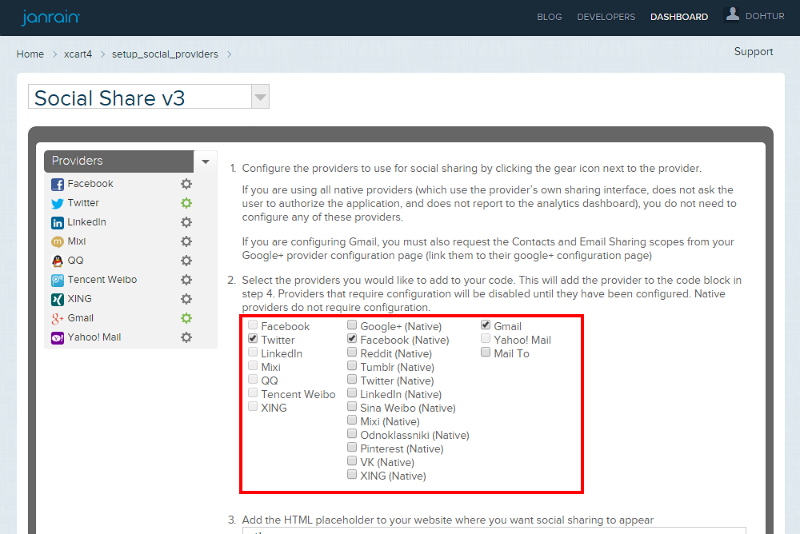
Note that providers with a gear icon next to their name are configurable; they need to be configured before they can be selected (To start configuring, click the gear icon). The rest of the providers are "native" and do not require configuration.
Important: Note that selecting a check box for any specific provider here is not enough to add social sharing via this provider to your store's website; all it does is change the embeddable code that you can see lower on the same page. To enable social sharing, there's yet another thing you will have to do: enable the same providers in the Social Login module settings in X-Cart.
If you are using Social Share v2:
Review the list of providers on the left and select the providers you are going to use for social sharing by clicking or dragging them to the empty provider slots on the right.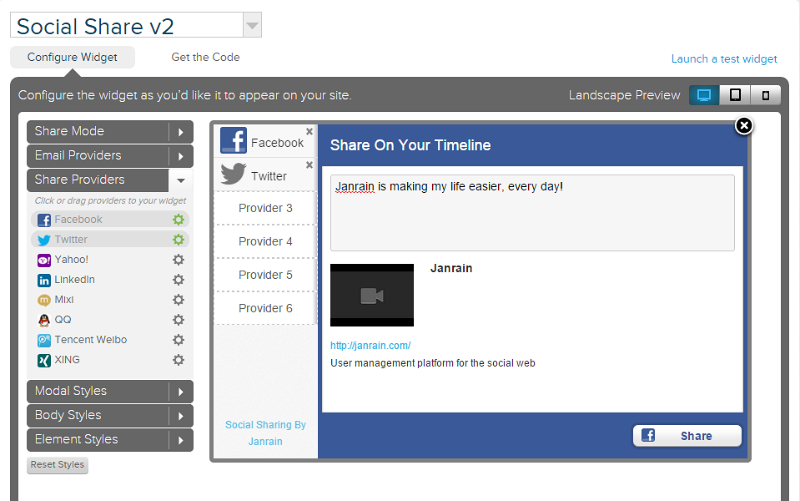
- Make sure each social sharing provider you enabled has appropriate permissions. For example, if you are configuring Gmail, you must request the Contacts and Email Sharing scopes from your Google+ provider configuration page.
- On the Dashboard, click Sharing under the Widgets and SDKs menu:


That is all; now you can proceed to configuring Social Login in your X-Cart store's Admin back end.
Facebook setup
The following procedure provides detailed instructions for setting up a Facebook application for use with Janrain Social Login. When configuring Social Login via Facebook, please follow these instructions at Step 5.2 of the Configuring your Janrain Social Login application procedure.
- Sign in to your Facebook account and go to developers.facebook.com/apps. Allow "Developer" access to your account if prompted.
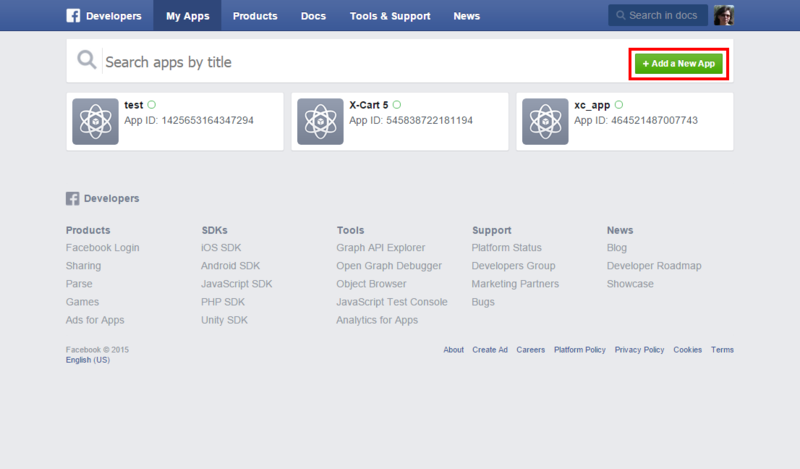
- Create your Facebook application and save it:
- Click Add a New App:
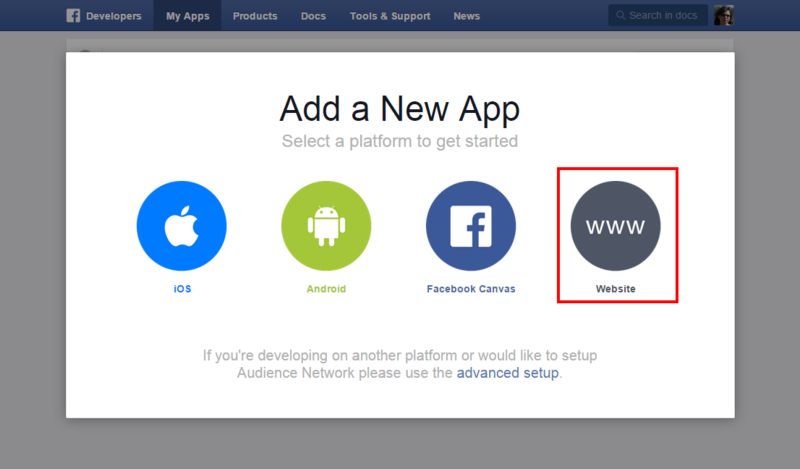
- Select the platform "Website":
:
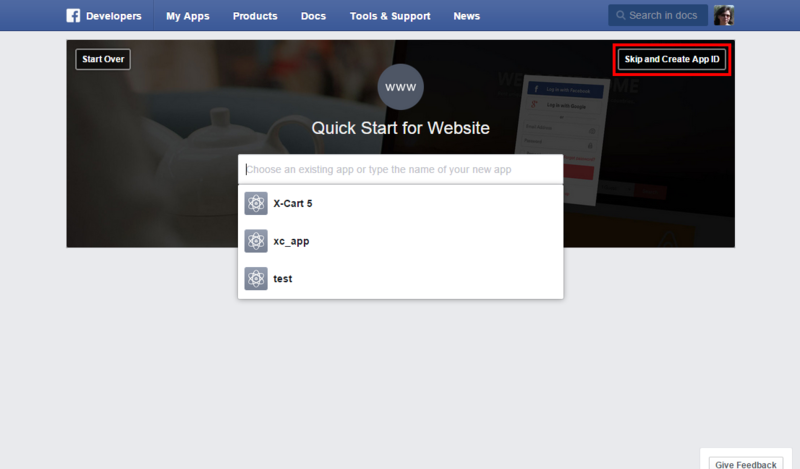
- On the next screen, choose Skip and Create App ID:
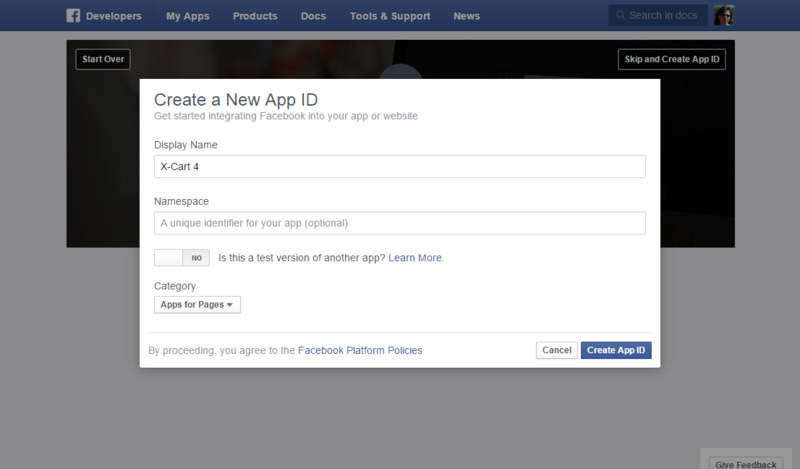
- On the Create a New App ID screen, enter a name for your Facebook app and set the Category setting to "Apps for Pages":
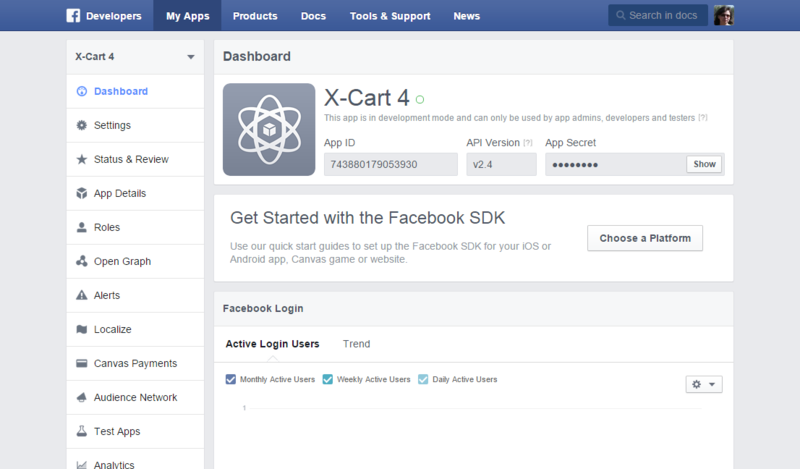
- Click Create App ID. Once you do so, Facebook usually provides some kind of test as a security check for protection against automated app id registrations; so do that test as well. If successful, Facebook generates your App ID, and now you should be looking at the Facebok Dashboard with the details of your app:
- Click Add a New App:
- Configure the Facebook application you have created:
- Click Settings in the left navigation.
- Insert into the appropriate fields the values that the Facebook setup wizard on the Janrain site tells you to copy and paste to Facebook. In our case, the wizard tells us to copy and paste the Site URL https://my-x-cart-store.rpxnow.com (the App Domain for our Janrain application):
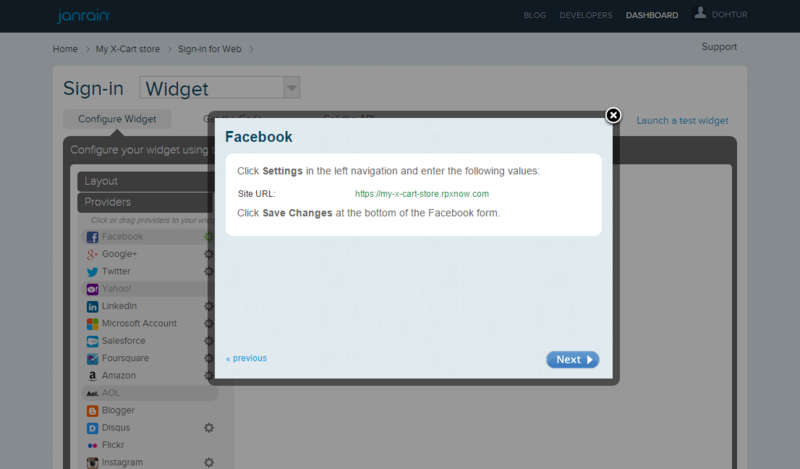
So, that's exactly what we'll do. Let's click + Add Platform: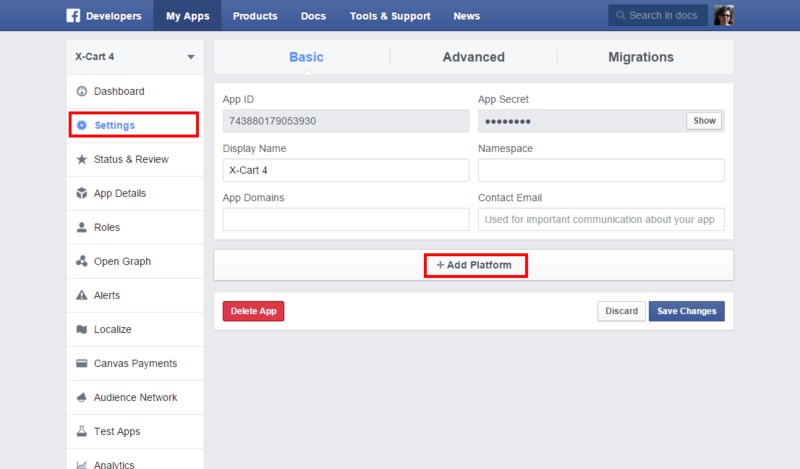
select the platform "Website":
and paste our Janrain app domain value to the Site URL field: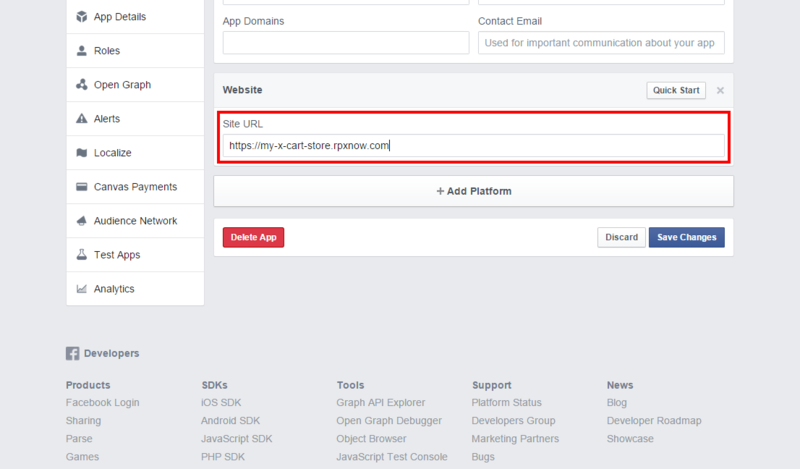
Done. - Save your changes by clicking Save Changes at the bottom of the Facebook form.
- Click App Details in the left navigation.
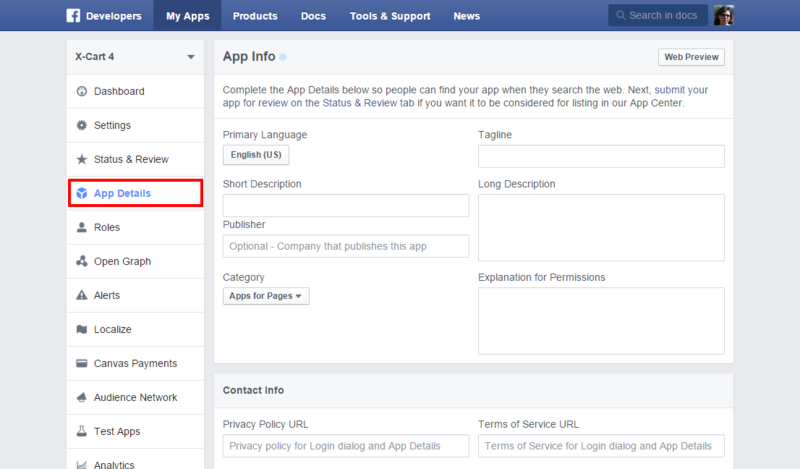
- Configure your Facebook application details as suggested by the Facebook setup wizard on the Janrain site.
- Enter this URL:
https://my-x-cart-store.rpxnow.com/facebook/callback
into the 'Valid OAuth Redirect URIs' field in the section 'Facebook Login'->'Settings'

- Save your changes by clicking Save Changes at the bottom of the Facebook form.
- Connect your Facebook application to your Janrain Social Login application:
- Click Settings in the left navigation.
- Locate your Facebook App ID and App Secret values (You will need to click the Show button to reveal the App Secret value):
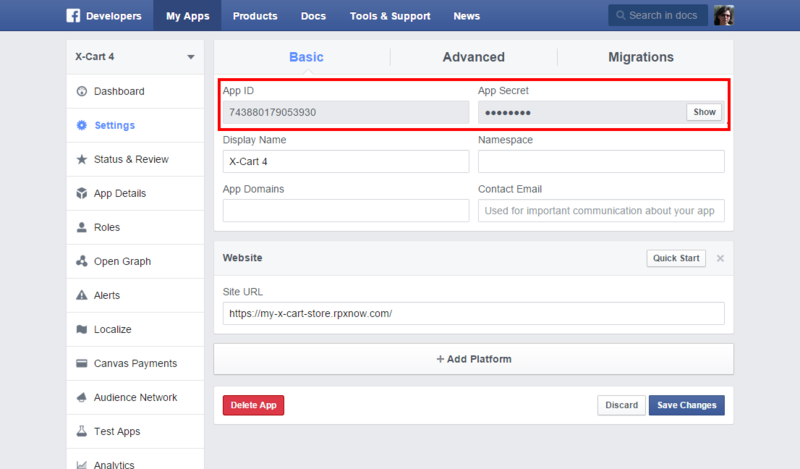
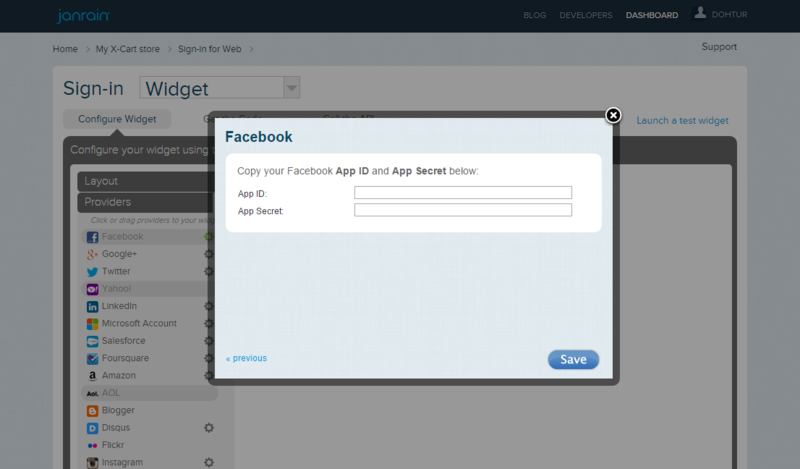
- Copy and paste these values one by one into the fields on the Janrain site:
- Click Save:
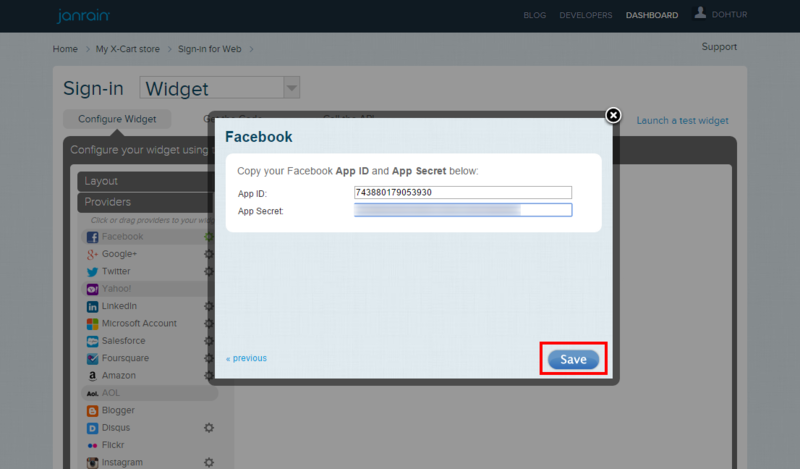
This enables Facebook: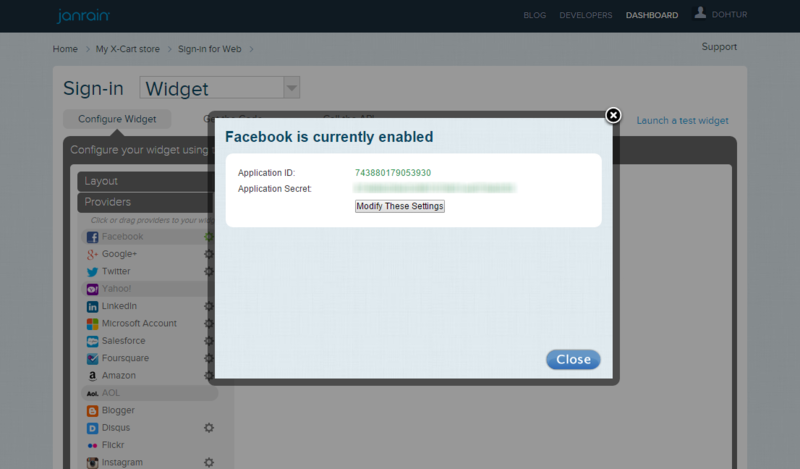


You can now click the Close button to quit the Facebook configuration wizard and continue setting up your Janrain application starting from Step 5.3.
Configuring Social Login in your X-Cart store's Admin back end
Now, tell your X-Cart what it should do with all the stuff you have just set up -- configure the Social Login module that you enabled in your store a few steps earlier.
To configure the Social Login module:
- Log in to the X-Cart Admin area.
- Select Settings -> Modules on the menu.
- Scroll down until you see the Social Login module item and click on the Configure link opposite it. The Social Login module configuration page opens.

- Adjust the Social Login module configuration settings and click the Apply changes button.

Social Login module configuration settings
Here are a few notes on the Social Login module configuration settings:
- API key (Secret), Application ID and Application Domain: These values can be obtained from your application settings in the Janrain Dashboard. To access these values, select App Info in the Settings menu on the Dashboard for your Janrain application:
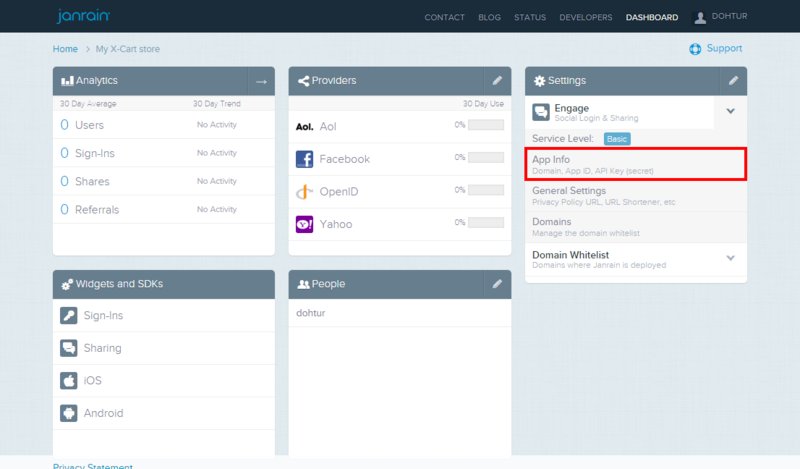
The information you require will be provided on the Application Settings page: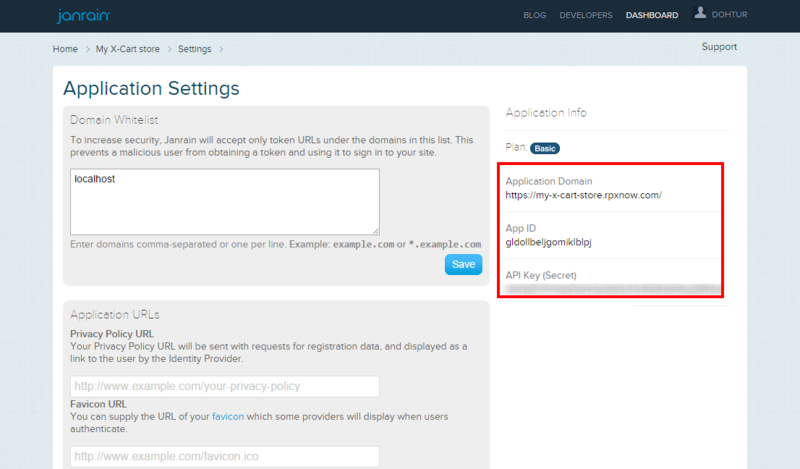
- Display mode: This setting defines the layout of the user login block.
The Horizontal option produces the following result: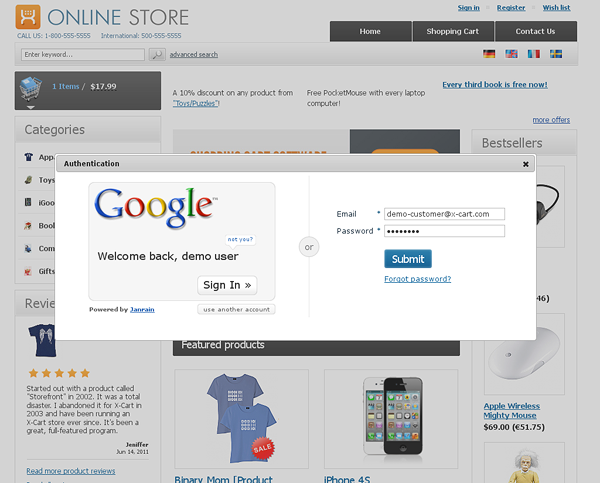
The Vertical option gives the following result: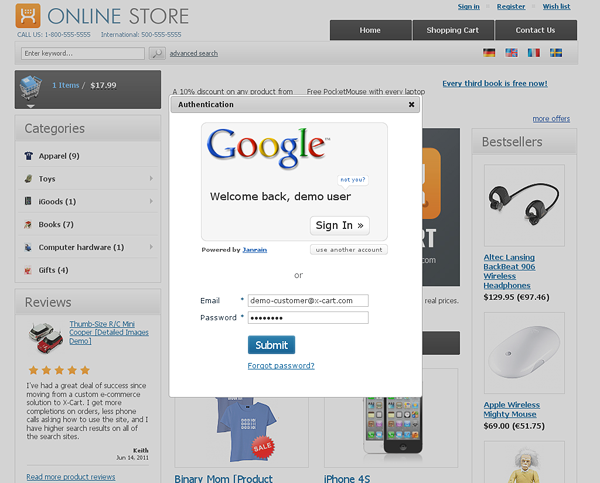
- API key (Secret), Application ID and Application Domain: These values can be obtained from your application settings in the Janrain Dashboard. To access these values, select App Info in the Settings menu on the Dashboard for your Janrain application:


Administrator sign-in over identity providers
To enable signing in as administrator over an external identity provider:
- Sign in to your X-Cart store using your regular credentials.
- In the X-Cart Admin area, click on the administrator profile link at the top of the page.
- On the Account details page, click on the 'Add an identifier' link.
- Sign-in using your preferred identity provider.
Adding Social Sharing to your online store
To add the Social Sharing widget to your online store:
- On the Janrain Dashboard page, select Deployment -> Social Sharing for Web on the menu.
- Follow the instructions provided on the Social Widget Setup page for adding the social widget to your online store.
For more information on creating and using activity objects, please refer to Janrain's social sharing documentation.
Troubleshooting
Error: Whoops, you've been directed here by mistake
The 'Application name' specified in X-Cart admin back end on the module configuration page is incorrect. Janrain replaces dots with dashes, thus to fix the issue you should do the same, e.g. if your app name is yourappname.domain:
yourappname.domain -> yourappname-domain
You should specify "yourappname-domain" as an 'Application name' in X-Cart.
Misaligned form in Fast Lane Checkout
If you are using Fast Lane Checkout in your X-Cart store, you may experience issues with the aligning of elements in the checkout area:

To resolve the issue, make sure you are using the single-column widget:

Facebook: URL Blocked: This redirect failed because the redirect URI is not whitelisted in the app’s Client OAuth Settings. Make sure Client and Web OAuth Login are on and add all your app domains as Valid OAuth Redirect URIs.
Configure the 'Valid OAuth redirect URIs' field
https://www.janrain.com/blog/social-login-facebook-app-requires-strict-uri-matching